Introduction
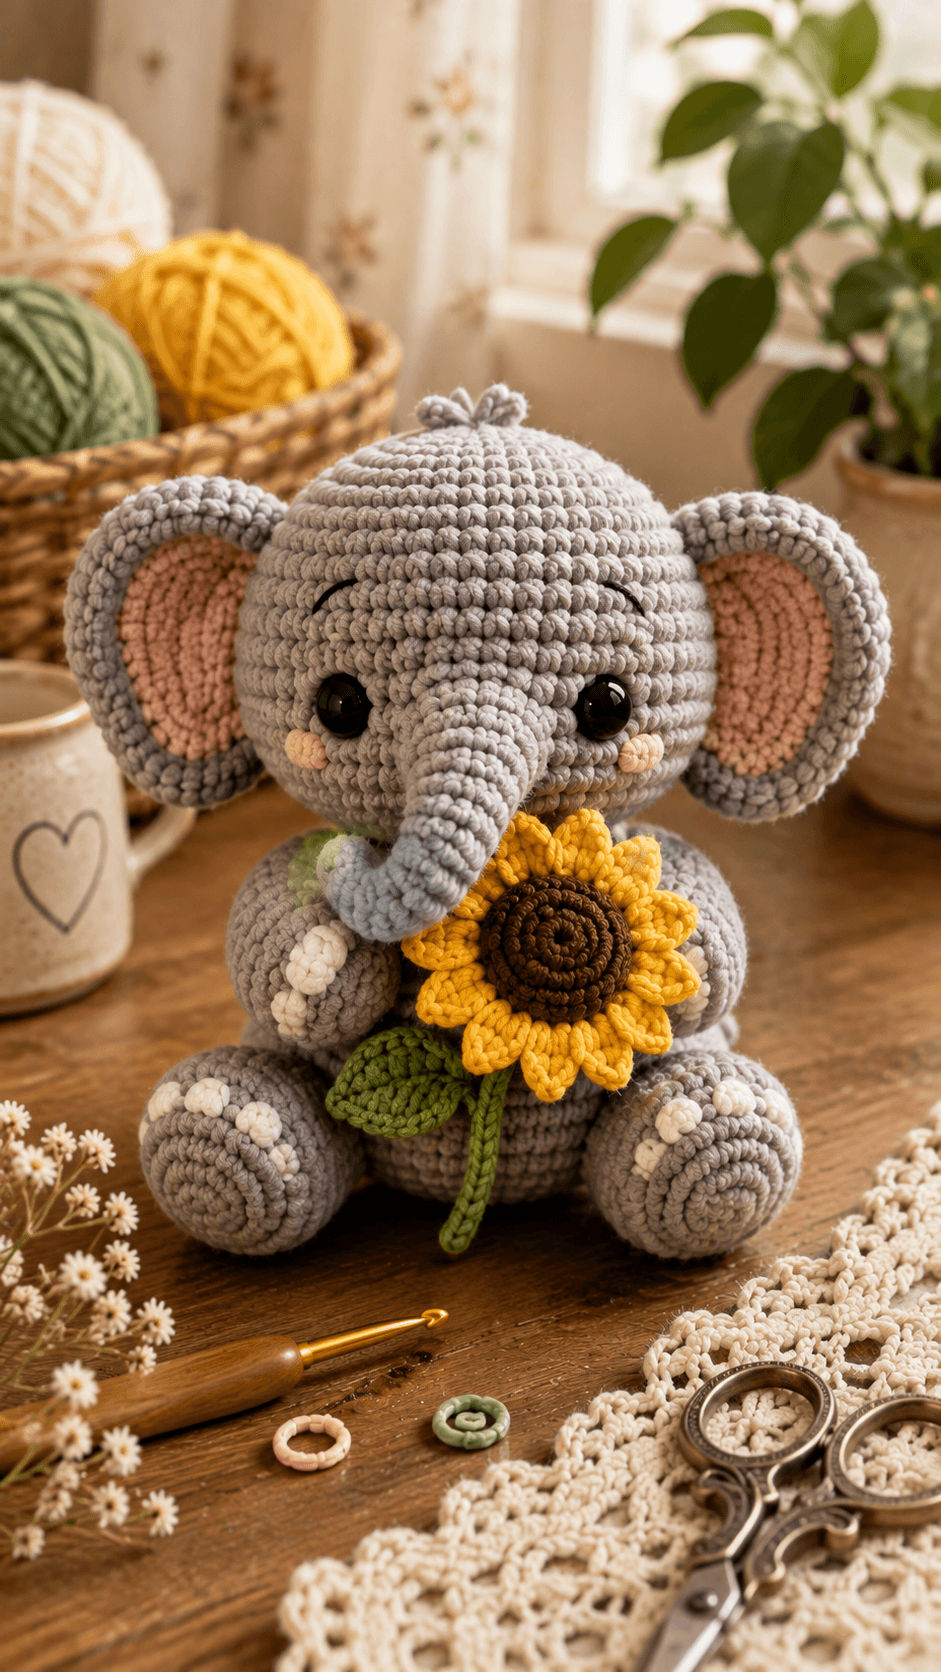
An elephant can lose its identity quickly when the ears shrink or the trunk becomes a straight tube. This elephant amigurumi crochet pattern uses chunky yarn, a 4.5 mm hook, oversized two-layer ears, and a 42-stitch head to produce a sitting elephant around 25–30 cm tall. The intermediate construction includes a dimensional sunflower held between the arms, giving the front limbs a fixed position while preserving the trunk as the main facial feature.
The Design: What Makes This Elephant Different
The head is deliberately larger than the torso because the ears and trunk need enough surface area to remain visually separate. A 42-stitch head plateau creates that width without requiring an excessively tall sphere. The body stops at 36 stitches, keeping the silhouette compact and allowing the two broad hind feet to project forward. Large pink-lined ears are worked as paired panels rather than single flat circles; this adds enough edge thickness to stop them from folding behind the head. The sunflower elephant crochet pattern also uses a tapered trunk that narrows toward its curved tip instead of maintaining one diameter. A frequent mistake in a gray elephant amigurumi is placing the eyes too far from the trunk. That creates an unusually wide facial gap and makes the ears dominate the character. Keep the eyes close enough to frame the trunk root.
Project Info at a Glance
| Skill Level | Time | Finished Size | Hook | Best For |
|---|---|---|---|---|
| Intermediate | Not established by the verified references | Approx. 25–30 cm sitting | 4.5 mm | Display plush, nursery decor, floral animal collection |
The target height is based on the photographed proportions and comparison data from published elephant patterns. Finished size changes with yarn diameter, tension, stuffing density, and hook choice.
Materials and Tools
Yarn
- Light gray — bulky or chunky #5 yarn — approximately 150–200 g — use a dense cotton-blend, acrylic, or low-pile plush yarn that holds ear shape.
- Dusty pink — matching weight — approximately 20–30 g — for inner ears and cheeks.
- Sunflower yellow — matching weight — approximately 30–50 g — for twelve flower petals.
- Dark brown — matching or slightly thinner yarn — approximately 20–30 g — for the sunflower center.
- Olive green — matching or slightly thinner yarn — approximately 20–30 g — for the stem and leaf.
- Cream or white — small amount — for toenails.
- Black embroidery yarn — small amount — for eyebrows and optional eye detailing.
Tools
- 4.5 mm crochet hook
- 18–20 mm safety eyes, 2
- Polyester fiberfill
- Long tapestry needle
- Stitch markers
- Straight pins
- Scissors
Abbreviations
MR — magic ring
sc — single crochet
inc — 2 sc in one stitch
dec — decrease over 2 stitches
sl st — slip stitch
ch — chain
hdc — half double crochet
dc — double crochet
BLO — back loop only
FLO — front loop only
st/sts — stitch/stitches
R — round or row
For an invisible decrease, insert the hook through the front loops of the next two stitches, draw up a loop, then complete one single crochet through the remaining loops.
Pattern — Step by Step
Work spiral components continuously unless rows or joined rounds are stated. The following construction is an original photo-matched interpretation using standard six-stitch amigurumi shaping.
Head
Yarn: light gray — Source: standard amigurumi math with photo-matched elephant proportions.
R1: 6 sc in MR (6)
R2: inc ×6 (12)
R3: (1 sc, inc) ×6 (18)
R4: (2 sc, inc) ×6 (24)
R5: (3 sc, inc) ×6 (30)
R6: (4 sc, inc) ×6 (36)
R7: (5 sc, inc) ×6 (42)
R8: 42 sc (42)
R9: 42 sc (42)
R10: 42 sc (42)
R11: 42 sc (42)
R12: 42 sc (42)
R13: 42 sc (42)
R14: 42 sc (42)
Place the safety eyes between R10 and R11. Start with approximately 7 stitches between the inner edges and pin the trunk beneath them before locking the washers.
R15: (5 sc, dec) ×6 (36)
R16: (4 sc, dec) ×6 (30)
R17: (3 sc, dec) ×6 (24)
Stuff the upper head firmly. Keep the lower front section slightly softer because the trunk base will be sewn across this area.
R18: (2 sc, dec) ×6 (18)
R19: (1 sc, dec) ×6 (12)
R20: dec ×6 (6)
Fasten off. Leave a 20 cm tail, draw it through the front loops of the remaining stitches, close the opening, and bury the end.
Trunk
Yarn: light gray — Source: standard amigurumi shaping adapted to the visible downward-curved trunk.
R1: 6 sc in MR (6)
R2: 6 sc (6)
R3: 6 sc (6)
R4: (2 sc, inc) ×2 (8)
R5: 8 sc (8)
R6: 8 sc (8)
R7: (3 sc, inc) ×2 (10)
R8: 10 sc (10)
R9: 10 sc (10)
R10: (4 sc, inc) ×2 (12)
R11: 12 sc (12)
R12: 12 sc (12)
R13: (1 sc, inc) ×6 (18)
R14: 18 sc (18)
Add a narrow amount of stuffing from R5 upward. Keep the first four rounds almost unstuffed so the tip can curve naturally.
Fasten off. Leave a 35 cm sewing tail.
To form the bend, thread matching gray yarn through the underside of the trunk from approximately R3 to R8. Pull until the tip curves upward slightly, then secure the shaping strand inside the trunk.
Outer Ears — Make 2
Yarn: light gray — Source: standard flat-circle math modified into an elephant ear.
R1: 6 sc in MR (6)
R2: inc ×6 (12)
R3: (1 sc, inc) ×6 (18)
R4: (2 sc, inc) ×6 (24)
R5: (3 sc, inc) ×6 (30)
R6: (4 sc, inc) ×6 (36)
R7: (5 sc, inc) ×6 (42)
Fasten off. Leave a 35 cm sewing tail.
Inner Ears — Make 2
Yarn: dusty pink — Source: standard flat-circle math.
R1: 6 sc in MR (6)
R2: inc ×6 (12)
R3: (1 sc, inc) ×6 (18)
R4: (2 sc, inc) ×6 (24)
R5: (3 sc, inc) ×6 (30)
Fasten off with a 25 cm tail. Center one pink circle on each gray ear and sew around the pink edge. Leave approximately one gray round visible as a border.
Head Tuft
Yarn: light gray — Source: photo-matched surface detail.
Join gray yarn at the center top of the head. Work ch 4, sl st in the same insertion point; repeat twice more to create three small loops.
Fasten off and pull both ends into the head.
Body
Yarn: light gray — Source: standard amigurumi math; medium 36-stitch plateau.
R1: 6 sc in MR (6)
R2: inc ×6 (12)
R3: (1 sc, inc) ×6 (18)
R4: (2 sc, inc) ×6 (24)
R5: (3 sc, inc) ×6 (30)
R6: (4 sc, inc) ×6 (36)
R7: 36 sc (36)
R8: 36 sc (36)
R9: 36 sc (36)
R10: 36 sc (36)
R11: 36 sc (36)
R12: 36 sc (36)
R13: 36 sc (36)
R14: (4 sc, dec) ×6 (30)
R15: 30 sc (30)
R16: (3 sc, dec) ×6 (24)
R17: 24 sc (24)
R18: (2 sc, dec) ×6 (18)
R19: 18 sc (18)
R20: (1 sc, dec) ×6 (12)
Stuff the lower body firmly enough to support the flower and both front arms. Keep the final two rounds moderately packed so the neck seam can compress against the head.
Fasten off. Leave a 40 cm tail for joining the head.
Front Arms — Make 2
Yarn: light gray — Source: standard amigurumi math.
R1: 6 sc in MR (6)
R2: inc ×6 (12)
R3: (1 sc, inc) ×6 (18)
R4: 18 sc (18)
R5: 18 sc (18)
R6: (1 sc, dec) ×6 (12)
R7: 12 sc (12)
R8: 12 sc (12)
R9: 12 sc (12)
R10: 12 sc (12)
R11: (1 sc, dec) ×4 (8)
R12: 8 sc (8)
Stuff the paw end firmly through R6. Leave the upper third lightly stuffed so the arm can bend around the sunflower.
Flatten the opening and work 4 sc through both layers (4). Fasten off, leaving a 30 cm tail.
Back Legs — Make 2
Yarn: light gray — Source: standard amigurumi math.
R1: 6 sc in MR (6)
R2: inc ×6 (12)
R3: (1 sc, inc) ×6 (18)
R4: (2 sc, inc) ×6 (24)
R5: 24 sc (24)
R6: 24 sc (24)
R7: (2 sc, dec) ×6 (18)
R8: 18 sc (18)
R9: (1 sc, dec) ×6 (12)
R10: 12 sc (12)
Stuff firmly through R7. Keep the attachment end softer so the feet can rotate outward after pinning.
Fasten off, leaving a 35 cm sewing tail.
Toenails — Make 12
Yarn: cream or white — Source: photo-matched detail.
For each nail, ch 3. Starting in the second chain from the hook, work 2 sc.
Fasten off with a 12 cm sewing tail.
Sew three toenails across the upper front edge of each hind foot and three across each visible front paw if you want to reproduce the photographed detailing exactly.
Cheek Patches — Make 2
Yarn: dusty pink — Source: standard flat-circle construction.
R1: 6 sc in MR (6)
R2: inc ×6 (12)
Fasten off with a 15 cm tail. For smaller cheeks, sew around only the inner six-stitch ring and allow the outer edge to compress slightly.
Sunflower Center — Make 2
Yarn: dark brown — Source: standard flat-circle math.
R1: 6 sc in MR (6)
R2: inc ×6 (12)
R3: (1 sc, inc) ×6 (18)
R4: (2 sc, inc) ×6 (24)
R5: (3 sc, inc) ×6 (30)
Fasten off the first circle. Keep the yarn attached to the second.
Place both circles together and sc through both layers around the edge. Add a thin disk of stuffing before closing the final four stitches.
Sunflower Petals — Make 12
Yarn: sunflower yellow — Source: original photo-matched petal construction.
R1: 6 sc in MR (6)
R2: (1 sc, inc) ×3 (9)
R3: 9 sc (9)
R4: (1 sc, dec) ×3 (6)
R5: dec ×3 (3)
Add only a trace of stuffing at the wide end. The petal should flatten naturally when sewn.
Fasten off with a 20 cm tail.
Arrange all twelve petals around the rear edge of the brown flower center before sewing. Place six petals first at equal intervals, then insert the remaining six between them.
Sunflower Stem
Yarn: olive green — Source: photo-matched accessory construction.
R1: 6 sc in MR (6)
R2–R18: 6 sc around (6)
Do not stuff. Fasten off with a 25 cm tail. Flatten the stem slightly between the fingers before attachment.
Sunflower Leaf
Yarn: olive green — Source: worked around both sides of a foundation chain.
Ch 9.
Starting in the second chain from the hook:
sl st, sc, hdc, 2 dc, hdc, sc, 3 sc in the final chain.
Continue along the opposite side of the foundation chain:
sc, hdc, 2 dc, hdc, sc, sl st.
Fasten off with a 25 cm sewing tail.
Optional Tail
Yarn: light gray — Source: standard amigurumi construction. The tail is not visible from the supplied front angle but is anatomically appropriate.
R1: 6 sc in MR (6)
R2: 6 sc (6)
R3: 6 sc (6)
R4: 6 sc (6)
R5: 6 sc (6)
R6: 6 sc (6)
Do not stuff. Fasten off with a 20 cm tail. Add three short gray yarn strands at the tip if a small tassel is wanted.
Assembly
- Pin the head above the 12-stitch body opening. Sew twice around the neck seam, adding a final small amount of stuffing before closing the last gap.
- Position the body so its widest lower section faces directly forward. Check that the head remains level before burying the neck yarn tail.
- Pin the trunk centrally between and below the eyes. Sew around the 18-stitch base while keeping the curved tip aimed down and slightly toward one side.
- Attach the pink inner panels to the gray ears, then pin both completed ears to the sides of the head. Keep the upper ear edges approximately level with the forehead rather than the top of the crown.
- Sew the cheek patches below and slightly outside the eyes. Add one short black embroidered eyebrow above each eye, following the shallow downward curve shown in the reference.
- Attach the back legs low on the body. Rotate each foot forward and approximately 15 degrees outward so all three front toenails remain visible.
- Sew the optional tail to the lower back before attaching the flower. Keep it flat against the body so it does not interfere with the seated base.
- Assemble the sunflower by attaching twelve yellow petals around the stuffed brown center. Sew the green stem to the lower rear edge and place the leaf approximately halfway down the stem.
- Position the sunflower against the center of the elephant’s belly. Tack the rear of the brown center to the body with several hidden stitches so the arms do not carry its full weight.
- Sew the two arms to the upper body and curve the paw ends around the sunflower. Add one hidden attachment stitch from each paw into the flower edge, then weave every remaining tail through a stuffed section.
The completed elephant should sit on both broad hind legs with the sunflower centered below the trunk and the outer ear edges extending beyond the width of the head.
7 Technical Tips
- Round-marker drift: Losing one stitch in gray yarn can rotate the trunk position several millimeters by the time the head reaches 42 stitches. Move the marker after every completed round and recount every increase or decrease round before continuing.
- Head overstuffing: Packing the lower face as firmly as the crown can force the safety eyes outward after the trunk is attached. Keep approximately the front quarter of the head slightly softer until facial assembly is finished.
- Visible decrease holes: Conventional decreases can leave openings that expose white fiberfill against gray yarn. Work decreases through the front loops only and keep their loop height equal to the adjacent single crochets.
- Eye placement error: Safety-eye washers become difficult to reach after R15 begins reducing the head. Test both 18–20 mm eyes with the trunk pinned underneath before locking either washer.
- Ear collapse: A single loosely crocheted 42-stitch ear can fold backward under its own weight. Sew the smaller pink layer across the center and use at least a 25 mm attachment section where the gray ear meets the head.
- Flower rotation: Twelve petals make small spacing errors accumulate around the center. Pin petals at the 12, 3, 6 and 9 o’clock positions first, divide each remaining gap evenly, and sew only after all twelve points look balanced.
- Arm displacement: Relying on the arms alone to support the sunflower can pull both shoulders toward the center. Stitch the flower directly to the belly first, then attach each paw with only one or two hidden stitches at its contact point.
Conclusion
The strongest visual checks for this elephant are ear diameter, trunk taper, and flower position. The pink inner ears should remain framed by a visible gray border, while the trunk must finish below the eyes without covering the sunflower center. After assembly, place the figure on a flat surface and correct either hind leg if the body leans before burying the final yarn tails. Record the yarn weight, hook, eye diameter, and finished sitting height beside the pattern before making another version. Share the completed elephant on Pinterest and Instagram with #SunflowerElephant. For your next elephant amigurumi crochet pattern, would you keep the sunflower yellow or replace it with a different flower species?









