Introduction
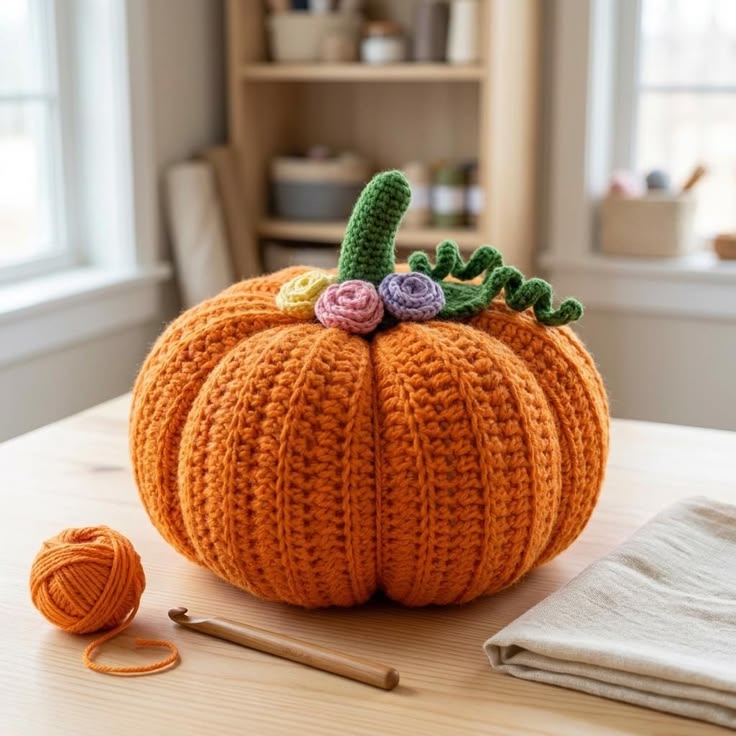
A pumpkin has no neck or limbs, so its silhouette depends almost entirely on how strongly the ribs compress the body. This large crochet pumpkin pattern uses bulky yarn, a 6.5 mm hook, a ribbed rectangular body, and eight shaping channels to produce a pumpkin approximately 28 cm wide. A tall green stem, curled vine, leaf, and three small flowers reproduce the botanical topper visible in the reference image.
The Design: What Makes This Pumpkin Different
The body is worked flat rather than built as a conventional amigurumi sphere because back-loop rows create stronger vertical channels than surface embroidery alone. Once the rectangle is seamed and gathered, eight long shaping strands pull those channels inward and produce the broad lobes visible in the photograph. The stem is deliberately taller than the short brown stems used on many fall crochet pumpkins; its narrow green profile gives the top arrangement enough height to balance the wide body. Three spiral rosettes sit around the stem base, while a flat leaf and curling vine extend the topper sideways. A common mistake in a ribbed crochet pumpkin pattern is overstuffing before the shaping strands are added. Excess filling resists compression and turns the pumpkin into a nearly round ball instead of a flattened, segmented form.
Project Info at a Glance
| Skill Level | Time | Finished Size | Hook | Best For |
|---|---|---|---|---|
| Intermediate | Not established by verified reference data | Approx. 28 cm wide × 19 cm body height | 6.5 mm | Fall table décor, shelf displays, seasonal centerpieces |
The final diameter depends more on stuffing and rib tension than on gauge alone. A looser seam or lightly pulled shaping strands will make the pumpkin wider, while stronger compression produces deeper grooves and slightly reduces the diameter.
Materials and Tools
Yarn
- Burnt orange — bulky #5 yarn — approximately 200 g — Brava Bulky or another smooth bulky acrylic with visible stitch definition.
- Forest green — bulky or heavy worsted yarn — approximately 35–50 g — for the stem, leaf, and vine.
- Dusty pink — worsted or bulky yarn — approximately 10 g — for one rosette.
- Lavender — worsted or bulky yarn — approximately 10 g — for one rosette.
- Pale yellow — worsted or bulky yarn — approximately 10 g — for one smaller rosette.
Tools
- 6.5 mm crochet hook
- Polyester fiberfill, approximately 350–500 g depending on firmness
- Long upholstery or doll needle, preferably 20–30 cm
- Tapestry needle
- Stitch markers
- Straight pins
- Scissors
Abbreviations
MR — magic ring
sc — single crochet
hdc — half double crochet
dc — double crochet
inc — 2 stitches in one stitch
dec — decrease over 2 stitches
sl st — slip stitch
ch — chain
BLO — back loop only
FLO — front loop only
st/sts — stitch/stitches
R — round or row
An invisible decrease is made through the front loops of two consecutive stitches before completing one single crochet, reducing bulk at the decrease point.
Pattern — Step by Step
The pumpkin body is worked flat in rows. Stem components are worked in rounds or rows as stated. Stitch counts remain in brackets throughout the pattern.
Pumpkin Body
Yarn: burnt orange — Source: original photo-matched construction using standard BLO ribbing.
Ch 25.
Row 1: Starting in the second ch from hook, hdc across (24).
Row 2: ch 1, turn, BLO hdc across (24).
Row 3: ch 1, turn, BLO hdc across (24).
Row 4: ch 1, turn, BLO hdc across (24).
Row 5: ch 1, turn, BLO hdc across (24).
Row 6: ch 1, turn, BLO hdc across (24).
Row 7: ch 1, turn, BLO hdc across (24).
Row 8: ch 1, turn, BLO hdc across (24).
Row 9: ch 1, turn, BLO hdc across (24).
Row 10: ch 1, turn, BLO hdc across (24).
Row 11: ch 1, turn, BLO hdc across (24).
Row 12: ch 1, turn, BLO hdc across (24).
Row 13: ch 1, turn, BLO hdc across (24).
Row 14: ch 1, turn, BLO hdc across (24).
Row 15: ch 1, turn, BLO hdc across (24).
Row 16: ch 1, turn, BLO hdc across (24).
Row 17: ch 1, turn, BLO hdc across (24).
Row 18: ch 1, turn, BLO hdc across (24).
Row 19: ch 1, turn, BLO hdc across (24).
Row 20: ch 1, turn, BLO hdc across (24).
Row 21: ch 1, turn, BLO hdc across (24).
Row 22: ch 1, turn, BLO hdc across (24).
Row 23: ch 1, turn, BLO hdc across (24).
Row 24: ch 1, turn, BLO hdc across (24).
Row 25: ch 1, turn, BLO hdc across (24).
Row 26: ch 1, turn, BLO hdc across (24).
Row 27: ch 1, turn, BLO hdc across (24).
Row 28: ch 1, turn, BLO hdc across (24).
Row 29: ch 1, turn, BLO hdc across (24).
Row 30: ch 1, turn, BLO hdc across (24).
Row 31: ch 1, turn, BLO hdc across (24).
Row 32: ch 1, turn, BLO hdc across (24).
Row 33: ch 1, turn, BLO hdc across (24).
Row 34: ch 1, turn, BLO hdc across (24).
Row 35: ch 1, turn, BLO hdc across (24).
Row 36: ch 1, turn, BLO hdc across (24).
Row 37: ch 1, turn, BLO hdc across (24).
Row 38: ch 1, turn, BLO hdc across (24).
Row 39: ch 1, turn, BLO hdc across (24).
Row 40: ch 1, turn, BLO hdc across (24).
Row 41: ch 1, turn, BLO hdc across (24).
Row 42: ch 1, turn, BLO hdc across (24).
Row 43: ch 1, turn, BLO hdc across (24).
Row 44: ch 1, turn, BLO hdc across (24).
The panel should be approximately 24–26 cm tall before assembly. Width determines pumpkin circumference, so add two rows if your panel looks too narrow to form a broad cylinder.
Fasten off. Leave at least a 75 cm tail for the vertical seam.
Stem
Yarn: forest green — Source: standard six-stitch amigurumi math adapted to the tall curved stem in the photograph.
R1: 6 sc in MR (6)
R2: inc ×6 (12)
R3: 12 sc (12)
R4: 12 sc (12)
R5: 12 sc (12)
R6: 12 sc (12)
R7: 12 sc (12)
R8: 12 sc (12)
R9: 12 sc (12)
R10: 12 sc (12)
R11: 12 sc (12)
R12: 12 sc (12)
R13: (4 sc, dec) ×2 (10)
R14: 10 sc (10)
R15: 10 sc (10)
R16: 10 sc (10)
Stuff the lower two-thirds lightly. Leave the upper 3–4 cm almost unstuffed so the stem can curve without forming a sharp crease.
Fasten off. Leave a 35 cm tail for attachment.
Large Green Leaf
Yarn: forest green — Source: original leaf worked around both sides of a foundation chain.
Ch 13.
Starting in the second chain from the hook:
sl st, sc, hdc, dc, dc, 3 dc, dc, hdc, sc, sl st, 3 sc in final chain.
Continue along the opposite side of the foundation chain:
sl st, sc, hdc, dc, 3 dc, dc, hdc, sc, sl st.
Fasten off. Leave a 25 cm sewing tail.
For the central vein, surface-slip-stitch from the base toward the tip using the same green yarn.
Curly Vine
Yarn: forest green — Source: standard crochet corkscrew construction.
Ch 36.
Starting in the second chain from the hook, work 3 sc into every chain across.
The strip should coil automatically as the stitches accumulate. Fasten off with a 25 cm tail.
Pink Rosette
Yarn: dusty pink — Source: original spiral-flower construction.
Ch 24.
Starting in the second chain from hook:
2 sc in each of the first 6 chains, 2 hdc in each of the next 8 chains, then 2 dc in each remaining chain.
Fasten off with a 30 cm tail. Roll the strip from the sc end toward the dc end and stitch through every layer across the base.
Lavender Rosette
Yarn: lavender — Source: original spiral-flower construction.
Ch 22.
Starting in the second chain from hook:
2 sc in each of the first 6 chains, 2 hdc in each of the next 7 chains, then 2 dc in each remaining chain.
Fasten off with a 30 cm tail. Roll into a compact spiral and sew through the base several times.
Pale-Yellow Rosette
Yarn: pale yellow — Source: original small spiral-flower construction.
Ch 18.
Starting in the second chain from hook:
2 sc in each of the first 5 chains, 2 hdc in each of the next 6 chains, then 2 dc in each remaining chain.
Fasten off with a 25 cm tail. Roll tightly and secure across the underside.
Pumpkin Rib Strands — Make 8
Yarn: burnt orange — Source: photo-matched structural shaping.
Cut eight strands approximately 100 cm long. These strands are not crocheted; they pass through the pumpkin center and around the exterior to compress the body into eight lobes.
Assembly
- Fold the orange body panel so Row 1 meets Row 44. Whipstitch the short edges together through matching loops to create a wide ribbed tube.
- Thread a 90–100 cm orange strand through the stitches around one open edge. Pull the running stitch tight, knot securely, and pass the yarn across the opening several times before burying the tail inside.
- Turn the tube so the seam sits at the back. Fill the body gradually, placing fiberfill against the side walls first and leaving the center slightly less dense.
- Run another long orange strand around the remaining open edge. Pull until the top closes to an opening approximately 15–20 mm across, then knot the strand without cutting it immediately.
- Insert a long upholstery needle through the top center and exit through the bottom center. Bring the yarn around the outside along one rib channel, reinsert through the top, and pull until one deep groove forms.
- Repeat the center-to-center shaping process until eight channels divide the pumpkin. Space each groove about 45 degrees apart and compare the lobes before making the final knots.
- Pin the green stem over the top opening. Sew around the 12-stitch lower edge, then add one concealed anchoring stitch through the stem and deep into the pumpkin body to keep the tall stem upright.
- Attach the large green leaf beside the stem and place the curly vine behind it. Allow the vine to extend toward one side rather than wrapping evenly around the stem.
- Arrange the pink and lavender rosettes directly in front of the stem. Position the smaller yellow rosette slightly behind or beside them so all three flower centers remain visible.
- Check every rib from above and adjust any uneven channel by pulling its shaping strand. Bury the remaining ends inside the pumpkin and trim only after the exterior grooves have stopped shifting.
The finished pumpkin should have eight readable lobes, a slightly flattened base, and a flower cluster positioned tightly around the stem rather than floating above the crown.
7 Technical Tips
- Rib collapse: If the BLO rows are worked too loosely, the channels flatten after stuffing and the surface looks smooth. Use a 6.5 mm hook only if the fabric stays dense enough that gaps remain under about 3 mm when lightly stretched.
- Overstuffed center: Packing the center as tightly as the perimeter prevents the shaping strands from pulling inward. Leave the central column about 20 percent softer than the outer walls before closing the top.
- Uneven lobe width: Moving one shaping strand even two rows sideways creates visibly different pumpkin sections. Mark eight channel positions around the top with removable markers before inserting the upholstery needle.
- Weak gathering edge: Running the closing yarn through only occasional stitches concentrates too much force on individual loops. Pass through every second stitch around the edge and make at least two securing passes across the center opening.
- Stem tipping: A 10–15 cm stem attached only around its perimeter can lean under its own weight. Add one long anchoring stitch from the upper stem through the pumpkin center before attaching the flowers.
- Rosette unrolling: Sewing only the outer end of a spiral flower allows the inner coil to rotate outward. Pass the finishing yarn through at least four layers across the underside before attaching each flower to the pumpkin.
- Visible yarn tails: Bulky yarn ends trimmed directly beside a flower or leaf can work back through the surface. Leave at least 15 cm, pass each tail through the pumpkin filling in two directions, then trim where it re-emerges.
Conclusion
The defining measurements in this design are the 24-stitch body height, 44 ribbed rows, and eight evenly spaced shaping channels. After stuffing, view the pumpkin from directly above before attaching the topper; unequal lobes are easier to correct while the stem area remains open. Record the final diameter and the number of body rows if you plan to make smaller coordinating pumpkins later. Photograph the finished piece against a plain background for Pinterest and Instagram and tag it with #FloralRibbedPumpkin. This large crochet pumpkin pattern can also be adapted by changing only the topper. Would you keep the three pastel flowers or replace them with autumn leaves and acorns?









