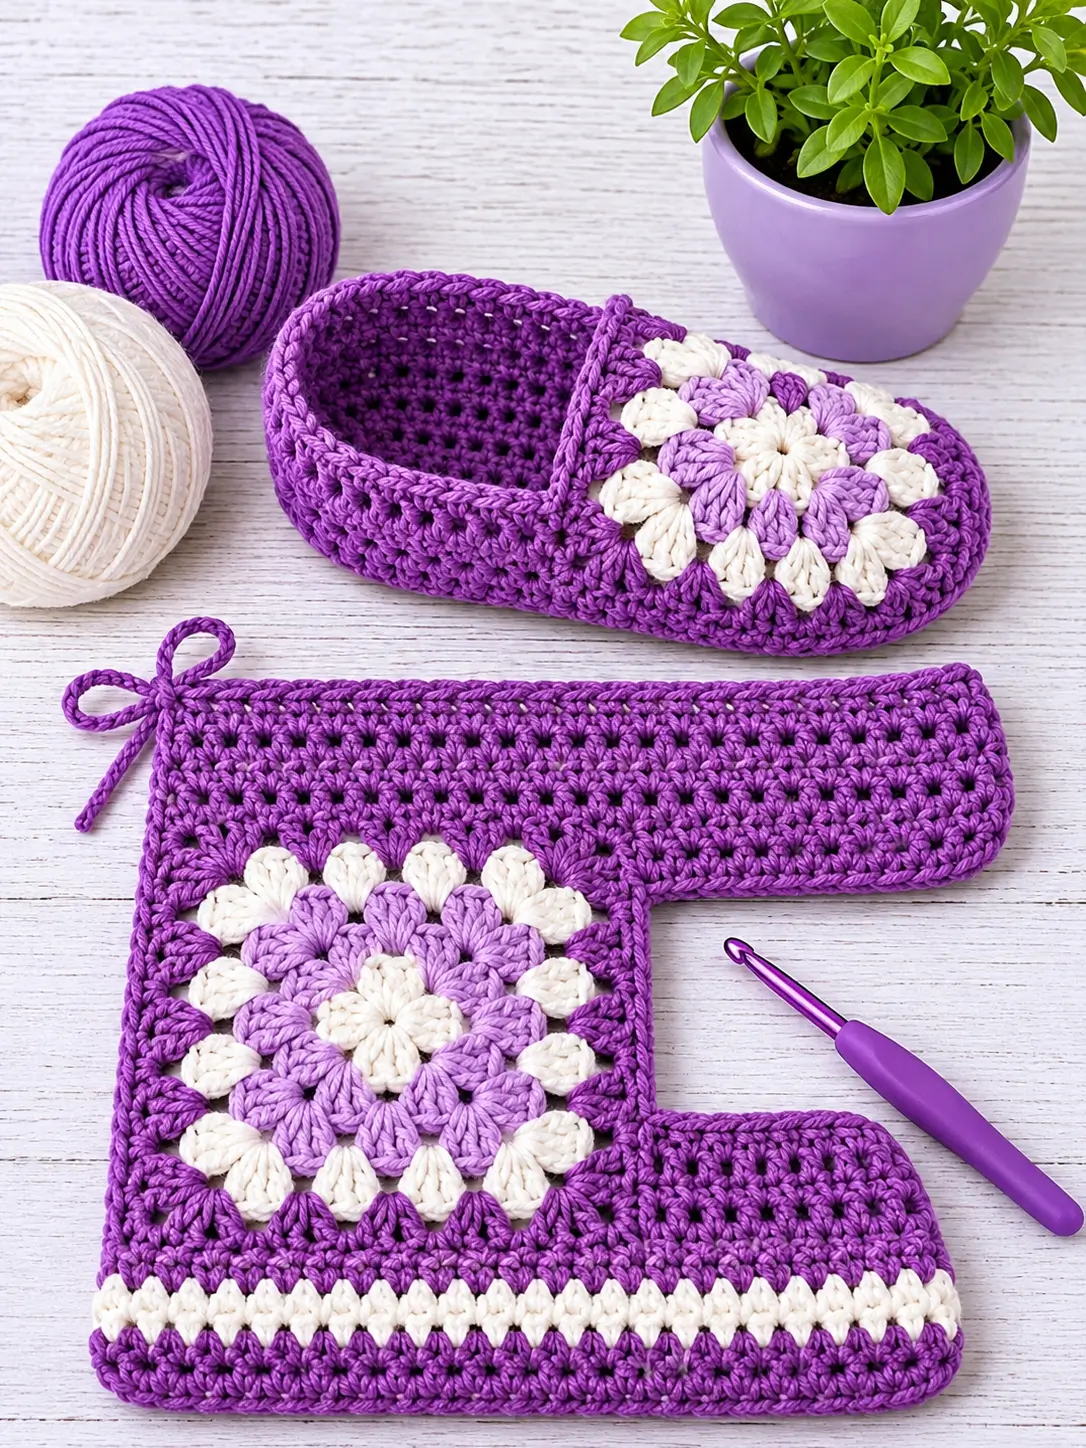
The floral square on these slippers has two jobs: it creates the decorative toe panel and supplies enough width to curve over the front of the foot. This purple granny square crochet slippers pattern combines a dense oval sole, raised side walls, and a layered flower motif in ivory, lavender, and deep purple. The construction is worked in separate sections so the finished slipper can be adjusted to the wearer’s foot length.
The Design: What Makes These Crochet Slippers Different
The slipper uses a dense sole rather than an open granny-stitch base. That choice limits stretching under the foot and gives the side wall a stable foundation. The decorative toe is made separately as a floral granny square, then positioned over the front section instead of forcing the flower directly into the oval shaping. A deep-purple border visually connects the motif with the sole.
The flower uses three contrasting layers: a small ivory center, lavender petals, and an ivory outer petal round. Deep purple then converts the circular flower into a square-like toe panel. The main construction error to avoid is attaching the motif too tightly. If its side edges are pulled flat against the sole, there will not be enough vertical space for the toes.
Project Information at a Glance
| Skill Level | Construction | Hook | Yarn | Reference Foot Length |
|---|---|---|---|---|
| Intermediate | Oval sole + floral toe panel | 4.0–4.5 mm | Worsted #4 cotton or cotton blend | Approx. 23–25 cm |
Materials and Tools
Yarn
- Deep Purple — worsted #4 — approximately 100–130 g
- Lavender — worsted #4 — approximately 25–35 g
- Ivory — worsted #4 — approximately 30–40 g
The quantities are working estimates for one adult pair. Foot size, yarn thickness, hook size, and stitch tension will change actual consumption.
Tools
- 4.0–4.5 mm crochet hook
- Yarn needle
- Scissors
- Stitch markers
- Measuring tape
- Optional nonslip fabric paint or slipper-sole material
Abbreviations
- MR — magic ring
- ch — chain
- sc — single crochet
- hdc — half double crochet
- dc — double crochet
- tr — treble crochet
- sl st — slip stitch
- st/sts — stitch/stitches
- sp — space
- BLO — back loop only
- RS — right side
Before Starting: Measure the Foot
Place the foot on a flat surface and measure from the back of the heel to the longest toe. Also measure around the widest part of the forefoot.
The finished sole should normally be close to the actual foot length because crochet fabric stretches during wear. For a 24 cm foot, begin with a target sole of approximately 23.5–24 cm and test the fit before building the upper.
| Approx. Foot Length | Suggested Finished Sole |
|---|---|
| 22 cm | 21.5–22 cm |
| 23 cm | 22.5–23 cm |
| 24 cm | 23.5–24 cm |
| 25 cm | 24.5–25 cm |
| 26 cm | 25.5–26 cm |
Floral Granny Square Toe Panel — Make 2
Make both floral panels before beginning the final slipper assembly. Matching the two motifs is easier when each color round is completed on both pieces before moving to the next color.
Round 1 — Ivory Flower Center
With ivory yarn, make an MR.
Ch 2.
Work 12 hdc into the ring.
Pull the ring closed and join with sl st. (12 sts)
Round 2 — Ivory Petal Foundation
Ch 1.
Repeat around:
*Sc in next st, ch 3, skip next st.*
Join.
You should have 6 ch-3 spaces positioned evenly around the center.
Round 3 — Ivory Inner Petals
Into each ch-3 space work:
(sc, hdc, 3 dc, hdc, sc)
Repeat in all 6 spaces.
Fasten off ivory.
Lavender Petal Layer
Join lavender behind the first flower layer.
Round 4 — Lavender Foundation
Work one anchoring sc between two ivory petals.
Ch 5.
Anchor with sc between the next two petals.
Repeat around to form 6 larger loops behind the ivory flower.
Round 5 — Lavender Petals
Into each ch-5 loop work:
(sc, hdc, 2 dc, tr, 2 dc, hdc, sc)
Repeat around.
Fasten off.
The lavender petals should sit behind the smaller ivory center petals without completely covering them.
Ivory Outer Flower Layer
Join ivory behind the lavender petals.
Round 6 — Outer Foundation
Anchor the yarn between two lavender petals.
Ch 6.
Sc between the next two petals.
Repeat around.
Round 7 — Ivory Outer Petals
Into each ch-6 space work:
(sc, hdc, 2 dc, 2 tr, 2 dc, hdc, sc)
Repeat around.
Fasten off.
Converting the Flower into a Toe Panel
Join deep purple behind the outer petals. The objective is not to compress the flower into a rigid square. The purple rounds provide four structural zones that can be sewn to the slipper.
Purple Foundation Round
Mark four points around the flower as evenly as possible.
Work sc around the back of the motif, placing approximately the same number of stitches between each marker.
At each marker work:
(sc, ch 2, sc)
First Squaring Round
Ch 2.
Hdc across each side.
In every ch-2 corner space work:
(2 hdc, ch 2, 2 hdc)
Join.
Second Squaring Round
Ch 1.
Sc in every stitch.
At each corner work:
(sc, ch 1, sc)
Join and fasten off.
Measure both finished panels. They should be the same width within approximately 5 mm.
Slipper Sole — Make 2
Use deep purple for the sole.
The starting chain determines most of the finished length. Rather than relying on a universal chain count, make a chain approximately 5–6 cm shorter than the required sole length. The rounded toe and heel increases supply the remaining length.
For a medium adult slipper, a starting chain of approximately 24–28 stitches with worsted yarn is a practical test range.
Sole Round 1
Ch the required number.
Work 2 hdc in the second chain from the hook.
Hdc across until one chain remains.
Work 5 hdc into the final chain.
Turn the foundation so you can work along the opposite side.
Hdc across.
Work 3 hdc into the final foundation point.
Join with sl st.
Sole Round 2
At the toe, distribute increases across the curved stitches.
Work one hdc into each straight side stitch.
Increase across the heel curve.
Keep the increases symmetrical from left to right.
Sole Round 3
Continue the same principle: increase only around the rounded toe and heel while keeping the long sides relatively straight.
Place the sole on a flat surface after this round.
If it cups upward, additional increases are required around the curves. If it develops waves, reduce the number of increases.
Optional Sole Round 4
For a wider foot, add another hdc round with a small number of increases at the toe and heel.
Stop once the sole matches the required length and width.
Second Sole Layer
For thicker house slippers, make two identical soles for each foot.
Place two sole pieces together with wrong sides facing.
Join them with deep-purple sc around the entire perimeter.
A double sole provides more structure and reduces distortion when the upper is attached.
Building the Slipper Side Wall
With the sole RS facing, join deep-purple yarn at the center back.
Side Round 1
Ch 1.
Work sc in BLO around the entire sole.
Join.
The unused front loops create a visible line separating the sole from the upper.
Side Round 2
Work one hdc in every stitch around without increasing.
Side Round 3
Repeat one hdc in each stitch.
Side Round 4
Work one sc in every stitch.
The wall should now rise approximately 2.5–4 cm from the sole, depending on yarn and tension.
Shaping the Heel
The back of the photographed slipper rises higher than the front edge.
Mark approximately the back 40% of the slipper circumference.
Work back and forth across this heel section.
Heel Row 1
Ch 1, turn.
Sc across the marked heel section.
Heel Rows 2–4
Ch 1, turn.
Sc across.
Add or remove a row according to the desired heel height.
Fasten off.
Attaching the Floral Toe Panel
Position one floral square over the front of the slipper.
The flower center should align with the center line of the foot.
Pin the two lower corners of the motif approximately 1–2 cm behind the widest point of the toe.
Curve the panel upward rather than stretching it flat.
Sew or slip stitch one side of the motif to the slipper wall.
Repeat on the opposite side.
Leave the rear edge of the floral panel open to form the foot opening.
Try the slipper on before weaving in the joining yarn.
Finishing the Foot Opening
Join deep-purple yarn at the heel.
Work one round of sc around the entire opening, including the exposed upper edge of the floral panel.
Where the heel meets the flower panel, work the stitches firmly enough to remove gaps without gathering the fabric.
Final Edge
Work one round of reverse sc or standard sc around the opening.
Fasten off.
The final edge should hold its shape while still stretching enough for the foot to enter comfortably.
Matching the Second Slipper
Before assembling the second slipper, place both soles together.
Confirm that their lengths and widths match.
Then compare the two floral panels.
Attach the second panel at the same distance from the toe as the first. Count the number of side-wall stitches covered by the first panel and repeat that number on the second slipper.
Optional Nonslip Sole
Crochet slippers can slide on smooth flooring.
If the slippers will be worn on tile, polished wood, or laminate, add a suitable nonslip treatment to the bottom.
Small dots or short lines of purpose-made nonslip fabric product can be applied to the heel and forefoot according to the product instructions. Another option is to sew a commercial nonslip slipper-sole material to the crochet sole.
Allow any applied product to cure fully before wearing the slippers.
Optional Matching Granny Square Pouch
The rectangular accessory shown with the slippers can be made from the same floral motif and deep-purple yarn.
Front Panel
Make one floral granny square using the same instructions as the slipper toe.
Add deep-purple rounds until the square reaches approximately 18–20 cm.
Side Extension
Join deep purple to one side of the square.
Work hdc rows back and forth until the extension measures approximately 25–30 cm.
Repeat from the opposite side if a longer wrap-style accessory is required.
Edging
Work sc around the entire piece.
Add one ivory stripe near the lower edge if you want to reproduce the contrast visible in the set.
Tie
Ch approximately 45–55.
Sl st back along the chain.
Attach the cord to one upper corner and tie it into a small bow.
Making a Smaller or Larger Slipper
The safest adjustment is to change the sole before changing the flower.
For a shorter foot, reduce the foundation chain and stop the sole when it reaches the required measurement.
For a longer foot, add foundation chains while keeping the rounded-end construction unchanged.
The floral toe panel should cover approximately the front 35–45% of the finished sole length.
If the motif is too small, add another purple squaring round. If it is too large, use a smaller hook for the motif rather than gathering its edges during assembly.
Suggested Color Variations
| Main Color | Petal Color | Accent |
|---|---|---|
| Deep Purple | Lavender | Ivory |
| Dusty Rose | Blush Pink | Cream |
| Sage Green | Soft Olive | Ivory |
| Navy Blue | Powder Blue | White |
| Burgundy | Dusty Pink | Warm Cream |
Assembly
- Make two matching floral granny-square toe panels and block them lightly to equal dimensions.
- Crochet two oval soles in deep purple, checking each one against the actual foot length.
- Add a second sole layer if a thicker house slipper is required.
- Work the BLO foundation round around each sole to establish the side wall.
- Build the deep-purple side walls to approximately 2.5–4 cm high.
- Add extra rows across the heel section to create the raised back visible in the design.
- Center one floral panel over each toe and pin both sides before sewing.
- Attach the panels without pulling them flat; retain enough curved volume above the toes.
- Work the final deep-purple edging around each foot opening and add nonslip treatment if required.
- Weave every yarn tail into the inside of the fabric, then compare both slippers for equal length, heel height, and toe-panel position.
The completed pair should have matching oval soles, raised purple heel walls, and centered ivory-and-lavender floral toe panels.
7 Technical Tips
- The sole curls upward: the curved ends do not contain enough increases. Add increases only around the toe and heel; adding them along the straight sides makes the entire sole wider instead of correcting the curve.
- The sole develops waves: too many increases were added. Place it on a flat table after every round and remove increases from the next curved round if the perimeter refuses to lie flat.
- The toe feels tight: the floral panel has been sewn flat against the sole. Pin the motif with approximately 1–2 cm of vertical room above the toes before completing the second side seam.
- The slipper falls off at the heel: the back wall is too low or the opening is too wide. Add one or two sc heel rows and check the opening before working the final edging.
- The two flowers look different: petal placement has shifted between motifs. Complete each color round on both flowers before beginning the next layer and count all six foundation spaces.
- The opening becomes rigid: the final edging was worked too tightly. The edge must stretch enough for the widest part of the foot to pass through without pulling the floral panel out of shape.
- The slippers twist during wear: the toe panels were attached off center. Mark the exact center of both the sole toe and flower before pinning, then compare the number of covered side-wall stitches on the left and right sides.
Washing and Blocking
Follow the care instructions for the selected yarn. Cotton slippers can become heavier and temporarily larger when wet, so reshape them before drying.
Do not aggressively stretch the finished slipper during blocking. Concentrate on flattening the sole, aligning the flower, and matching the dimensions of the pair.
If a nonslip coating has been applied, follow that product’s washing instructions as well.
Conclusion
The purple granny square crochet slippers pattern depends on three measurements: finished sole length, side-wall height, and the width of the floral toe panel. Make the two flower motifs first, then build each sole to the wearer’s actual foot measurement before attaching the upper. This method also makes the design easy to resize without changing the decorative structure. Use the remaining lavender and ivory yarn for the matching rectangular accessory or a small storage pouch. Share the finished set on Pinterest or Instagram with #PurpleGrannySquareSlippers. For this design, would you keep the ivory outer petals or replace them with a second shade of lavender?









