Introduction
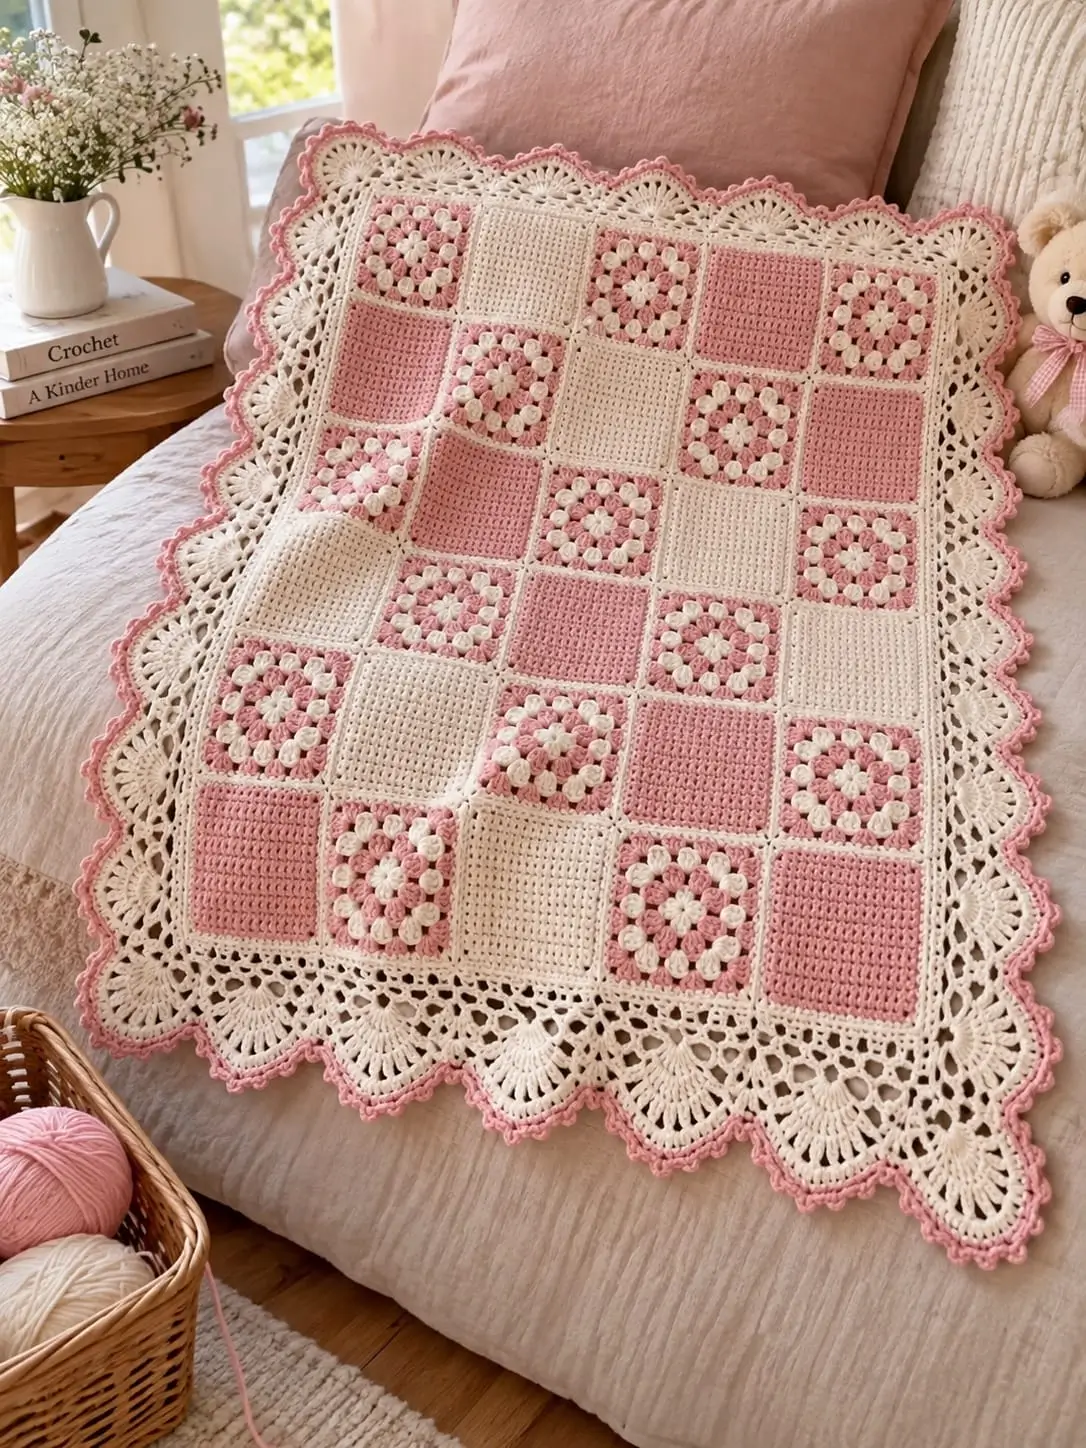
A pink granny square becomes a different construction problem when half its neighbors are solid blocks and the entire grid must support a deep cream lace frame. This pink granny square blanket crochet pattern uses DK yarn, a 4 mm hook, modular squares, and a 96 × 127 cm reference throw size. It suits intermediate crocheters because consistent blocking matters. The modular format also makes damaged squares easier to replace.
The Design: What Makes This Pink Granny Square Blanket Different
Three structural decisions define this design. First, open granny motifs alternate with solid pink and cream blocks, giving the center enough density to support the much more open perimeter. Second, every module receives a cream outer edge or seam. That separation keeps the pink and cream crochet blanket visually ordered even when the two square styles have different stitch structures.
The third decision is scale. The lace frame is intentionally deeper than the compact edging found on many granny blankets, so its attachment round must distribute stitches evenly before the fans begin.
A frequent mistake in a granny square blanket pattern is joining motifs before checking their blocked dimensions. A difference of only 5 mm per square can become several centimeters across a completed row. Block first. Join second.
Project Info at a Glance
| Skill Level | Time | Finished Size | Hook | Best For |
|---|---|---|---|---|
| Intermediate | Multi-session project | 96 × 127 cm reference size | 4 mm | Lap blanket / small throw |
The 96 × 127 cm dimension is a reference size for a modular granny-square throw and should be treated as a sizing target rather than a measurement extracted directly from the photograph.
Materials and Tools
Yarn
Use one yarn line for both colors so the modules respond similarly to washing and blocking.
- Cream / ivory — DK weight — enough for approximately half the solid squares, granny motif rounds, joining, and the large lace border.
- Dusty blush pink — DK weight — enough for pink blocks, alternating granny clusters, and the final border accent.
Purchase yarn by calculated yardage after making a gauge square. Crochet density, final dimensions, fiber content, square count, and border depth can substantially change total yarn consumption.
Tools
- 4 mm crochet hook
- Tapestry needle
- Locking stitch markers
- Sharp scissors
- Blocking pins
- Blocking mats
- Tape measure
No stuffing, safety eyes, or amigurumi notions are required.
Abbreviations
- MR — magic ring
- ch — chain
- sc — single crochet
- dc — double crochet
- tr — treble crochet
- sl st — slip stitch
- sp — space
- sts — stitches
- rep — repeat
- RS — right side
- FO — fasten off
An invisible decrease is not used in this blanket because the technique is intended for three-dimensional shaping rather than flat square construction.
Pattern — Step by Step
The photographed center appears to contain approximately 30 modules arranged 5 squares across by 6 squares down. This count is a visual reconstruction rather than a specification taken from an original written pattern.
Make enough granny motifs and solid blocks to produce an alternating checkerboard arrangement. Every finished module should reach the same blocked dimensions before joining.
Classic Pink-and-Cream Granny Square
Yarn: cream and dusty blush pink.
With cream yarn, make a magic ring.
R1: Ch 3, 2 dc into ring, ch 2; (3 dc into ring, ch 2) ×3. Join with sl st. You now have four 3-dc clusters and four corner spaces.
Change to pink.
R2: Move to a corner. Ch 3, 2 dc, ch 2, 3 dc in the same corner; ch 1. Work (3 dc, ch 2, 3 dc) in next corner, ch 1 around. Join.
Change to cream.
R3: Work (3 dc, ch 2, 3 dc) into every corner. Work 3 dc into each side ch-1 space, with ch 1 between groups. Join.
Change to pink.
R4: Repeat the established granny-square sequence, adding one additional side cluster on every side.
If the motif remains smaller than the required module size, add another cream round using the same progression.
Block the square to the selected module dimensions before measuring it against the solid squares.
Fasten off and weave in the center tail.
Solid Cream Square
Yarn: cream.
Use solid granny-square geometry so the finished dimensions can be matched to the open granny motifs.
R1: Form four sides and four corner spaces for 12 dc total.
R2: Increase at all four corners — 28 dc, plus four corner spaces.
R3: Continue the same corner construction — 44 dc, plus four corner spaces.
R4: Continue — 60 dc, plus four corner spaces.
R5: If required for size — 76 dc, plus four corner spaces.
The mathematical progression adds 16 dc per round: 12, 28, 44, 60, then 76.
Fasten off. Block the square to exactly the same dimensions as the classic granny motif.
Solid Pink Square
Yarn: dusty blush pink.
Work the pink blocks using the same solid-square construction as the cream blocks.
R1: 12 dc plus corner spaces.
R2: 28 dc plus corner spaces.
R3: 44 dc plus corner spaces.
R4: 60 dc plus corner spaces.
R5: 76 dc plus corner spaces if needed to reach the target dimensions.
Fasten off.
The pink and cream blocks must finish at identical measurements. Do not automatically add another round to one color because its unblocked square appears smaller. Block a test piece and measure it first.
Arrange the Crochet Squares
Place the blocked squares on a large flat surface before joining. Reproduce the alternating appearance of the photographed blanket by distributing granny motifs among pink and cream solid blocks.
A practical arrangement is approximately five squares across and six squares down. Alternate the three module types so large groups of identical solid blocks do not collect in one section.
Measure the complete arrangement before joining. Five squares that are each only 5 mm wider than planned can add 25 mm to the blanket width.
Cream Joining Seams
Yarn: cream.
Arrange the blocked squares in the planned 5 × 6 checkerboard.
Join each horizontal pair using mattress stitch, whip stitch, or a flat crochet join. Keep one stitch on the first square aligned with the corresponding stitch on its neighbor.
Complete the short seams first to create rows. Then join the completed rows along their long edges.
At every four-square intersection, align all four corners before tightening the surrounding seam. The joined center should remain flat when placed on a table or blocking mat.
Do not pull the joining yarn tightly enough to shorten the edges of the squares. A tight seam can make the blanket center pucker even when every individual square has been blocked correctly.
Foundation Border
Yarn: cream.
Before beginning the decorative lace, establish a stable perimeter around the joined squares.
R1: Attach cream yarn at one outer corner. Work sc evenly around the entire blanket, placing 3 sc at each corner. Join with sl st.
R2: Ch 3. Work dc around the perimeter, distributing the stitches evenly. Add the necessary corner stitches so each corner turns without pulling inward.
R3: Work another stabilizing round if the joined center still pulls slightly at the outer seams.
Place the blanket on a flat surface after every round. A border that develops waves contains too many stitches. A border that cups toward the center needs additional stitches or a looser working tension.
Openwork Cream Lace Border
Yarn: cream.
The photographed blanket uses a deep decorative frame with repeated fan-shaped sections separated by open chain spaces. Because an exact stitch count cannot be recovered reliably from a single photograph, fit the repeat to the actual perimeter of your blanket.
R1: Ch 3, skip 2 sts, sc in next st. Repeat along each side, making small spacing adjustments near the corners where required.
R2: Sl st into the first ch-space. Work (sc, ch 5, sc) into each ch-space.
R3: Into each ch-5 loop work 7 dc. Sc between adjacent fans.
R4: Work sc into the first dc of each fan, then ch 3, skip 1 dc, sc in next dc across the fan. Use a slightly larger chain space between neighboring fans.
R5: Work a new fan into each central arch. Increase the width of the fan only when required to keep the lace flat.
Continue the fan-and-arch construction until the cream lace reaches the required depth.
The outer border should expand gradually from the rectangular center. Check the work after every completed round instead of attempting to correct severe rippling during final blocking.
Pink Picot-Style Final Edging
Yarn: dusty blush pink.
Attach the pink yarn at the top of one completed cream fan.
R1: Sc into the first suitable edge space, ch 3, sl st into the first ch to form a picot, then sc into the next edge space. Repeat around the cream border.
At valleys between two cream fans, omit a picot when necessary to prevent the pink edging from becoming crowded.
At each blanket corner, add one additional picot repeat only if the corner begins pulling inward.
Join with an invisible finish. Weave the yarn tail securely through several stitches on the wrong side.
Assembly
- Crochet all classic pink-and-cream granny motifs before establishing the final layout.
- Make the solid cream squares and solid pink squares to the same finished dimensions.
- Wet-block or steam-block according to the yarn manufacturer’s care instructions, matching every square against the same measurement template.
- Arrange approximately 30 modules in a 5 × 6 checkerboard based on the photographed composition.
- Join the individual squares into horizontal rows with cream yarn.
- Join those rows together, aligning every four-square intersection before securing the surrounding seam.
- Work the cream foundation rounds around the entire assembled rectangle.
- Add the openwork cream lace, checking the blanket on a flat surface after every completed round.
- Crochet the dusty-pink picot-style edging around the outermost cream fans.
- Weave all remaining tails through the wrong side, trim them, and complete a final blocking pass.
The completed blanket should lie flat through the center, joining seams, lace transition, and outer decorative points.
7 Technical Tips for a Flatter Granny Square Blanket
- Mark all four corners. A misplaced stitch marker can create asymmetric border corners. Mark each corner before beginning the cream foundation round, particularly where a joining seam can resemble a normal edge space.
- Watch joining tension. Overly tight seams create a puckered center. Keep the joining yarn relaxed enough that two adjacent blocked squares retain their original combined width.
- Do not decrease the solid squares. Invisible decreases are designed for three-dimensional shaping. If a solid square becomes too wide, correct the gauge or hook size instead of decreasing along its sides.
- Check for a 5 mm discrepancy. A difference of only 5 mm per module becomes 25 mm across a five-square row. Measure every blocked motif in both directions before assembly.
- Control color-change tension. Loose tension immediately after a color change can create enlarged corner spaces. Hold the new color at the same working tension for the first complete cluster.
- Pin every fan peak. Pinning a deep lace border only at its four corners can leave curved sides. During blocking, place pins at consistent intervals and at the major cream fan points.
- Reverse direction when weaving tails. A short tail woven in only one direction can work loose after laundering. Run each joining and border tail through several stitch backs, reverse direction once, and trim after the final blocking stage.
Finishing and Blocking
Measure the blanket before its final blocking so you can determine how much correction the lace border requires. The central grid should already be square and stable; blocking should refine the shape rather than compensate for major stitch-count errors.
Pin the four corners first without stretching them beyond the intended dimensions. Next, establish straight lines along the four sides. Pin the peaks of the cream lace fans individually so their spacing remains consistent.
Arrange the pink outer picots after the cream border has been positioned. Each point should project outward rather than folding over the preceding cream round.
Allow the blanket to dry completely before removing the pins if wet blocking is suitable for the selected yarn. Follow the yarn manufacturer’s care instructions when using steam or heat because fiber types respond differently.
Conclusion
The key measurement in this pink granny square blanket crochet pattern is not the total blanket length; it is the blocked dimension of one module. Establish that dimension first, reproduce it across every granny and solid square, then join the checkerboard before calculating the lace perimeter. Your next step is to crochet one pink-and-cream motif and one solid test square, block both, and adjust the hook until their dimensions match. Save the finished layout to Pinterest and share the completed border on Instagram with #PinkGrannySquareBlanket. When adapting this specific blanket, which element would you change first: the ratio of solid squares to granny motifs or the depth of the cream lace border?









