Introduction
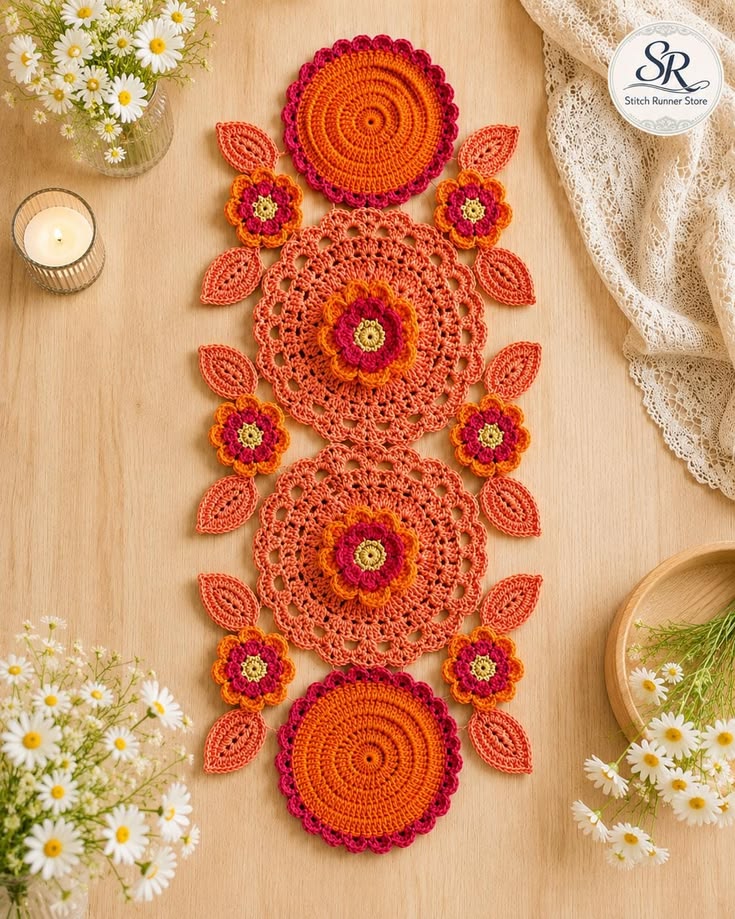
Two solid orange end discs frame a runner whose middle is built from lace medallions, six-petal flowers, and paired pointed leaves. This orange floral crochet table runner pattern uses cotton yarn, a 3.5 mm hook, joined circular motifs, and layered appliqués. The intermediate reconstruction targets approximately 34 × 125 cm. Its modular construction also makes the finished length easy to alter before final joining.
The instructions below are an original photo-inspired reconstruction based on visible structure; published patterns cited later are used only for sizing, gauge, and material benchmarks.
The Design: What Makes This Runner Different
Three different circle treatments control this design. The two ends use dense orange discs with raspberry scallops, while two larger coral medallions in the middle switch to open lace and carry dimensional flowers. Six smaller flowers and twelve pointed leaves occupy the side gaps, turning separate circles into one continuous crochet flower table runner. The first structural decision is to crochet every large medallion separately so diameter can be corrected during blocking. Second, leaves are attached only along their lower center lines, preserving the open spaces visible in the photograph. Third, small flowers become joining points rather than decoration added afterward. A common mistake with a round motif crochet table runner is joining circles directly from the hook; small diameter differences then accumulate and pull the finished piece into a curve.
Project Info at a Glance
| Skill Level | Time | Finished Size | Hook | Best For |
|---|---|---|---|---|
| Intermediate | Reconstruction estimate: 16–22 hours | Reconstruction target: 32–36 × 120–130 cm | 3.5 mm | Dining tables, coffee tables, sideboards |
Published floral runners demonstrate how widely scale changes with yarn choice. Raine Eimre’s Floral Table Runner uses mercerized cotton thread, a 1.75 mm hook, approximately 250 yards, and measures about 8 × 31 inches. Helda Panagary’s modular Floral Table Runner uses sport-weight 100% cotton with a 2.5 mm hook. Uma M Natarajan’s leaf appliqué uses worsted yarn with a 3.5 mm hook and lists only 5–7 yards per project. These are construction and material benchmarks rather than instructions for the reconstruction below.
Materials and Tools
Yarn
- Burnt orange — DK/light worsted cotton — reconstruction estimate: 180–220 g
- Coral — DK/light worsted cotton — reconstruction estimate: 200–240 g
- Raspberry pink — DK/light worsted cotton — reconstruction estimate: 100–130 g
- Golden yellow — DK/light worsted cotton — reconstruction estimate: 25–35 g
A smooth mercerized or tightly spun cotton is preferable for this reconstruction because the circular medallions need defined edges and the leaves need to hold pointed tips. Helda Panagary’s published modular floral runner provides a useful fiber benchmark: its specified sport yarn is Yarn and Colors Must Have, a 100% cotton yarn with 137 yards per 50 g.
Tools
- 3.5 mm crochet hook
- 3.0 mm hook if the flower centers need firmer definition
- Tapestry needle
- Locking stitch markers
- Scissors
- Measuring tape
- Blocking mats
- Rust-resistant pins
Abbreviations
- MR — magic ring
- ch — chain
- sl st — slip stitch
- sc — single crochet
- hdc — half double crochet
- dc — double crochet
- tr — treble crochet
- inc — increase
- sp — space
- st/sts — stitch/stitches
An invisible decrease is worked through the front loops of two adjacent stitches before completing one single crochet; no decreases are needed in the principal flat motifs.
Motif Plan
The reconstruction uses the following visible structure:
- Solid orange end medallion ×2
- Large coral lace medallion ×2
- Large layered center flower ×2
- Small layered flower ×6
- Pointed coral leaf ×12
- Small joining rings as required between neighboring motifs
Block all four large circles before assembly. Target approximately 25–27 cm for each central lace medallion and 20–22 cm for each solid end medallion.
Pattern — Step by Step
Solid Orange End Medallion — Make 2
Yarn: burnt orange. Hook: 3.5 mm.
R1: 12 dc in MR. Join. (12)
R2: 2 dc in each st around. (24)
R3: (Dc, 2 dc in next st) ×12. (36)
R4: (2 dc, 2 dc in next st) ×12. (48)
R5: (3 dc, 2 dc in next st) ×12. (60)
R6: (4 dc, 2 dc in next st) ×12. (72)
R7: (5 dc, 2 dc in next st) ×12. (84)
R8: (6 dc, 2 dc in next st) ×12. (96)
R9: (7 dc, 2 dc in next st) ×12. (108)
Measure the disc. If it has reached approximately 19–20 cm, proceed to the edging. If your gauge is tighter, add one more mathematically consistent round:
Optional R10: (8 dc, 2 dc in next st) ×12. (120)
Fasten off orange.
Raspberry Scalloped Edge
Join raspberry pink.
Edging R1: Sc in each stitch around. Keep the disc flat.
Edging R2: *Sl st in next st, skip 2 sts, 5 dc in next st, skip 2 sts* around, adjusting only the final repeat if your selected disc size does not divide exactly by six.
Fasten off and block to approximately 20–22 cm.
Large Coral Lace Medallion — Make 2
Yarn: coral. Hook: 3.5 mm.
R1: 12 dc in MR. (12)
R2: 2 dc in each st. (24)
R3: (Dc, ch 1) in each st around. (24 dc, 24 ch-1 spaces)
R4: Sl st to first ch-1 sp; (2 dc, ch 1) in each ch-1 sp. (48 dc)
R5: Sl st to first ch-1 sp; (3 dc, ch 2) in each ch-1 sp around. (24 groups)
R6: Sl st to first ch-2 sp; (2 dc, ch 3, 2 dc, ch 1) in each ch-2 sp. (24 groups)
The next round begins the larger openings visible near the perimeter.
R7: Sl st into first ch-3 sp; (3 dc, ch 5, 3 dc) in each ch-3 sp around.
R8: In each ch-5 sp work (sc, hdc, 5 dc, hdc, sc). Sl st between adjacent shells.
R9: Ch 1. Sc around, working one sc into each shell stitch and ch 3 between adjacent shells.
Fasten off.
Block both medallions to the same 25–27 cm diameter. Diameter equality is more important than matching an unblocked stitch measurement.
Large Center Flower — Make 2
The photograph places one dimensional flower over each lace medallion.
Gold Center
R1: With golden yellow, 6 sc in MR. (6)
R2: Inc ×6. (12)
Change to raspberry.
Raspberry Petal Layer
R3: *Sl st in next st, (ch 3, 3 dc, ch 3, sl st) in next st* ×6.
This consumes all 12 center stitches and produces exactly six petals.
Orange Outer Layer
Working behind the raspberry petals, make six ch-5 loops anchored evenly around the 12-stitch center.
Into each ch-5 loop work:
Sc, hdc, dc, 3 tr, dc, hdc, sc.
Fasten off with a 40 cm tail.
Target approximately 10–12 cm across after light blocking.
Small Side Flower — Make 6
R1: With golden yellow, 6 sc in MR. (6)
R2: Change to raspberry and inc ×6. (12)
R3: *Sl st in next st, (ch 3, 3 dc, ch 3, sl st) in next st* ×6.
Change to burnt orange.
Create six ch-4 loops behind the raspberry petals.
Into each loop work:
Sc, hdc, 3 dc, hdc, sc.
Fasten off with a 30 cm sewing tail.
Block to approximately 7–8 cm.
Pointed Coral Leaf — Make 12
Yarn: coral. Hook: 3.5 mm.
Ch 14.
Starting in the second chain, work into the next 12 chains, leaving the final chain for the pointed turn:
Sl st in 1, sc in 2, hdc in 2, dc in 3, tr in 2, dc in 1, hdc in 1. (12)
Work 5 sc into the final foundation chain.
Along the opposite side work the exact reverse sequence:
Hdc in 1, dc in 1, tr in 2, dc in 3, hdc in 2, sc in 2, sl st in 1. (12)
Fasten off with a 25 cm tail.
Each leaf contains exactly 29 stitches: 12 + 5 + 12.
Leaf Interior Outline
The reference leaves show an open, layered center rather than a completely plain surface.
Join coral at the base of a leaf.
Surface slip stitch along one side of the foundation-chain ridge, stopping approximately 1 cm before the tip.
Ch 2 and return down the opposite side of the ridge with loose surface slip stitches.
Fasten off.
Do not pull the decorative line tight. Shortening the center line causes the leaf to cup.
Small Joining Ring
Use these only where the photograph shows a small gap between major components.
With coral or burnt orange, ch 12.
Join with a slip stitch to form a ring.
Work 18 sc around the chain ring.
Join and fasten off with a 20 cm tail.
The ring becomes a flexible connector between flower, leaf, and medallion edges.
Medallion Arrangement
Lay the components on a blocking mat in this order:
Solid end medallion → small-flower transition → large lace medallion → small-flower transition → large lace medallion → small-flower transition → solid end medallion.
The large lace circles should touch or nearly touch at their outer scallops.
Allow approximately 5–7 cm between each solid end medallion and the nearest lace medallion. Small flowers and leaves occupy those transitions.
Measure the full arrangement before sewing. Target 120–130 cm overall.
Positioning the Large Flowers
Center one large layered flower over each coral lace medallion.
Rotate the flower so one orange petal points toward the longitudinal center line.
Sew through the 12-stitch center at six evenly distributed points.
Add two concealed stitches through the bases of opposite orange petals.
Leave the remaining petal edges free.
Positioning the Six Small Flowers
Place one small flower on each side of the upper transition, one on each side of the central transition, and one on each side of the lower transition.
This produces three pairs.
Keep the center of each flower approximately 5–7 cm beyond the edge of the neighboring large medallion.
Do not line all six flowers into perfectly straight columns. A slight inward rotation follows the botanical geometry visible in the reference.
Positioning the Twelve Leaves
Each small flower receives two pointed coral leaves.
Place one leaf above and one below the flower.
Angle each leaf approximately 30–45 degrees away from the runner’s center line.
Six flowers × two leaves gives the required 12 leaves.
Sew through the leaf base and approximately the lower 2.5–3 cm of its center ridge.
Leave the pointed half free.
Joining the Two Central Medallions
Pin the two large coral circles with approximately 1–2 cm of edge overlap.
Using matching coral yarn, sew through three adjacent scallops on each medallion.
Add a second line of concealed stitches approximately 2 cm farther inward.
The join must remain flat because this is the principal structural connection through the middle of the runner.
Joining Side Flowers to the Medallions
Attach every small flower at three points: its inner petal base, its upper leaf base, and its lower leaf base.
Where a gap remains larger than approximately 2 cm, insert one small joining ring.
Sew the ring to both neighboring components at two points each.
This keeps the construction open while preventing isolated motifs from rotating during use.
Connecting the Solid End Medallions
Position one orange disc above and one below the central floral section.
Place the nearest leaf pair so its tips overlap the raspberry scalloped edge by approximately 1 cm.
Sew the two leaf tips to separate scallops.
Add one small joining ring between the orange disc and the nearest flower if the measured gap exceeds 2 cm.
Repeat at the opposite end.
Optional Decorative Edge Picots
If the orange end circles need a stronger raspberry outline, join raspberry at any scallop.
Work:
*Sl st in shell center, ch 3, sl st into first chain, sl st to next shell center*.
Repeat around.
Fasten off.
This adds definition without materially increasing the disc diameter.
Blocking Sequence
Block components before joining rather than trying to correct the complete runner afterward.
First block the two solid discs to matching diameters.
Next pin the two lace medallions to the same measurement.
Shape all twelve leaves to matching lengths.
Finally block the six small flowers and two large flowers without flattening their upper petal layers.
After assembly, perform only a light final block of the joins and exposed lace.
Assembly
- Crochet the two solid burnt-orange end medallions, add their raspberry scallops, and block both pieces to exactly the same diameter before proceeding.
- Make two coral openwork medallions and block them to approximately 25–27 cm, correcting individual shell positions while the cotton is damp.
- Crochet two large layered center flowers, six smaller side flowers, and all gold centers, then shape their petals without pressing the dimensional layers flat.
- Make 12 pointed coral leaves, add the optional interior surface-crochet outlines, and block every leaf to a matching center axis.
- Lay the four principal circles on a measured center line, placing the two lace medallions in the middle and one solid orange disc at each end.
- Sew the two central lace medallions together first, then attach one large layered flower to the center of each medallion at six or more concealed points.
- Arrange the six small flowers as three opposing pairs and place exactly two leaves around each flower, angling their tips away from the runner center.
- Join each small floral unit to neighboring medallions at three structural points, inserting small crocheted rings only where an open gap exceeds approximately 2 cm.
- Attach the two orange end medallions through the nearest leaves and connector rings, then check that the entire runner remains centered and approximately 120–130 cm long.
- Weave each tail through at least 5 cm of matching crochet, lightly block the assembled joins, and reshape every raised flower petal after the runner has dried.
The completed reconstruction contains four principal circular motifs, eight layered flowers, twelve pointed leaves, and open joining spaces rather than a continuous rectangular foundation.
7 Technical Tips
- The large medallions produce a curved runner: block both coral circles to within approximately 5 mm of the same diameter before joining. A 1 cm diameter difference is enough to shift the center line over multiple motif connections.
- The circular discs become wavy: check the fabric after every increase round rather than adding another round automatically. Rippling indicates excessive circumference for the current gauge, while cupping indicates insufficient circumference.
- The leaves curl into tubes: keep the decorative center slip stitches loose and stop approximately 1 cm before the pointed tip. A shortened center ridge pulls both long edges inward.
- The small flowers rotate during handling: attach each floral unit at three structural points rather than one central stitch. Three connections form a stable triangle and prevent the flower from twisting between medallions.
- The raised center flowers collapse: sew only through the center and lower 1–2 cm of selected outer petals. Stitching the complete petal perimeter to the medallion removes the dimensional layer visible in the reference.
- The runner finishes longer than the table: dry-lay all four principal circles before attaching the side flowers. Keep the reconstruction within the 120–130 cm target by reducing connector gaps rather than compressing the medallions.
- The end circles refuse to lie flat after edging: measure them before and after the raspberry scallop round. An increase greater than approximately 1.5 cm in radius usually means the shell edging contains too much fabric for the foundation circumference.
Why Circular Motifs Fit This Photograph
The design is not a conventional rectangle disguised by decoration. Its outline expands and contracts around individual medallions, flowers, and leaves. Constructing those pieces independently therefore reproduces the visible geometry more accurately than crocheting a rectangular base and sewing appliqués over it.
Separate circles also simplify scale control. If a medallion finishes 1 cm too large, it can be reblocked or its final round revised before that error affects the full runner.
The method resembles published modular floral runners in principle, although the round counts, flower construction, leaf structure, colors, and assembly above are an original photo-inspired reconstruction.
Published Floral Runner Benchmarks
Raine Eimre’s Floral Table Runner uses Golo Mercerized Cotton 20, a 1.75 mm hook, and approximately 250 yards / 229 m. Its published finished dimensions are approximately 8 inches wide × 31 inches long, with a gauge of seven lace repeats across eight inches.
Helda Panagary’s Floral Table Runner is specifically described as modular and motif-based. It uses sport-weight Yarn and Colors Must Have, a 100% cotton yarn with approximately 137 yards per 50 g, and a 2.5 mm hook. Those specifications support cotton as an appropriate fiber for crisp joined floral motifs while showing that finer published runners can use substantially smaller hooks than this photo reconstruction.
Published Leaf Benchmark
Uma M Natarajan’s Crochet Leaf Applique lists worsted yarn, a 3.5 mm hook, and 5–7 yards. Its published gauge is four stitches and four rows per inch.
The 3.5 mm hook is particularly relevant here because the photographed leaves have compact edges rather than loose, draping fabric. The exact 14-chain leaf above is nevertheless a separate reconstruction designed around the pointed motifs visible in the supplied image.
Changing the Runner Length
The modular structure makes length adjustment possible before permanent joining.
For a shorter runner, remove one coral lace medallion and its large center flower. Reposition two pairs of small flowers between the remaining central medallion and the end discs.
For a longer runner, add one additional coral medallion, one large center flower, two small flowers, and four leaves. Block the new medallion to the exact diameter of the existing pair before assembly.
Changing the Color Palette
The reference relies on closely related warm colors rather than strong complementary contrast. Burnt orange occupies the solid end discs, coral controls the lace and leaves, raspberry defines flower interiors and scallops, and yellow is restricted to small centers.
For a cooler version, the same value structure can be translated to navy, denim blue, plum, and pale gold. Keep the darkest shade concentrated in smaller areas so the open lace remains visually dominant.
Making the Runner Flatter
Omit the orange outer petal layer from the six small flowers.
For the two central flowers, retain both layers but sew the lower third of each outer petal to the lace medallion.
This modification reduces snagging and creates a flatter surface for serving dishes while preserving the circular composition.
Making a Wider Version
Do not enlarge every circle independently. Instead, increase only the two central lace medallions and lengthen the leaves proportionally.
An additional mathematically consistent dc increase round can add diameter to a solid circle, but the openwork medallions require their lace spacing to be recalculated as well.
Make one enlarged test medallion first and block it before committing yarn to the second.
Yarn Planning by Weight
Crochet one solid disc, one lace medallion, one large flower, one small flower, and one leaf before buying supplemental yarn.
Weigh each finished component on a gram scale.
Multiply the measured leaf weight by 12 and the small-flower weight by six. Double the weights of the solid disc, lace medallion, and large flower.
Add approximately 15% for joining, connector rings, tails, gauge variation, and replacement motifs. This sample-based calculation is more reliable than transferring yardage from a fine-thread runner to a DK or light-worsted reconstruction.
Competition Gap
Published floral table runners commonly use continuous lace stitch patterns, rectangular foundations, or repeated identical motifs. Raine Eimre’s runner, for example, uses a repeating lace star-flower stitch, while Helda Panagary’s design is modular and motif based. Current marketplace designs also feature circular medallions with flowers and leaves.
The supplied image combines several less-uniform elements in one piece: solid circular end caps, open lace center medallions, dimensional center flowers, smaller transition flowers, paired leaves, and irregular negative spaces. Treating those as separate component families is therefore more useful than forcing every section into one repeated motif.
Care and Storage
Follow the care instructions for the selected cotton yarn. Support the complete runner when wet because the joined construction places more stress on small connecting points than a continuous rectangle.
Dry flat. Pin the four principal circles first, then correct the positions of the flowers and leaves.
For storage, roll the runner loosely rather than folding through the two large dimensional center flowers. Place acid-free tissue over the raised petals if the piece will remain stored for an extended period.
Sources
Ravelry — Floral Table Runner by Raine Eimre — mercerized cotton thread, 1.75 mm hook, 250 yards, seven repeats per eight inches, and approximately 8 × 31 inch finished dimensions.
Ravelry — Floral Table Runner by Helda Panagary — modular motif construction using sport-weight 100% cotton and a 2.5 mm hook.
Ravelry — Crochet Leaf Applique by Uma M Natarajan — worsted yarn, 3.5 mm hook, 5–7 yards, and a published four-stitch/four-row per inch gauge.
Ravelry — Table Runner Centerpiece by ThePoshCrochet — customizable Irish-crochet floral runner using motifs, thread, and a 1.5 mm hook.
Ravelry — Floral Table Runner Pattern Details — additional published specifications for Raine Eimre’s flower-stitch runner.
Mayer Crochet — Crochet Flower Table Runner Tutorial — 2026 tutorial covering floral motif joining and length adjustment.
Crochet by Glau — Crochet Flower Table Runner Tutorial — 2026 floral-runner tutorial using fine yarn and a 1.25–1.50 mm hook.
Conclusion
The four circular motifs establish the measurements, so block those components before committing to any permanent joins. Match the two coral medallions within 5 mm, position the six small flowers as three pairs, and use exactly two leaves around each transition flower. The next practical step is to crochet one solid orange disc and one coral lace medallion, then compare their blocked diameters against the 20–22 cm and 25–27 cm reconstruction targets. Save this orange floral crochet table runner pattern to Pinterest or share the completed runner on Instagram with #OrangeFloralRunner. Would you keep the photographed coral leaves or substitute contrasting olive-green leaves? “`0









