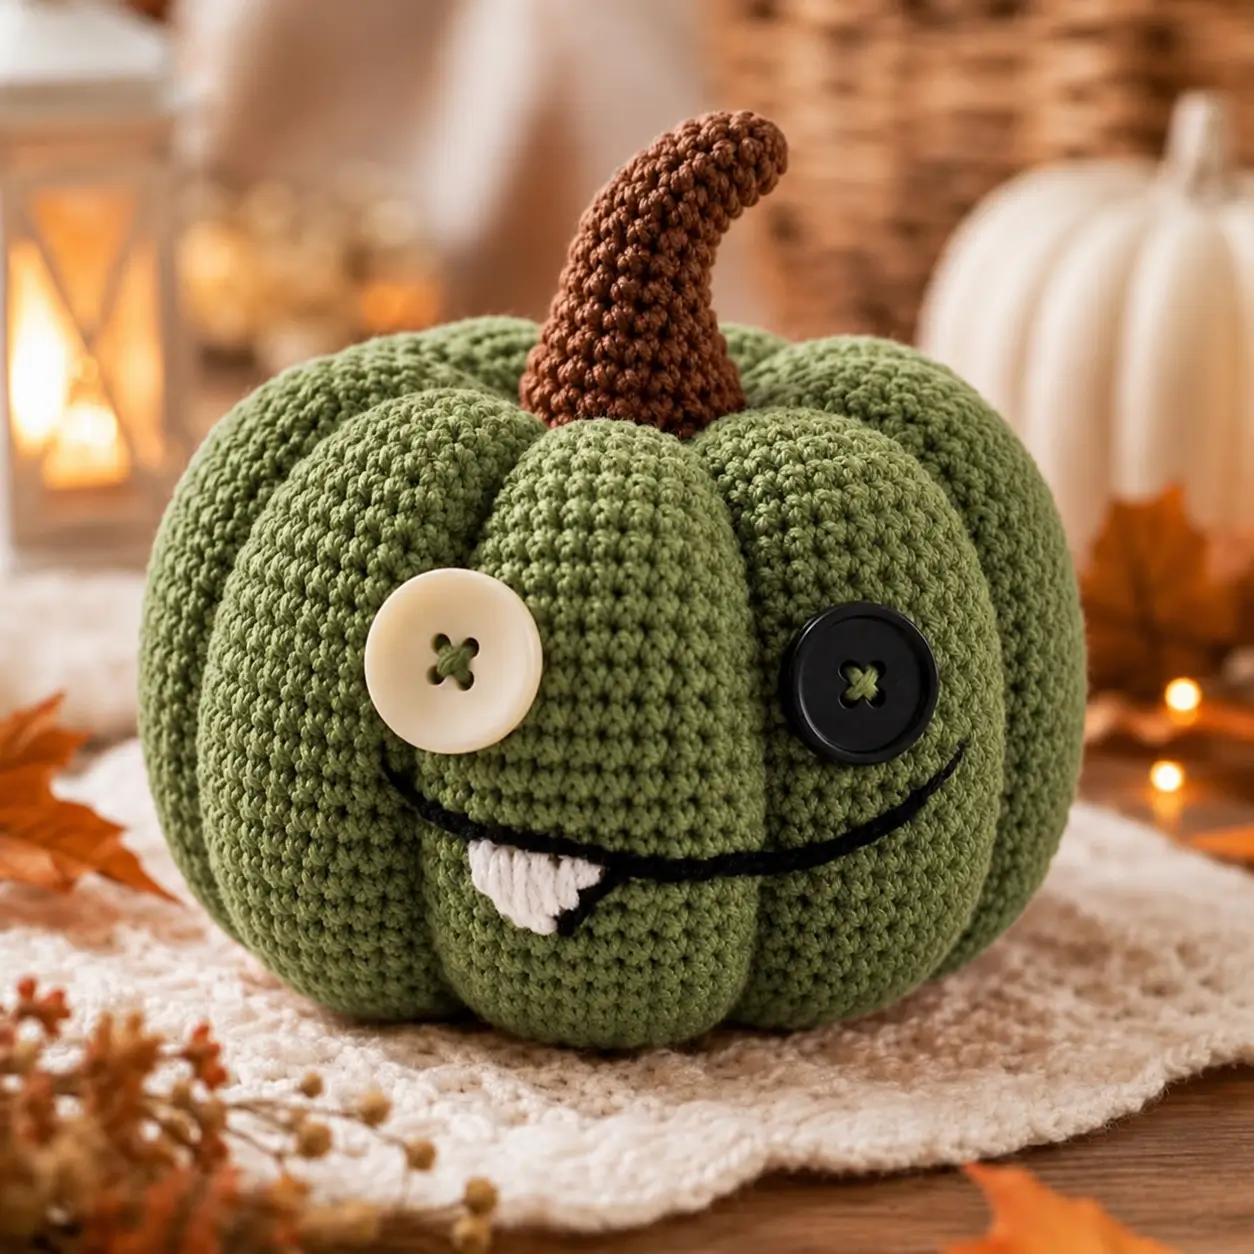
One cream button and one black button turn this green pumpkin into a deliberately mismatched character, so the face has to sit across the ribs without disappearing into them. This green crochet pumpkin amigurumi pattern uses worsted yarn, a 3.5 mm hook, eight shaped segments, a curved brown stem, embroidered smile, and one small tooth. The finished pumpkin targets approximately 15–17 cm wide and works as decorative fall or Halloween crochet.
The Design: What Makes This Pumpkin Different
The pumpkin body is crocheted as one stuffed sphere and shaped afterward into eight pronounced ribs. That method matters because the facial features need broad vertical sections rather than a heavily textured rib stitch beneath them.
The mismatched button eyes provide the defining feature of this cute pumpkin amigurumi. One oversized cream button and one smaller black button deliberately break facial symmetry, while the curved mouth follows the lower contour of the central ribs.
A tapered brown stem adds height without competing with the face. Published pumpkin patterns also use external shaping strands to create eight sections, while in-the-round amigurumi versions commonly rely on tight single crochet and later cinching. A common failure is overstuffing: a rigid pumpkin resists the shaping strands and produces shallow grooves instead of rounded lobes.
Project Info at a Glance
| Skill Level | Time | Finished Size | Hook | Best For |
|---|---|---|---|---|
| Intermediate | 4–6 hours | Approx. 15–17 cm wide | 3.5 mm | Fall shelves, Halloween displays and handmade décor |
The size above is a photo-inspired target. Published pumpkin amigurumi varies considerably: examples range from approximately 9 × 13 cm with a 3.5 mm hook to 13 × 15 cm using bulky yarn and an 8 mm hook. Final dimensions depend on yarn, hook, stuffing and shaping tension.
Materials and Tools
Yarn
- Olive green: worsted/Aran weight yarn — approximately 70–90 g
- Medium brown: worsted/Aran weight yarn — approximately 15–20 g
- Black: small quantity for the embroidered mouth
- Ivory: small quantity for the tooth
- Green sewing yarn: approximately 3–4 m for pumpkin segmentation
Published amigurumi pumpkin patterns commonly use DK through Aran yarn with hooks around 2.5–4 mm. A 3.5 mm hook with worsted yarn is appropriate here because the fabric needs to remain tight enough that stuffing does not show through the single crochet stitches.
Tools
- 3.5 mm crochet hook
- Polyester fiberfill — approximately 80–110 g
- Long doll or upholstery needle
- Tapestry needle
- Stitch marker
- Scissors
- Cream four-hole button: approximately 28–32 mm
- Black four-hole button: approximately 24–28 mm
Safety note: buttons are detachable small parts. This version is intended as decorative crochet, not as a toy for babies or young children. For a child-safe adaptation, replace both buttons with embroidered eyes.
Abbreviations
- MR — magic ring
- sc — single crochet
- inc — increase
- dec — invisible decrease
- sl st — slip stitch
- ch — chain
- BLO — back loop only
- FLO — front loop only
- sts — stitches
For an invisible decrease, insert the hook through the front loops of the next two stitches and complete one single crochet through both loops; this reduces the gaps that ordinary decreases can create in stuffed amigurumi.
Green Crochet Pumpkin Amigurumi Pattern
Work the body in a continuous spiral unless stated otherwise. Place a marker in the first stitch of every round and move it upward as the work progresses.
Pumpkin Body
Yarn: olive green.
R1: 6 sc in MR. (6)
R2: Inc ×6. (12)
R3: (1 sc, inc) ×6. (18)
R4: (2 sc, inc) ×6. (24)
R5: (3 sc, inc) ×6. (30)
R6: (4 sc, inc) ×6. (36)
R7: (5 sc, inc) ×6. (42)
R8: Sc around. (42)
R9: Sc around. (42)
R10: Sc around. (42)
R11: Sc around. (42)
R12: Sc around. (42)
R13: Sc around. (42)
R14: Sc around. (42)
R15: Sc around. (42)
R16: Sc around. (42)
R17: Sc around. (42)
R18: Sc around. (42)
R19: Sc around. (42)
R20: (5 sc, dec) ×6. (36)
R21: (4 sc, dec) ×6. (30)
R22: (3 sc, dec) ×6. (24)
Begin stuffing. Fill the outer circumference first, then add stuffing toward the center. Keep the body firm enough to hold its shape but compressible enough for segmentation.
R23: (2 sc, dec) ×6. (18)
R24: (1 sc, dec) ×6. (12)
Add the final stuffing before the opening becomes too small. Check that the body remains evenly rounded.
R25: Dec ×6. (6)
Fasten off with a 30 cm tail. Thread through the six remaining front loops and pull the opening closed.
Shaping the Eight Pumpkin Ribs
Cut approximately 250 cm of strong green yarn and thread it onto a long needle.
Insert the needle through the bottom center and bring it out at the top center.
Take the yarn down the outside of the pumpkin and insert the needle through the bottom center again. Bring it back through the top.
Pull until the yarn begins forming a visible groove.
Repeat around the pumpkin until eight approximately equal segments have been marked.
Do not fully tighten the first groove while the remaining seven are loose. Establish all eight ribs at moderate tension first.
Make a second pass around the pumpkin, tightening each segment gradually. Published crochet-pumpkin instructions also use quarter divisions followed by splitting each quarter to create eight sections.
When the grooves are balanced, secure the shaping yarn at the bottom and bury the tail inside the stuffed body.
Curved Brown Stem
Yarn: medium brown.
R1: 6 sc in MR. (6)
R2: Inc ×6. (12)
R3: BLO sc around. (12)
R4: Sc around. (12)
R5: Sc around. (12)
R6: 8 sc, 4 sl st. (12)
R7: 8 sc, 4 sl st. (12)
R8: Sc around. (12)
R9: 7 sc, 5 sl st. (12)
R10: 7 sc, 5 sl st. (12)
R11: Sc around. (12)
R12: (1 sc, dec) ×4. (8)
R13: 5 sc, 3 sl st. (8)
R14: 5 sc, 3 sl st. (8)
R15: Sc around. (8)
R16: Dec ×4. (4)
Fasten off and close the top.
Stuff the lower half lightly. Leave the upper portion almost unstuffed so the stem can curve without developing a hard angle.
Leave a 30 cm yarn tail at the base for sewing.
Cream Button Eye
Place the larger cream button on the upper-left area of the face.
Position its center approximately 2–3 cm left of the pumpkin’s vertical center line. The button should sit predominantly on one rib rather than directly inside a deep groove.
Thread a long needle with green yarn and pass through the pumpkin, then through two opposite button holes.
Repeat through the other pair of holes to create the visible green cross stitch.
Pass through the body at least three times before securing the yarn.
Black Button Eye
Position the smaller black button on the upper-right side.
Place it slightly lower than the cream eye to reproduce the intentionally uneven expression.
Sew through the four holes with green yarn, creating another visible cross.
Check both eyes from the front before tying the final knot. The spacing should leave one central pumpkin rib visible between them.
Embroidered Curved Smile
Yarn: black.
Cut approximately 60 cm of black yarn.
Insert the needle from the back or bottom of the pumpkin and bring it out approximately 2 cm below the cream eye.
Create a long shallow stitch toward the center of the face.
Make a second stitch from the center toward the area below the black eye.
Add two or three tiny anchoring stitches along the long black line. These couching stitches hold the smile against the rounded pumpkin surface without making the mouth look segmented.
The lowest point of the smile should sit approximately 2–3 cm below the eye line.
Secure the yarn and bury both ends inside the pumpkin.
Single White Tooth
Yarn: ivory.
Ch 4.
Row 1: Starting in second ch from hook, sc in next 3 sts. (3)
Row 2: Ch 1, dec, sc. (2)
Row 3: Ch 1, dec. (1)
Fasten off with a 15 cm tail.
Position the wide edge immediately beneath the left half of the embroidered smile. Sew the top edge behind the black mouth line so the pointed portion hangs downward.
Alternative Embroidered Eyes
Buttons create the distinctive photographed face, but they are not required for the pumpkin construction.
For a version intended around children, embroider one cream circular eye and one black circular eye using yarn.
Outline each circle first, then fill the center with closely packed satin-style stitches.
Add a small green cross over each embroidered eye to retain the button-inspired appearance.
This substitution removes hard detachable components while preserving the asymmetrical expression.
Getting the Pumpkin Proportions Right
The body should be wider than it is tall before the stem is attached. Aim for approximately 15–17 cm across and 11–13 cm from base to pumpkin top after segmentation.
The brown stem can add approximately 8–10 cm of visual height.
Do not increase the body height simply by adding many extra plateau rounds. A tall sphere becomes difficult to compress into the low pumpkin profile visible in the photograph.
If additional width is required, change yarn weight or hook size while maintaining tight amigurumi fabric.
How to Position the Face Across the Ribs
Complete all eight shaping grooves before attaching the eyes or mouth.
Rotate the pumpkin until three broad ribs face forward. The middle rib forms the nose area even though no nose is added.
Position the cream button mainly over the left rib and the black button mainly over the right rib.
The smile can cross the center groove because its embroidered line is flexible. Avoid positioning a button directly over a groove; the rigid button will bridge the depression and can rock away from the fabric.
Pin or temporarily tie both buttons in place before sewing them permanently.
Making a More Pronounced Stem Curve
The stem bends because selected rounds combine single crochet with shorter slip stitches.
Keep the slip-stitch sections aligned on the inside of the intended curve.
For a stronger bend, replace one additional single crochet with a slip stitch on Rounds 9, 10, 13 and 14.
For a straighter stem, work single crochet around instead.
Published pumpkin stem patterns also use uneven decreases and increases to introduce a bend, confirming that asymmetric stitch shaping is an effective alternative to inserting wire.
Adjusting the Pumpkin Size
The 42-stitch plateau creates the large version used for this photo-inspired pattern.
For a small pumpkin, stop increasing at 30 stitches:
6 → 12 → 18 → 24 → 30.
Work approximately seven straight rounds before reversing the increase sequence with decreases.
For a medium pumpkin, stop at 36 stitches:
6 → 12 → 18 → 24 → 30 → 36.
Work approximately nine straight rounds.
For the large version, continue to 42 stitches:
6 → 12 → 18 → 24 → 30 → 36 → 42.
Keep the eight-segment shaping method for all three sizes.
Assembly
- Crochet the green body through R25, stuffing the outer circumference evenly before closing the final six stitches.
- Use strong green yarn to divide the stuffed body into eight equal segments, tightening all grooves gradually.
- Crochet the brown stem, stuff only its lower portion, shape the curve, and sew the broad base firmly to the top center.
- Rotate the completed pumpkin until three broad ribs form a balanced front-facing area for the character’s face.
- Position the cream button on the upper-left rib and secure it with several passes of green yarn.
- Attach the smaller black button on the upper-right rib, placing it slightly lower than the cream eye.
- Embroider the black curved smile across the lower face and secure the long stitches with small hidden couching stitches.
- Crochet the single ivory tooth and sew its broad edge behind the left portion of the smile.
- Inspect all eight shaping grooves and tighten any segment that became shallower while the face was attached.
- Bury every yarn tail inside the stuffed body, flatten the base by hand, and adjust the stem until the pumpkin stands without rocking.
The finished character should have eight rounded green segments, one tall curved brown stem, two deliberately mismatched eyes, a shallow black smile and one visible ivory tooth.
7 Technical Tips for This Pumpkin Amigurumi
- Keep the 42-stitch plateau consistent. An accidental increase during R8–R19 creates an oversized section that becomes obvious after segmentation. Count every second plateau round even when the spiral appears correct.
- Stop stuffing before the body becomes rigid. The finished sphere should compress approximately 2–3 cm under firm hand pressure. A harder body resists the external shaping strands and produces shallow ribs.
- Mark eight divisions before tightening. Uneven shaping positions create narrow and wide lobes that cannot be corrected by stuffing alone. Temporary markers around the circumference provide a useful spacing guide.
- Attach the eyes after segmentation. A button sewn before cinching can move into a groove when the body changes shape. Finish all eight ribs first, then select the final front of the pumpkin.
- Keep the button centers off the deepest grooves. A rigid 25–30 mm button cannot conform to a recessed channel. Center each eye on the broadest area of its selected pumpkin segment.
- Stuff only the lower half of the stem. Firm stuffing through the final 4–5 cm prevents the crocheted stalk from maintaining its curve. The upper section should remain flexible.
- Anchor the mouth every 15–20 mm. One unanchored long yarn strand can lift away from the rounded face. Small couching stitches keep the smile following the pumpkin surface.
Yarn and Hook Selection
Worsted yarn is a practical choice when the goal is a defined amigurumi surface rather than a plush chenille pumpkin. Ravelry lists a pumpkin amigurumi by Hooked by Robin using Aran-weight yarn with a 4 mm hook, while another published pumpkin amigurumi uses DK yarn and a 2.5 mm hook. The required hook therefore depends heavily on the selected yarn.
A separate no-sew pumpkin guide recommends 3 mm for DK and 3.5 mm for Aran, with the hook kept smaller than normal when necessary to prevent stuffing gaps.
For this version, begin with 3.5 mm. If stuffing remains visible between stitches, move down to 3.25 or 3 mm rather than tightening every stitch excessively.
Stuffing for Deep Pumpkin Segments
Distribute fiberfill around the sides before filling the center. This supports each future lobe while leaving the middle compressible.
Push small amounts into the lower perimeter first. Continue around the upper perimeter, then fill the central cavity.
Do not leave hard lumps directly beneath the facial area. Buttons exaggerate surface irregularities because their flat backs sit against the curved crochet.
After R24, squeeze the body from top to bottom. It should become slightly flatter without collapsing.
Once the final round is closed, massage the stuffing into an even sphere before adding the shaping yarn.
Color Variations
Olive green creates the muted autumn character shown in the photograph, but the same construction supports several palettes.
Burnt orange with a dark-brown stem produces a conventional pumpkin. Mustard with chocolate details gives the character a warmer vintage palette. Cream with a tan stem emphasizes the mismatched eyes, while charcoal with an orange stem creates a stronger Halloween version.
Keep the shaping yarn close to the body color. A contrasting segmentation strand remains visible inside the grooves and changes the appearance of the ribs.
The cream-and-black eye combination can remain unchanged across every body color because the intentional mismatch is the main facial feature.
Finishing and Display
Set the finished pumpkin on a flat surface and press the lower center upward slightly. This redistributes stuffing toward the outer lobes and creates a broader base.
Check the stem from the front and side. Its curve should begin above the pumpkin rather than leaning from a loose attachment seam.
Inspect both buttons by pulling them gently away from the surface. Decorative pieces that move noticeably need additional stitches before display.
Run a finger beneath the embroidered smile and confirm that no long section lifts away from the crochet.
Store the pumpkin without weight on the stem. If the ribs flatten during storage, reshape the body by hand and redistribute the stuffing before display.
Conclusion
This character combines a 42-stitch green body, eight externally shaped pumpkin ribs, a curved brown stem, mismatched button eyes, embroidered smile and one small ivory tooth. Complete the segmentation before deciding where the face belongs; the final grooves determine which three ribs provide the cleanest front surface. The practical next step is to crochet and stuff the body, then test the 15–17 cm target before making the stem. Save this green crochet pumpkin amigurumi pattern to Pinterest or share the completed version on Instagram with #ButtonEyePumpkin. For this exact character, would you keep the single tooth on the left or move it beneath the black button eye? “`0









