Introduction
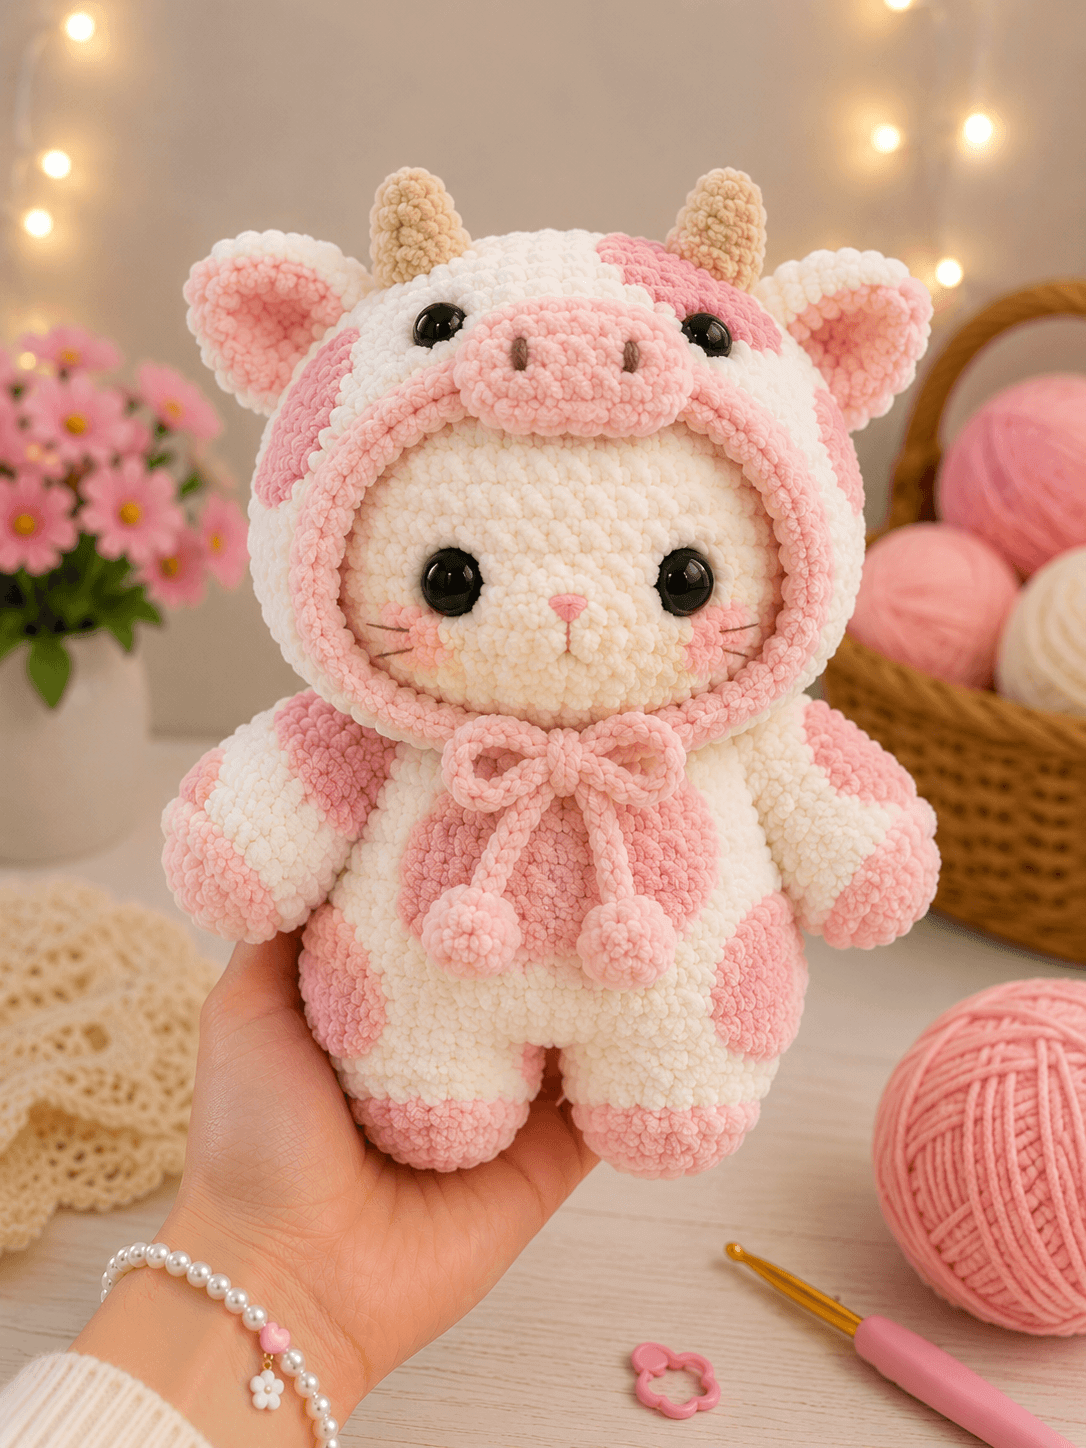
A kitten inside a cow hood needs two readable faces without letting the upper muzzle obscure the cat’s eyes. This cat in cow costume amigurumi pattern uses super-bulky chenille, a 4.5 mm hook and two eye sizes to make a sitting plush approximately 24 cm tall. The intermediate project includes a separate cat, fitted hood, horns, ears, costume patches and pompom-ended neck ties.
The Design: What Makes the Costume Construction Different
The cat and costume are built as separate structures rather than one color-changed body. That decision keeps the cream kitten face clean while allowing the hood opening to form a raised pink frame. A 36-stitch cat head sits inside a wider 48-stitch hood crown, leaving enough fabric for the cow muzzle, eyes, ears and horns without compressing the inner face. The body also reaches 36 stitches, but shorter plateau rounds produce the compact proportions required for a plush costume cat. Raised pink patches are sewn onto the torso and limbs instead of created with mid-round color changes. Their edges remain more visible in chenille. The main failure point is a hood opening that stretches downward and covers the cheeks. This cow hood cat crochet pattern controls that opening with a final 42-stitch edging round and four anchoring points at the crown, chin and both sides.
Project Info at a Glance
| Skill Level | Time | Finished Size | Hook | Best For |
|---|---|---|---|---|
| Intermediate | 10–14 hours | Approximately 24 cm sitting | 4.5 mm | Display, collections and supervised play |
Materials and Tools
Yarn
- Cream — super-bulky chenille, weight 6 — approximately 180–210 g — use for the cat, hood crown, outer ears and costume base.
- Blush pink — super-bulky chenille, weight 6 — approximately 70–90 g — use for the hood border, cow muzzle, inner ears, patches, paws, cheeks and ties.
- Tan — super-bulky chenille, weight 6 — approximately 10–15 g — use for both horns.
- Brown — smooth cotton or embroidery yarn — less than 1 g — use for cow nostrils.
- Dark pink — smooth cotton yarn — less than 1 g — use for the cat nose and mouth.
- Black — embroidery yarn — less than 1 g — use for whiskers.
Tools
- 4.5 mm crochet hook
- Two 18 mm black safety eyes for the cat
- Two 14–16 mm black safety eyes for the cow hood
- Polyester stuffing, approximately 180–220 g
- Large-eye yarn needle
- Locking stitch markers
- Rust-resistant pins
- Flexible measuring tape
- Scissors
Replace all plastic eyes with tightly embroidered features when the finished plush will be given to a child under three.
Abbreviations
- MR — magic ring
- sc — single crochet
- inc — two single crochets in one stitch
- dec — single-crochet decrease
- sl st — slip stitch
- ch — chain
- BLO — back loop only
- FLO — front loop only
- hdc — half double crochet
Work an invisible decrease through the front loops of the next two stitches so the reduced round does not expose the stuffing.
Pattern — Step by Step
Work in continuous spirals unless a section is identified as a row. Mark the first stitch of every round.
Cat Head
Yarn: cream — original shaping based on standard six-stitch amigurumi math.
R1: 6 sc in MR (6)
R2: inc ×6 (12)
R3: (1 sc, inc) ×6 (18)
R4: (2 sc, inc) ×6 (24)
R5: (3 sc, inc) ×6 (30)
R6: (4 sc, inc) ×6 (36)
R7–R12: sc around (36)
Insert the 18 mm eyes between R9 and R10 with approximately seven visible stitches between their inner edges.
R13: (4 sc, dec) ×6 (30)
R14: (3 sc, dec) ×6 (24)
R15: (2 sc, dec) ×6 (18)
Stuff firmly around the eye posts. Shape the cheeks outward while keeping the center of the muzzle moderately soft.
R16: (1 sc, dec) ×6 (12)
R17: dec ×6 (6)
Fasten off. Leave a 15 cm tail and close the opening through the remaining front loops.
Cat Muzzle
Yarn: cream.
R1: 6 sc in MR (6)
R2: inc ×6 (12)
R3: (1 sc, inc) ×6 (18)
R4: sc around (18)
R5: (1 sc, dec) ×6 (12)
Add a thin layer of stuffing. Embroider a pink triangular nose at the center and one short vertical mouth line below it.
Fasten off. Leave a 25 cm sewing tail.
Cat Cheek Patches — Make Two
Yarn: blush pink.
R1: 6 sc in MR (6)
R2: inc ×6 (12)
Fasten off. Leave a 15 cm tail. Keep each patch flat.
Body
Yarn: cream.
R1: 6 sc in MR (6)
R2: inc ×6 (12)
R3: (1 sc, inc) ×6 (18)
R4: (2 sc, inc) ×6 (24)
R5: (3 sc, inc) ×6 (30)
R6: (4 sc, inc) ×6 (36)
R7–R11: sc around (36)
R12: (4 sc, dec) ×6 (30)
R13–R14: sc around (30)
R15: (3 sc, dec) ×6 (24)
R16: sc around (24)
R17: (2 sc, dec) ×6 (18)
Stuff the lower body firmly and maintain a rounded front. Add smaller pieces near the neck.
R18: (1 sc, dec) ×6 (12)
Fasten off. Leave a 35 cm tail for assembly.
Arms — Make Two
Yarn: begin with blush pink and change to cream.
R1: 6 sc in MR (6)
R2: inc ×6 (12)
R3: (1 sc, inc) ×6 (18)
R4–R5: sc around (18)
R6: change to cream, (1 sc, dec) ×6 (12)
R7–R10: sc around (12)
Stuff the pink paw firmly and the upper arm lightly.
R11: (2 sc, dec) ×3 (9)
Flatten and crochet 4 sc through both layers.
Fasten off. Leave a 25 cm sewing tail.
Legs — Make Two
Yarn: begin with blush pink and change to cream.
R1: 6 sc in MR (6)
R2: inc ×6 (12)
R3: (1 sc, inc) ×6 (18)
R4: (2 sc, inc) ×6 (24)
R5: sc around in BLO (24)
R6: sc around (24)
R7: change to cream, (2 sc, dec) ×6 (18)
R8–R10: sc around (18)
R11: (1 sc, dec) ×6 (12)
R12–R13: sc around (12)
Fill the foot firmly and leave the upper two rounds flexible for seated positioning.
Flatten and crochet 6 sc through both layers.
Fasten off. Leave a 30 cm sewing tail.
Hood Crown
Yarn: cream. Work from the top of the cow head downward.
R1: 6 sc in MR (6)
R2: inc ×6 (12)
R3: (1 sc, inc) ×6 (18)
R4: (2 sc, inc) ×6 (24)
R5: (3 sc, inc) ×6 (30)
R6: (4 sc, inc) ×6 (36)
R7: (5 sc, inc) ×6 (42)
R8: (6 sc, inc) ×6 (48)
R9–R13: sc around (48)
R14: 33 sc, ch 27, skip 27 stitches, join with sl st to the first stitch of the round.
The skipped section forms the face opening. Confirm that the cat’s eyes, muzzle and cheeks remain visible before continuing.
R15: sc in each of the 33 crown stitches and 27 sc across the chain (60)
R16: sc around (60)
R17: (8 sc, dec) ×6 (54)
R18: (7 sc, dec) ×6 (48)
R19: (6 sc, dec) ×6 (42)
Fasten off. Leave a 35 cm tail for attaching the lower back edge to the costume body.
Pink Hood Edging
Yarn: blush pink.
Join the yarn at the center bottom of the face opening.
R1: work 42 sc evenly around the opening (42)
R2: sc around (42)
Fasten off. Leave a 20 cm tail for securing the lower center.
Cow Muzzle
Yarn: blush pink.
R1: 6 sc in MR (6)
R2: inc ×6 (12)
R3: (1 sc, inc) ×6 (18)
R4: (2 sc, inc) ×6 (24)
R5–R6: sc around (24)
R7: (2 sc, dec) ×6 (18)
Stuff lightly and embroider two brown vertical nostrils four stitches apart.
Fasten off. Leave a 30 cm sewing tail.
Cow Outer Ears — Make Two
Yarn: cream.
R1: 6 sc in MR (6)
R2: inc ×6 (12)
R3: (1 sc, inc) ×6 (18)
R4: (2 sc, inc) ×6 (24)
R5: sc around (24)
Fasten off. Leave a 25 cm tail and flatten the circle into an oval.
Cow Inner Ears — Make Two
Yarn: blush pink.
R1: 6 sc in MR (6)
R2: inc ×6 (12)
R3: (1 sc, inc) ×6 (18)
Fasten off. Leave a 20 cm tail. Sew one inner ear to each outer ear while retaining a cream border.
Horns — Make Two
Yarn: tan.
R1: 6 sc in MR (6)
R2: sc around (6)
R3: (1 sc, inc) ×3 (9)
R4–R7: sc around (9)
R8: (1 sc, dec) ×3 (6)
Insert a narrow roll of stuffing and keep the base flat.
Fasten off. Leave a 25 cm sewing tail.
Cow Forehead Patch
Yarn: blush pink.
R1: 6 sc in MR (6)
R2: inc ×6 (12)
R3: (1 sc, inc) ×6 (18)
R4: 4 sc, 2 inc, 6 sc, 2 inc, 4 sc (22)
Fasten off. Leave a 25 cm sewing tail.
Costume Patches — Make Five
Yarn: blush pink. Make one large chest patch, two shoulder patches and two side-body patches.
Small patch R1: 6 sc in MR (6)
Small patch R2: inc ×6 (12)
Small patch R3: (1 sc, inc) ×6 (18)
Fasten off after R3 for each small patch.
Large chest patch R4: (2 sc, inc) ×6 (24)
Fasten off. Leave 20–25 cm tails for sewing.
Neck Tie
Yarn: blush pink.
Ch 71, leaving a 20 cm starting tail.
Row 1: sl st in the second ch from the hook and in every chain across (70)
Fasten off with a second 20 cm tail.
Tie Pompoms — Make Two
Yarn: blush pink.
R1: 6 sc in MR (6)
R2: inc ×6 (12)
R3: sc around (12)
R4: dec ×6 (6)
Add a small amount of stuffing.
Fasten off. Leave a 15 cm tail and attach one pompom to each end of the neck tie.
Assembly
- Sew the cat head to the body with two complete passes around the 12-stitch neck opening.
- Attach the cat muzzle below the eyes, then sew the cheek circles beside it and embroider three whiskers on each side.
- Pin the legs to the lower body at matching rounds and sew them in a forward-facing seated position.
- Attach the arms to the upper sides of the torso with the pink paws angled slightly inward.
- Sew the five pink costume patches to the chest, shoulders and lower sides before fitting the hood.
- Place the hood over the cat’s head and align the pink opening equally around both eyes and cheeks.
- Anchor the hood at the crown, chin and both side points using cream yarn passed into the cat head.
- Attach the cow muzzle above the hood opening, then insert or sew the cow eyes at equal distances from its outer edges.
- Sew the horns inside the ear line, attach both ears, and place the irregular forehead patch beside one horn.
- Secure the neck tie beneath the chin, form a centered bow, attach the pompoms and weave every structural tail through three stitch directions.
The finished plush should sit without support while both cat eyes and both cow-hood eyes remain level from the front.
7 Technical Tips
- Hood-opening stretch: An opening wider than 42 stitches drops over the cat’s cheeks. Measure the vertical opening at approximately 10–11 cm before attaching the hood.
- Eye-line conflict: Low cow eyes make the upper face appear crowded. Position their lower edges at least one full round above the cow muzzle seam.
- Marker drift: A shifted round start moves the hood opening toward one ear. Count all 48 stitches at the end of every crown plateau round.
- Visible decrease gaps: Standard decreases expose stuffing through cream chenille. Work every decrease through the two front loops and keep the hook parallel to the fabric.
- Collapsed horns: Loose stuffing causes the tan horns to fold at their bases. Fill each horn with a narrow roll that stops approximately 5 mm below the sewing edge.
- Patch distortion: Pulling the sewing thread tightly makes flat circles pucker. Pin each patch at four points and stitch through only the outer loops.
- Uneven seated balance: A leg attached one round higher tilts the costume body. Measure both inner foot edges from the centerline before completing either seam.
Conclusion
Check the alignment of both faces before cutting any hood-assembly tails. The cat muzzle must remain centered inside the pink opening, while the cow muzzle should sit directly above it without touching the lower pair of eyes. Record the finished hood circumference, eye spacing and yarn brand before making a second color version. Save this cat in cow costume amigurumi pattern to a Pinterest project board and post the completed plush on Instagram with #PinkCowCostumeCat. Use the same construction with brown, lavender or black patches after testing the original fit. Would you place the irregular cow patch above the right eye or move it toward one ear?
Technical Sources
- Nicki’s Homemade Crafts: Reversible Cat Cow Squish
- Ravelry: Reversible Cat Cow Squish
- Gathered: Free Amigurumi Cat Pattern
- Etsy: Cat in a Cow Costume Pattern









