Introduction
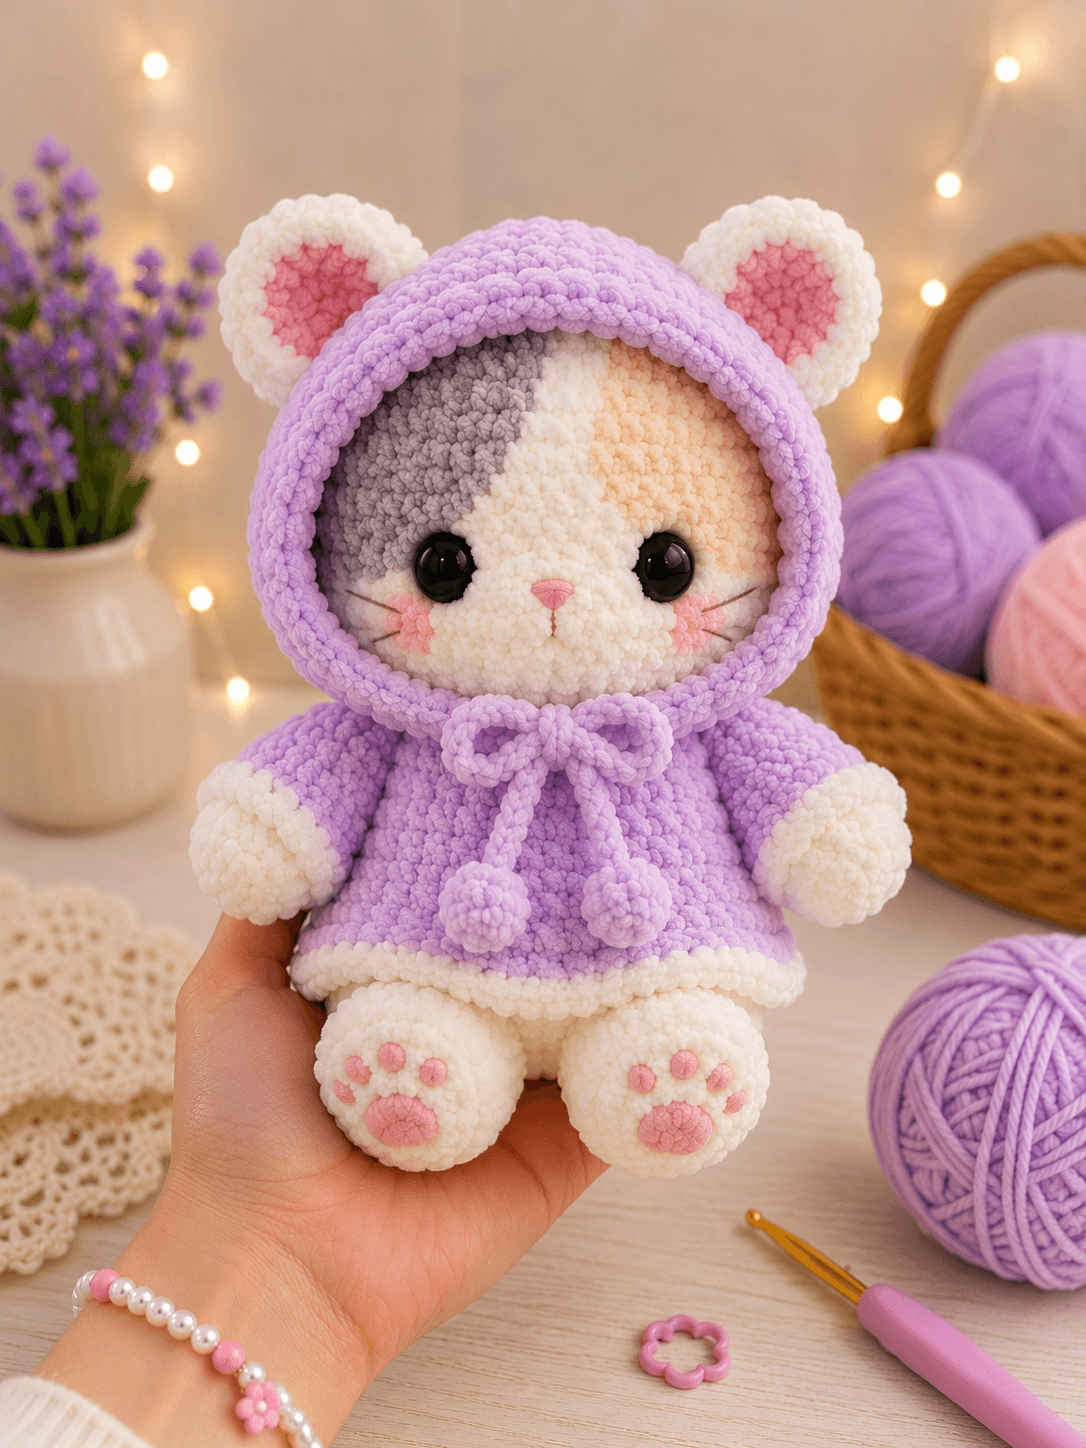
A calico kitten loses its defining face pattern when a hood covers the crown too deeply. This lavender hooded calico kitten amigurumi pattern keeps the gray and peach sections visible inside a measured circular opening. You will use super-bulky chenille, a 5 mm hook and 18 mm eyes to produce an approximately 28 cm intermediate project. Separate clothing pieces prevent the garment color from interrupting the stuffed body construction.
The Design: What Makes This Calico Kitten Different
The head expands to 42 stitches, six more than the body, because the photographed figure depends on a broad face and compact seated torso. Gray and peach sections are worked directly into the head rather than sewn on as flat patches. This keeps the color boundaries level with the cream fabric and avoids raised seams beneath the hood. Rounded layered ears remain outside the lavender crown, preserving the cat silhouette while allowing the hood to frame the cheeks. A flared dress covers the body join and finishes above the oversized feet. The common failure in a chenille calico cat crochet pattern is carrying unused yarn too tightly behind a color section. The resulting floats pull the head inward and create a flat temple. This velvet kitten amigurumi uses short isolated changes and loose internal floats to retain the 42-stitch circumference.
Project Info at a Glance
| Skill Level | Time | Finished Size | Hook | Best For |
|---|---|---|---|---|
| Intermediate | 10–13 hours | Approximately 28 cm | 5 mm | Display or supervised play |
Finished size is an estimate for super-bulky chenille. Gauge, yarn diameter and stuffing pressure can change the final measurement.
Materials and Tools
Yarn
- Cream white — super-bulky chenille or velvet — approximately 135 g — Himalaya Dolphin Baby, Premier Parfait Chunky or a comparable plush yarn.
- Lavender — super-bulky chenille or velvet — approximately 110 g — use the same yarn line as the cream shade.
- Medium gray — super-bulky chenille — approximately 25 g for the left facial section.
- Pale peach — super-bulky chenille — approximately 20 g for the right crown section.
- Pink — chenille scraps — approximately 12 g for the cheeks and paw pads.
- Pink embroidery yarn — DK or worsted — less than 2 g for the nose and mouth.
- Gray embroidery thread — approximately 1 m for the whiskers.
- Strong sewing yarn — cream and lavender — for structural seams.
Tools
- 5 mm crochet hook
- Two 18 mm safety eyes
- Polyester stuffing, approximately 120 g
- Large-eye yarn needle
- Embroidery needle
- Locking stitch markers
- Dressmaker pins
- Scissors
Use embroidered eyes instead of plastic components when the kitten is intended for a child younger than three or for an animal.
Abbreviations
MR — magic ring; sc — single crochet; inc — two single crochets in one stitch; dec — decrease; sl st — slip stitch; ch — chain; BLO — back loop only; FLO — front loop only; hdc — half double crochet; st/sts — stitch/stitches.
An invisible decrease is worked through the front loops of the next two stitches before completing one single crochet.
Pattern — Step by Step
Work in continuous spirals unless a section is marked as turned or joined. Move the marker into the first completed stitch of every round.
Calico Head
Yarn: cream, gray and pale peach — standard six-stitch amigurumi shaping with planned color blocks.
R1: 6 sc in MR with cream (6)
R2: inc ×6 (12)
R3: (1 sc, inc) ×6 (18)
R4: (2 sc, inc) ×6 (24)
R5: (3 sc, inc) ×6 (30)
R6: (4 sc, inc) ×6 (36)
R7: (5 sc, inc) ×6 (42)
From R8 onward, treat the first 13 stitches as the left face, the next 16 as the central cream section and the last 13 as the right face. Move color boundaries by one stitch where specified to avoid vertical stripes.
R8: 13 gray, 16 cream, 13 peach (42)
R9: 14 gray, 15 cream, 13 peach (42)
R10: 14 gray, 16 cream, 12 peach (42)
R11: 13 gray, 18 cream, 11 peach (42)
R12: 12 gray, 20 cream, 10 peach (42)
R13: 10 gray, 23 cream, 9 peach (42)
R14: 8 gray, 27 cream, 7 peach (42)
Insert the 18 mm eyes between R11 and R12. Place one eye within the gray section and the other within the cream section, leaving eight visible stitches between their inner edges.
R15: with cream, (5 sc, dec) ×6 (36)
R16: (4 sc, dec) ×6 (30)
R17: (3 sc, dec) ×6 (24)
R18: (2 sc, dec) ×6 (18)
R19: (1 sc, dec) ×6 (12)
R20: dec ×6 (6)
Stuff firmly around the eye posts. Leave the lower front slightly softer so the muzzle can settle against the face.
Fasten off. Leave a 20 cm tail and close the final six front loops.
Muzzle
Yarn: cream white.
R1: 6 sc in MR (6)
R2: inc ×6 (12)
R3: (1 sc, inc) ×6 (18)
R4: sc around (18)
Add a shallow layer of stuffing. The finished muzzle should project approximately 2 cm.
Fasten off. Leave a 30 cm sewing tail.
Body
Yarn: cream white — medium 36-stitch plateau.
R1: 6 sc in MR (6)
R2: inc ×6 (12)
R3: (1 sc, inc) ×6 (18)
R4: (2 sc, inc) ×6 (24)
R5: (3 sc, inc) ×6 (30)
R6: (4 sc, inc) ×6 (36)
R7–R11: sc around (36)
R12: (4 sc, dec) ×6 (30)
R13: sc around (30)
R14: (3 sc, dec) ×6 (24)
R15: sc around (24)
R16: (2 sc, dec) ×6 (18)
R17: sc around (18)
R18: (1 sc, dec) ×6 (12)
Fill the belly evenly. Add denser stuffing to the upper 2 cm to support the head.
Fasten off. Leave a 40 cm tail for joining the body to the head.
Arms or Front Legs — Make 2
Yarn: cream white.
R1: 6 sc in MR (6)
R2: inc ×6 (12)
R3–R5: sc around (12)
R6: (1 sc, dec) ×4 (8)
R7–R10: sc around (8)
Stuff R1–R5 only. Leave the upper half flat so it fits beneath the sleeve.
Flatten the opening and work 4 sc through both layers. Fasten off with a 25 cm tail.
Back Legs — Make 2
Yarn: cream white.
R1: 6 sc in MR (6)
R2: inc ×6 (12)
R3: (1 sc, inc) ×6 (18)
R4: (2 sc, inc) ×6 (24)
R5–R7: sc around (24)
R8: (2 sc, dec) ×6 (18)
R9: sc around (18)
R10: (1 sc, dec) ×6 (12)
R11: dec ×6 (6)
Stuff firmly toward the front to form a broad foot. Keep the back surface slightly flatter for attachment.
Fasten off. Close the opening and leave a 35 cm tail.
Outer Ears — Make 2
Yarn: cream white.
R1: 6 sc in MR (6)
R2: inc ×6 (12)
R3: (1 sc, inc) ×6 (18)
R4: (2 sc, inc) ×6 (24)
Fasten off. Leave a 30 cm sewing tail on each piece.
Inner Ears — Make 2
Yarn: pink.
R1: 6 sc in MR (6)
R2: inc ×6 (12)
R3: (1 sc, inc) ×6 (18)
Center each pink circle on one cream circle. Sew around the pink R3 so one cream round remains visible.
Fold the lower quarter of each ear inward and secure it with three stitches. Retain the cream attachment tails.
Lavender Hood
Yarn: lavender — fitted to the finished 42-stitch head.
R1: 6 sc in MR (6)
R2: inc ×6 (12)
R3: (1 sc, inc) ×6 (18)
R4: (2 sc, inc) ×6 (24)
R5: (3 sc, inc) ×6 (30)
R6: (4 sc, inc) ×6 (36)
R7: (5 sc, inc) ×6 (42)
R8–R12: sc around (42)
Stop the spiral. The next rows create the back and sides while leaving the face open.
Row 13: ch 1, turn, sc in next 34 sts (34)
Row 14: ch 1, turn, sc across (34)
Row 15: ch 1, turn, dec, 30 sc, dec (32)
Row 16: ch 1, turn, sc across (32)
Row 17: ch 1, turn, dec, 28 sc, dec (30)
Row 18: ch 1, turn, sc across (30)
Place the hood over the head. The opening should expose both eyes, all cheek pieces and the lower half of the peach crown section.
Work one round of sc around the face opening, placing two sc in each lower corner. Join with sl st. Work a second edging round in BLO. Fasten off.
Lavender Dress
Yarn: lavender — worked from the neckline downward.
R1: ch 24, join without twisting, sc around (24)
R2: (3 sc, inc) ×6 (30)
R3: (4 sc, inc) ×6 (36)
R4–R6: sc around (36)
R7: work in FLO, (5 sc, inc) ×6 (42)
R8: (6 sc, inc) ×6 (48)
R9–R11: hdc around (48)
R12: with cream, sc around (48)
Fit the dress before attaching the feet. Its cream hem should stop above the paw pads.
Fasten off and weave the tail into the inside of the garment.
Short Sleeves — Make 2
Yarn: lavender with cream cuffs.
R1: ch 12 with lavender, join without twisting, sc around (12)
R2: (1 sc, inc) ×6 (18)
R3–R4: sc around (18)
R5: change to cream, (1 sc, dec) ×6 (12)
R6: sc around (12)
Slide each sleeve over an arm before sewing the arm to the body.
Fasten off. Leave a 20 cm tail to tack the shoulder to the dress.
Cheek Patches — Make 2
Yarn: pink.
R1: 6 sc in MR (6)
R2: inc ×6 (12)
Fasten off. Leave a 20 cm sewing tail and flatten each circle.
Large Paw Pads — Make 2
Yarn: pink.
R1: 6 sc in MR (6)
R2: inc ×6 (12)
R3: (1 sc, inc) ×6 (18)
Fasten off. Leave a 20 cm tail on each piece.
Toe Pads — Make 8
Yarn: pink.
R1: 6 sc in MR (6)
Fasten off. Leave a 12 cm tail on every toe pad.
Neck Bow
Yarn: lavender.
Row 1: ch 9, sc in second ch from hook and across (8)
Row 2: ch 1, turn, sc across (8)
Row 3: ch 1, turn, sc across (8)
Row 4: ch 1, turn, sc across (8)
Fasten off. Wrap a separate 22 cm strand around the center five times and knot it at the back.
Hood Drawstrings — Make 2
Yarn: lavender.
Ch 30. Starting in the second chain from the hook, sl st through all 29 chains.
Fasten off. Leave a 10 cm tail at each end.
Drawstring Pompoms — Make 2
Yarn: lavender.
R1: 6 sc in MR (6)
R2: inc ×6 (12)
R3: sc around (12)
R4: dec ×6 (6)
Add a pea-sized amount of stuffing before closing the final round.
Fasten off. Pull one drawstring end through each pompom and knot it inside.
Assembly
- Center the body beneath the head and sew through all 12 neck stitches twice. Align the cream facial center with the midpoint between the feet.
- Pin the muzzle over head R12–R16. Add small amounts of stuffing while closing the seam, then embroider a pink triangular nose and two short mouth lines.
- Sew the cheek patches below the outer eye corners. Add three gray whiskers on each side, keeping every visible strand between 2.5 and 3 cm long.
- Attach the layered ears between head R3 and R7. Leave approximately 12 stitches between their inner attachment points.
- Pull the dress over the body and anchor its neckline to body R16 with six hidden stitches. Keep the cream hem level.
- Place each arm inside a sleeve and attach it to the upper body. Tack each lavender shoulder edge to the dress with two stitches.
- Sew the feet to the lower front of the body with approximately three stitches between them. Test the figure on a level surface before tightening the seams.
- Center one large paw pad on each foot. Arrange four toe pads in a shallow arc above it and secure every piece with matching sewing yarn.
- Fit the hood around the ears and face. Tack it to the back of the head at four points while keeping the front edging free from the eyes and whiskers.
- Attach the drawstrings to the lower hood corners and cover their upper ends with the bow. Pass all remaining tails through stuffed sections in three directions.
The completed kitten should measure approximately 28 cm from the foot base to the upper edge of the ears.
7 Technical Tips
- Tight color floats: A short carried strand can flatten one side of the 42-stitch head. Leave at least 5 mm of slack behind every gray-to-cream and cream-to-peach transition.
- Marker drift: Chenille can conceal the first stitch and rotate the facial blocks. Lock the marker through both loops of the first stitch after each round.
- Visible decrease holes: Standard decreases expose stuffing along the lower head. Work each decrease through the front loops only.
- Late eye placement: The 18 mm washers cannot pass through the final 12-stitch opening. Install both eyes after R17 and compare their height before continuing.
- Compressed hood opening: An edging pulled too tightly can distort the cheeks and muzzle. Keep each border loop level with the 5 mm hook shaft.
- Uneven paw-pad layout: Sewing one foot completely before marking the second often produces different toe spacing. Pin all 10 pads before attaching any of them.
- Escaping yarn tails: Chenille ends shorter than 15 cm can slide back through the fabric. Retain at least 20 cm for structural pieces and weave each tail in three directions.
Conclusion
Check the hood against the color boundaries before securing its four rear anchors. The gray eye section, cream muzzle and lower peach crown must remain visible inside the opening, while both ears sit outside the lavender fabric. Photograph the figure from the front and each side, then correct any difference in foot height, ear angle or paw-pad spacing. Record the yarn brand, 5 mm hook and final measurement because chenille diameter can change the result by several centimetres. Share the completed lavender hooded calico kitten amigurumi pattern project on Pinterest and post the face-coloring stage on Instagram with #LavenderCalicoKitten. Did loose floats or separate yarn cuts produce the cleaner gray facial patch?









