Introduction
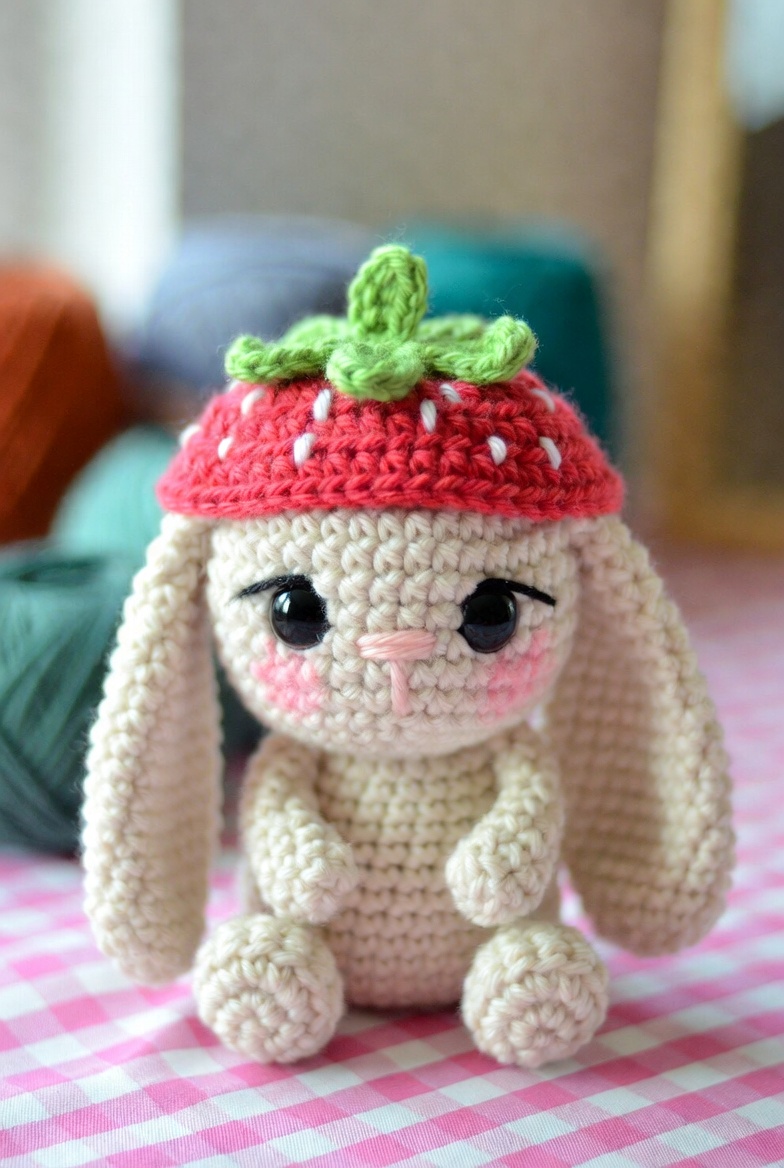
A lop rabbit’s ears begin above the crown, but this strawberry cap must sit between them without forcing either ear outward. This strawberry bunny amigurumi crochet pattern uses DK cotton, a 2.5 mm hook and 12 mm safety eyes to make a seated figure about 15 cm tall. The intermediate project creates a stable display doll with a removable-looking fruit hat and clearly defined facial embroidery.
The Design: What Makes This Strawberry Bunny Different
The head expands to 36 stitches, providing enough width for the eyes, blush patches and low embroidered nose without making the body equally broad. Each ear is worked as a narrow stuffed-free tube, then flattened so gravity creates the long lop shape shown in the reference photo. The strawberry hat uses a shallow dome instead of a complete fruit sphere; this keeps the face visible and gives the leaves a firm attachment surface. A common error in a bunny with strawberry hat pattern is sewing the ears directly beneath the cap edge. That creates a horizontal pull and lifts the lower ear tips away from the body. Place the ears first, test the hat second and stitch the cap only after both parts hang vertically. These proportions also distinguish the project from a strawberry rabbit amigurumi whose entire torso forms the fruit.
Project Info at a Glance
| Skill Level | Time | Finished Size | Hook | Best For |
|---|---|---|---|---|
| Intermediate | 6–8 hours | About 15 cm, excluding the tallest stem tip | 2.5 mm | Seasonal displays, fruit-themed collections and product photography |
Materials and Tools
Yarn
- Warm cream — DK cotton or cotton blend — approximately 45–50 g — Paintbox Yarns Cotton DK, Ricorumi DK or a comparable tightly spun yarn.
- Strawberry red — DK cotton — approximately 15–20 g — select a medium red that contrasts clearly with the white seed stitches.
- Leaf green — DK cotton — approximately 8–10 g — needed for five leaves and one stem.
- Blush pink — DK cotton or embroidery floss — approximately 2–3 g — needed for the cheeks, nose and mouth.
- White — embroidery floss or split DK yarn — less than 1 g — needed for the strawberry seeds.
- Black — embroidery floss — less than 1 g — needed for the eyebrows and upper eye lines.
Tools
- 2.5 mm crochet hook
- 12 mm safety eyes
- Polyester stuffing, approximately 25 g
- Yarn needle
- Embroidery needle
- Locking stitch markers
- Dressmaking pins
- Scissors
Safety eyes are not suitable for an infant toy because the eye or washer can become a small detachable part. Substitute tightly embroidered eyes when the finished rabbit will be handled by a child under three.
Abbreviations
- MR — magic ring
- sc — single crochet
- inc — two single crochet stitches in one stitch
- dec — invisible single crochet decrease
- sl st — slip stitch
- ch — chain
- hdc — half double crochet
- dc — double crochet
- BLO — back loop only
- FLO — front loop only
An invisible decrease passes through the front loops of the next two stitches before completing one single crochet through both loops.
Pattern — Step by Step
Work in a continuous spiral unless the instructions identify a joined round. Move the stitch marker after the final stitch of every completed round.
Head
Yarn: warm cream — Original standard six-stitch sphere calculation.
R1: 6 sc in MR (6)
R2: inc ×6 (12)
R3: (sc, inc) ×6 (18)
R4: (2 sc, inc) ×6 (24)
R5: (3 sc, inc) ×6 (30)
R6: (4 sc, inc) ×6 (36)
R7–R12: sc around (36)
R13: (4 sc, dec) ×6 (30)
R14: (3 sc, dec) ×6 (24)
R15: (2 sc, dec) ×6 (18)
R16: (sc, dec) ×6 (12)
R17: dec ×6 (6)
Insert the eyes between R9 and R10 with eight visible stitches between the posts. Stuff around the washers after R13, keeping the front surface round rather than flat.
Fasten off. Leave a 25 cm tail and close the remaining opening through the six front loops.
Body
Yarn: warm cream — Original standard six-stitch cylinder calculation.
R1: 6 sc in MR (6)
R2: inc ×6 (12)
R3: (sc, inc) ×6 (18)
R4: (2 sc, inc) ×6 (24)
R5: (3 sc, inc) ×6 (30)
R6: (4 sc, inc) ×6 (36)
R7–R12: sc around (36)
R13: (4 sc, dec) ×6 (30)
R14–R15: sc around (30)
R16: (3 sc, dec) ×6 (24)
R17–R18: sc around (24)
R19: (2 sc, dec) ×6 (18)
R20: sc around (18)
Stuff the lower half firmly. Reduce the stuffing pressure near R17 so the neck opening remains flat enough for head attachment.
Fasten off. Leave a 30 cm tail for sewing the body to the head.
Arms (Make 2)
Yarn: warm cream — Original small-limb calculation.
R1: 6 sc in MR (6)
R2: inc ×6 (12)
R3–R5: sc around (12)
R6: (sc, dec) ×4 (8)
R7–R9: sc around (8)
Place a small piece of stuffing in R1–R4 only. Flatten the upper opening and align four stitches on each side.
Fasten off. Leave an 18 cm tail for sewing.
Back Legs and Feet (Make 2)
Yarn: warm cream — Original seated-foot calculation.
R1: 6 sc in MR (6)
R2: inc ×6 (12)
R3: (sc, inc) ×6 (18)
R4–R6: sc around (18)
R7: (sc, dec) ×6 (12)
R8–R9: sc around (12)
R10: dec ×6 (6)
Stuff R1–R6 firmly enough to retain a round foot. Leave R8–R10 lightly filled so the ankle can turn toward the body.
Fasten off. Leave a 25 cm sewing tail and close the opening.
Ears (Make 2)
Yarn: warm cream — Original elongated tube calculation.
R1: 6 sc in MR (6)
R2: inc ×6 (12)
R3: (sc, inc) ×6 (18)
R4–R12: sc around (18)
R13: (sc, dec) ×6 (12)
R14–R18: sc around (12)
Do not stuff. Flatten the ear so the final-round marker lies along one side edge, then crochet or sew the six paired stitches together.
Fasten off. Leave a 30 cm tail on each ear.
Cheek Patches (Make 2)
Yarn: blush pink — Flat-circle calculation.
R1: 6 sc in MR (6)
R2: inc ×6 (12)
Join with a sl st. Fasten off and leave a 15 cm tail for sewing.
Strawberry Hat
Yarn: strawberry red — Original shallow-dome calculation.
R1: 6 sc in MR (6)
R2: inc ×6 (12)
R3: (sc, inc) ×6 (18)
R4: (2 sc, inc) ×6 (24)
R5: (3 sc, inc) ×6 (30)
R6: (4 sc, inc) ×6 (36)
R7–R9: sc around (36)
R10: FLO sc around (36)
Test the hat on the completed head before fastening off. R10 should sit above the eyebrows without covering the eye posts.
Join with a sl st. Fasten off and leave a 35 cm tail for attaching the back edge of the hat.
Hat Brim
Yarn: strawberry red — Work into the unused back loops from R10.
Brim round: Repeat (sl st in next stitch, 2 hdc in next stitch) 18 times (54 working stitches).
The additional half double crochet stitches produce the slight outward flare visible along the lower edge.
Join with a sl st. Fasten off and weave the brim tail into the inside of the cap.
Hat Leaves (Make 5)
Yarn: leaf green — Work in joined rounds.
R1: 6 sc in MR (6)
R2: (sl st, ch 4, starting in the second chain from the hook: sc, hdc, dc, sl st in the next base stitch) ×5
Pull the ring closed after the fifth leaf. Arrange one point toward the front and two points toward each side.
Fasten off. Leave a 25 cm tail for sewing the leaf unit to the hat.
Stem
Yarn: leaf green — Original narrow-tube calculation.
R1: 6 sc in MR (6)
R2–R6: sc around (6)
Do not stuff. Insert the initial yarn tail through the tube to add slight internal support, then flatten the final round.
Fasten off. Leave an 18 cm tail for sewing the stem upright at the leaf center.
Strawberry Seeds
Yarn: white embroidery floss or one separated strand of white DK yarn.
Make 12–15 vertical seed stitches over one crochet round each. Space adjacent seeds by three to five stitches and offset the second seed row so no two white marks form a straight vertical column.
Secure the embroidery inside the cap and trim the hidden tails.
Nose and Mouth
Yarn: blush pink embroidery floss.
Place three horizontal stitches across two head stitches between R10 and R11. Bring one vertical stitch downward from the center of the nose to the space between R12 and R13, then add two short diagonal stitches to form a restrained inverted-Y mouth.
Fasten the floss inside the head and bury both tails in the stuffing.
Eyebrows and Upper Eye Lines
Yarn: black embroidery floss.
Starting two stitches outside each eye, make one curved line across the upper third of the safety eye. Extend the outer end by approximately 5 mm to reproduce the angled lash line. Place the left and right lines at equal heights before tightening either stitch.
Secure the floss inside the head and conceal the ends.
Assembly
- Center the body beneath the head with the narrower neck opening touching the head’s final decrease rounds.
- Sew the head to the body using small mattress stitches, adding a narrow roll of stuffing inside the neck before closing the last 2 cm.
- Complete the nose, mouth, upper eye lines and cheek placement before attaching any ear or hat component.
- Pin the ears behind the head between R4 and R7, leaving approximately ten head stitches between the inner attachment points.
- Sew each flattened ear base in a shallow zigzag so the lower ear section hangs beside the body rather than behind it.
- Attach the arms between body R13 and R16, spacing their inner edges four stitches apart across the center front.
- Position the feet across body R3 to R7 and test the doll on a flat surface before sewing both legs permanently.
- Place the strawberry cap between the ear bases, align the front brim one round above the eyebrows and stitch only the back half of the cap to the head.
- Sew the five-leaf unit over the hat’s starting ring, then attach the stem through both the leaf center and the red cap fabric.
- Weave each remaining tail through at least 3 cm of dense crochet, reverse direction once and trim only after the yarn retracts beneath the stitches.
The finished rabbit should sit on the two feet and lower body while both ears hang without lifting the strawberry brim.
7 Technical Tips
- Round-marker drift: A shifted marker rotates the head decreases and can place the closing seam beside one eye. Count all 36 stitches after R12 and move the marker only after the final stitch is confirmed.
- Loose body base: Under-stuffing the first 4 cm makes the rabbit fall backward once the long ears are attached. Pack the lower body until firm finger pressure leaves a shallow dent that disappears within two seconds.
- Visible decrease holes: Standard decreases expose stuffing around the head and feet. Insert the hook through the next two front loops and keep the working yarn tension equal to the surrounding single crochet stitches.
- Late eye installation: Installing the washers after R14 leaves too little room for correct pressure. Fit both 12 mm eyes after R12, compare their height from the magic ring and lock the washers before beginning R13.
- Twisted ears: Closing an ear without aligning its side fold causes the tip to turn toward the face. Place the round marker on one folded edge and match exactly six stitches across the flattened opening.
- Uneven hat positioning: Sewing the cap before pinning can lower one side over an eye. Measure the front brim at four evenly spaced points; each point should sit approximately one crochet round above the embroidered upper eye line.
- Escaping yarn tails: A tail hidden in one direction can emerge when the ear flexes. Weave every ear and foot tail for at least 3 cm, reverse through an adjacent row and trim after lightly stretching the fabric.
Conclusion
Check the ear angle before securing the strawberry cap because the brim cannot correct a twisted attachment seam. The next concrete step is to pin the ears, hat and feet simultaneously, then photograph the rabbit from the front and both sides. Those three views reveal mismatched ear lengths, uneven eye clearance and a body that leans away from its seated base. Post the completed strawberry bunny amigurumi crochet pattern project to Pinterest with a vertical full-body photograph, then share the front view on Instagram using #StrawberryHatBunny. Should the strawberry stem point directly upward, or lean toward the shorter-looking ear to balance the final silhouette?









