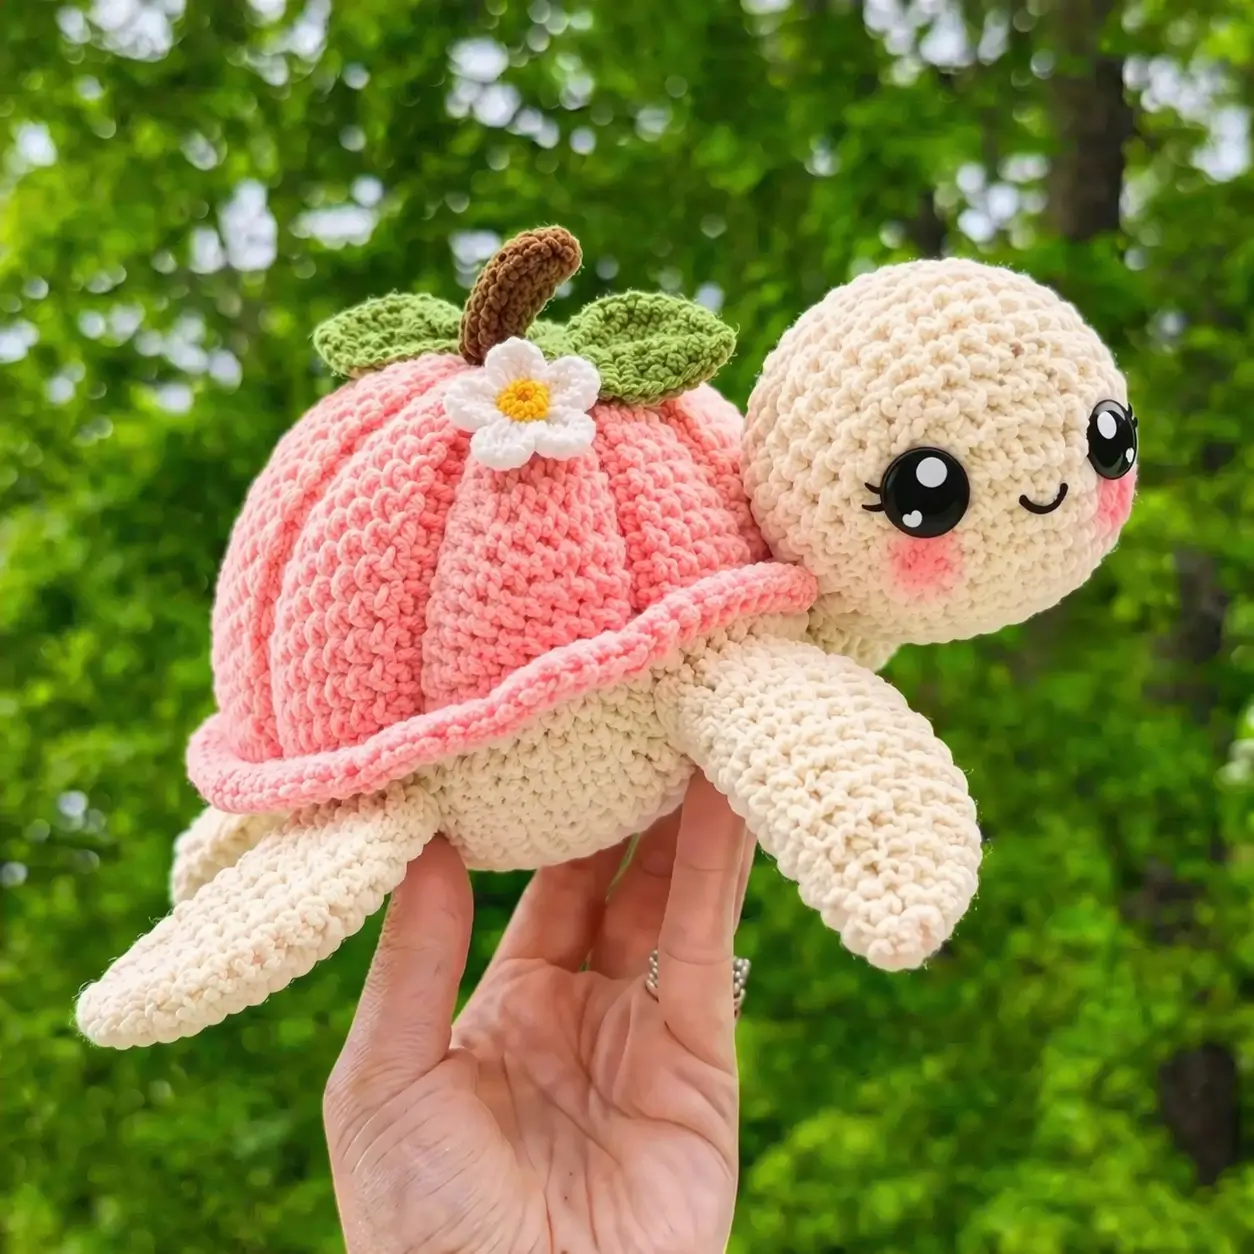
A peach turtle fails fast when the shell reads like a smooth dome instead of a ribbed fruit. This peach turtle amigurumi crochet pattern fixes that with a separate segmented shell, chunky yarn, and a medium build that lands around small-plush size using scaled turtle references. It suits an advanced beginner or intermediate maker and works well for market stock because the peach theme is visible from a distance.
The Design: What Makes Peach Turtle Different
This turtle needs three structural choices that a generic sea turtle does not. First, the shell has to read as peach flesh, not reptile armor, so the top is split into raised vertical wedges instead of hexagons or floral puffs. Second, the shell edge needs a slight outward brim. That lip hides the body join and widens the silhouette, which matches the photo better than a tight shell-to-body seam. Third, the topper matters. A short bent stem, two leaves, and one flower shift the design from “pink turtle” to “peach turtle” immediately. Many fruit turtle tutorials skip that last layer and rely on color alone. That weakens the read in photos. In the broader fruit turtle crochet pattern niche, this is the detail that separates a peach shell from a flower turtle or a pastel sea turtle. A crochet peach turtle also needs larger cheeks and a shorter muzzle than a realistic turtle.
Project Info at a Glance
| Skill Level | Time | Finished Size | Hook | Best For |
|---|---|---|---|---|
| Advanced Beginner / Intermediate | 4–6 hours | approx. 15–18 cm long | 5.5–6 mm for chunky chenille look; 3.5–3.75 mm for smaller cotton version | market plush, nursery decor, fruit-animal collections |
Finished-size and smaller-hook benchmarks are based on comparable published turtle patterns; the photographed plush appears scaled up with chunky chenille yarn.
Materials and Tools
Yarn
- Cream — chunky chenille equivalent — about 70 g — Premier Parfait Chunky style substitute
- Peach pink — chunky chenille equivalent — about 80 g — plush shell main
- Light pink — chunky chenille equivalent — about 20 g — shell rib contrast and brim
- Green — chunky chenille or cotton — about 10 g — leaves
- Brown — chunky chenille or cotton — about 5 g — stem
- White — cotton or chenille scrap — about 5 g — flower petals
- Yellow — cotton scrap — under 5 g — flower center
Published turtle references commonly use worsted/aran cotton around 50–60 yards for the body and smaller shell-color amounts; this plush version scales those quantities upward because the image reads as chenille.
Tools
- Hook 5.5 mm or 6.0 mm for the chunky look in the photo
- Safety eyes 18–22 mm for this scale
- Polyfill stuffing
- Tapestry needle
- Stitch markers
- Blush or pink pastel for cheeks
- Black embroidery thread for smile and eyelashes
Abbreviations
MR / sc / inc / dec / sl st / ch / BLO / FLO / hdc / dc
Invisible decrease works cleaner in plush yarn because it reduces the front-loop gap that can expose stuffing.
Pattern — Step by Step
Continuous spiral unless noted. This is an original image-based draft built with standard amigurumi math and photo analysis; counts are checked round by round.
Head (Make 1)
Yarn: cream — Standard amigurumi math
R1: 6 sc in MR (6)
R2: inc x6 (12)
R3: (sc 1, inc) x6 (18)
R4: (sc 2, inc) x6 (24)
R5: (sc 3, inc) x6 (30)
R6: (sc 4, inc) x6 (36)
R7-R12: sc around (36)
R13: (sc 4, dec) x6 (30)
R14: sc around (30)
R15: (sc 3, dec) x6 (24)
Insert safety eyes between R9 and R10, about 8–10 sts apart for 20 mm eyes. Add blush below eyes.
R16: sc around (24)
R17: (sc 2, dec) x6 (18)
Stuff firmly, but keep the lower neck area slightly softer.
R18: sc around (18)
Fasten off. Leave 20 cm tail.
Body (Make 1)
Yarn: cream — Standard amigurumi math
R1: 6 sc in MR (6)
R2: inc x6 (12)
R3: (sc 1, inc) x6 (18)
R4: (sc 2, inc) x6 (24)
R5: (sc 3, inc) x6 (30)
R6-R10: sc around (30)
R11: (sc 3, dec) x6 (24)
R12: sc around (24)
R13: (sc 2, dec) x6 (18)
Stuff body to medium firmness so the shell can sit over it without bulging.
R14: sc around (18)
Fasten off. Leave 20 cm tail.
Front Flippers (Make 2)
Yarn: cream — Standard amigurumi math
R1: 6 sc in MR (6)
R2: (sc 1, inc) x3 (9)
R3: (sc 2, inc) x3 (12)
R4-R8: sc around (12)
R9: (sc 4, dec) x2 (10)
R10-R11: sc around (10)
R12: (sc 3, dec) x2 (8)
Flatten. Crochet 4 sc through both layers to close.
Fasten off. Leave 18 cm tail.
Back Flippers (Make 2)
Yarn: cream — Standard amigurumi math
R1: 6 sc in MR (6)
R2: (sc 1, inc) x3 (9)
R3-R6: sc around (9)
R7: (sc 2, dec) x2, sc 1 (7)
R8: sc around (7)
Flatten. Crochet 3 sc through both layers to close.
Fasten off. Leave 18 cm tail.
Peach Shell Base (Make 1)
Yarn: peach pink — Standard amigurumi math
R1: 6 sc in MR (6)
R2: inc x6 (12)
R3: (sc 1, inc) x6 (18)
R4: (sc 2, inc) x6 (24)
R5: (sc 3, inc) x6 (30)
R6: (sc 4, inc) x6 (36)
R7: (sc 5, inc) x6 (42)
R8-R12: sc around (42)
Fasten off. Leave tail for sewing to underside ring later.
Shell Rib Panels (Make 8)
Yarn: light pink — Standard amigurumi math
Ch 9.
Row 1: sc in 2nd ch from hook and across (8)
Row 2-R8: ch 1, turn, sc across (8)
Do not fasten each one with a long tail unless you prefer sewing. These can be whip stitched or surface attached evenly over the shell base from top center to brim line.
Shell Brim / Edge Ring (Make 1)
Yarn: light pink — Standard amigurumi math
R1: 6 sc in MR (6)
R2: inc x6 (12)
R3: (sc 1, inc) x6 (18)
R4: (sc 2, inc) x6 (24)
R5: (sc 3, inc) x6 (30)
R6: (sc 4, inc) x6 (36)
R7: (sc 5, inc) x6 (42)
R8: BLO sc around (42)
R9: in FLO from R8, (sc 6, inc) x6 (48)
R10: sc around (48)
Fasten off. Leave 40 cm tail.
This extra ring creates the soft rolled edge visible in the photo.
Stem (Make 1)
Yarn: brown — Standard amigurumi math
R1: 6 sc in MR (6)
R2-R5: sc around (6)
R6: (sc 1, inc) x3 (9)
R7: sc around (9)
Fasten off. Leave 18 cm tail.
Lightly stuff base only. Bend before stitching down.
Leaves (Make 2)
Yarn: green — Standard amigurumi math
Ch 7.
Row 1: sc in 2nd ch from hook, sc 1, hdc 2, sc 1, sl st in last ch. Working on opposite side of chain: sc 1, hdc 2, sc 1, sl st to first st.
Fasten off. Leave 15 cm tail.
Flower (Make 1)
Yarn: white and yellow — Standard amigurumi math
With yellow:
R1: 6 sc in MR (6), sl st to first st. Change to white.
Petals: (ch 3, 2 dc in same st, ch 3, sl st in same st) x5 around.
Fasten off. Leave 12 cm tail.
Cheek Patches (Make 2)
Yarn: blush pink or use fabric blush instead — Standard amigurumi math
R1: 6 sc in MR (6)
R2: inc x6 (12)
Sl st to first st.
Fasten off. Leave 12 cm tail.
Tail (Make 1)
Yarn: cream — Standard amigurumi math
R1: 4 sc in MR (4)
R2: sc around (4)
R3: (sc 1, inc) x2 (6)
R4-R5: sc around (6)
Flatten lightly.
Fasten off. Leave 15 cm tail.
Assembly
- Sew the head to the front of the body, slightly angled upward.
- Sew the front flippers to each side of the body, one round below the neck join.
- Sew the back flippers near the rear third of the body.
- Sew the tail to the back center of the body.
- Attach the shell brim ring to the shell base around the outer edge.
- Position the eight shell rib panels evenly from top center to lower edge; stitch each panel in place.
- Place the finished shell over the body and sew it around the upper body line, keeping the brim free at the edge.
- Sew the stem to the shell top slightly off center and angle it backward.
- Sew the two leaves beside the stem, then attach the flower in front of the stem.
- Add the cheek patches or blush, embroider the smile and lashes, then weave in every tail securely.
The finished peach turtle should sit low, with the shell reading wider than the body.
7 Technical Tips
- Mark the shell into eight sections before attaching rib panels. If the spacing drifts, the peach reads lopsided from the top view.
- Stuff the head firmer than the body. A soft head collapses around large eyes, while an overstuffed body pushes the shell upward.
- Use invisible decreases on the head after Round 12. Plush yarn gaps show fastest on face shaping rounds.
- Install eyes before the final neck decrease. Waiting too long makes washer placement difficult, especially with 20 mm eyes.
- Reduce hook size by 0.5 mm if your chenille stitches spread. Velvet-style yarn can expose stuffing between increases on the shell dome.
- Pin the shell, brim, and body together before sewing. A 5 mm drift at the front edge makes the brim look twisted.
- Weave tails back through at least 4–5 cm of internal stitches. Short tail burying in chenille can pull free under handling.
Conclusion
This peach turtle amigurumi crochet pattern works because the read is immediate: ribbed fruit shell, brimmed edge, short stem, leaf pair, and a compact turtle body underneath. Keep the shell wider than the torso, place the eyes before closing the head, and pin the topper pieces before sewing. That order matters more than speed. Next, test the pattern in one solid peach palette and one high-contrast pink palette to see which photographs better for listings. Save it to Pinterest, post the finished plush on Instagram, and tag it with #PeachTurtlePattern. One practical question remains: did you angle the stem slightly back, or does yours stand upright like a pumpkin stalk?









