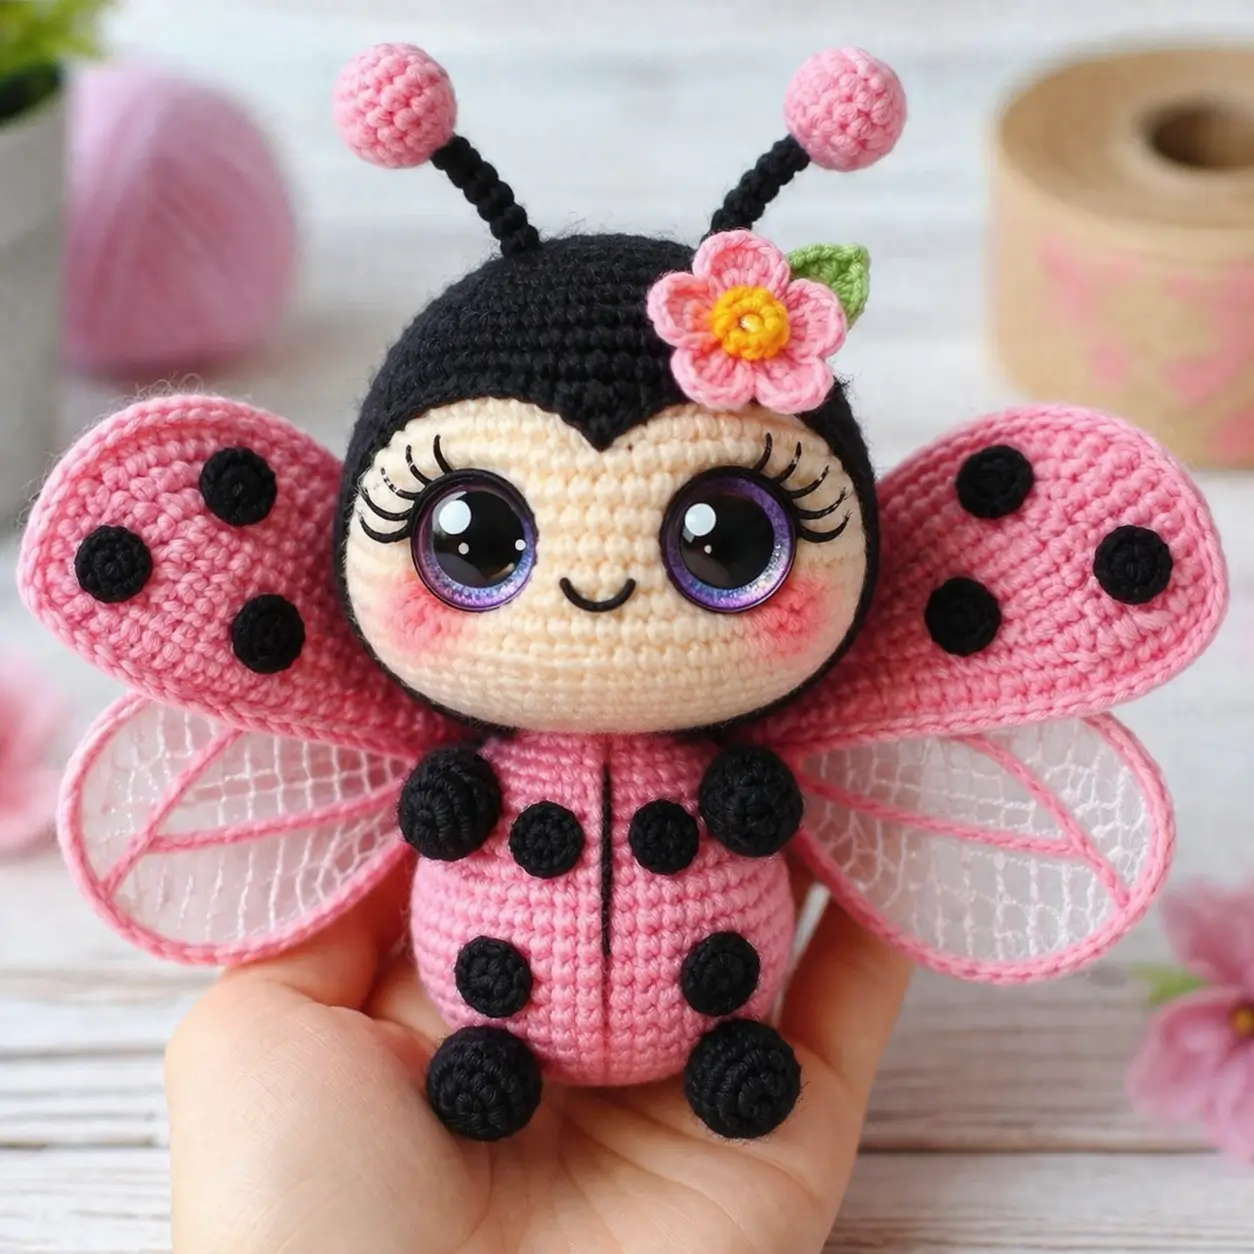
Ladybugs read as circles, but this one fails if the forehead point sits one row too high. This ladybug amigurumi crochet pattern is a photo-based doll adaptation with DK-to-worsted cotton, a 3.25 mm hook, 15 mm eyes, and a target height near 15 cm, using common published ladybug material ranges as the baseline. It suits an intermediate maker who needs a display toy, nursery prop, or market sample with a clear insect silhouette.
The Design: What Makes This Ladybug Different
The first structural decision is the split between a skin-tone head and a separate black cap. Standard bug patterns often treat the whole head as one shell, but a doll-faced ladybug needs a sharper forehead line so the face stays open and readable. A second decision is the two-layer wing system. The upper pink wings carry the spots and silhouette; the lower mesh wings widen the profile without adding much bulk. That matters because a dense double-crochet wing stack would pull the body backward.
Another choice is scale. Most published ladybug amigurumi free pattern results stay compact, often around 8 to 10 cm, while doll-style versions run larger and use more visual facial detail. A maker usually gets the proportions wrong by shrinking the wings after enlarging the head. The result looks like a doll in costume, not a ladybug crochet doll. Here the wing span has to compete with the head on purpose.
Project Info at a Glance
| Skill Level | Time | Finished Size | Hook | Best For |
|---|---|---|---|---|
| Intermediate | 6–8 hours | 13–15 cm | 3.25 mm | Display toy, gift topper, spring market sample |
Published comparables support 13 cm doll-style scale, DK/light-worsted yarn, and 2.5–4.0 mm hooks; this photo adaptation is set at 3.25 mm for a denser finish.
Materials and Tools
Yarn
- Soft pink — DK or light worsted cotton — about 25 g — Paintbox Cotton DK or similar
- Black — DK or light worsted cotton — about 30 g — Paintbox Cotton DK or similar
- Cream / skin tone — DK or light worsted cotton — about 20 g — any smooth cotton
- Yellow — DK cotton — about 5 g — any smooth cotton
- Light green — DK cotton — about 3 g — any smooth cotton
- White or pale pink embroidery thread — small amount for blush option
Tools
- Hook 3.25 mm
- 15 mm safety eyes
- Polyfill stuffing
- Yarn needle
- Stitch markers
- Black embroidery floss for lashes and smile
- Soft white tulle or organza for lower wing inserts
- Craft wire, 0.8 mm optional for lower wing shaping
Abbreviations
MR = magic ring
sc = single crochet
inc = 2 sc in one stitch
dec = invisible decrease
sl st = slip stitch
ch = chain
BLO = back loop only
FLO = front loop only
Use invisible decrease by working through the front loops of the next two stitches before pulling through; it reduces bulk on the face and body seams.
Pattern — Step by Step
Continuous spiral unless noted.
Head (Make 1)
Yarn: cream
R1: 6 sc in MR (6)
R2: inc x6 (12)
R3: (sc, inc) x6 (18)
R4: (2 sc, inc) x6 (24)
R5: (3 sc, inc) x6 (30)
R6: (4 sc, inc) x6 (36)
R7: (5 sc, inc) x6 (42)
R8–R14: sc around (42)
Insert safety eyes between R11 and R12, 8 sts apart.
R15: (5 sc, dec) x6 (36)
R16: (4 sc, dec) x6 (30)
R17: (3 sc, dec) x6 (24)
Stuff firmly but keep the lower face flat.
R18: (2 sc, dec) x6 (18)
R19: (sc, dec) x6 (12)
R20: dec x6 (6)
Fasten off. Leave a 20 cm tail.
Black Cap (Make 1)
Yarn: black
R1: 6 sc in MR (6)
R2: inc x6 (12)
R3: (sc, inc) x6 (18)
R4: (2 sc, inc) x6 (24)
R5: (3 sc, inc) x6 (30)
R6: (4 sc, inc) x6 (36)
R7: (5 sc, inc) x6 (42)
R8–R10: sc around (42)
Fasten off. Leave a long tail. Sew to head, shaping a center point over the forehead.
Body (Make 1)
Yarn: soft pink
R1: 6 sc in MR (6)
R2: inc x6 (12)
R3: (sc, inc) x6 (18)
R4: (2 sc, inc) x6 (24)
R5: (3 sc, inc) x6 (30)
R6: (4 sc, inc) x6 (36)
R7–R11: sc around (36)
R12: (4 sc, dec) x6 (30)
R13: sc around (30)
R14: (3 sc, dec) x6 (24)
R15: sc around (24)
R16: (2 sc, dec) x6 (18)
Stuff the lower body heavily so it sits.
R17: sc around (18)
R18: (sc, dec) x6 (12)
R19: dec x6 (6)
Fasten off. Leave a 20 cm tail.
Arms / Front Legs (Make 2)
Yarn: black
R1: 6 sc in MR (6)
R2: inc x6 (12)
R3–R4: sc around (12)
R5: (sc, dec) x4 (8)
Light stuffing only.
R6–R7: sc around (8)
Fasten off. Leave a 15 cm tail.
Legs (Make 2)
Yarn: black
R1: 6 sc in MR (6)
R2: inc x6 (12)
R3–R4: sc around (12)
R5: (sc, dec) x4 (8)
Stuff lightly and flatten slightly.
R6: sc around (8)
Fasten off. Leave a 15 cm tail.
Antennae Stems (Make 2)
Yarn: black
R1: 6 sc in MR (6)
R2–R6: sc around (6)
Fasten off. Leave a 12 cm tail.
Antennae Tips (Make 2)
Yarn: soft pink
R1: 6 sc in MR (6)
R2: inc x6 (12)
R3–R4: sc around (12)
R5: dec x6 (6)
Stuff lightly. Fasten off. Sew one tip to each stem.
Upper Wings (Make 2)
Yarn: soft pink
Ch 11.
R1: Starting in 2nd ch from hook, 9 sc, 3 sc in last ch, working on opposite side 8 sc, inc (22)
R2: inc, 8 sc, 3 inc, 8 sc, 2 inc (28)
R3: sc around (28)
R4: dec, 11 sc, dec, 13 sc (26)
R5: sc around (26)
R6: dec, 10 sc, dec, 12 sc (24)
R7: sc around (24)
Do not overstuff. Flatten. Fasten off, leaving a 20 cm tail.
Lower Mesh Wings (Make 2)
Yarn: pale pink for outline + white tulle insert
With pink yarn, ch 14.
R1: Starting in 2nd ch from hook, 12 sc, 3 sc in last ch, working opposite side 11 sc, inc (28)
R2: inc, 11 sc, 3 inc, 11 sc, 2 inc (34)
R3: sc around (34)
R4: dec, 14 sc, dec, 16 sc (32)
Fasten off. Cut a matching tulle oval slightly larger than the frame, fold over the inside edge, and whipstitch to the crochet outline. Add two pink embroidered vein lines across each wing.
Wing Spots (Make 6)
Yarn: black
R1: 6 sc in MR (6)
R2: inc x6 (12)
Fasten off. Leave a 10 cm tail.
Flower (Make 1)
Yarn: pink and yellow
With yellow:
R1: 6 sc in MR (6)
R2: inc x6 (12)
Change to pink.
R3: (sl st, ch 2, 2 dc in next st, ch 2, sl st in same st) x5 to form 5 petals.
Fasten off. Leave a 12 cm tail.
Leaf (Make 1)
Yarn: light green
Ch 7.
Row 1: Starting in 2nd ch from hook, sl st, sc, hdc, dc, hdc, sc.
Work opposite side of chain: sc, hdc, dc, hdc, sc, sl st.
Fasten off. Leave a 10 cm tail.
Cheek Patches (Make 2)
Yarn: very pale pink or blush thread
R1: 6 sc in MR (6)
R2: inc x6 (12)
Fasten off. Leave a short tail.
Assembly
- Sew the black cap to the head, centering the point above the nose line.
- Install or confirm the 15 mm eyes, then embroider lashes and a small curved smile.
- Attach the cheek patches or brush blush onto the lower face, one round below the eyes.
- Sew the head to the body with the body centered slightly forward for a seated pose.
- Attach the arms at the upper body sides, angled toward the front.
- Sew the legs at the base so the doll sits flat and the feet face outward.
- Fix the antennae to the top of the cap, spaced about 10 to 12 stitches apart.
- Sew three black spots to each upper wing, then attach the upper wings to the back seam area.
- Layer the lower mesh wings under the upper wings and tack them at the inner top edge only.
- Sew the leaf and flower to the right side of the cap and add the center body split with black embroidery.
The finished piece should sit upright with the wings spreading wider than the body.
7 Technical Tips
- Mark the first stitch of every round. Losing the start point on the head shifts the forehead point and throws off the black cap line by one or two stitches.
- Stuff the head hard and the limbs lightly. Soft limbs keep the front from looking crowded, while a loose head collapses around large eyes.
- Use invisible decreases on the face side. Standard decreases leave a dotted ridge that shows immediately on cream yarn.
- Set the eyes before the final head decreases. On this size, placing them around R11–R12 keeps the cheeks low and stops the mouth from climbing too close to the eyes.
- Pin both upper wings before sewing. A 3 mm difference in wing height is visible because the eye line is centered and the wings frame it.
- Do not overstuff the upper wings. Even a small amount of extra fill turns the wings into pads and removes the flatter beetle-shell profile.
- Weave tails through direction changes, not straight rows. On pink cotton, a tail buried through only one column can print through the outer surface after handling.
Conclusion
This ladybug amigurumi crochet pattern works because the insect markers stay visible even after the design shifts toward a doll format. The black cap, rounded body, layered wings, and spot placement do most of that work. Next, test the head and cap first before making the wing set; it is the fastest way to lock in scale. When you finish, post one front view and one back view to Pinterest and Instagram so the wing construction reads clearly. Use #PinkLadybugDoll. On your version, did you keep the flower on the cap, or move it lower so the antennae stay more vertical?









