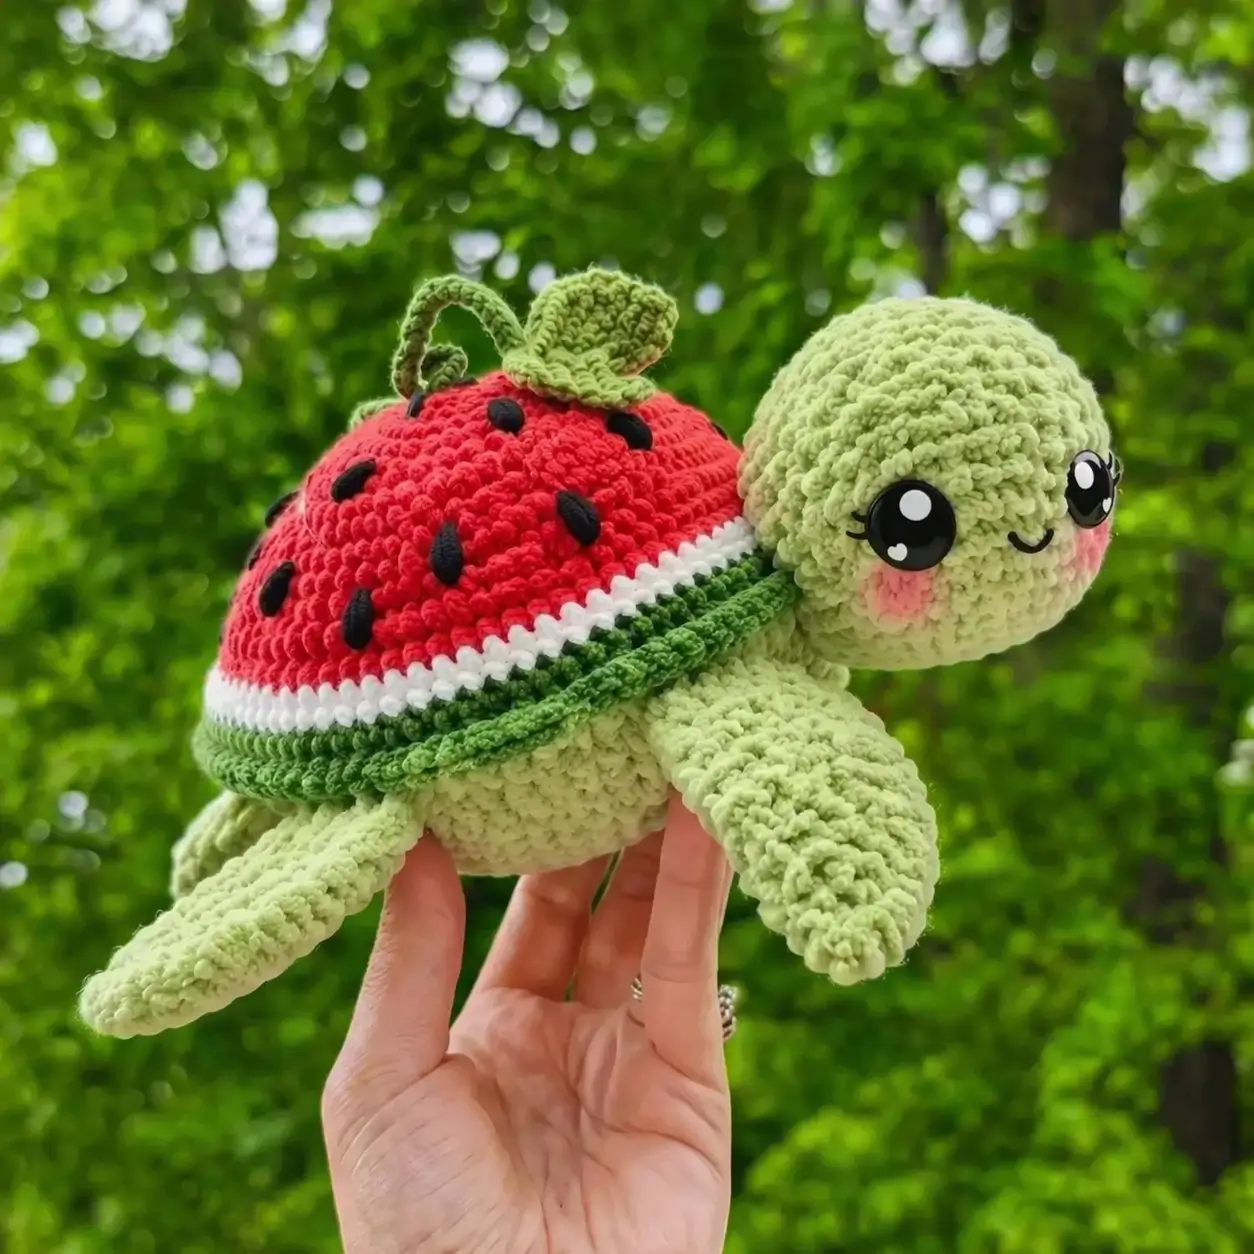
A watermelon turtle only works if the shell reads as rind before it reads as carapace. This watermelon turtle amigurumi crochet pattern builds that contrast with chenille yarn, a 5 mm hook, and a medium plush profile that lands around 23 cm long. It suits an advanced beginner who can hold count through color changes. The practical use is simple: market-table plush, summer decor, or a photo prop that reads clearly at first glance.
The Design: What Makes Watermelon Turtle Different
The shell carries the whole concept. Red has to dominate the dome, while the white stripe must stay narrow enough to read as rind, not a second shell band. That is why this version keeps the shell top as a separate piece with a controlled color break rather than blending colors across short rows. Public plush patterns also cluster around chenille yarn and 5 mm hooks, which supports the broad, soft silhouette seen in the photo.
Head proportion matters just as much. A crochet fruit turtle looks off when the head sits too low or too small; then the shell dominates and the turtle loses its character. In this build, the maker sets the head slightly forward and slightly above the body seam. The result gives a gentle upward face angle. One common mistake with a watermelon turtle crochet pattern is overstuffing the shell edge after the white round. That thickens the rind line and blurs the watermelon read. Public tutorials show the trend. They rarely stop to explain why that distortion happens. That gap is where this written pattern is more useful.
Project Info at a Glance
| Skill Level | Time | Finished Size | Hook | Best For |
|---|---|---|---|---|
| Advanced beginner | 4–6 hours | 23 cm long × 13 cm tall | 5 mm | Plush gift, market stock, summer display |
Finished size and hook reflect verified plush watermelon turtle sources; time is a practical estimate for this original build.
Materials and Tools
Yarn
- Pale mint green — super bulky chenille (#6) — main body and head — Sweet Snuggles Lite or similar
- Red — super bulky chenille (#6) — shell flesh
- White — super bulky chenille (#6) — rind stripe
- Dark green — super bulky chenille (#6) — rind edge, leaf, stem
- Black — lightweight acrylic or chenille scrap — seeds and mouth
- Pink — light yarn scrap — cheek blush
Tools
- Hook 5 mm
- Safety eyes 16 mm
- Polyester stuffing
- Yarn needle
- Stitch markers
- Scissors
Abbreviations
MR = magic ring
sc = single crochet
inc = increase
dec = invisible decrease
sl st = slip stitch
ch = chain
BLO = back loop only
FO = fasten off
Use invisible decrease on all shaping rounds so the chenille surface stays compact and the stuffing does not show through the decrease line.
Pattern — Step by Step
Continuous spiral unless noted. This is an original pattern drafted from the photographed plush and standard amigurumi count logic, not a transcription of any published source.
Head (Make 1)
Yarn: pale mint green — original stitch math for the photographed plush
R1: 6 sc in MR (6)
R2: inc x6 (12)
R3: (sc, inc) x6 (18)
R4: (2 sc, inc) x6 (24)
R5: (3 sc, inc) x6 (30)
R6: (4 sc, inc) x6 (36)
R7-R12: sc around (36)
Insert 16 mm eyes between R9 and R10, spaced 8 stitches apart.
R13: (4 sc, dec) x6 (30)
R14: (3 sc, dec) x6 (24)
R15: (2 sc, dec) x6 (18)
Stuff firmly, with extra fill in the snout side.
R16: (sc, dec) x6 (12)
R17: dec x6 (6)
FO. Close opening. Leave a 25 cm tail.
Body Underside (Make 1)
Yarn: pale mint green — original stitch math for the photographed plush
R1: 6 sc in MR (6)
R2: inc x6 (12)
R3: (sc, inc) x6 (18)
R4: (2 sc, inc) x6 (24)
R5: (3 sc, inc) x6 (30)
R6: (4 sc, inc) x6 (36)
R7-R9: sc around (36)
R10: (4 sc, dec) x6 (30)
R11: sc around (30)
Light stuffing only. Keep this piece flatter than the head.
FO. Leave a 35 cm tail for sewing to the shell.
Shell Top (Make 1)
Yarn: red, white, dark green — color order follows verified watermelon turtle sources showing red first, then white, then green.
R1: 6 sc in MR with red (6)
R2: inc x6 (12)
R3: (sc, inc) x6 (18)
R4: (2 sc, inc) x6 (24)
R5: (3 sc, inc) x6 (30)
R6: BLO, (4 sc, inc) x6 with white (36)
R7: (5 sc, inc) x6 with dark green (42)
R8-R10: sc around (42)
Add light stuffing only after assembly, not now, so the dome does not over-round.
FO. Leave a 45 cm tail.
Front Flippers (Make 2)
Yarn: pale mint green — original stitch math
R1: 6 sc in MR (6)
R2: inc x6 (12)
R3: (sc, inc) x6 (18)
R4-R6: sc around (18)
R7: (sc, dec) x6 (12)
R8-R10: sc around (12)
Flatten top edge.
FO. Leave a 20 cm tail.
Back Flippers (Make 2)
Yarn: pale mint green — original stitch math
R1: 6 sc in MR (6)
R2: inc x6 (12)
R3-R5: sc around (12)
R6: (sc, dec) x4 (8)
R7-R8: sc around (8)
Light stuffing in the base only.
FO. Leave a 20 cm tail.
Tail (Make 1)
Yarn: pale mint green — keeps the photographed short tapered form.
R1: 6 sc in MR (6)
R2: sc around (6)
R3: (sc, inc) x3 (9)
R4: sc around (9)
R5: (2 sc, inc) x3 (12)
R6: sc around (12)
FO. Flatten. Leave a 20 cm tail.
Leaf (Make 1)
Yarn: dark green — shaped accessory based on the photographed leaf
Ch 7.
Row 1: starting in 2nd ch from hook, sc 5, 3 sc in last ch; working on other side of chain, sc 4, inc in last st, ch 1, turn (14)
Row 2: inc, sc 4, hdc 3, sc 4, inc 2, ch 1, turn (18)
Row 3: sl st, sc 5, hdc 4, sc 5, sl st
FO. Leave a 20 cm tail.
Curled Stem (Make 1)
Yarn: dark green — original accessory math
Ch 16.
Working in 2nd ch from hook: 2 sc in each ch across.
FO. Twist naturally into a curl. Leave a 12 cm tail.
Cheek Patches (Make 2)
Yarn: pink — original flat circle math
R1: 6 sc in MR (6)
R2: inc x6 (12)
FO. Leave a 10 cm tail.
Seed Appliqués (Make 8–10)
Yarn: black — original embroidered appliqué
Ch 3, work 3 sc in 2nd ch from hook.
FO. Pull tail tight to make a pointed oval. Leave tails for sewing.
Smile
Yarn: black acrylic
Embroider a shallow curved smile centered 2 rounds below the eyes.
Assembly
- Sew the head to the front third of the body underside, angled slightly upward.
- Sew the front flippers to the sides of the body, centered just behind the head seam.
- Sew the back flippers to the lower sides, aligned with the widest part of the body.
- Sew the tail to the center back.
- Pin the shell top over the body and check that the white stripe sits evenly around the midpoint.
- Add a thin layer of stuffing under the shell dome only after pinning.
- Sew the shell to the body with small whip stitches, keeping the body flatter than the dome.
- Sew the cheek patches below the outer corners of the eyes.
- Attach the leaf near the shell crown and tack the stem beside it.
- Sew the black seed appliqués across the red shell section in staggered rows.
The piece is complete when the shell sits level and the head remains slightly lifted without tipping forward.
7 Technical Tips
- Mark the shell color break before Round 6. Chenille hides stitches, and one missed increase at the white stripe shifts the whole rind line off-center by the time you reach 42 stitches.
- Do not stuff the body like a sphere. The underside should compress slightly under finger pressure; overfilling makes the turtle stand tall instead of reading low and gliding.
- Place eyes before the final head decreases. On chenille, forcing 16 mm eyes through after Round 13 can split the pile and leave visible backing.
- Keep the eye spacing at about 8 stitches on a 36-stitch head. Closer spacing makes the face look cramped; wider spacing pushes the cheeks too far outward.
- Use invisible decreases only on the head front and shell edge. Regular decreases on plush yarn create a dotted ridge that catches light and shows in photos.
- Pin all four flippers before sewing any of them. A 5 mm difference in front-to-back placement makes the shell look twisted from above.
- Weave tails back through the chenille core, not across the surface. Surface weaving leaves dark drag lines, especially where black seed tails cross the red shell.
Conclusion
This build works because the shell reads in three bands, the head stays oversized, and the flippers stay broad rather than tapered. That combination keeps the silhouette close to the photographed plush while the stitch math stays clean. For the next step, make one test shell first and check the stripe balance before committing to full assembly. Then photograph the finished piece from the side and top; those angles show the rind effect best. Save it to Pinterest, post it on Instagram, and tag it with #WatermelonTurtlePattern. For this watermelon turtle amigurumi crochet pattern, one question matters most: did you keep the leaf centered, or did you offset it to one side for more motion?









