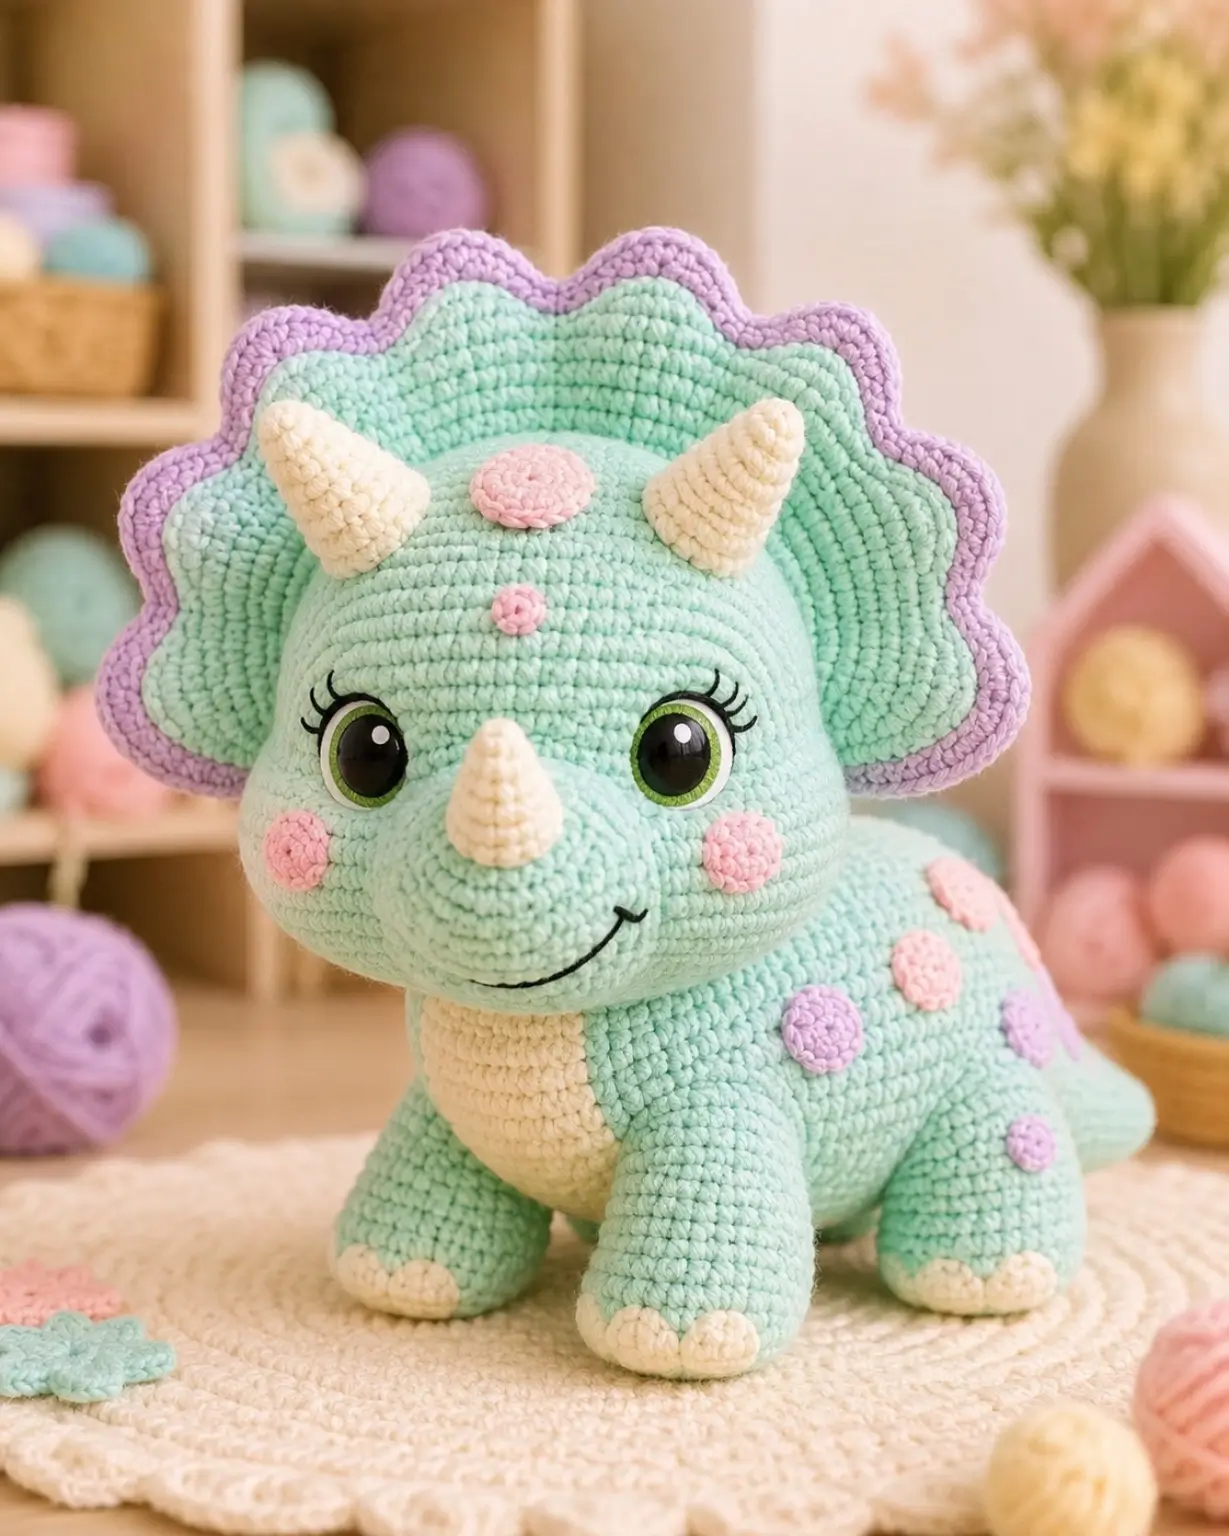
A triceratops frill is not decoration; it is a shield-shaped balance problem behind three horns. This triceratops amigurumi crochet pattern builds a 23 cm seated dinosaur with sport/DK cotton-blend yarn, a 2.5–3 mm hook, safety eyes, horns, cheek patches, frill, and tail. Use it as a shelf-scale dinosaur pattern where the broad head must stay upright without dragging the body forward. Skill level: intermediate.
The Design: What Makes This Triceratops Different
You need three structural controls here: a short neck, a wide frill, and a low body. The head uses a 42-stitch plateau instead of a taller sphere because the horns and frill add weight to the front and back. The body stays longer than the head so the back legs can sit under the center line. Then the maker shifts from anatomy to display styling: pastel dinosaur amigurumi spots, pink cheek circles, and a cream belly patch break up the mint body without changing the base shape. A common mistake in a free triceratops crochet pattern is treating the frill like a flat collar. It needs pinning and a curved sewing path. Otherwise, this crochet dinosaur pattern tips visually even when the stuffing is firm.
Project Info at a Glance
| Skill Level | Time | Finished Size | Hook | Best For |
|---|---|---|---|---|
| Intermediate | Multi-session display build | 23 cm seated target | 2.5 mm sport / 3 mm DK | Shelf plush, nursery display, dinosaur pattern collection |
The 23 cm seated benchmark and hook sizing are based on comparable triceratops amigurumi construction using sport or DK yarn.
Materials and Tools
Yarn
- Mint/aqua — sport or DK cotton-acrylic — 70–100 g — YarnArt Jeans, Paintbox Cotton DK, or similar
- Lavender — same weight — 12–20 g — for scalloped frill edge and body spots
- Cream — same weight — 8–15 g — for horns, toe claws, and belly patch
- Pale pink — same weight — scrap to 8 g — for cheek patches and spots
- Black embroidery thread — small amount — smile and eyelashes
- Green felt or crochet thread — optional — iris rings behind eyes
Tools
- Hook 2.5 mm for sport yarn or 3 mm for DK yarn
- 12 mm safety eyes, or 14 mm if using oversized display eyes
- Fiberfill stuffing
- Tapestry needle
- Stitch markers
- Pins with large heads
- Scissors
Abbreviations
MR = magic ring / sc = single crochet / inc = 2 sc in same stitch / dec = invisible decrease / sl st = slip stitch / ch = chain / BLO = back loop only / FO = fasten off.
Invisible decrease uses the front loops of the next two stitches to remove one stitch with less surface bulk.
Pattern — Step by Step
Continuous spiral unless noted. All crochet parts below use the standard 6-stitch amigurumi increase system: 6, 12, 18, 24, 30, 36, 42.
Head — Make 1
Yarn: mint/aqua
R1: 6 sc in MR (6)
R2: inc ×6 (12)
R3: (sc, inc) ×6 (18)
R4: (2 sc, inc) ×6 (24)
R5: (3 sc, inc) ×6 (30)
R6: (4 sc, inc) ×6 (36)
R7: (5 sc, inc) ×6 (42)
R8–R15: sc around (42)
R16: (5 sc, dec) ×6 (36)
R17: (4 sc, dec) ×6 (30)
R18: (3 sc, dec) ×6 (24)
Place safety eyes between R10 and R11, 11 stitches apart. Add green felt rings before backs if using colored eyes.
R19: (2 sc, dec) ×6 (18)
R20: (sc, dec) ×6 (12)
R21: dec ×6 (6)
Stuff firmly around the eye backs and snout area.
Fasten off. Leave 35 cm tail for sewing to the body.
Body — Make 1
Yarn: mint/aqua
R1: 6 sc in MR (6)
R2: inc ×6 (12)
R3: (sc, inc) ×6 (18)
R4: (2 sc, inc) ×6 (24)
R5: (3 sc, inc) ×6 (30)
R6: (4 sc, inc) ×6 (36)
R7: (5 sc, inc) ×6 (42)
R8–R16: sc around (42)
R17: (5 sc, dec) ×6 (36)
R18: sc around (36)
R19: (4 sc, dec) ×6 (30)
R20: sc around (30)
R21: (3 sc, dec) ×6 (24)
R22: (2 sc, dec) ×6 (18)
Stuff the base firmly. Keep the top slightly compressible for head attachment.
R23: (sc, dec) ×6 (12)
R24: dec ×6 (6)
Fasten off. Leave 40 cm tail if sewing head directly through the body top.
Front Legs — Make 2
Yarn: cream for foot, mint/aqua for leg
R1: 6 sc in MR with cream (6)
R2: inc ×6 (12)
R3: (sc, inc) ×6 (18)
R4: (2 sc, inc) ×6 (24)
R5: sc around (24)
R6: switch to mint, BLO sc around (24)
R7–R10: sc around (24)
R11: (2 sc, dec) ×6 (18)
R12–R14: sc around (18)
R15: (sc, dec) ×6 (12)
R16–R17: sc around (12)
Stuff foot and lower leg only. Leave upper 1 cm flatter for sewing.
R18: flatten opening; 6 sc through both layers (6)
Fasten off. Leave 25 cm tail.
Back Legs — Make 2
Yarn: cream for foot, mint/aqua for leg
R1: 6 sc in MR with cream (6)
R2: inc ×6 (12)
R3: (sc, inc) ×6 (18)
R4: (2 sc, inc) ×6 (24)
R5: (3 sc, inc) ×6 (30)
R6: switch to mint, BLO sc around (30)
R7–R9: sc around (30)
R10: (3 sc, dec) ×6 (24)
R11–R12: sc around (24)
R13: (2 sc, dec) ×6 (18)
R14–R16: sc around (18)
R17: (sc, dec) ×6 (12)
R18: sc around (12)
Stuff foot heavily, thigh moderately.
R19: flatten opening; 6 sc through both layers (6)
Fasten off. Leave 30 cm tail.
Toe Claws — Make 12
Yarn: cream
R1: 6 sc in MR (6)
R2: sc around (6)
Fasten off. Leave 12 cm tail. Sew three claws to each foot. Flatten each claw rather than stuffing it.
Tail — Make 1
Yarn: mint/aqua
R1: 6 sc in MR (6)
R2–R3: sc around (6)
R4: inc ×6 (12)
R5–R6: sc around (12)
R7: (sc, inc) ×6 (18)
R8–R9: sc around (18)
R10: (2 sc, inc) ×6 (24)
R11–R12: sc around (24)
Stuff lightly. The tail should counterbalance the head, not lift the body.
R13: (2 sc, dec) ×6 (18)
R14: sc around (18)
Fasten off. Leave 30 cm tail.
Side Frill Wings — Make 2
Yarn: mint/aqua center, lavender edge
With mint, ch 13.
Row 1: sc in 2nd ch from hook and across (12)
Row 2: ch 1, turn, inc ×6 across paired stitches (18)
Row 3: ch 1, turn, (2 sc, inc) ×6 (24)
Row 4: ch 1, turn, sc across (24)
Switch to lavender.
Row 5: ch 1, turn, sc across (24)
Fasten off. Leave 25 cm tail. Pin one side frill wing behind each side of the head, with the lavender row facing outward.
Center Frill Panel — Make 1
Yarn: mint/aqua center, lavender edge
With mint, ch 25.
Row 1: sc in 2nd ch from hook and across (24)
Row 2: ch 1, turn, (3 sc, inc) ×6 (30)
Row 3: ch 1, turn, (4 sc, inc) ×6 (36)
Row 4: ch 1, turn, (5 sc, inc) ×6 (42)
Row 5: ch 1, turn, sc across (42)
Switch to lavender.
Row 6: ch 1, turn, sc across (42)
Fasten off. Leave 45 cm tail. Curve the lower edge around the back of the head before sewing. Do not sew it flat like a bib.
Brow Horns — Make 2
Yarn: cream
R1: 6 sc in MR (6)
R2–R3: sc around (6)
R4: inc ×6 (12)
R5–R7: sc around (12)
Stuff only the base. Pinch the tip with the starting tail for a sharper cone.
Fasten off. Leave 25 cm tail.
Nose Horn — Make 1
Yarn: cream
R1: 6 sc in MR (6)
R2–R3: sc around (6)
R4: inc ×6 (12)
R5: sc around (12)
Stuff very lightly.
Fasten off. Leave 20 cm tail.
Cheek Patches — Make 2
Yarn: pale pink
R1: 6 sc in MR (6)
R2: inc ×6 (12)
Sl st to next stitch (12)
Fasten off. Leave 18 cm tail. Block flat under a book for 10 minutes before sewing.
Belly Patch — Make 1
Yarn: cream
R1: 6 sc in MR (6)
R2: inc ×6 (12)
R3: (sc, inc) ×6 (18)
R4: (2 sc, inc) ×6 (24)
R5: (3 sc, inc) ×6 (30)
R6: sc around (30)
Fasten off. Leave 35 cm tail. Stretch slightly into an oval while pinning to the front body.
Body Spots — Make 6
Yarn: pale pink and lavender
Large spots, make 4:
R1: 6 sc in MR (6)
R2: inc ×6 (12)
Sl st to finish (12)
Small spots, make 2:
R1: 6 sc in MR (6)
Sl st to finish (6)
Fasten off each spot with a 15 cm sewing tail.
Assembly
- Sew the head to the body first, centered over R20–R24 of the body, using two full passes around the neck opening.
- Pin the belly patch to the front body before attaching legs; sew around the outer loop only so the patch stays flat.
- Sew cheek patches below the eyes, one round lower than the eye line and slightly outside the smile curve.
- Embroider the smile with black thread across 8–10 stitches; add three short lash stitches at the outer side of each eye.
- Attach the nose horn at the center front of the head, then place the brow horns above the eyes and 5–6 stitches apart.
- Sew the center frill panel behind the head, curving the lower row from one cheek line to the other.
- Add the side frill wings behind the cheeks, overlapping the center frill by 2 stitches on each side.
- Sew front legs to the lower front body, then sew back legs under the body so the toy sits without rocking.
- Attach the tail at the back body, angled slightly downward to act as a rear support.
- Sew body spots across the back and hips, then attach three cream toe claws to each foot.
The finished triceratops should sit with the frill clear of the table and the nose horn centered between the eyes.
7 Technical Tips
- Stitch marker drift: If the marker moves more than 3 stitches off the underside line by R12 of the body, shift the final sewing placement instead of twisting the body. Twisting makes the back spots look diagonal.
- Stuffing firmness: The head needs firm stuffing at 90–95% capacity before closing R21. A soft head will collapse under the brow horns and pull the smile upward.
- Invisible decrease gaps: On mint yarn, a loose dec at R17 of the head leaves visible holes around the face. Pull the working yarn tight after each dec, not after the full round.
- Eye placement timing: Insert the eyes after R18 of the head, before the opening becomes too small for adjusting washers. A 1-round height error changes the cheek patch position by about 5 mm.
- Velvet tension warning: If substituting velvet yarn, reduce the hook by at least 0.5 mm from the label suggestion and test R1–R4 first. Velvet hides stitches, so missed increases usually appear as a tilted snout later.
- Pinning the frill: Use at least 9 pins on the center frill: two lower corners, three across the lower curve, and four around the lavender edge. Fewer pins let the frill creep toward one horn while sewing.
- Tail weaving: Weave the tail yarn through at least 6 body stitches, then reverse direction through 4 stitches. A tail attached with one pass can loosen because it carries rear balance pressure.
Conclusion
The final check is not the smile or the spots. It is the triangle formed by the nose horn, both eyes, and the two brow horns. Pin those pieces first, photograph the face straight on, then sew only after the frill sits evenly behind them. For a cleaner WordPress post, add one process photo after the center frill panel and one after eye placement. Share the finished dinosaur on Pinterest and Instagram with the hashtag #PastelTriceratops. This triceratops amigurumi crochet pattern is ready for a pastel dinosaur collection. Which frill edge would match this character better: seven lavender scallops or one continuous lavender outline?