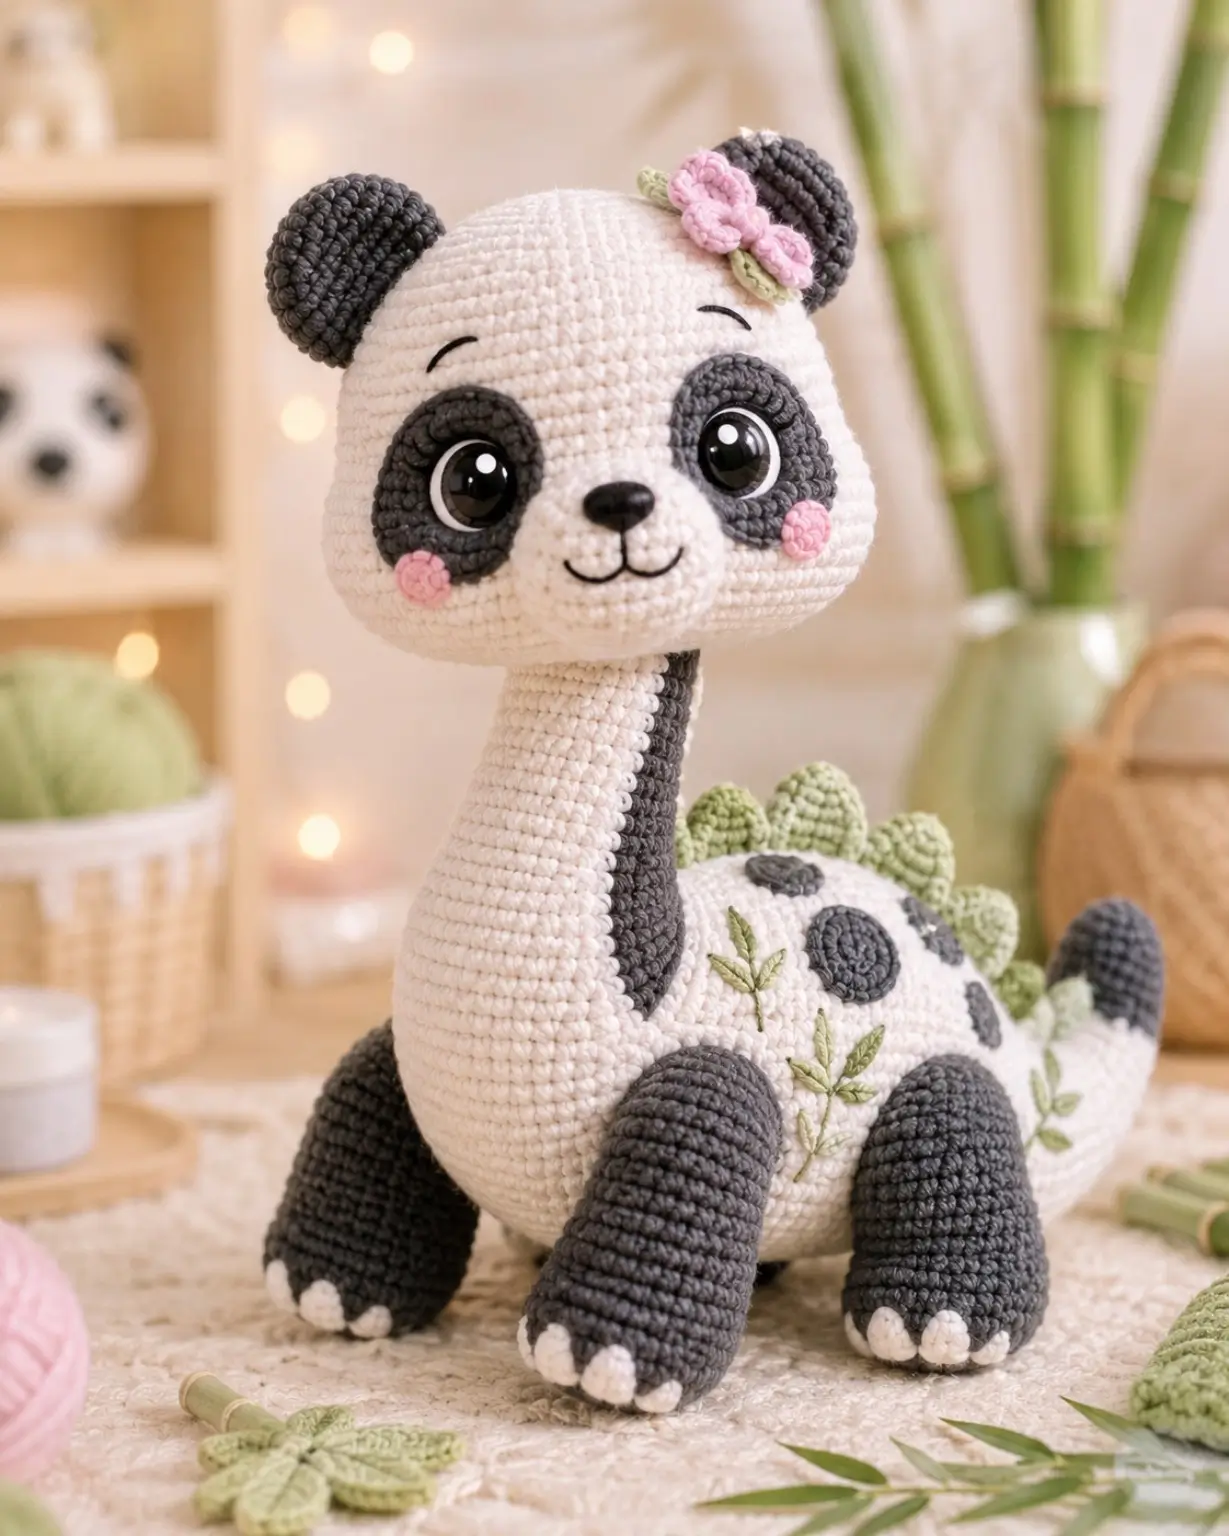
A panda brontosaurus has two visual centers: black eye patches and a tail-heavy sauropod body. This panda brontosaurus amigurumi crochet pattern uses worsted yarn, a 3.5 mm hook, 16 mm safety eyes, and a large 42-stitch plateau to make a seated toy about 22 cm tall. The skill level is intermediate. Make it when a dinosaur plush needs clear panda markings from the front and side.
The Design: What Makes Bai-Bronte Different
Bai-Bronte is built around contrast placement, not just color change. The head stays broad because panda identity depends on oversized black eye patches, rounded ears, and a small dark nose. The body uses brontosaurus proportions: long neck, low oval belly, thick legs, and a tail that points up enough to read from a shelf. Green dorsal plates solve the dinosaur signal without hiding the panda spots. They also add weight along the spine, so the body must be stuffed firmly before the plates are sewn. A common maker mistake with a panda dinosaur crochet pattern is shrinking the eye patches after the safety eyes are set. That makes the toy look like a plain brontosaurus with spots. Keep the patches wide, and the brontosaurus amigurumi pattern keeps both species visible.
Project Info at a Glance
| Skill Level | Time | Finished Size | Hook | Best For |
|---|---|---|---|---|
| Intermediate | 6–8 hours | About 22 cm seated | 3.5 mm | Panda-dinosaur display plush with photo-style markings |
Materials and Tools
Yarn
- White — worsted/Aran #4 — 70 g — Paintbox Cotton Aran, YarnArt Jeans held double, or similar cotton/acrylic
- Charcoal black — worsted/Aran #4 — 45 g — same yarn family as white
- Soft green — worsted/Aran #4 — 15 g — plates, leaves, embroidery
- Pale pink — worsted/Aran #4 — 5 g — cheeks and flower
- Black embroidery thread — nose, mouth, brows
Tools
- Hook 3.5 mm
- 16 mm safety eyes
- Fiberfill stuffing
- Yarn needle
- Stitch markers
- Pins
- Scissors
Abbreviations
MR = magic ring; sc = single crochet; inc = 2 sc in next stitch; dec = single crochet decrease; sl st = slip stitch; ch = chain; BLO = back loop only; hdc = half double crochet; dc = double crochet; FO = fasten off. Invisible decrease is worked through the front loops of the next two stitches so the closure line loses less height.
Pattern — Step by Step
Continuous spiral unless noted. Use a stitch marker at the first stitch of every round.
Head
Yarn: white
R1: 6 sc in MR (6)
R2: inc ×6 (12)
R3: (sc, inc) ×6 (18)
R4: (2 sc, inc) ×6 (24)
R5: (3 sc, inc) ×6 (30)
R6: (4 sc, inc) ×6 (36)
R7: (5 sc, inc) ×6 (42)
R8–R15: sc around (42)
R16: (5 sc, dec) ×6 (36)
R17: (4 sc, dec) ×6 (30)
Place eye patches first. Insert safety eyes through the patch centers and head between R11 and R12, 8 stitches apart.
R18: (3 sc, dec) ×6 (24)
R19: (2 sc, dec) ×6 (18)
Stuff the head firmly, adding more at the cheeks than the crown.
R20: (sc, dec) ×6 (12)
R21: dec ×6 (6)
Fasten off. Leave a 20 cm tail and close the hole.
Muzzle
Yarn: white
R1: 6 sc in MR (6)
R2: inc ×6 (12)
R3: (sc, inc) ×6 (18)
R4: sc around (18)
R5: (sc, dec) ×6 (12)
Fasten off. Leave a 25 cm tail. Stuff lightly, then sew below the eyes. Embroider a black oval nose across R3–R4 and a split mouth under it.
Body
Yarn: white
R1: 6 sc in MR (6)
R2: inc ×6 (12)
R3: (sc, inc) ×6 (18)
R4: (2 sc, inc) ×6 (24)
R5: (3 sc, inc) ×6 (30)
R6: (4 sc, inc) ×6 (36)
R7: (5 sc, inc) ×6 (42)
R8–R17: sc around (42)
R18: (5 sc, dec) ×6 (36)
R19: (4 sc, dec) ×6 (30)
R20: sc around (30)
R21: (3 sc, dec) ×6 (24)
R22: (2 sc, dec) ×6 (18)
Stuff the belly densely. A soft center will let the neck tip forward.
R23: (sc, dec) ×6 (12)
R24: dec ×6 (6)
Fasten off. Leave a 30 cm tail for sewing if the body hole is at the neck side; otherwise weave in.
Neck
Yarn: white
R1: 6 sc in MR (6)
R2: inc ×6 (12)
R3: (sc, inc) ×6 (18)
R4: (2 sc, inc) ×6 (24)
R5–R18: sc around (24)
R19: (2 sc, dec) ×6 (18)
R20: sc around (18)
Stuff in small plugs every 3 rounds. Keep the column round, not flat.
Fasten off. Leave a 35 cm tail.
Neck Back Stripe
Yarn: charcoal black
Row 1: ch 7, sc in second ch from hook and across (6)
Rows 2–15: ch 1, turn, sc across (6)
Fasten off. Leave a 25 cm tail. Sew down the back of the neck after the neck is attached.
Front Legs / Arms (Make 2)
Yarn: charcoal black
R1: 6 sc in MR (6)
R2: inc ×6 (12)
R3: (sc, inc) ×6 (18)
R4–R7: sc around (18)
R8: (sc, dec) ×6 (12)
R9–R11: sc around (12)
Stuff the lower half only. Flatten the top edge.
Fasten off. Leave a 25 cm tail.
Back Legs (Make 2)
Yarn: charcoal black
R1: 6 sc in MR (6)
R2: inc ×6 (12)
R3: (sc, inc) ×6 (18)
R4: (2 sc, inc) ×6 (24)
R5–R9: sc around (24)
R10: (2 sc, dec) ×6 (18)
R11–R12: sc around (18)
Stuff firmly at the foot and lightly at the top.
Fasten off. Leave a 30 cm tail.
Toe Claws
Yarn: white
For each foot, make 3 small vertical satin stitches across the front edge. Each claw should cover 2 rounds in height and 1 stitch in width. Knot inside the leg before sewing the leg to the body.
Ears (Make 2)
Yarn: charcoal black
R1: 6 sc in MR (6)
R2: inc ×6 (12)
R3: (sc, inc) ×6 (18)
R4: (2 sc, inc) ×6 (24)
R5–R7: sc around (24)
R8: (2 sc, dec) ×6 (18)
R9: (sc, dec) ×6 (12)
Stuff lightly. Flatten the lower edge into a half dome.
Fasten off. Leave a 25 cm tail.
Tail
Yarn: charcoal black for R1–R4, white for R5 onward
R1: 6 sc in MR (6)
R2: sc around (6)
R3: inc ×6 (12)
R4: sc around (12)
Change to white.
R5: (sc, inc) ×6 (18)
R6–R10: sc around (18)
R11: (2 sc, inc) ×6 (24)
R12–R17: sc around (24)
R18: (3 sc, inc) ×6 (30)
R19–R21: sc around (30)
Stuff from the tip upward. Keep the black tip rounded.
Fasten off. Leave a 35 cm tail.
Dorsal Plates (Make 7)
Yarn: soft green
R1: 6 sc in MR (6)
R2: sc around (6)
R3: inc ×6 (12)
R4: sc around (12)
R5: (sc, inc) ×6 (18)
R6: sc around (18)
Stuff very lightly. Flatten the base before sewing.
Fasten off. Leave a 20 cm tail on each plate.
Eye Patches (Make 2)
Yarn: charcoal black
R1: 6 sc in MR (6)
R2: inc ×6 (12)
R3: (sc, inc) ×6 (18)
R4: (2 sc, inc) ×6 (24)
Sl st to close. Fasten off. Leave a 20 cm tail. Insert each safety eye through the center area before the washer is added inside the head.
Cheek Patches (Make 2)
Yarn: pale pink
R1: 6 sc in MR (6)
R2: inc ×6 (12)
Sl st to close. Fasten off. Leave a 15 cm tail. Sew one cheek under each eye patch.
Body Spots (Make 3)
Yarn: charcoal black
Small spot: R1: 6 sc in MR (6); R2: inc ×6 (12). Fasten off with 15 cm tail.
Medium spots, make 2: R1: 6 sc in MR (6); R2: inc ×6 (12); R3: (sc, inc) ×6 (18). Fasten off with 20 cm tail.
Sew one medium spot on each side of the body and one small spot near the top rump.
Ear Flower
Yarn: pale pink center and petals; soft green leaves
Flower center: R1: 6 sc in MR (6); R2: inc ×6 (12); sl st to close.
Petals: join pink to any stitch, *(ch 3, 2 dc in same stitch, ch 3, sl st in next stitch)* ×5.
Leaves, make 2: ch 6, sl st in second ch, sc, hdc, sc, sl st (5).
Fasten off. Leave tails for sewing. Sew the flower to the right ear base.
Body Leaf Embroidery
Yarn: soft green
Make 3 stems on the white body, each 3–5 cm long. Add paired leaf stitches every 1 cm along each stem. Keep the stitches shallow so the embroidery does not pull stuffing into dents.
Assembly
- Sew the neck to the front top of the body, centered over R7–R11 of the body.
- Sew the head to the top of the neck, checking that the muzzle points slightly downward.
- Sew the muzzle to the lower front of the head and embroider the nose, mouth, and brows.
- Secure the eye patches if any edge lifts, then sew the cheek patches under the outer lower corners.
- Sew the ears to the head between R5 and R10, one on each upper side.
- Sew the front legs to the body below the neck, angled forward for a seated pose.
- Sew the back legs to the lower sides of the body so the toy rests on both feet and tail base.
- Sew the tail to the rear body opening, angled upward by about 20 degrees.
- Sew the dorsal plates from the crown-side neck line down the spine to the tail base.
- Add the black body spots, neck stripe, flower, leaves, and toe-claw embroidery.
The finished toy is a seated panda brontosaurus with a balanced three-point base.
7 Technical Tips
- Stitch marker drift: the black spots will rotate if the marker moves more than 2 stitches over 10 rounds. Reset the marker at the back center after R10 of the body.
- Stuffing collapse: the neck will fold if it is packed only at the top and bottom. Add stuffing plugs every 3 rounds and press them into a continuous column.
- Eye placement error: eyes placed wider than 9 stitches apart will push the panda patches too far to the sides. Set the eyes 8 stitches apart between R11 and R12 before closing the head.
- Invisible decrease ridge: regular decreases can make six visible bumps on the head closure. Work every head and body decrease through front loops only.
- Velvet tension shift: velvet or chenille can add 3–5 cm to the finished height. Drop to a 3.0 mm hook for dense velvet stitches or keep the 3.5 mm hook for cotton/acrylic.
- Pinning failure: dorsal plates sewn without pins often lean to one side by the fourth plate. Pin all 7 plates first, then sew from neck to tail.
- Tail weaving gap: the tail base can split open if the yarn tail is woven across only one round. Weave through at least 3 body rounds and 3 tail rounds before trimming.
Conclusion
This build works because the panda features stay on the face while the dinosaur features stay on the silhouette. The 42-stitch head and body give enough surface for eye patches, spots, and green plates without crowding the seams. Next, pin all facial pieces before attaching the safety-eye washers; that single step controls the final expression. Share the finished panda brontosaurus amigurumi crochet pattern on Pinterest with a side-view photo, then post the front view on Instagram so the panda patches read clearly. Use #PandaBrontosaurus. Should the next version keep green plates, or should the plates turn black and white to match the panda markings?









