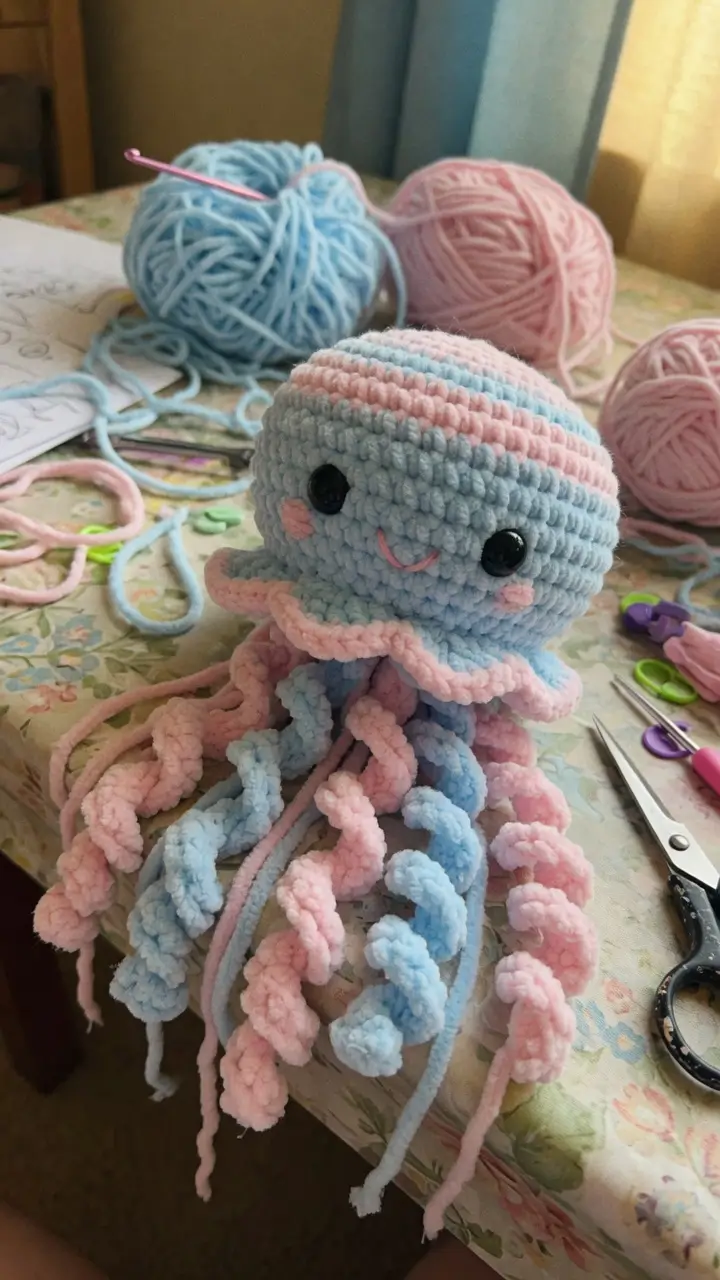
Jellyfish carry their weight in the bell, not the legs. This jellyfish amigurumi crochet pattern uses a 42-stitch dome, a closed underside puck, and separate curly tentacles so the plush sits without collapsing. Work it in chunky velvet yarn with a 5 mm hook for a 16 cm bell and about 40 cm total length. Skill level: advanced beginner. The finished piece works as a shelf plush or market-table ocean item.
The Design: What Makes This Jellyfish Different
The photographed jellyfish is not built like a sphere with strings added later. Its wide bell needs a flat visual front, so the increases stop at 42 stitches and the lower rounds pull inward before closing. That gives the face a broad plane and keeps the ruffle from rolling upward. The second decision is the underside puck. It gives the oral arms a firm anchor, which matters because plush yarn can tear if long spirals are tied to one loose stitch.
Finally, the tentacles are split into spiral arms and straight strands. Real jellyfish have mixed oral arms and trailing tentacles; the split also prevents a single heavy bundle at center. A common error in a crochet jellyfish pattern is placing eyes after stuffing, which stretches the velvet stitches and leaves uneven holes. For this free jellyfish amigurumi pattern, test the face before locking the washers.
Project Info at a Glance
| Skill Level | Time | Finished Size | Hook | Best For |
|---|---|---|---|---|
| Advanced beginner | 2–3 hours | 16 cm bell; about 40 cm total length | 5 mm | Plush display, ocean decor, market table |
Materials and Tools
Yarn
- Light blue — super bulky chenille — 75 g — Premier Parfait Chunky, Bernat Blanket, or similar plush yarn
- Baby pink — super bulky chenille — 40 g — same yarn line for matching gauge
- Black — embroidery thread or thin cotton — 1 g — smile only
- Blush pink — chenille scrap or cotton scrap — 2–5 g — cheek patches
Tools
- Hook 5 mm
- 12 mm black safety eyes
- Polyester stuffing
- Yarn needle
- Locking stitch markers
- Pins
- Scissors
Abbreviations
- MR = magic ring
- sc = single crochet
- inc = 2 sc in one stitch
- dec = single crochet decrease
- sl st = slip stitch
- ch = chain
- BLO = back loop only
- FLO = front loop only
- dc = double crochet
- hdc = half double crochet
An invisible decrease works through the front loops of the next two stitches before completing one sc; it reduces the gap on closing rounds.
Pattern — Step by Step
Continuous spiral unless noted. Use a stitch marker in the first stitch of every round.
Head / Bell
Yarn: light blue and baby pink.
R1, light blue: 6 sc in MR (6)
R2, baby pink: inc ×6 (12)
R3, light blue: [sc, inc] ×6 (18)
R4, baby pink: [2 sc, inc] ×6 (24)
R5, light blue: [3 sc, inc] ×6 (30)
R6, light blue: [4 sc, inc] ×6 (36)
R7, light blue: [5 sc, inc] ×6 (42)
R8: sc around (42)
R9: sc around (42)
R10, baby pink: sc around (42)
R11, light blue: sc around (42)
R12, baby pink: sc around (42)
R13, light blue: sc around (42)
R14: sc around (42)
R15: [5 sc, dec] ×6 (36)
R16: BLO [4 sc, dec] ×6 (30)
R17: [3 sc, dec] ×6 (24)
R18: [2 sc, dec] ×6 (18)
R19: [sc, dec] ×6 (12)
R20: dec ×6 (6)
Place eyes between R10 and R11, about 10 stitches apart, before closing R18. Stuff firmly but do not overfill the lower bell.
Fasten off. Leave 20 cm tail and close the final 6 stitches.
Body / Underside Puck
Yarn: light blue.
R1: 6 sc in MR (6)
R2: inc ×6 (12)
R3: [sc, inc] ×6 (18)
R4: [2 sc, inc] ×6 (24)
R5: [3 sc, inc] ×6 (30)
R6: BLO sc around (30)
R7: [3 sc, dec] ×6 (24)
R8: [2 sc, dec] ×6 (18)
R9: [sc, dec] ×6 (12)
R10: dec ×6 (6)
Stuff lightly. This part should stay flatter than the bell.
Fasten off. Leave 30 cm tail for sewing to the lower center of the head.
Scalloped Rim
Yarn: baby pink.
Join baby pink yarn to a free front loop from Head R16.
R1: [sc in next loop, skip 1 loop, 5 dc in next loop, skip 1 loop, sc in next loop, skip 1 loop] ×6 (42 made sts)
Let the rim flare outward. Do not stuff behind this edge.
Fasten off. Leave 15 cm tail and weave into the inside of the bell.
Front Spiral Oral Arms
Yarn: make 1 light blue and 1 baby pink.
R1: ch 31 (31)
R2: starting in second ch from hook, inc in each ch across (60)
The strip should curl by itself. Twist once by hand only if the chenille nap blocks the spiral.
Fasten off. Leave 20 cm tail on each arm.
Back Spiral Tentacles
Yarn: make 1 light blue and 1 baby pink.
R1: ch 41 (41)
R2: starting in second ch from hook, 3 sc in each ch across (120)
These are longer and heavier than the front oral arms. Attach them behind the underside puck, not at the face line.
Fasten off. Leave 20 cm tail on each tentacle.
Straight Hanging Strands
Yarn: make 2 light blue and 2 baby pink.
R1: ch 36 (36)
R2: starting in second ch from hook, sl st in each ch across (35)
Keep these strands less curled than the spiral arms. Pulling too tightly shortens them.
Fasten off. Leave 18 cm tail on each strand.
Side Bell Ruffle Lobes
Yarn: baby pink. Make 2.
R1: 6 sc in MR (6)
R2: [sc, inc] ×3 (9)
R3: sc around (9)
Flatten each lobe into a half-oval before sewing. Place one on each side under the rim if the bell edge needs extra width.
Fasten off. Leave 15 cm tail.
Cheek Patches
Yarn: blush pink. Make 2.
R1: 6 sc in MR (6)
R2: inc ×6 (12)
R3: sl st around (12)
Flatten before sewing. Place each cheek one round below the eye and slightly toward the center.
Fasten off. Leave 15 cm tail.
Embroidered Smile
Yarn: black or baby pink embroidery strand.
Use one horizontal stitch between the eyes, then anchor the smile with two tiny lower stitches.
The smile should sit centered between the eyes, not below the cheeks.
Fasten off on the inside and knot once.
Accessory Check
No crocheted accessory is attached to the photographed toy. The yarn balls, scissors, stitch markers, and hook are workspace props, so no accessory pattern is added.
Assembly
- Place the head with the face forward and the R20 closure pointing down.
- Pin the underside puck over the closure so it covers the final decrease hole.
- Sew the puck to the head through R6 of the puck and the lower bell fabric.
- Attach the two front spiral oral arms to the front third of the underside puck.
- Attach the two back spiral tentacles to the back third of the puck.
- Add the four straight hanging strands between the spiral pieces, spacing them evenly.
- Sew the cheek patches one round below the eyes and mirror their distance from the smile.
- Add the side ruffle lobes only if the rim needs more width at the left and right sides.
- Weave every yarn tail through at least 5 cm of interior fabric before trimming.
- Steam is not needed; reshape the bell by hand and let the chenille nap settle flat.
The jellyfish is complete when the underside puck hides all tentacle joins and the bell sits level.
7 Technical Tips
- Stitch marker failure mode: The first stitch disappears easily in velvet yarn after R7. Move the marker every round and count 42 stitches again after each stripe row.
- Stuffing firmness measurement: The bell should compress about 1 cm when pressed at the top. More stuffing makes the eye washers bulge; less stuffing lets the face crease.
- Invisible decrease failure mode: Standard decreases can leave six visible holes around R19. Use invisible decreases on R18–R20 so the lower bell closes cleanly.
- Eye placement timing: Install the 12 mm eyes after R14 and before R18. Waiting until the bell is closed forces the washer through stretched chenille stitches.
- Velvet tension failure mode: Chenille spirals flatten when the hook is too large. Stay at 5 mm for super bulky yarn unless the stitches become stiff and hard to close.
- Pinning measurement: Pin tentacles at least 1.5 cm apart on the underside puck. Closer spacing creates one heavy clump that pulls the bell forward.
- Tail weaving failure mode: Short tails slide out of plush yarn after handling. Weave every tentacle tail through 5–7 cm of fabric and cross back once before trimming.
Conclusion
This jellyfish amigurumi crochet pattern is built around the parts visible in the photo: a wide pastel bell, a pink scalloped rim, black safety eyes, blush cheeks, and mixed hanging tentacles. The 42-stitch plateau gives the dome enough width for a kawaii face, while the underside puck keeps the tentacle joins hidden. For the next step, make one test bell in scrap yarn and confirm the eye spacing before cutting chenille tails. Share the finished jellyfish on Pinterest and Instagram with #PastelJellyfishAmigurumi. Which version matches this character better: more pink tentacles at the front, or a wider blue bell stripe across the crown?









