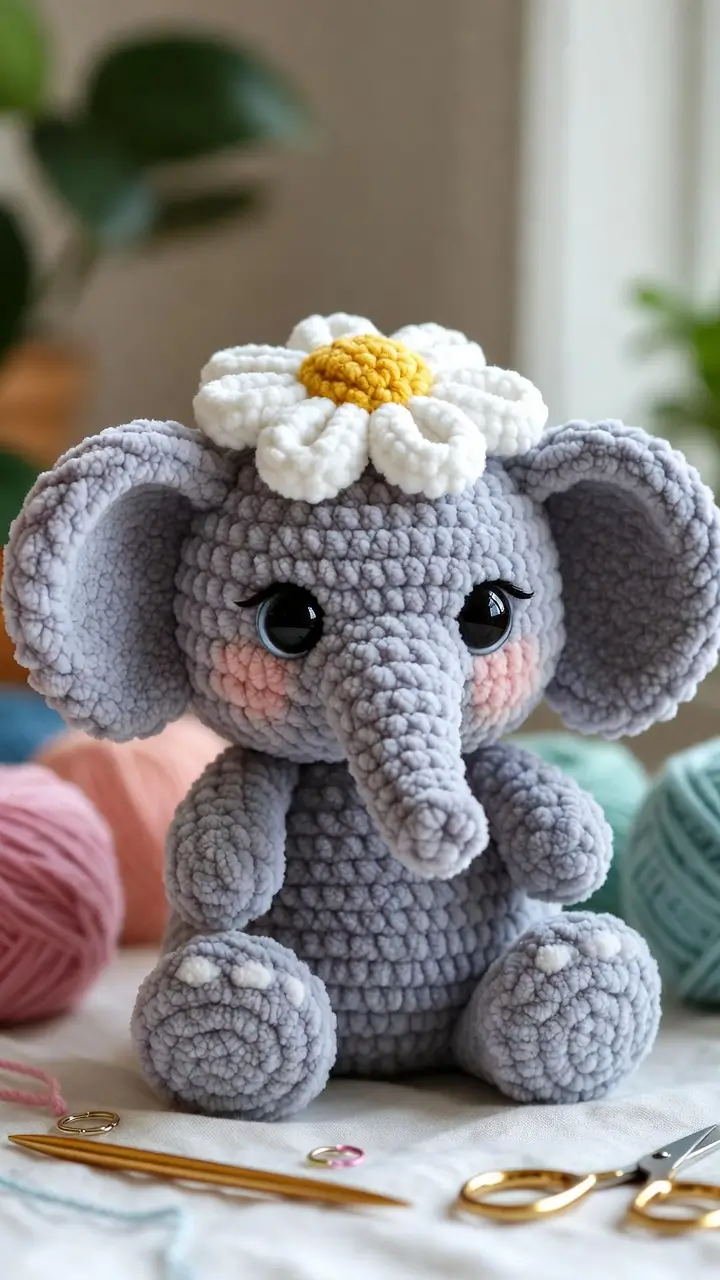
An elephant fails when the trunk hangs like a tube instead of reading as weight. This elephant amigurumi crochet pattern builds a 23 cm sitting plush with chunky gray velvet yarn, 4.5 mm hook, 16 mm eyes, and a sewn daisy. You need standard increases, decreases, flat circles, and clean pinning. The finished toy works as a nursery shelf piece because the wide ears keep its silhouette readable from the front.
The Design: What Makes Daisy Elephant Different
Elephant anatomy forces three choices: ears must be broad, the trunk must taper, and the body must sit low. This design gives the head a 42-stitch plateau so the ears can attach without collapsing the face. The trunk starts narrow, then widens at the base; that keeps the front from looking like a snout on a bear. You will make the body smaller than the head, which matches a baby elephant crochet toy and leaves enough room for feet. The maker then treats the daisy as a structural cap, not a random applique. It hides the crown increases and adds vertical balance above the wide ears. A common mistake in a chunky elephant amigurumi is placing eyes too high; the face becomes mouse-like when the trunk sits below a tall blank forehead.
Project Info at a Glance
| Skill Level | Time | Finished Size | Hook | Best For |
|---|---|---|---|---|
| Advanced beginner to intermediate | Not verified in source set | 23 cm sitting | 4.5 mm | Nursery shelf, plush display, market sample |
The size, hook, yarn, and eye choices follow a 9-inch chunky elephant benchmark using 125 g main yarn, 4.5 mm hook, and 16 mm safety eyes. Source: Amigurumi Corner.
Materials and Tools
Yarn
- Light gray — chunky chenille / velvet, weight 6 — 125 g — Himalaya Dolphin Baby or similar plush yarn.
- Darker gray — chunky chenille / velvet, weight 6 — 13 g — inner ear shadows and tail tassel.
- White — chunky chenille / velvet, weight 6 — 10 g — daisy petals and toe patches.
- Yellow — chunky chenille / velvet, weight 6 — 4 g — daisy center.
- Blush pink — worsted scrap or plush scrap — 2 g — cheek patches.
The 125 g main-yarn and 13 g contrast-yarn benchmark comes from a 9-inch chunky elephant source; the daisy and cheek quantities are photo-matched estimates for this version. Source: Amigurumi Corner.
Tools
- Hook 4.5 mm
- 16 mm safety eyes
- Polyester stuffing
- Tapestry needle
- Locking stitch markers
- Sewing pins
- Small scissors
Abbreviations
MR = magic ring; sc = single crochet; inc = increase; dec = decrease; sl st = slip stitch; ch = chain; BLO = back loop only; FO = fasten off. Invisible decrease means working through the front loops of the next two stitches before the final yarn-over to reduce visible gaps in plush yarn.
Pattern — Step by Step
Continuous spiral unless noted. Count every round before moving on.
Head
Yarn: light gray — Source: Standard amigurumi math, cross-checked against 42-stitch elephant head construction.
R1: 6 sc in MR (6)
R2: inc ×6 (12)
R3: (sc, inc) ×6 (18)
R4: (2 sc, inc) ×6 (24)
R5: (3 sc, inc) ×6 (30)
R6: (4 sc, inc) ×6 (36)
R7: (5 sc, inc) ×6 (42)
R8–R13: sc around (42)
Insert 16 mm safety eyes between R10 and R11, 8 stitches apart. Check that the trunk space sits centered below them.
R14: (5 sc, dec) ×6 (36)
R15: (4 sc, dec) ×6 (30)
R16: (3 sc, dec) ×6 (24)
R17: (2 sc, dec) ×6 (18)
Stuff firmly, especially behind the eyes and lower face.
R18: (sc, dec) ×6 (12)
R19: dec ×6 (6)
Fasten off. Leave a 25 cm tail to close.
Body
Yarn: light gray — Source: Standard amigurumi math, with 36-stitch body benchmark.
R1: 6 sc in MR (6)
R2: inc ×6 (12)
R3: (sc, inc) ×6 (18)
R4: (2 sc, inc) ×6 (24)
R5: (3 sc, inc) ×6 (30)
R6: (4 sc, inc) ×6 (36)
R7–R11: sc around (36)
R12: (4 sc, dec) ×6 (30)
R13–R14: sc around (30)
R15: (3 sc, dec) ×6 (24)
R16: sc around (24)
R17: (2 sc, dec) ×6 (18)
Stuff the lower body firmly and the neck area extra firmly.
R18: (sc, dec) ×6 (12)
R19: dec ×6 (6)
Fasten off. Leave a 35 cm tail for sewing to the head.
Arms / Front Legs
Yarn: light gray — Source: Standard amigurumi math.
Make 2.
R1: 6 sc in MR (6)
R2: inc ×6 (12)
R3–R7: sc around (12)
Stuff only the lower half so the arm can hang against the body.
R8: dec ×6 (6)
R9: sc around (6)
Flatten the opening and sew across 3 stitches. Fasten off. Leave an 18 cm tail.
Back Legs and Feet
Yarn: light gray — Source: Standard amigurumi math.
Make 2.
R1: 6 sc in MR (6)
R2: inc ×6 (12)
R3: (sc, inc) ×6 (18)
R4–R6: sc around (18)
Shape the foot into an oval while stuffing. Keep the top flatter than the sole.
R7: (sc, dec) ×6 (12)
R8: sc around (12)
R9: dec ×6 (6)
Fasten off. Leave a 25 cm tail.
Ears
Yarn: light gray for outer ear; darker gray for inner panel — Source: Standard amigurumi math plus elephant ear layout research.
Make 2 outer ears.
R1: 6 sc in MR (6)
R2: inc ×6 (12)
R3: (sc, inc) ×6 (18)
R4: (2 sc, inc) ×6 (24)
R5: (3 sc, inc) ×6 (30)
R6: (4 sc, inc) ×6 (36)
R7: sc around (36)
Do not stuff. Fold the lower edge slightly to cup the ear. Fasten off and leave a 35 cm tail.
Make 2 inner panels in darker gray.
R1: 6 sc in MR (6)
R2: inc ×6 (12)
R3: (sc, inc) ×6 (18)
R4: (2 sc, inc) ×6 (24)
Fasten off. Sew one inner panel to each outer ear before attaching ears to the head.
Trunk
Yarn: light gray — Source: Standard amigurumi math; elephant trunk shape cross-checked against separate trunk construction.
R1: 6 sc in MR (6)
R2: inc ×6 (12)
R3–R8: sc around (12)
Stuff lightly. A packed trunk will point outward instead of hanging down.
R9: (sc, inc) ×6 (18)
R10–R11: sc around (18)
Fasten off. Leave a 40 cm tail for sewing.
Cheek Patches
Yarn: blush pink — Source: Standard amigurumi math.
Make 2.
R1: 6 sc in MR (6)
R2: inc ×6 (12)
Sl st to finish the round. Fasten off. Leave a 15 cm tail.
Toe Patches
Yarn: white — Source: Standard amigurumi math.
Make 6.
R1: 6 sc in MR (6)
Pull the ring tight and sl st to the first stitch. Fasten off. Leave a 12 cm tail on each patch.
Daisy Center
Yarn: yellow — Source: Standard amigurumi math.
R1: 6 sc in MR (6)
R2: inc ×6 (12)
R3: (sc, inc) ×6 (18)
R4: sc around (18)
R5: (sc, dec) ×6 (12)
Stuff lightly. Fasten off. Leave a 25 cm tail.
Daisy Petals
Yarn: white — Source: Standard amigurumi math.
Make 8.
R1: 6 sc in MR (6)
R2: inc ×6 (12)
R3–R4: sc around (12)
R5: dec ×6 (6)
Do not overstuff. Flatten each petal slightly. Fasten off and leave a 15 cm tail.
Tail
Yarn: light gray with darker gray tassel — Source: Standard amigurumi math.
R1: 6 sc in MR (6)
R2–R4: sc around (6)
Do not stuff. Fasten off with a 15 cm tail. Add three darker gray yarn strands through the tip and knot them into a short tassel.
Assembly
- Close the head opening with the yarn tail, then press the lower face forward with your thumb to set the trunk area.
- Place the body under the head with the body’s R1 centered under the head’s closing point; sew through one full round twice.
- Pull the eye indentations with gray yarn from the lower head to the inside corner of each eye.
- Sew the cheek patches under the eyes, with the top edge one round below the eye line.
- Attach the arms to the upper body between body R12 and R14, leaving 8 stitches between them at the front.
- Sew the back legs to the lower front of the body so the feet angle upward and remain visible.
- Pin the ears to the sides of the head between head R7 and R12, then sew the folded base firmly.
- Sew the trunk between the eyes and cheeks, with the wide end covering head R11 to R14.
- Attach the tail to the back of the body at R9, then trim the tassel to 2 cm.
- Arrange the eight petals around the yellow center on the crown, sew petals first, then sew the center over their inner tips.
The elephant is complete when it sits without tipping and the daisy center is aligned over the trunk.
7 Technical Tips
- Stitch-marker drift: If the marker moves more than 2 stitches to the right by R10 of the head, the face will twist. Reset the marker at the center back before placing the safety eyes.
- Stuffing firmness: The head needs firm stuffing behind the eyes and medium stuffing at the crown. A soft crown lets the daisy sink and makes the ears pull downward.
- Invisible decrease gaps: Velvet yarn shows ladders when normal decreases are worked too loosely. Use front-loop invisible decreases on head R14–R19 and body R15–R19.
- Eye placement timing: Lock the 16 mm safety eyes after R13 and before R14. Waiting until the head is nearly closed makes the washers hard to seat flat.
- Velvet tension: Keep each sc about 8–10 mm wide with this yarn scale. Tight stitches crush the plush texture; loose stitches expose stuffing at the decrease rounds.
- Pinning symmetry: Measure from the trunk base to each ear base before sewing. A difference greater than 1 cm makes one ear look higher in front photos.
- Tail weaving: Bury each sewing tail through at least 4 cm of stuffed fabric before trimming. Short tails work loose faster in chenille because the fibers slide against each other.
Conclusion
Keep the head large, the body compact, and the trunk attached before the ears are sewn flat. That order gives the elephant its front-facing silhouette and leaves the daisy centered instead of drifting toward one ear. Your next step is to make one test head in scrap yarn, then adjust eye spacing before cutting the velvet tails. Save this elephant amigurumi crochet pattern to Pinterest and post the finished plush on Instagram with #DaisyElephantAmigurumi. For the next version, change only one variable: petal count, ear size, or cheek color. Which feature makes your elephant read correctly first—the trunk curve, the ear span, or the yellow daisy center?









