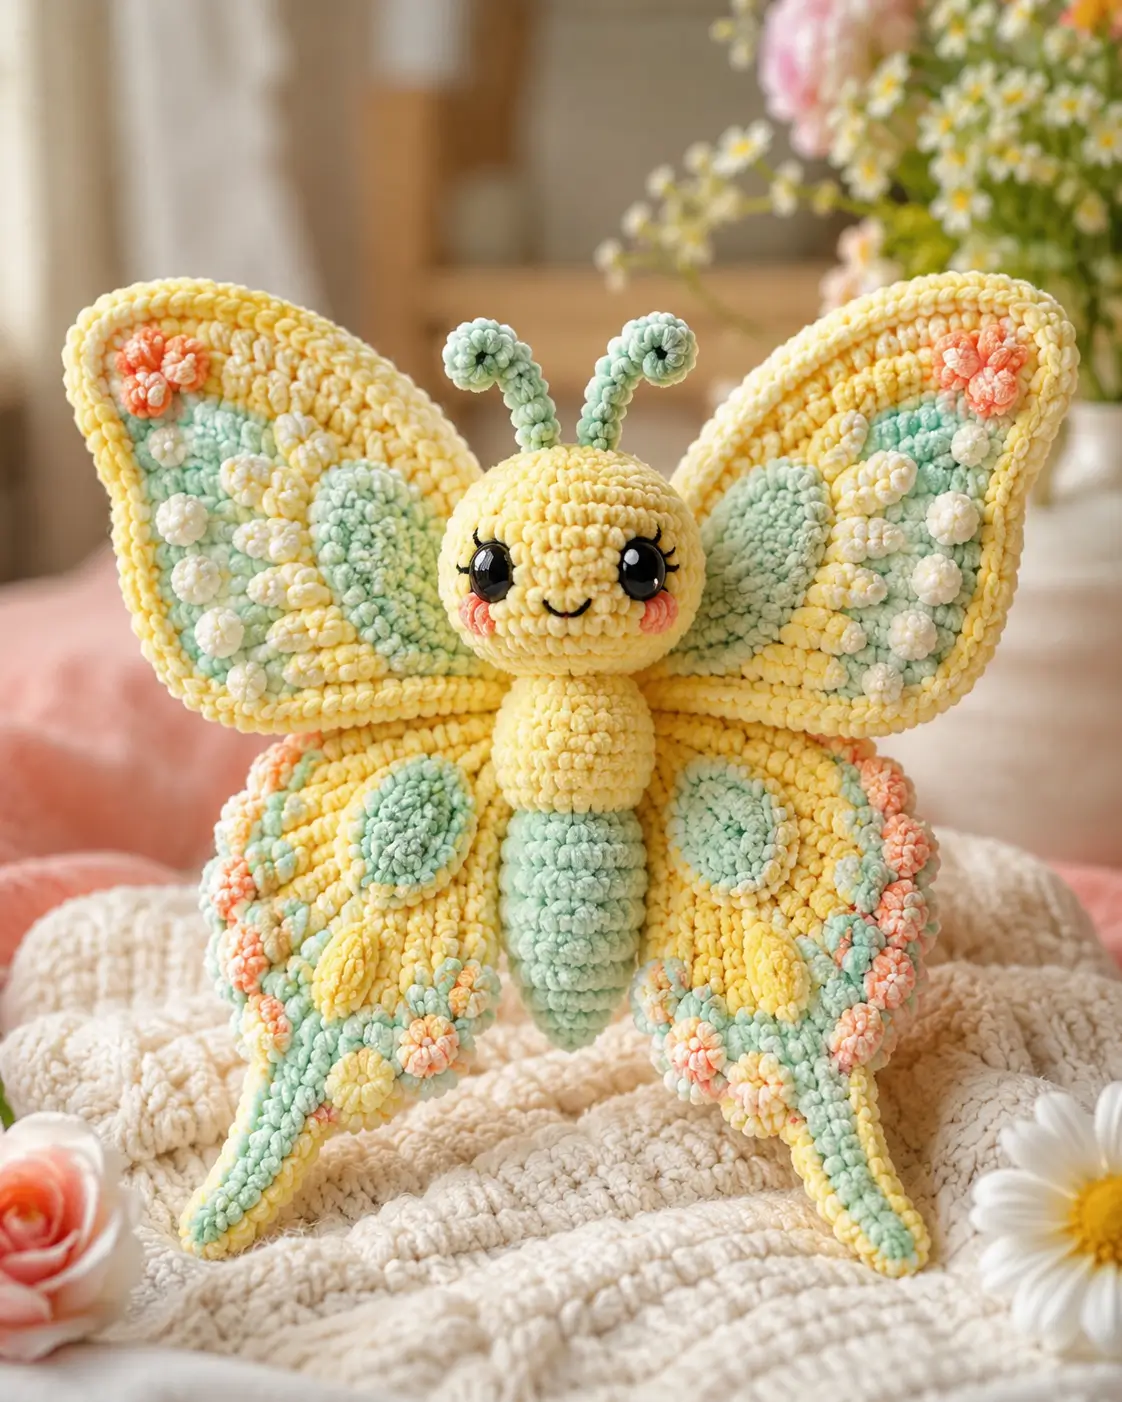
Butterflies have four wings, not two, and this butterfly amigurumi crochet pattern builds that problem into the structure. You will make a pastel chenille plush about 22 cm tall with a 5 mm hook, 12 mm eyes, and intermediate shaping. The design works as shelf decor because the wing panels are pinned and sewn flat against a narrow body.
The Design: What Makes This Butterfly Different
This butterfly uses four separate wing panels instead of one folded piece. The upper pair has a 42-stitch plateau so it reads wide; the lower pair drops to 36 stitches and gets a pointed tail, which keeps the silhouette from becoming a round bow. The body stays slimmer than the head. That choice moves visual weight to the wings, where a real butterfly carries most of its surface area. Work the face before closing the head because chenille hides stitch columns after stuffing; the maker who waits until assembly often sets the eyes one round too low. Raised cream and coral dots are sewn on last so the plush crochet butterfly keeps a clean underside. In this pastel crochet butterfly, the mint patches act as color blocks, not structural pieces.
Project Info at a Glance
| Skill Level | Time | Finished Size | Hook | Best For |
|---|---|---|---|---|
| Intermediate | 5–7 hours | 22 cm tall | 5.0 mm | Shelf decor, photos, older-child toy with embroidered eyes |
For children under 3, embroidered eyes are the safer choice because detachable small parts create choking risk.
Materials and Tools
Yarn
- Pastel yellow — super bulky chenille — 1 × 100 g skein, about 60 g used — Himalaya Dolphin Baby, YarnArt Dolce, or similar
- Mint green — super bulky chenille — 1 × 100 g skein, about 35 g used — same brand family
- Cream — super bulky chenille — 1 × 100 g skein, about 10 g used — same brand family
- Peach/coral — super bulky chenille — 1 × 100 g skein, about 8 g used — same brand family
- Black thread — embroidery floss or cotton thread — small length for mouth and lashes
Tools
- Hook 5.0 mm
- 12 mm black safety eyes or embroidered eyes
- Polyester fiberfill
- Yarn needle
- Locking stitch markers
- Straight pins
- Scissors
- Black embroidery needle
Abbreviations
MR = magic ring; sc = single crochet; inc = increase; dec = invisible decrease; sl st = slip stitch; ch = chain; BLO = back loop only; st = stitch; R = round; Row = flat row. Invisible decrease uses the front loops of the next two stitches before finishing one single crochet, which reduces the ridge on chenille fabric.
Pattern — Step by Step
Continuous spiral unless noted.
Head
Yarn: pastel yellow chenille
R1: 6 sc in MR (6)
R2: inc ×6 (12)
R3: (sc, inc) ×6 (18)
R4: (2 sc, inc) ×6 (24)
R5: (3 sc, inc) ×6 (30)
R6: (4 sc, inc) ×6 (36)
R7–R12: sc around (36)
R13: (4 sc, dec) ×6 (30)
R14: (3 sc, dec) ×6 (24)
R15: (2 sc, dec) ×6 (18)
Insert 12 mm eyes between R9 and R10, 7 stitches apart. Embroider lashes before stuffing if using safety eyes.
R16: (sc, dec) ×6 (12)
Stuff firmly, adding fiberfill in small pieces.
R17: dec ×6 (6)
Fasten off. Leave 20 cm tail and close the final opening.
Body
Yarn: pastel yellow for thorax, mint green for abdomen
R1: 6 sc in MR (6)
R2: inc ×6 (12)
R3: (sc, inc) ×6 (18)
R4: (2 sc, inc) ×6 (24)
R5: (3 sc, inc) ×6 (30)
R6–R8: sc around (30)
R9: (3 sc, dec) ×6 (24)
Change to mint green on the final yarn-over of R9.
R10–R13: sc around (24)
R14: (2 sc, dec) ×6 (18)
R15–R16: sc around (18)
R17: (sc, dec) ×6 (12)
Stuff the body so it feels firm but still narrow.
R18: dec ×6 (6)
Fasten off. Leave 30 cm tail for sewing the body to the head.
Front Legs
Yarn: pastel yellow chenille
Make 2.
R1: 6 sc in MR (6)
R2–R5: sc around (6)
Do not stuff. Flatten the tube.
R6: sc through both layers to close (3)
Fasten off. Leave 15 cm tail.
Antennae
Yarn: mint green chenille
Make 2.
R1: 6 sc in MR (6)
R2: (sc, inc) ×3 (9)
R3: sc around (9)
R4: (sc, dec) ×3 (6)
R5–R10: sc around (6)
Stuff only the round tip. Leave the stem soft so it can curve.
Fasten off. Leave 25 cm tail. Bend the final three rounds into a curl and tack them with two hidden stitches.
Upper Wings
Yarn: pastel yellow chenille
Make 2.
R1: 6 sc in MR (6)
R2: inc ×6 (12)
R3: (sc, inc) ×6 (18)
R4: (2 sc, inc) ×6 (24)
R5: (3 sc, inc) ×6 (30)
R6: (4 sc, inc) ×6 (36)
R7: (5 sc, inc) ×6 (42)
R8–R10: sc around (42)
R11: (5 sc, dec) ×6 (36)
R12: (4 sc, dec) ×6 (30)
R13: sc around (30)
Do not stuff. Flatten each panel with the outer curve higher than the inner edge.
Fasten off. Leave 45 cm tail.
Lower Wings
Yarn: pastel yellow chenille
Make 2.
R1: 6 sc in MR (6)
R2: inc ×6 (12)
R3: (sc, inc) ×6 (18)
R4: (2 sc, inc) ×6 (24)
R5: (3 sc, inc) ×6 (30)
R6: (4 sc, inc) ×6 (36)
R7–R8: sc around (36)
R9: (4 sc, dec) ×6 (30)
R10: sc around (30)
R11: (3 sc, dec) ×6 (24)
R12: (2 sc, dec) ×6 (18)
Do not stuff. Flatten the panel and close the open edge with whipstitch.
Fasten off. Leave 45 cm tail.
Lower Wing Tail Points
Yarn: mint green chenille
Make 2.
Row 1: ch 7, sc in 2nd ch from hook and across (6)
Row 2: ch 1, turn, dec, 2 sc, dec (4)
Row 3: ch 1, turn, dec ×2 (2)
Row 4: ch 1, turn, dec (1)
Fasten off. Leave 25 cm tail.
Cheek Patches
Yarn: peach/coral chenille
Make 2.
R1: 6 sc in MR (6)
R2: inc ×6 (12)
Sl st to first stitch.
Fasten off. Leave 20 cm tail.
Mint Wing Center Patches
Yarn: mint green chenille
Make 2 large patches for the upper wings.
R1: 6 sc in MR (6)
R2: inc ×6 (12)
R3: (sc, inc) ×6 (18)
R4: (2 sc, inc) ×6 (24)
R5: (3 sc, inc) ×6 (30)
R6: sc around (30)
Fasten off. Leave 25 cm tail.
Make 2 small patches for the lower wings.
R1: 6 sc in MR (6)
R2: inc ×6 (12)
R3: (sc, inc) ×6 (18)
R4: (2 sc, inc) ×6 (24)
Fasten off. Leave 25 cm tail.
Raised Wing Flowers and Dots
Yarn: cream and peach/coral chenille
Make 14 cream dots and 6 peach dots.
R1: 6 sc in MR (6)
Sl st to first stitch.
Fasten off. Leave 15 cm tail.
For flower-style peach dots, add: ch 2, sl st in same stitch, repeat once in each of the 6 stitches (6 petals). Fasten off again and leave 15 cm tail.
Face Embroidery
Yarn: black embroidery thread
Place the mouth between R11 and R12 of the head. Stitch a shallow U shape across 3 stitches. Add one short lash at the outer edge of each eye, angled upward by one round. Knot inside the head before final closure.
Assembly
- Sew the head to the narrow top of the body, using the body tail and a full circle of stitches.
- Check that the face points forward and the mint abdomen sits centered below the chin.
- Embroider the mouth and lashes before attaching the wings if they were not completed during head work.
- Sew the front legs under the yellow thorax, 4 stitches apart, so they do not show from the front.
- Pin the upper wings to the back of the body with their top curves level with R6 of the head.
- Sew the upper wings through the inner 8 stitches only, leaving the outer edges free.
- Pin the lower wings below the upper pair, then sew them to the body with the same 8-stitch anchor.
- Attach the mint tail points to the lower wing tips and angle them downward.
- Sew the mint patches first, then add cream and peach dots after the large color blocks are fixed.
- Sew the cheek patches below the eyes and weave every tail through at least 5 cm of fabric.
The finished butterfly has four flat wings, two curled antennae, a narrow body, and raised floral markings.
7 Technical Tips
- A drifting stitch marker will twist the head seam by one full stitch column after R12. Move the marker into the first stitch of every round and recount at each 6-stitch increase.
- Under-stuffing the head makes the safety-eye washers tilt inward. Fill to about 85% firmness before R16, then add small pieces through the 12-stitch opening.
- A standard decrease creates a ridge on velvet yarn. Use invisible decrease through front loops only on every decrease round, especially R13–R17 of the head.
- Eye placement is locked before the head closes. Set the eyes between R9 and R10 with 7 stitches between posts; 5 stitches apart makes the face look crowded.
- Chenille tension failure shows as pale stuffing between stitches. If gaps appear on R6 of the head, drop from a 5.0 mm hook to a 4.5 mm hook.
- Wing pinning controls the whole silhouette. Match both upper wing tops to the same head round and keep lower tails at a 35–45 degree downward angle.
- Short woven tails work loose inside raised dots. Weave each dot tail in three directions for at least 5 cm before trimming.
Conclusion
This build is strongest when the wing panels are treated as flat engineering, not soft pillows. Pin every curve, mark the center line of the body, and sew through the base of each wing twice before adding the dots. For the next sample, change only the spot colors first; changing the wing shape and palette together makes troubleshooting harder. Save the butterfly amigurumi crochet pattern to Pinterest, then post the finished toy on Instagram with #PastelButterflyAmigurumi. A useful test photo is straight-on against a pale wall because it shows whether both upper wings sit at the same height. Which marking should sit closest to your butterfly’s lower tail: mint oval or coral flower?









