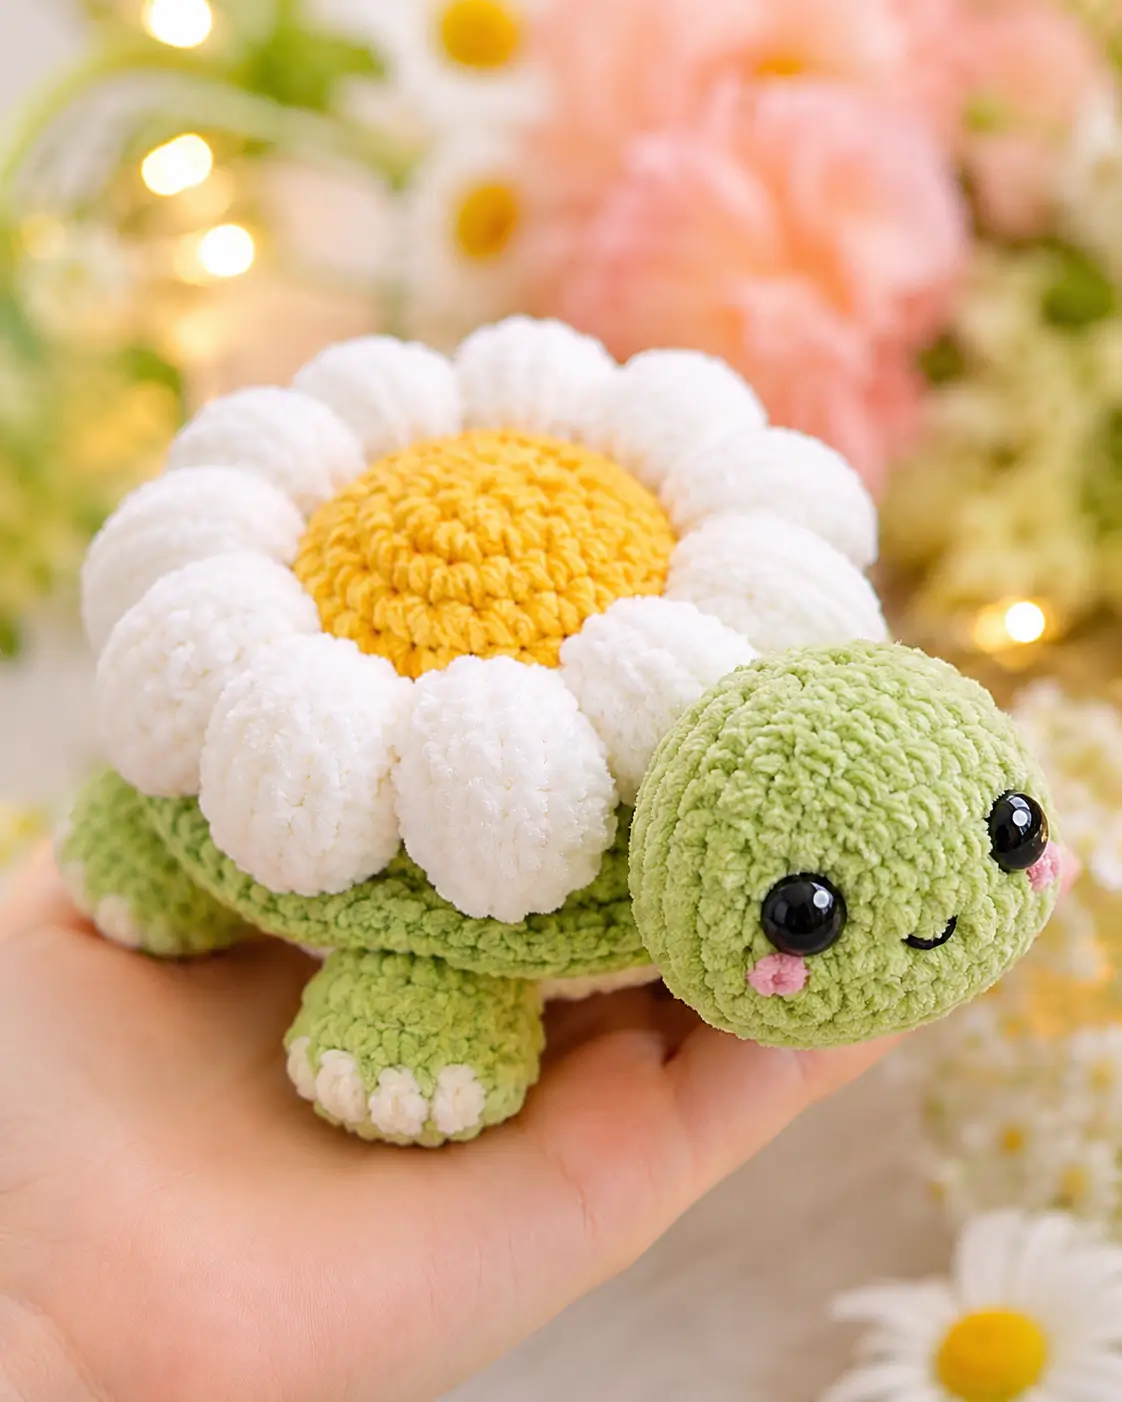
A turtle looks wrong the second the shell tips the head toward the table. This daisy turtle amigurumi crochet pattern uses super bulky plush yarn, a 4.5 mm hook, and a compact flower shell to land at about 14 cm long. It suits an advanced beginner and makes sense for spring market stock, nursery shelf styling, or a photo-ready desk plush.
The Design: What Makes Daisy Turtle Different
You need three structural choices to make this turtle read cleanly from one glance. First, the shell has to stay low rather than balloon upward, because a domed body lifts the feet and pushes the head down. Second, the flower center must sit smaller than the body disc or the petals swallow the face line. Third, the head needs a short narrowed neck, not a full sphere sewn flush to the shell. The plush then keeps its forward look instead of appearing tucked in.
A common error in any flower turtle crochet pattern is overstuffing the body until it turns ball-shaped. In plush daisy turtle builds, the cleaner examples keep the shell wide relative to the head. That is the right direction for a photo-matched chunky turtle plush.
Project Info at a Glance
| Skill Level | Time | Finished Size | Hook | Best For |
|---|---|---|---|---|
| Advanced beginner | 2.5–3.5 hours | 14 cm / 5.5 in | 4.5 mm | Market prep, spring décor, shelf plush |
Materials and Tools
Yarn
- Light green — super bulky velvet / chenille — 35 g — YarnArt Dolce or Premier Parfait Chunky in a mint or seaglass tone
- White — super bulky velvet / chenille — 15 g — Premier Parfait Chunky White or similar
- Yellow — super bulky velvet / chenille — 15 g — Premier Parfait Chunky Sunshine or similar
- Pink — super bulky plush scrap — 2 g — any soft blush tone for cheek circles
- Cream — super bulky plush scrap — 5 g — optional belly patch and toe trim
Tools
- Hook 4.5 mm
- 14 mm safety eyes
- Polyfill stuffing
- Tapestry needle
- Stitch markers
- Small scissors
Abbreviations
- MR = magic ring
- sc = single crochet
- inc = increase
- dec = decrease
- sl st = slip stitch
- ch = chain
- BLO = back loop only
Use invisible decrease in the front loops only; chenille gaps widen fast with a standard decrease.
Pattern — Step by Step
Continuous spiral unless noted.
Head (Make 1)
Yarn: light green
- R1: 6 sc in MR (6)
- R2: inc ×6 (12)
- R3: (sc, inc) ×6 (18)
- R4: (2 sc, inc) ×6 (24)
- R5: (3 sc, inc) ×6 (30)
- R6: (4 sc, inc) ×6 (36)
- R7: sc around (36)
- R8: sc around (36)
- R9: sc around (36)
- R10: sc around (36)
- Insert 14 mm eyes between R8 and R9, spacing them 11 stitches apart. Start stuffing.
- R11: (4 sc, dec) ×6 (30)
- R12: (3 sc, dec) ×6 (24)
- R13: (2 sc, dec) ×6 (18)
- R14: sc around (18)
- R15: sc around (18)
- Stuff firmly, but keep the neck area softer than the face.
- Flatten opening. Sc 9 through both sides.
Fasten off. Leave a 25 cm tail.
Body (Make 1)
Yarn: light green
- R1: 6 sc in MR (6)
- R2: inc ×6 (12)
- R3: (sc, inc) ×6 (18)
- R4: (2 sc, inc) ×6 (24)
- R5: (3 sc, inc) ×6 (30)
- R6: (4 sc, inc) ×6 (36)
- R7: (5 sc, inc) ×6 (42)
- R8: sc around (42)
- R9: sc around (42)
- R10: sc around (42)
- R11: (5 sc, dec) ×6 (36)
- R12: (4 sc, dec) ×6 (30)
- R13: (3 sc, dec) ×6 (24)
- R14: (2 sc, dec) ×6 (18)
- Stuff lightly. Press the base against your palm as you fill so the body stays low.
- R15: (sc, dec) ×6 (12)
- R16: dec ×6 (6)
Fasten off. Leave a 25 cm tail.
Belly Patch (Make 1)
Yarn: cream
- R1: 6 sc in MR (6)
- R2: inc ×6 (12)
- R3: (sc, inc) ×6 (18)
- R4: (2 sc, inc) ×6 (24)
Fasten off. Leave a 20 cm tail.
Front Legs (Make 2)
Yarn: light green
- R1: 6 sc in MR (6)
- R2: inc ×6 (12)
- R3: (sc, inc) ×6 (18)
- R4: sc around (18)
- R5: sc around (18)
- R6: (sc, dec) ×6 (12)
- Light stuffing only. Keep the lower edge broad.
- Flatten opening. Sc 6 through both sides.
Fasten off. Leave a 20 cm tail.
Back Legs (Make 2)
Yarn: light green
- R1: 6 sc in MR (6)
- R2: inc ×6 (12)
- R3: (sc, inc) ×6 (18)
- R4: sc around (18)
- R5: (sc, dec) ×6 (12)
- Light stuffing only.
- Flatten opening. Sc 6 through both sides.
Fasten off. Leave a 20 cm tail.
Tail (Make 1)
Yarn: light green
- Ch 4. Starting in 2nd ch from hook:
- Row 1: sc, hdc, dc
Fasten off. Leave a 12 cm tail.
Daisy Center (Make 1)
Yarn: yellow
- R1: 6 sc in MR (6)
- R2: inc ×6 (12)
- R3: (sc, inc) ×6 (18)
- R4: (2 sc, inc) ×6 (24)
- R5: (3 sc, inc) ×6 (30)
- R6: sc around (30)
- R7: sc around (30)
- Add a pinch of stuffing before closing the circle with your sewing tension if you want a raised center.
Fasten off. Leave a 35 cm tail.
Daisy Petals (Make 12)
Yarn: white
- R1: 6 sc in MR (6)
- R2: inc ×6 (12)
- R3: sc around (12)
- R4: (sc, dec) ×4 (8)
- Very light stuffing only, or leave unstuffed for a flatter shell.
- Flatten opening. Sc 4 through both sides.
Fasten off. Leave an 18 cm tail.
Cheek Patches (Make 2)
Yarn: pink
- R1: 6 sc in MR (6)
- Sl st to first stitch.
Fasten off. Leave a 10 cm tail.
Assembly
- Sew the head to the front of the body, centering the 9-stitch neck seam on the front body line.
- Angle the head slightly upward rather than straight out.
- Sew the front legs to the lower front sides, one round behind the head seam.
- Sew the back legs to the lower rear sides, keeping both pairs level so the plush sits evenly.
- Attach the tail centered between the back legs.
- Sew the cream belly patch to the underside. For the white toe look in the photo, add three tiny surface-slip stitches or short satin stitches to each front foot edge.
- Pin twelve petals around the top body, spacing them evenly before sewing.
- Sew the petals in place first, then stitch the yellow center over their inner edges so the petal seams disappear.
- Attach the two pink cheek patches below the eyes and embroider a short curved smile between them with black thread.
- Compress the shell lightly with your palm and redistribute stuffing until all four feet touch the table.
The finished plush sits at roughly 14 cm / 5.5 in when made in super bulky plush yarn with a 4.5 mm hook.
7 Technical Tips
- Stitch marker drift: Lose the start point once on chenille and the petal ring will rotate off center. Move the marker every round; on a 42-stitch shell, even a 1-stitch drift shows.
- Stuffing firmness: Overfill the body and the turtle turns into a ball instead of a low shell. Stop when the body compresses about 5 mm under thumb pressure but still keeps its outline.
- Invisible decrease: Standard dec leaves open ladders in plush yarn, especially on the head taper. Work invisible dec on every decrease round from R11 onward to keep the face smooth.
- Eye placement timing: Put the eyes in after R10 of the head, before the opening drops below 24 stitches. Later insertion stretches the chenille and can tilt the washers inside the stuffing.
- Velvet tension: Loose tension exposes backing threads and makes the cheeks look oversized by contrast. If gaps appear, go down from 4.5 mm to 4.0 mm or pull the working yarn more vertically.
- Pinning order: Pin the head first, then front legs, then back legs, then petals. This stops the shell decoration from dictating a bad body angle.
- Tail weaving: A short chain tail twists sideways if the end is buried in one pass. Run the tail through the body in three direction changes before trimming.
Conclusion
Start with one head and one petal before cutting the full color set. That small test tells you whether the 4.5 mm hook is tight enough for your yarn and whether the 14 mm eyes read correctly on the face. After that, batch all twelve petals, then move through the shell and limbs in one run. For sharing, post one top view for Pinterest and one side profile for Instagram so the shell height and head angle are both visible. Tag the finished plush with #DaisyTurtle and note your yarn brand. Which version did you prefer for this daisy turtle amigurumi crochet pattern: tightly packed petals or a slightly open daisy ring?









