Introduction
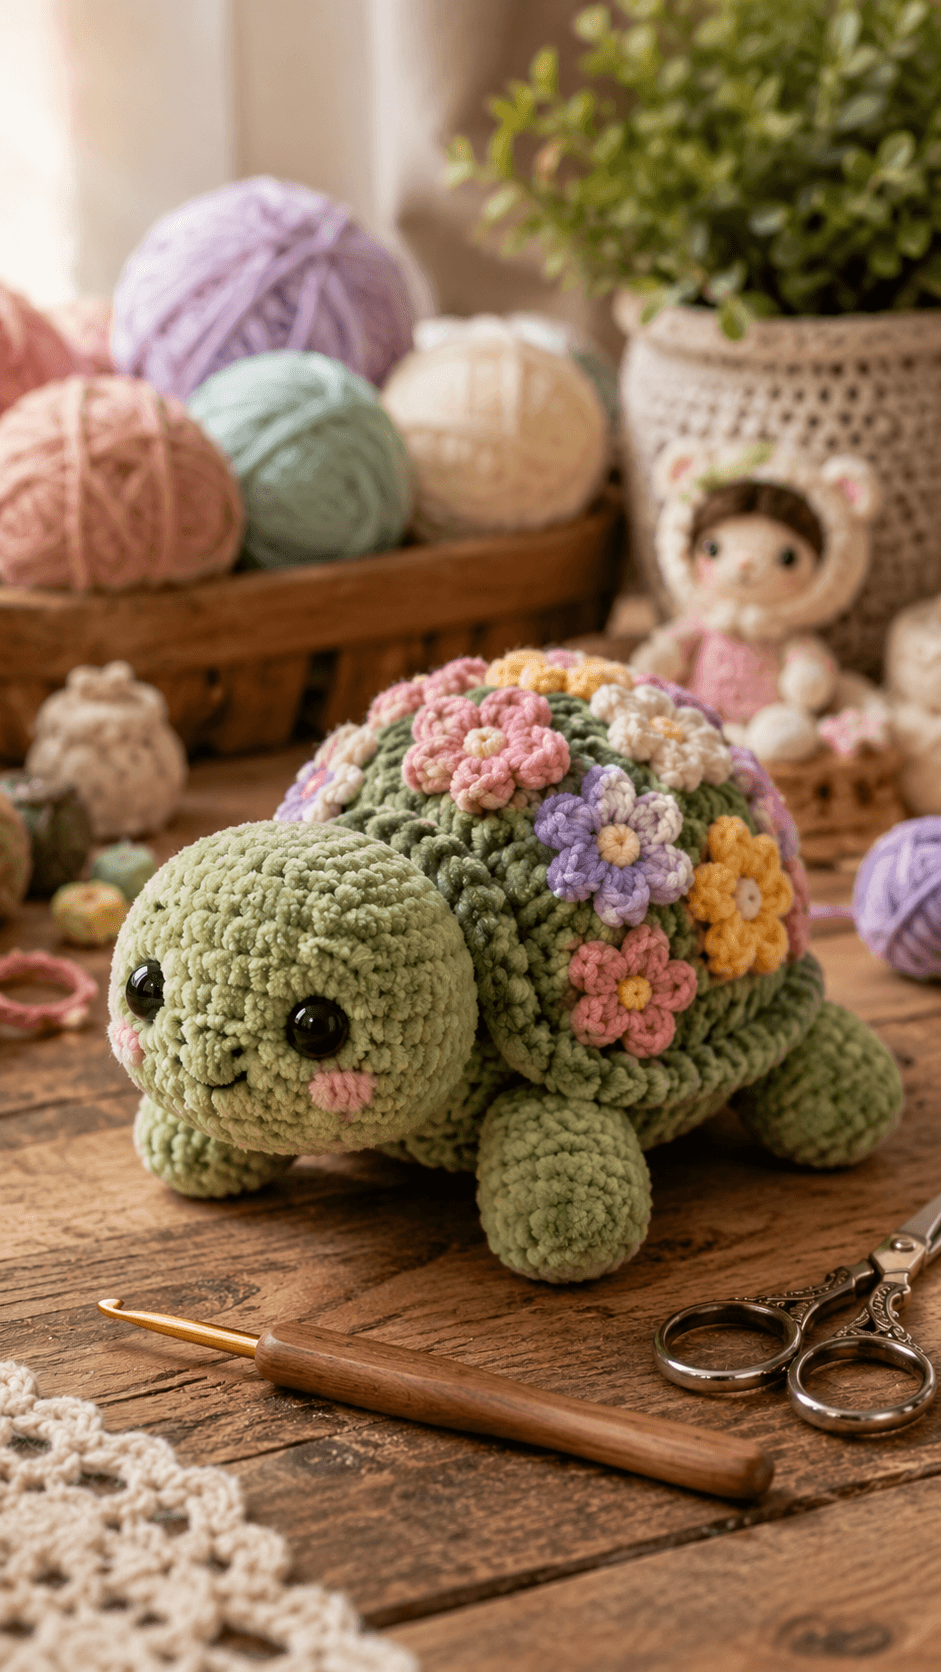
A turtle shell normally carries plates; this one has to support an entire raised flower garden without hiding the curve underneath. This turtle amigurumi crochet pattern uses worsted yarn, a 3.5 mm hook and 12 mm safety eyes for a turtle approximately 20–23 cm long. Four short legs, pink cheeks, a domed sage shell and eleven pastel flowers create the intermediate multi-piece construction.
The Design: What Makes This Flower Turtle Different
The turtle uses a 36-stitch head because the face is broad and nearly spherical, while the body reaches the same maximum but stays lower beneath the shell. Four short legs establish a walking-turtle silhouette instead of the long flippers associated with sea turtles. The shell expands farther, reaching 42 stitches before maintaining its dome, which creates enough surface area for the floral arrangement. Pink, lavender, yellow and cream blooms are distributed irregularly across the upper shell and separated by small green leaves. This floral turtle amigurumi therefore depends on two layers: the structural shell underneath and decorative motifs above. One common maker error is covering the shell so completely that no sage green remains visible. Leave narrow gaps between several flowers so the rounded shell still reads as a distinct anatomical part.
Project Information at a Glance
| Skill Level | Time | Finished Size | Hook | Best For |
|---|---|---|---|---|
| Intermediate | 10–14 hours | Approx. 20–23 cm long | 3.5 mm | Garden-themed decor, turtle collections and market plush |
Materials and Tools
Yarn
- Soft sage green — worsted/Aran yarn — approximately 100–130 g — head, body, legs and shell
- Darker sage or olive — worsted yarn — approximately 15–20 g — leaves
- Dusty pink — worsted yarn — approximately 15–20 g — flowers and cheeks
- Lavender — worsted yarn — approximately 8–12 g — flowers
- Butter yellow — worsted yarn — approximately 8–12 g — flowers and centres
- Cream — worsted yarn — approximately 8–12 g — flowers and centres
- Black embroidery yarn — small amount — smile
Tools
- 3.5 mm crochet hook
- Two 12 mm black safety eyes
- Polyester toy stuffing
- Large-eye yarn needle
- Locking stitch marker
- Dressmaking pins
- Scissors
Use a compact gauge for the stuffed pieces. The flower motifs can be worked with slightly looser hand tension because their petals need to curve outward rather than form dense spherical fabric.
Abbreviations
- MR — magic ring
- sc — single crochet
- inc — two single crochet stitches in one stitch
- dec — decrease over two stitches
- sl st — slip stitch
- ch — chain
- hdc — half double crochet
- dc — double crochet
- tr — treble crochet
- BLO — back loop only
- FLO — front loop only
An invisible decrease is worked through the front loops of the following two stitches before completing them together as one single crochet.
Pattern — Step by Step
Work all stuffed parts in continuous spirals unless a section states otherwise. Mark the first stitch of each round and confirm the number in brackets before starting the next round.
Head
Yarn: soft sage green.
R1: 6 sc in MR (6)
R2: inc × 6 (12)
R3: (sc, inc) × 6 (18)
R4: (2 sc, inc) × 6 (24)
R5: (3 sc, inc) × 6 (30)
R6: (4 sc, inc) × 6 (36)
R7–R12: sc around (36)
R13: (4 sc, dec) × 6 (30)
Insert the 12 mm safety eyes between R9 and R10, approximately seven visible stitches apart. Lock both washers before continuing.
R14: (3 sc, dec) × 6 (24)
R15: (2 sc, dec) × 6 (18)
R16: (sc, dec) × 6 (12)
R17: dec × 6 (6)
Stuff after R13. Keep the lower front slightly softer so the smile and cheek area remain broad rather than pointed.
Fasten off. Pass a 25 cm tail through the six remaining front loops and close.
Body
Yarn: soft sage green.
R1: 6 sc in MR (6)
R2: inc × 6 (12)
R3: (sc, inc) × 6 (18)
R4: (2 sc, inc) × 6 (24)
R5: (3 sc, inc) × 6 (30)
R6: (4 sc, inc) × 6 (36)
R7–R12: sc around (36)
R13: (4 sc, dec) × 6 (30)
R14: sc around (30)
R15: (3 sc, dec) × 6 (24)
R16: (2 sc, dec) × 6 (18)
Stuff firmly through R14. Keep the final section slightly softer where the head and shell contact the body.
R17: (sc, dec) × 6 (12)
R18: dec × 6 (6)
Fasten off and leave a 40 cm structural sewing tail.
Front Legs — Make Two
Yarn: soft sage green.
R1: 6 sc in MR (6)
R2: inc × 6 (12)
R3: (sc, inc) × 6 (18)
R4–R7: sc around (18)
R8: (sc, dec) × 6 (12)
R9–R10: sc around (12)
R11: dec × 6 (6)
Stuff through R7. Keep the upper attachment section softer so the legs angle slightly outward from the body.
Fasten off and leave a 30 cm tail.
Back Legs — Make Two
Yarn: soft sage green.
R1: 6 sc in MR (6)
R2: inc × 6 (12)
R3: (sc, inc) × 6 (18)
R4–R6: sc around (18)
R7: (sc, dec) × 6 (12)
R8–R9: sc around (12)
R10: dec × 6 (6)
Stuff to medium firmness and flatten the upper seam slightly. The rear pair sits partly beneath the shell.
Fasten off and leave a 30 cm attachment tail.
Cheek Patches — Make Two
Yarn: dusty pink.
R1: 6 sc in MR (6)
Slip stitch into the first stitch and fasten off with a 12 cm tail. Stretch each circle into a small horizontal oval during attachment.
Smile
Yarn: black embroidery yarn.
Embroider a shallow curved smile approximately 1.5–2 cm wide below the eye line. Keep the centre of the curve aligned with the midpoint between the two safety eyes.
Domed Shell
Yarn: sage green. Work this section separately.
R1: 6 sc in MR (6)
R2: inc × 6 (12)
R3: (sc, inc) × 6 (18)
R4: (2 sc, inc) × 6 (24)
R5: (3 sc, inc) × 6 (30)
R6: (4 sc, inc) × 6 (36)
R7: (5 sc, inc) × 6 (42)
R8–R12: sc around (42)
R13: (5 sc, dec) × 6 (36)
R14: sc around (36)
Stuff the shell lightly enough that it stays domed but does not become a hard sphere. The lower opening needs to spread over the body.
Fasten off and leave a 55 cm sewing tail.
Optional Shell Underside Disc
Use this if the turtle will be handled frequently.
R1: 6 sc in MR (6)
R2: inc × 6 (12)
R3: (sc, inc) × 6 (18)
R4: (2 sc, inc) × 6 (24)
R5: (3 sc, inc) × 6 (30)
R6: (4 sc, inc) × 6 (36)
Fasten off with a 35 cm tail.
Place the disc under the stuffed shell opening and sew the 36-stitch edges together. This produces a self-contained shell that can then be attached to the turtle body.
Large Five-Petal Flowers — Make Three
Make one dusty pink, one lavender and one cream or pale pink.
R1: 10 sc in MR, join with sl st (10)
For each petal:
sl st in next st, ch 2, 2 dc in same st, 3 tr in next st, 2 dc in same st, ch 2, sl st in same st.
Repeat five times around.
Fasten off and leave a 25 cm sewing tail.
Medium Five-Petal Flowers — Make Four
Use dusty pink, lavender, butter yellow and cream.
R1: 5 sc in MR (5)
In each stitch work:
sl st, ch 2, 3 dc, ch 2, sl st.
Repeat five times.
Fasten off with a 20 cm tail.
Small Flowers — Make Four
Use mixed pink, yellow, cream and lavender.
R1: 5 sc in MR (5)
In each stitch work:
sl st, ch 1, hdc, dc, hdc, ch 1, sl st.
Repeat five times.
Fasten off and leave a 15 cm attachment tail.
Flower Centres — Make Eleven
Alternate cream and yellow.
R1: 6 sc in MR (6)
Slip stitch to close and leave a 10 cm tail. Sew one centre over the middle of every flower.
Shell Leaves — Make Eight
Yarn: darker sage or olive.
Ch 7.
Starting in the second chain from the hook:
sl st, sc, hdc, dc, sc, sl st.
Work 3 sc in the final chain and continue along the opposite side:
sl st, sc, hdc, dc, sc, sl st.
Fasten off and leave a 15 cm tail.
Fold lightly along the foundation chain before sewing so the central ridge stays visible.
Assembly
- Sew the head to the front of the body with two complete passes around the contact area. Keep the face approximately horizontal rather than tilting upward.
- Attach the pink cheek patches below and outside the safety eyes, then embroider the small curved smile at the centre of the face.
- Pin the two front legs beneath the shoulder area and the two back legs near the rear body. Leave a visible section of body between the front and rear pairs.
- Place the stuffed shell over the upper body and centre it from both front and rear views. Its widest point should sit above the legs rather than beyond them.
- Sew the shell around a broad lower perimeter, passing the needle through both shell and body fabric. Add two hidden central anchor stitches so the shell cannot rotate.
- Pin the three large flowers first, placing one near the upper centre and the others offset toward opposite sides. Do not sew them yet.
- Add the four medium flowers and four smaller blooms in the remaining spaces. Keep several narrow sections of sage shell visible between motifs.
- Slide the eight green leaves underneath selected flowers and angle their tips outward. Sew the leaves before permanently attaching the flowers.
- Secure each flower through its centre and the inner base of several petals. Leave the outer petal edges raised from the shell surface.
- Set the turtle on a level surface, correct any leg or shell imbalance, then weave every structural yarn tail through at least three different stitch directions.
The completed turtle should rest on four short legs with the rounded head forward, the shell clearly domed and the eleven flowers distributed across the top without hiding all of the sage base.
7 Technical Tips
- Shell rotation: A domed shell attached only around its outside edge can twist sideways. Add at least two hidden anchor stitches through the centre underside and the turtle body.
- Head droop: A loosely filled 36-stitch head may tilt downward once attached. Pack the lower rear head until firm finger pressure compresses it by no more than approximately 5 mm.
- Decrease gaps: Conventional decreases can expose stuffing along the head and legs. Work each reduction through the front loops of the following two stitches.
- Leg imbalance: A vertical difference of even 5 mm between corresponding leg seams can make the turtle rock. Pin all four legs before permanently sewing any one piece.
- Flower collapse: A large bloom sewn only through its centre can fold sideways. Add one small anchoring stitch at the inner base of at least three petals.
- Shell crowding: Flowers placed edge-to-edge remove the visual outline of the shell. Leave approximately 5–10 mm of visible sage fabric between several neighboring blooms.
- Leaf disappearance: A leaf sewn completely flat can vanish behind its flower. Attach only the centre ridge and lower third, leaving the pointed outer section free.
Shaping the Turtle Head
The head supplies the expression for this turtle amigurumi crochet pattern, so it is proportionally larger than a realistic turtle head. Six increase rounds create the 36-stitch maximum, followed by six plain rounds that add enough depth for the safety eyes and cheeks.
Keep the eye line in the upper-middle section rather than near the crown. The face needs room below the eyes for two pink patches and a short smile.
Add stuffing in small pieces around the eye washers. A single dense lump behind one eye can alter its projection and make the face appear turned even when both stems are positioned correctly.
Constructing the Low Turtle Body
The body uses the same 36-stitch maximum as the head, but the shell covers much of its upper surface. Its main purpose is therefore structural: it connects the head, four legs and domed shell.
Do not overstuff the upper body. A hard spherical torso lifts the shell too high and pushes the legs downward at steep angles.
After closing the body, press it gently into a low oval. The broadest measurement should run from front to back rather than vertically.
Making Four Sturdy Turtle Legs
The photograph shows short rounded walking legs rather than tapered swimming flippers. Each leg reaches 18 stitches, holds that width for several rounds and then narrows toward the attachment end.
Stuff the rounded ends more firmly than the seams. This keeps the visible feet substantial while allowing the upper section to conform to the body.
The front pair can angle slightly outward. Rear legs should sit partly under the shell so their attachment points remain less visible.
Building the Domed Shell
The shell reaches 42 stitches, one expansion stage beyond the head and body. That added width provides both a recognizable turtle silhouette and enough room for the flower arrangement.
Five plain rounds at 42 stitches create the dome depth. One decrease stage returns the lower opening to 36 stitches, matching the optional underside disc and making the shell easier to centre over the torso.
Add filling in a shallow layer. Too much stuffing produces a ball rather than a low turtle shell and forces the flower motifs into overly steep angles.
Planning the Flower Garden
The supplied shell uses multiple blossom sizes rather than one repeated motif. Start with the three largest flowers because they establish the visual weight across the shell.
Medium and small flowers can then fill spaces without creating a strict grid. Pink dominates, while lavender, yellow and cream provide interruptions across the sage background.
Pin all eleven flowers before sewing the first one. A balanced layout from the front may appear crowded when viewed from above, and the top view is where shell coverage is easiest to judge.
Making Raised Five-Petal Flowers
The large flowers begin with a ten-stitch centre, providing two base stitches for each of five petals. Double and treble crochet create the rounded outer section while the low slip stitches pull the inner edges back toward the centre.
Medium flowers use a smaller five-stitch ring but retain five distinct petals. Small flowers reduce the stitch height again, producing enough scale change to keep the garden varied.
Do not flatten the motifs during sewing. Their outer edges should rise slightly above the shell, particularly around the large crown flower.
Adding Leaves Between the Flowers
Green leaves provide separation when two flowers of similar color sit close together. Their darker shade should remain distinct from the main shell color.
Working both sides of one foundation chain creates a leaf with a natural central line. A light fold along that chain makes the ridge more pronounced.
Place most leaves beneath the outer half of a flower rather than directly between two blooms. Only the pointed tips need to remain visible.
Choosing Eye Size and Placement
The photographed turtle uses large glossy eyes relative to its head. For this 36-stitch worsted build, 12 mm eyes create a similar proportion.
Place both stems before locking either washer. The head is symmetrical enough that a one-round vertical difference remains noticeable after stuffing.
Embroidered eyes can replace plastic hardware when detachable components are not appropriate for the intended recipient.
Controlling Flower Weight
Eleven flowers and several leaves add measurable weight to the top of the shell. Spreading that weight matters more than any one motif’s individual mass.
Place the three largest flowers in different zones rather than clustering them along one side. The smaller blooms can then fill gaps without pulling the shell off-centre.
After assembly, set the turtle on a hard surface and check whether one leg has lifted. Move or reduce stuffing inside the shell before altering the leg attachments.
Working with Worsted Yarn
Worsted yarn gives enough stitch definition for the shell flowers while remaining dense enough for the stuffed turtle pieces. A 3.5 mm hook provides a compact starting gauge for this project.
If your yarn is unusually thick, make the first six rounds of the head and lightly stretch the sample. Visible stuffing gaps indicate that a smaller hook is needed.
Use the same yarn weight for the flowers unless a deliberately smaller motif is required. A heavier accent yarn can make individual blooms dominate the shell.
Adjusting Finished Size
Keep the written counts and change yarn thickness for the cleanest resize. DK yarn with a 2.5–2.75 mm hook creates a smaller turtle while retaining the flower-to-shell proportions.
For a larger plush, move to chunky yarn before adding another shell increase stage. A 48-stitch shell paired with an unchanged 36-stitch body would require larger legs and a wider attachment area.
Make one large flower after selecting the final yarn. If it covers more than roughly one-quarter of the visible shell width, reduce the flower yarn thickness instead of removing petals.
Flower Placement for a Photo-Matched Shell
Position one large pink flower near the upper-left area of the shell when viewed from the front. Place a lavender flower lower on the opposite side and a cream or pink bloom toward the top.
Scatter yellow flowers between the cooler colors rather than grouping them. The supplied image uses warm yellow as an accent rather than the dominant shell color.
Keep the lowest flowers above the shell-body seam. Blooms hanging beneath that edge can obscure the legs and make the floral layer look attached to the torso rather than the shell.
Finishing Checks
Place the finished turtle on a level surface and check all four legs first. The animal should rest without rocking diagonally or pushing one rear leg away from the table.
View the face straight on. Both eyes need comparable height, the cheek patches should sit below them and the smile must remain centred.
Inspect the shell from above last. All flower colors should be distributed across the dome, several leaf tips should remain visible and narrow sections of sage shell should still separate portions of the garden.
Conclusion
Measure the finished turtle from the front of the head to the rear shell edge, then record the shell diameter and largest flower width beside the yarn and hook used. Those three measurements make later versions easier to scale without overcrowding the floral surface. Photograph the project from above as well as from the front to check shell coverage and flower distribution. Save this turtle amigurumi crochet pattern to Pinterest and share the completed turtle on Instagram with #FlowerGardenTurtle. Lift each leaf tip and reshape the large petals before the final photograph. Would you keep the pastel mixed garden shown here or make the next shell entirely from pink flowers?
Sources
- Stitch by Fay — No-Sew Crochet Turtle Pattern, updated 2026: DK yarn, 2.5 mm hook, 8 mm eyes and 30-stitch head construction.
- DIY Fluffies — Free Turtle Crochet Pattern: 8 cm sport-weight and 17 cm super-bulky versions with 5 mm hook and larger safety-eye reference.
- Theresa’s Crochet Shop — Turtle Pattern Pack: worsted yarn, 3.75 mm hook, 12 mm eyes and multiple published turtle sizes.
- All About Ami — Amigurumi Turtle: four separate legs, 30-stitch head and traditional stuffed-shell construction.
- Passionate Crafter — Crochet Rose and Daisy Turtle: current flower-turtle competition reference.
- Ravelry — Flower Rose Turtle and Nala the No-Sew Turtle: current flower-shell and interchangeable-shell competition references.









