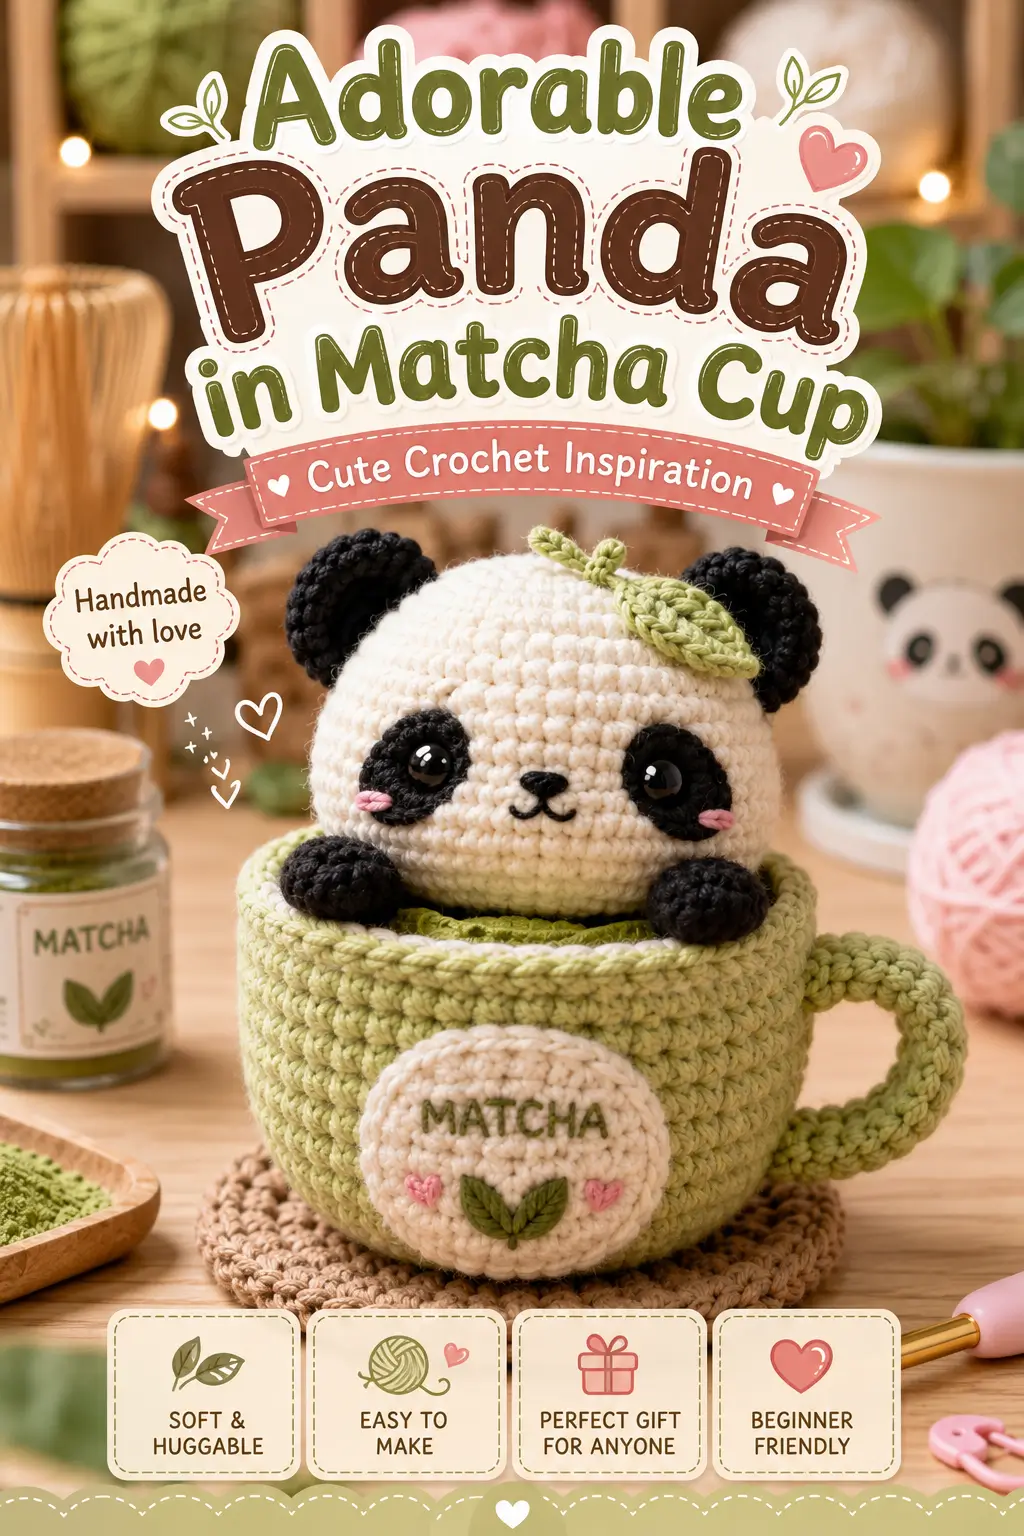
A panda reads as a panda only when the black eye patches sit low enough to crowd the muzzle. This panda amigurumi crochet pattern turns that facial balance into a compact desk display with DK cotton yarn, a small hook, a seated body, and a separate matcha mug shell. The project suits an intermediate maker who wants a giftable piece that works as shelf decor, market stock, or a tea-station accent.
The Design: What Makes This Panda Different
This version is not built as a standing bear. It is drafted as a compressed, front-facing panda with a broad head, tiny paws, and a shallow lower body that disappears into a mug. That decision keeps the silhouette readable from one angle, which matters in a display piece. The eye patches are flat appliqués rather than colorwork. That gives cleaner edges and lets you shift placement before sewing. A small leaf sprout replaces the usual plain crown detail, which ties the animal to the matcha theme without adding much weight.
The second structural choice is the separate cup. Many panda crochet cup topper designs attach the animal directly to the vessel shape. Here, the panda remains a complete mini plush that sits inside a rigid crocheted mug wall. That improves stability and makes stuffing easier. A common mistake with kawaii panda amigurumi is placing the eyes too high. The face then reads as bear-like but not distinctly panda.
Project Info at a Glance
| Skill Level | Time | Finished Size | Hook | Best For |
|---|---|---|---|---|
| Intermediate | 4–6 hours | Approx. 10 cm panda | 2.5 mm | Desk decor, gifts, market display |
Comparable mini panda patterns commonly use a 2.5 mm hook with fine cotton, 6 mm safety eyes, and finish around 6.5–10 cm tall, depending on yarn and tension. :contentReference[oaicite:9]{index=9}
Materials and Tools
Yarn
- Cream/white — DK cotton — about 20 g — Paintbox Cotton DK or similar
- Black — DK cotton — about 15 g — same base yarn
- Matcha green — DK cotton — about 30 g — same base yarn
- Light pink — DK cotton — scrap amount
- Olive green — DK cotton — scrap amount
- Tan — DK cotton — about 20 g for coaster
Tools
- Hook 2.5 mm
- Safety eyes 6–10 mm
- Polyester stuffing
- Yarn needle
- Stitch markers
- Black embroidery thread
Mini panda references show 2.5 mm hooks with fine cotton and 6 mm eyes, while some small DK listings move up to 3.0 mm with 10 mm eyes. Scale the eye size only after checking the patch width. :contentReference[oaicite:10]{index=10}
Abbreviations
- MR = magic ring
- sc = single crochet
- inc = increase
- dec = decrease
- sl st = slip stitch
- ch = chain
- BLO = back loop only
- FO = fasten off
Use invisible decrease on all closing rounds so the face and mug edge stay smooth instead of notched.
Pattern — Step by Step
Continuous spiral unless noted. The stitch counts below are drafted from standard amigurumi math and the proportions visible in the photo.
Head (Make 1)
Yarn: white — Source: standard amigurumi math
R1: 6 sc in MR (6)
R2: inc x6 (12)
R3: (sc, inc) x6 (18)
R4: (2 sc, inc) x6 (24)
R5: (3 sc, inc) x6 (30)
R6-R11: sc around (30)
R12: (3 sc, dec) x6 (24)
R13: (2 sc, dec) x6 (18)
R14: (sc, dec) x6 (12)
Insert eyes after eye patches are attached, between R8 and R9, about 7 stitches apart. Stuff firmly before the last decrease round closes the lower face shape.
FO. Leave 25 cm tail.
Body (Make 1)
Yarn: white — Source: standard amigurumi math
R1: 6 sc in MR (6)
R2: inc x6 (12)
R3: (sc, inc) x6 (18)
R4: (2 sc, inc) x6 (24)
R5: (3 sc, inc) x6 (30)
R6-R8: sc around (30)
R9: (3 sc, dec) x6 (24)
R10: sc around (24)
R11: (2 sc, dec) x6 (18)
R12: (sc, dec) x6 (12)
Stuff lightly. The body should stay shallow so it sinks naturally into the mug instead of bulging above the rim.
FO. Leave 20 cm tail.
Arms / Front Paws (Make 2)
Yarn: black — Source: standard amigurumi math
R1: 6 sc in MR (6)
R2: inc x6 (12)
R3-R4: sc around (12)
R5: (sc, dec) x4 (8)
Stuff only the front half of each paw.
FO. Leave 18 cm tail.
Back Legs (Make 2)
Yarn: black — Source: standard amigurumi math
R1: 6 sc in MR (6)
R2: inc x6 (12)
R3-R4: sc around (12)
R5: dec x6 (6)
These sit low and mostly hidden inside the mug.
FO. Leave 15 cm tail.
Ears (Make 2)
Yarn: black — Source: adapted from small panda ear construction
R1: 6 sc in MR (6)
R2: inc x6 (12)
R3-R4: sc around (12)
Flatten lightly before sewing. Do not overstuff.
FO. Leave 15 cm tail.
Eye Patches (Make 2)
Yarn: black — Source: photo proportions
R1: 6 sc in MR (6)
R2: inc x6 (12)
R3: (sc, inc) x6 (18)
Flatten into soft ovals while sewing by stretching one side slightly downward.
FO. Leave 15 cm tail.
Muzzle (Make 1)
Yarn: white — Source: standard amigurumi math
R1: 6 sc in MR (6)
R2: inc x6 (12)
R3: sc around (12)
Embroider a small black nose and short split mouth before attaching.
FO. Leave 15 cm tail.
Cheek Patches (Make 2)
Yarn: pink — Source: photo proportions
R1: 6 sc in MR (6)
These are tiny blush circles. Flatten completely.
FO. Leave 10 cm tail.
Leaf Sprout (Make 1)
Yarn: olive green — Source: adapted from leaf-style row shaping
Ch 9.
Row 1: sl st in 2nd ch from hook, sc, hdc, dc, hdc, sc, sl st. FO.
Make a second identical leaf.
Stem: ch 4, sl st back down 3.
Sew both leaves to the stem base, then fix to the top center of the head.
Leave 12 cm tails for sewing.
Matcha Mug (Make 1)
Yarn: matcha green — Source: standard vessel shaping
R1: 6 sc in MR (6)
R2: inc x6 (12)
R3: (sc, inc) x6 (18)
R4: (2 sc, inc) x6 (24)
R5: (3 sc, inc) x6 (30)
R6: BLO sc around (30)
R7-R13: sc around (30)
R14: crab stitch or sl st loosely around (30)
The mug should hold its wall shape. Add a cardboard circle liner between crocheted base layers only if the item is decor and will not be washed.
FO. Weave in end.
Mug Handle (Make 1)
Yarn: matcha green — Source: photo proportions
Ch 18.
Row 1: sc in 2nd ch from hook and across (17)
Row 2: ch 1, turn, sc across (17)
Curve into a handle and sew to the mug side.
FO. Leave 20 cm tail.
Front Badge (Make 1)
Yarn: white — Source: standard flat circle math
R1: 6 sc in MR (6)
R2: inc x6 (12)
R3: (sc, inc) x6 (18)
R4: (2 sc, inc) x6 (24)
Embroider “MATCHA” in olive green before attaching. Add two pink heart stitches and a small two-leaf motif below the text.
FO. Leave 20 cm tail.
Coaster (Make 1)
Yarn: tan — Source: standard flat circle math
R1: 6 sc in MR (6)
R2: inc x6 (12)
R3: (sc, inc) x6 (18)
R4: (2 sc, inc) x6 (24)
R5: (3 sc, inc) x6 (30)
R6: (4 sc, inc) x6 (36)
R7: BLO sc around (36)
R8: sl st around (36)
FO. Weave in end.
Assembly
- Sew the eye patches to the head first, slightly below center.
- Insert safety eyes through the patches and head between R8 and R9.
- Sew the muzzle centered under the eyes and embroider the nose if not done already.
- Attach the cheek patches low and outward from the muzzle corners.
- Sew the ears to the upper sides of the head, angled slightly outward.
- Sew the leaf sprout to the crown, just off center.
- Join head to body with the face leaning very slightly forward.
- Sew arms to the front lower body and back legs to the underside.
- Place the panda into the mug and tack the lower body to the inside wall with a few hidden stitches.
- Attach the handle, sew on the front badge, and set the mug on the coaster.
The finished piece should sit flat, with the panda visible above the rim and both front paws resting on the cup edge.
7 Technical Tips
- Mark the first stitch of every round. Losing one round in a 30-stitch head shifts the eye line enough to flatten the face.
- Stuff the head firmer than the body. A soft head collapses under the eye patches and makes the muzzle tilt upward.
- Use invisible decrease on rounds 12 to 14 of the head. Standard decreases leave ridges that show beside the black patches.
- Do not place the eyes before pinning the patches. On a face this small, a 1-stitch error can make the panda look startled instead of calm.
- Keep black-yarn tension slightly looser on paws and ears. Tight black rounds shrink visually and make the limbs read undersized.
- Pin the panda into the mug before sewing it down. Check that 2 to 3 body rounds remain below the rim so the cup does not look shallow.
- Weave tails through at least 3 internal direction changes. One straight pass can loosen when the mug body is handled from the side.
Conclusion
This panda amigurumi crochet pattern works because the proportions stay disciplined: broad head, compressed body, low eye patches, and a mug wide enough to frame the paws. Keep the face flat, keep the cup sturdy, and the finished piece will read clearly from across a room. The next step is to swatch your chosen yarn with the eye size beside it before starting the head. Share the finished project on Pinterest and Instagram with one front view and one overhead mug shot. Hashtag: #MatchaMugPanda. Did you position your leaf sprout centered, or did you offset it to one ear like the sample?









