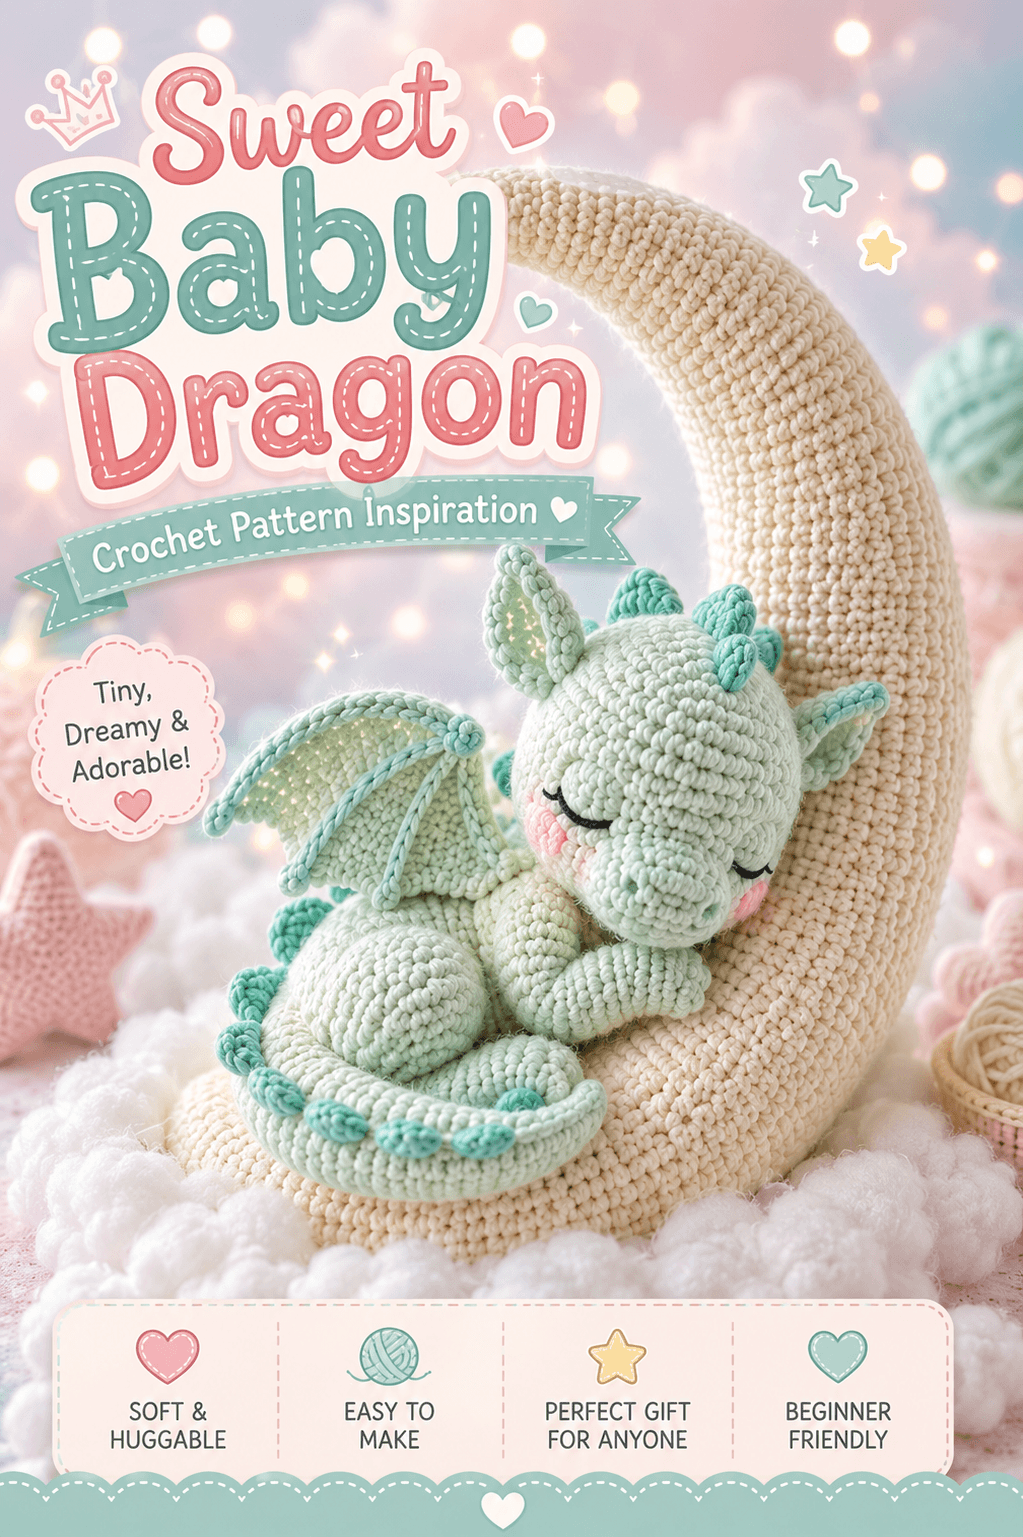
A baby dragon only looks asleep when the snout drops low enough to hide the neck line. This baby dragon amigurumi crochet pattern builds that posture first, then locks it against a crescent moon display with DK yarn, a 3.0 mm hook scale, embroidered eyes, and a compact curled body. It suits an intermediate maker who wants a fantasy nursery piece, shelf decor item, or photo-ready handmade gift.
The Design: What Makes This Baby Dragon Different
This dragon is not drafted as a standing plush. It is a resting figure with the spine curved into a crescent, the tail wrapped forward, and the forelegs folded under the chin. That choice matters because a sleeping dragon needs one continuous line from horn to tail tip. Break that line and the pose reads stiff. The wings are small and shallow, not wide. Large wings pull visual weight away from the face and fight the moon silhouette. Tiny rounded back spikes are used instead of tall points because the photographed design stays soft rather than armored.
The second key decision is the separate crescent base. A sleeping dragon crochet pattern often relies on the body alone for balance. This version uses the moon as both prop and support, which lets the dragon lean naturally without flattening the side of the head. A common error in baby dragon plush crochet is overbuilding the neck. Then the chin lifts, and the dragon stops looking asleep.
Project Info at a Glance
| Skill Level | Time | Finished Size | Hook | Best For |
|---|---|---|---|---|
| Intermediate | 6–8 hours | Dragon approx. 20 cm long display scale | 3.0 mm | Nursery decor, fantasy gift, shelf styling |
Comparable baby dragon references commonly use DK yarn with a 3.0 mm hook, with one Ravelry pattern listing an 8 inch finished dragon and one LoveCrafts listing about 125 g total yarn. :contentReference[oaicite:19]{index=19}
Materials and Tools
Yarn
- Main body mint green — DK cotton or cotton blend — approx. 60 g — Paintbox Cotton DK, Ricorumi DK, or similar
- Accent aqua — DK cotton — approx. 20 g — for spikes and wing edging
- Wing membrane pale mint or cream-green — DK cotton — approx. 15 g
- Moon cream — DK cotton — approx. 70 g
- Blush pink — scrap amount — for cheeks
- Pale yellow — scrap amount — optional star detail if added
Tools
- Hook 3.0 mm
- Stuffing
- Yarn needle
- Stitch markers
- Embroidery thread in black
- Craft wire or pipe cleaner for the moon core if a firmer curve is needed
One published baby dragon reference uses DK yarn and a 3.0 mm hook, while another baby dragon reference lists 9 mm eyes. This photographed style uses embroidered sleeping eyes instead, which keeps the face flatter and safer for decor settings. :contentReference[oaicite:20]{index=20}
Abbreviations
- MR = magic ring
- sc = single crochet
- inc = increase
- dec = decrease
- sl st = slip stitch
- ch = chain
- BLO = back loop only
- hdc = half double crochet
- dc = double crochet
- FO = fasten off
Use invisible decrease on all shaping rounds. That keeps the snout, limbs, and moon curve cleaner than standard paired decreases.
Pattern — Step by Step
Continuous spiral unless noted. Counts are verified with standard amigurumi math. This photographed dragon reads as a medium figure, so the head plateaus at 36 stitches.
Head (Make 1)
Yarn: main mint — Source: standard amigurumi math
R1: 6 sc in MR (6)
R2: inc x6 (12)
R3: (sc, inc) x6 (18)
R4: (2 sc, inc) x6 (24)
R5: (3 sc, inc) x6 (30)
R6: (4 sc, inc) x6 (36)
R7-R12: sc around (36)
R13: (4 sc, dec) x6 (30)
R14: (3 sc, dec) x6 (24)
R15: (2 sc, dec) x6 (18)
Stuff firmly, but leave the lower front slightly softer so the snout can dip during assembly.
FO. Leave 30 cm tail.
Snout (Make 1)
Yarn: main mint — Source: standard amigurumi math
R1: 6 sc in MR (6)
R2: inc x6 (12)
R3: (sc, inc) x6 (18)
R4-R5: sc around (18)
R6: (sc, dec) x6 (12)
Stuff lightly. Embroider nostril dots before sewing to the head.
FO. Leave 20 cm tail.
Body (Make 1)
Yarn: main mint — Source: standard amigurumi math
R1: 6 sc in MR (6)
R2: inc x6 (12)
R3: (sc, inc) x6 (18)
R4: (2 sc, inc) x6 (24)
R5: (3 sc, inc) x6 (30)
R6-R9: sc around (30)
R10: (3 sc, dec) x6 (24)
R11-R12: sc around (24)
R13: (2 sc, dec) x6 (18)
R14: sc around (18)
Stuff moderately. Do not overfill the front belly, because the body has to curl against the moon.
FO. Leave 30 cm tail.
Front Legs (Make 2)
Yarn: main mint — Source: standard amigurumi math
R1: 6 sc in MR (6)
R2: inc x6 (12)
R3-R4: sc around (12)
R5: (sc, dec) x4 (8)
R6-R8: sc around (8)
Stuff only the paw end. Flatten the upper arm so it tucks under the chin.
FO. Leave 18 cm tail.
Back Legs (Make 2)
Yarn: main mint — Source: standard amigurumi math
R1: 6 sc in MR (6)
R2: inc x6 (12)
R3-R5: sc around (12)
R6: (sc, dec) x4 (8)
These sit low and side-facing, not vertical.
FO. Leave 18 cm tail.
Ears (Make 2)
Yarn: main mint — Source: standard shaping for pointed ears
R1: 4 sc in MR (4)
R2: inc x4 (8)
R3: (sc, inc) x4 (12)
R4-R5: sc around (12)
Flatten and pinch the base before sewing so the ear angles outward.
FO. Leave 15 cm tail.
Horns (Make 2)
Yarn: aqua — Source: standard amigurumi math
R1: 4 sc in MR (4)
R2: sc around (4)
R3: (sc, inc) x2 (6)
R4: sc around (6)
Do not stuff. The photographed horns are short and soft.
FO. Leave 12 cm tail.
Wings (Make 2)
Yarn: main mint with aqua edging — Source: standard row shaping, supported by common baby dragon wing tutorials
Ch 8.
Row 1: sc in 2nd ch from hook and across (7)
Row 2: ch 1, turn, dec, 3 sc, dec (5)
Row 3: ch 1, turn, sc across (5)
Row 4: ch 1, turn, dec, sc, dec (3)
Edging: sc evenly around outer edge.
Wing bones: surface sl st or chain embroidery from base to edge in 3 lines.
Keep the wings shallow. Tall wings overpower the sleeping pose.
FO. Leave 18 cm tail.
Tail (Make 1)
Yarn: main mint — Source: standard tapered tube shaping
R1: 6 sc in MR (6)
R2: (sc, inc) x3 (9)
R3-R18: sc around (9)
Insert light stuffing only in the first half. Leave the tail flexible enough to curve around the body front.
FO. Leave 25 cm tail.
Back Spikes (Make 9)
Yarn: aqua — Source: standard mini cone math
R1: 4 sc in MR (4)
R2: sc around (4)
Make 3 small for the head, 3 medium for the back, and 3 small for the tail by varying stitch tension rather than stitch count.
FO. Leave 10 cm tail.
Cheek Patches (Make 2)
Yarn: pink — Source: photo proportions
R1: 6 sc in MR (6)
Flatten completely. These are blush spots, not stuffed cheeks.
FO. Leave 8 cm tail.
Crescent Moon Outer Tube (Make 2)
Yarn: cream — Source: standard tube shaping
R1: 6 sc in MR (6)
R2: inc x6 (12)
R3: (sc, inc) x6 (18)
R4-R36: sc around (18)
Make two identical tubes. Lightly stuff as you go. Curve each piece into a crescent. For a firm display piece, run craft wire through the center before closing.
FO first tube. FO second tube with long tail.
Moon Base Join
Yarn: cream — Source: assembly shaping
Sew the two tube pieces side by side along the lower 10 to 12 rounds to create a thicker bottom crescent. Taper the upper ends by whip stitching the final 4 rounds of each tube inward so both tips look narrower than the base.
Moon Bottom Stabilizer (Make 1)
Yarn: cream — Source: standard oval base math
Ch 7.
R1: 5 sc, 3 sc in last ch, work opposite side 4 sc, inc (14)
R2: inc, 4 sc, inc x3, 4 sc, inc x2 (20)
R3: sc around (20)
Sew to the bottom contact point of the crescent if the moon needs a flatter standing edge.
FO. Leave 20 cm tail.
Assembly
- Sew the snout to the lower front of the head, centered and slightly angled downward.
- Embroider the closed eyes as shallow curved lines set low on the face.
- Attach the cheek patches below the eye line and slightly outward from the snout.
- Sew the ears high on the head and set the horns just inside them.
- Join the head to the body with the chin tipped toward the forelegs.
- Sew the front legs folded together under the snout and place the back legs low on each side of the body.
- Attach the wings high on the back, angled slightly backward rather than straight up.
- Sew the spikes from crown to tail, reducing spacing at the neck curve.
- Attach the tail at the back of the body and curve it around the front edge.
- Hand stitch the finished dragon to the inner curve of the moon at head, shoulder, hip, and tail contact points.
The finished piece should rest without twisting, with the snout touching or nearly touching the forelegs and the moon carrying most of the display weight.
7 Technical Tips
- Mark the first stitch of every round on the head and body. A one-round drift will shift the neck seam and break the sleeping line of the profile.
- Keep the snout lightly stuffed. A hard snout pushes the head upward and removes the drooping baby-dragon expression.
- Use invisible decrease on head rounds 13 to 15 and body round 13. Regular decreases leave corners that show on pale yarn.
- Embroider the eyes before fixing the head to the moon. Once the dragon is stitched down, rebalancing eyelid angle becomes awkward.
- Pin the tail first, then place the spikes. If you sew spikes before testing the tail curve, the last two spikes often land too high.
- Do not overfill the moon tubes. A rigidly stuffed crescent resists shaping and can spring open at the inner curve seam.
- Anchor the dragon to the moon at no fewer than four points. One tack at the belly is not enough to stop rotation during handling.
Conclusion
This baby dragon amigurumi crochet pattern depends on controlled posture more than extra detail. Keep the head low, keep the body compact, keep the wings restrained, and the sleeping pose will stay readable. Start by making the head and one foreleg first, then pin them together before committing to the body curve. Share the finished piece on Pinterest and Instagram with one side-profile shot and one full front display shot. Hashtag: #SweetBabyDragonMoon. Did your dragon’s tail wrap fully across the front, or did you stop the curve just before the forepaws?









