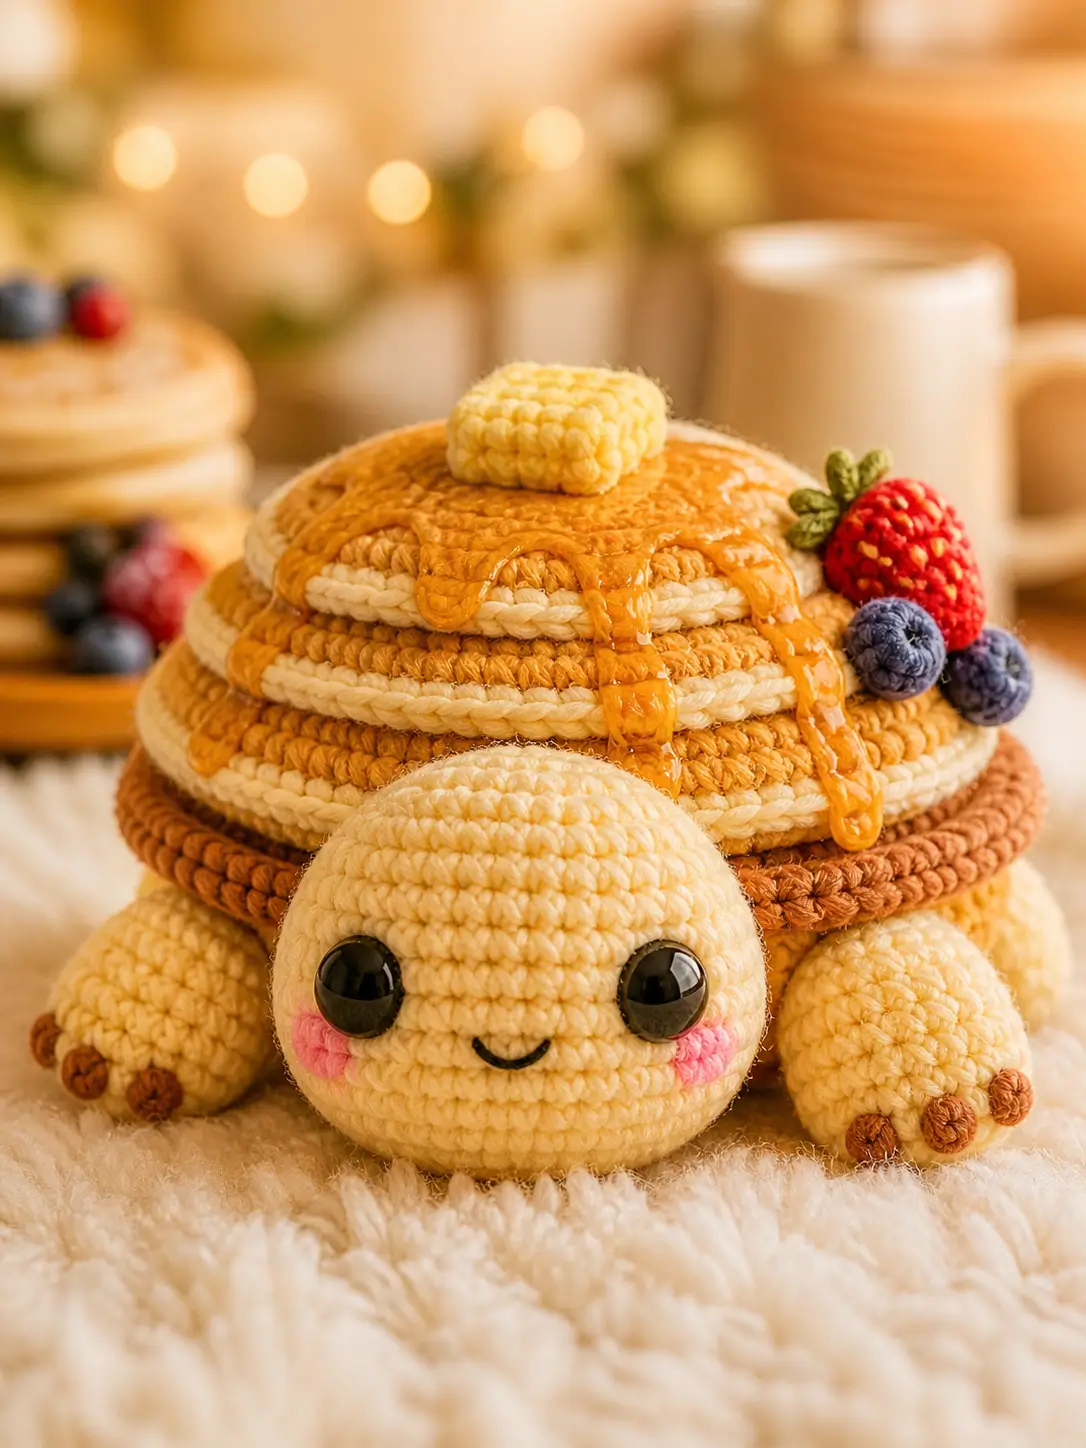
A pancake turtle has a shell problem: in a pancake turtle amigurumi crochet pattern, the stack must read as breakfast first and turtle second. This version uses worsted yarn, a 3.5 mm hook, 12 mm safety eyes, and separate pancake layers for a 16–18 cm display plush. Advanced beginners get clear shaping, stable legs, and a practical market-table food-animal design.
The Design: What Makes Pancake Turtle Different
This design works because the shell is split into pancakes, not treated as one dome. You build a low oval body first, then pin three shallow layers over it so the head and legs stay forward instead of disappearing under the stack. The maker keeps the top pancake lighter than the underside; that small color break separates syrup, butter, and berry toppings from the turtle anatomy. A second decision is the wide 42-stitch head. It balances the tall shell and gives enough fabric for 12 mm eyes without stretching the front rounds. A common mistake in a food turtle crochet pattern is overstuffing the pancake shell. The finished breakfast amigurumi turtle should sit low. Too much fill turns the pancakes into a melon and pulls the face downward.
Project Info at a Glance
| Skill Level | Time | Finished Size | Hook | Best For |
|---|---|---|---|---|
| Advanced beginner to intermediate | 5–6 hr editor estimate | 15–18 cm span | 3.5 mm | Display plush, food-animal market table |
Comparable turtle sources support the 15–18 cm size range, worsted/aran yarn, and 3.5–3.75 mm hook choice.
Materials and Tools
Yarn
- Butter yellow body — worsted weight 4 — 35 g — Paintbox Cotton Aran, Scheepjes Catona held double, or similar smooth yarn
- Golden pancake tan — worsted weight 4 — 40 g — Paintbox Cotton Aran or similar
- Cream separator bands — worsted weight 4 — 12 g — same yarn family
- Amber syrup — worsted weight 4 — 8 g — smooth acrylic or cotton blend
- Caramel brown claws — worsted weight 4 — 4 g — scrap yarn
- Pink cheeks — worsted weight 4 — 2 g — scrap yarn
- Red, blueberry blue, leaf green, pale yellow toppings — worsted weight 4 — 12 g combined — scrap yarns
Tools
- Hook 3.5 mm
- 12 mm black safety eyes
- Polyester stuffing
- Tapestry needle
- Locking stitch markers
- Pins
- Black embroidery thread
Abbreviations
MR = magic ring / sc = single crochet / inc = increase / dec = decrease / sl st = slip stitch / ch = chain / BLO = back loop only / FLO = front loop only / st = stitch / sts = stitches / R = round or row.
Invisible decrease: work through the front loops only of the next two stitches so the decrease ridge stays inside the fabric.
Pattern — Step by Step
Continuous spiral unless noted. Use a stitch marker at the first stitch of every round.
Head Make 1
Yarn: butter yellow — Source: Standard amigurumi math.
R1: 6 sc in MR (6)
R2: inc ×6 (12)
R3: (sc 1, inc) ×6 (18)
R4: (sc 2, inc) ×6 (24)
R5: (sc 3, inc) ×6 (30)
R6: (sc 4, inc) ×6 (36)
R7: (sc 5, inc) ×6 (42)
R8–R15: sc around (42 each round)
Place 12 mm eyes between R12 and R13, 9 stitches apart. Begin firm stuffing after R15.
R16: (sc 5, dec) ×6 (36)
R17: (sc 4, dec) ×6 (30)
R18: (sc 3, dec) ×6 (24)
R19: (sc 2, dec) ×6 (18)
R20: (sc 1, dec) ×6 (12)
R21: dec ×6 (6)
Fasten off. Close the opening and leave a 25 cm sewing tail.
Body Belly Make 1
Yarn: butter yellow — Source: Standard amigurumi math.
R1: 6 sc in MR (6)
R2: inc ×6 (12)
R3: (sc 1, inc) ×6 (18)
R4: (sc 2, inc) ×6 (24)
R5: (sc 3, inc) ×6 (30)
R6: (sc 4, inc) ×6 (36)
R7: (sc 5, inc) ×6 (42)
R8–R10: sc around (42 each round)
R11: (sc 5, dec) ×6 (36)
R12: (sc 4, dec) ×6 (30)
R13: (sc 3, dec) ×6 (24)
R14: (sc 2, dec) ×6 (18)
Stuff lightly. The underside must stay flatter than the head.
R15: (sc 1, dec) ×6 (12)
R16: dec ×6 (6)
Fasten off. Weave in the tail.
Pancake Shell Layers Make 3
Yarn: golden pancake tan, with one darker bottom layer if wanted — Source: Standard amigurumi math.
R1: 6 sc in MR (6)
R2: inc ×6 (12)
R3: (sc 1, inc) ×6 (18)
R4: (sc 2, inc) ×6 (24)
R5: (sc 3, inc) ×6 (30)
R6: (sc 4, inc) ×6 (36)
R7: (sc 5, inc) ×6 (42)
R8: BLO sc around (42)
R9: sc around (42)
R10: sl st around loosely (42)
Fasten off. Leave a 30 cm tail on each layer. Add a thin sheet of stuffing under each pancake only after pinning.
Cream Separator Bands Make 2
Yarn: cream — Source: Standard amigurumi math.
R1: ch 42, sl st to first ch without twisting, ch 1, sc in each ch around (42)
R2: sc around (42)
R3: sl st around (42)
Fasten off. Leave a 25 cm tail.
Side Shell Wings Make 2
Yarn: golden pancake tan — Source: Standard amigurumi math.
These are side shell panels, not animal wings. They widen the pancake stack over the legs.
R1: 6 sc in MR (6)
R2: inc ×6 (12)
R3: (sc 1, inc) ×6 (18)
R4–R5: sc around (18 each round)
R6: fold flat, sc through both layers across (9)
Fasten off. Leave a 20 cm tail.
Arms or Front Legs Make 2
Yarn: butter yellow — Source: Standard amigurumi math.
R1: 6 sc in MR (6)
R2: inc ×6 (12)
R3: (sc 1, inc) ×6 (18)
R4–R8: sc around (18 each round)
Stuff the first half only. Keep the wrist end flat.
R9: (sc 1, dec) ×6 (12)
R10: fold flat, sc through both layers across (6)
Fasten off. Leave a 25 cm tail.
Back Legs Make 2
Yarn: butter yellow — Source: Standard amigurumi math.
R1: 6 sc in MR (6)
R2: inc ×6 (12)
R3: (sc 1, inc) ×6 (18)
R4–R6: sc around (18 each round)
R7: (sc 1, dec) ×6 (12)
R8: fold flat, sc through both layers across (6)
Fasten off. Leave a 25 cm tail.
Brown Toe Pads Make 8
Yarn: caramel brown — Source: Standard amigurumi math.
R1: 6 sc in MR (6)
R2: sl st around (6)
Fasten off. Leave a 10 cm tail on each pad.
Sew three pads to each front leg and one pad to the outside edge of each back leg.
Tail Make 1
Yarn: butter yellow — Source: Standard amigurumi math.
R1: 6 sc in MR (6)
R2–R4: sc around (6 each round)
Fasten off. Do not stuff. Leave a 20 cm tail.
Cheek Patches Make 2
Yarn: pink — Source: Standard amigurumi math.
R1: 6 sc in MR (6)
R2: inc ×6, sl st to first stitch (12)
Fasten off. Leave a 15 cm tail.
Syrup Top and Drips
Yarn: amber syrup — Source: Standard amigurumi math plus chain-row shaping.
Syrup Top Make 1
R1: 6 sc in MR (6)
R2: inc ×6 (12)
R3: (sc 1, inc) ×6 (18)
R4: (sc 2, inc) ×6 (24)
R5: (sc 3, inc) ×6 (30)
R6: sl st around (30)
Fasten off. Leave a 30 cm tail.
Long Front Drip Make 1
R1: ch 10, sc in 2nd ch from hook and across (9)
R2: ch 1, turn, sc across (9)
Fasten off. Leave a 15 cm tail.
Short Side Drips Make 4
R1: ch 7, sc in 2nd ch from hook and across (6)
R2: ch 1, turn, sc across (6)
Fasten off. Leave a 12 cm tail on each drip.
Butter Pat Make 1
Yarn: pale yellow — Source: Standard amigurumi math.
R1: 6 sc in MR (6)
R2: inc ×6 (12)
R3–R5: sc around (12 each round)
R6: dec ×6 (6)
Fasten off. Flatten into a soft cube and close the gap.
Strawberry Make 1
Yarn: red and green — Source: Standard amigurumi math.
R1: 6 sc in MR (6)
R2: inc ×6 (12)
R3: (sc 1, inc) ×6 (18)
R4–R5: sc around (18 each round)
R6: (sc 1, dec) ×6 (12)
R7: dec ×6 (6)
Fasten off. Close the point and embroider small seed stitches.
Leaf crown: with green, make 5 leaves from the top center. For each leaf, ch 4, sl st in 2nd ch from hook, sc 1, hdc 1, sl st back into the crown base (3 stitches per leaf). Fasten off and weave in ends.
Blueberries Make 3
Yarn: blueberry blue — Source: Standard amigurumi math.
R1: 6 sc in MR (6)
R2: inc ×6 (12)
R3: sc around (12)
R4: dec ×6 (6)
Fasten off. Close the opening and embroider a small navy star on top.
Assembly
- Sew the head to the front of the body belly, centered across 12 stitches.
- Pin the bottom pancake layer over the body so the front edge sits just behind the head seam.
- Add the first cream separator band around the bottom pancake edge and sew at four anchor points.
- Stack the second pancake, add the second cream band, then stack the top pancake.
- Sew the face details: cheeks beside the eyes, then embroider a small black mouth between the cheeks.
- Attach front legs under the shell at the 10 o’clock and 2 o’clock positions.
- Attach back legs under the shell at the 7 o’clock and 5 o’clock positions.
- Sew the tail to the back center, then attach the two side shell wings over the side seams.
- Sew the syrup top to the upper pancake, then place the long drip at the front and the short drips along the sides.
- Add the butter pat, strawberry, and blueberries to the top-right shell area, then weave in every tail.
The finished toy stands as a stacked pancake-shell turtle with visible fruit, syrup, butter, cheeks, and four grounded legs.
7 Technical Tips
- Stitch-marker drift: At the 42-stitch plateau, a marker shift of more than 2 stitches will twist the eye line. Reset the marker after R7 of the head and again after R15 before decreasing.
- Stuffing firmness: The head should compress by about 1 cm under thumb pressure. Under-stuffing makes the eye backs tilt inward, while overstuffing stretches the smile.
- Invisible decrease ridges: Standard decreases on R16–R21 can leave six visible corners on the face. Use FLO invisible decreases only on those rounds.
- Eye placement timing: Install the 12 mm eyes before R16. After the head drops below 36 stitches, the washer angle becomes hard to control.
- Velvet substitution risk: If using velvet or chenille, move to a 4.5–5 mm hook and expect the toy to grow by 30–50 percent. Loose velvet tension makes syrup drips curl sideways.
- Pinning the pancake stack: Use 8 pins: front, back, left, right, and four midpoints. Without midpoint pins, the stack rolls toward the heaviest berry cluster.
- Tail weaving length: Leave at least 8 cm after sewing each drip. Shorter tails can pop through the amber fabric when the top pancake is handled.
Conclusion
This pancake turtle amigurumi crochet pattern depends on proportion control: a wide head, low body, flat pancake discs, and toppings placed after the shell is stable. The next step is to crochet the head and one pancake layer first, then check eye scale against the syrup and berry pieces before cutting long sewing tails. Share the finished turtle on Pinterest with a side-view photo so the stacked shell is visible, then post the front view on Instagram with #PancakeTurtleAmigurumi. Which detail should dominate this character: the long front syrup drip, the butter pat, or the strawberry cluster?









