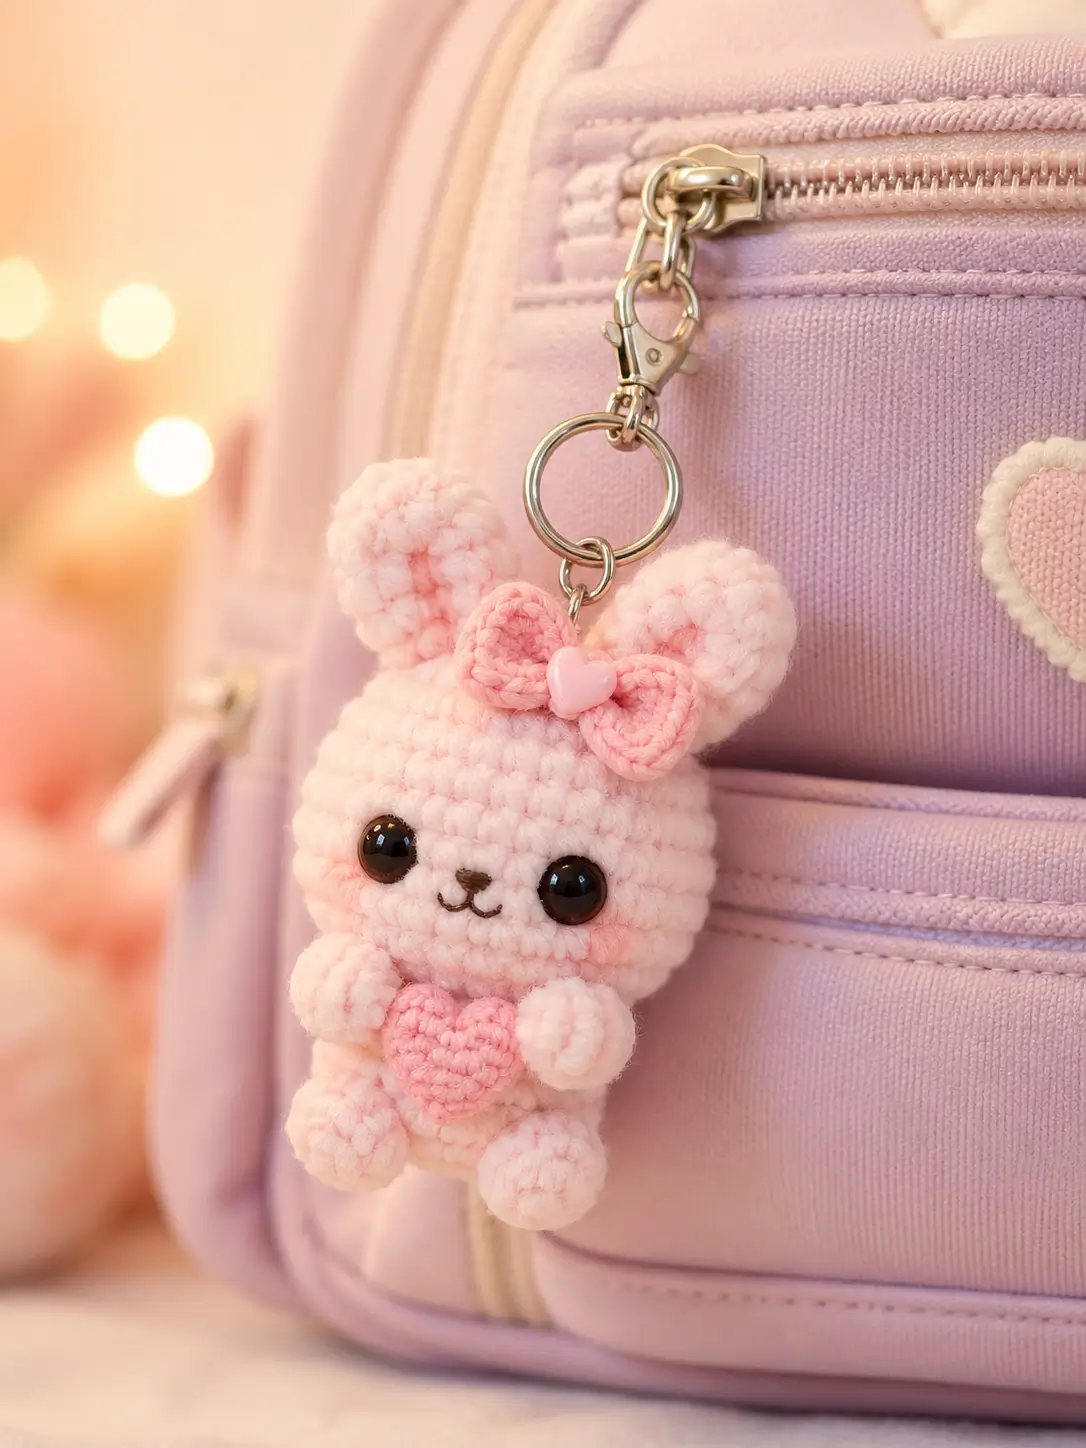
Rabbit ears make this charm top-heavy before a single limb is attached. This bunny amigurumi keychain pattern builds a stable 8–10 cm pink rabbit with a 36-stitch head, smaller body, bow, cheek patches, and heart. Use worsted yarn, a 3.0 mm hook, 8 mm safety eyes, and intermediate-beginner skills; the finished piece works as a backpack charm.
The Design: What Makes Blush Bow Bunny Different
The head is built as the largest sphere because rabbit faces read from eye spacing first, not from body length. A 36-stitch plateau gives enough width for 8 mm eyes, cheek patches, and a tiny embroidered split mouth. The body stays at 30 stitches so the charm does not hang like a pear under the clasp. Ears are short ovals, not long floppy panels; the photo shows upright rounded ears partly covered by a bow, so extra ear length would fight the hardware.
In a crochet bunny keychain, the common maker mistake is attaching the ring to only one yarn strand at the crown. It stretches. This mini bunny crochet pattern adds a reinforced hanger between the ears and keeps the heart light so the face remains forward.
Project Info at a Glance
| Skill Level | Time | Finished Size | Hook | Best For |
|---|---|---|---|---|
| Advanced beginner / low intermediate | 2–3 hours | 8–10 cm without clasp | 3.0 mm | Backpack charm, zipper pull, small gift topper |
Comparable source data supports this size range: 5 cm sport-weight keychain bunnies, 10 cm worsted bunnies, and DK bunnies at 8–12 cm are all documented in current small-bunny patterns. Source
Materials and Tools
Yarn
- Pale blush pink — worsted/light worsted — 16–18 g — Paintbox Cotton Aran, YarnArt Jeans held firmly, or similar smooth amigurumi yarn.
- Rose pink — worsted/light worsted — 4–6 g — bow, cheeks, and heart.
- Dark brown embroidery thread — less than 1 g — nose and mouth.
- Black sewing thread or fine yarn — optional — eye reinforcement stitches.
Small bunny sources use DK, sport, and worsted yarns; the 3.0 mm hook sits inside the recommended worsted amigurumi hook range. Source
Tools
- Hook 3.0 mm
- 8 mm black safety eyes
- Fiberfill stuffing
- Yarn needle
- Embroidery needle
- Locking stitch marker
- Straight pins
- Scissors
- Split ring, jump ring, and lobster clasp
- Optional small heart bead for bow center
8 mm eyes match a small worsted bunny scale; published small bunny sources list 8 mm eyes for a 10 cm worsted bunny and 6 mm eyes for smaller sport-weight work. Source
Abbreviations
- MR = magic ring
- sc = single crochet
- inc = 2 sc in one stitch
- dec = single crochet decrease
- sl st = slip stitch
- ch = chain
- BLO = back loop only
- FLO = front loop only
- FO = fasten off
The invisible decrease is worked through the front loops of the next two stitches so the reduction sits inside the fabric.
Pattern — Step by Step
Continuous spiral unless noted. Stitch counts are listed in brackets at the end of every round. Use a marker on the first stitch of each round and move it upward as the work grows.
Head
Make 1. Yarn: pale blush pink.
R1: 6 sc in MR (6)
R2: inc ×6 (12)
R3: (sc, inc) ×6 (18)
R4: (2 sc, inc) ×6 (24)
R5: (3 sc, inc) ×6 (30)
R6: (4 sc, inc) ×6 (36)
R7–R12: sc around (36)
Place safety eyes between R9 and R10, 7 stitches apart. Check that the bow side still has room above one eye.
R13: (4 sc, dec) ×6 (30)
R14: (3 sc, dec) ×6 (24)
Begin stuffing. Shape the front as a rounded oval, not a hard ball.
R15: (2 sc, dec) ×6 (18)
R16: (sc, dec) ×6 (12)
R17: dec ×6 (6)
Fasten off. Leave 15 cm tail and close through FLO.
Body
Make 1. Yarn: pale blush pink.
R1: 6 sc in MR (6)
R2: inc ×6 (12)
R3: (sc, inc) ×6 (18)
R4: (2 sc, inc) ×6 (24)
R5: (3 sc, inc) ×6 (30)
R6–R9: sc around (30)
R10: (3 sc, dec) ×6 (24)
R11: sc around (24)
R12: (2 sc, dec) ×6 (18)
Stuff firmly at the bottom and lightly at the neck so the head can sit forward.
R13: sc around (18)
R14: (sc, dec) ×6 (12)
R15: dec ×6 (6)
Fasten off. Leave 30 cm tail for sewing to head.
Arms / Front Legs
Make 2. Yarn: pale blush pink.
R1: 6 sc in MR (6)
R2: (sc, inc) ×3 (9)
R3–R5: sc around (9)
R6: (sc, dec) ×3 (6)
R7: sc around (6)
Stuff only the rounded hand end. Flatten the top opening.
Fasten off. Leave 18 cm tail.
Back Legs
Make 2. Yarn: pale blush pink.
R1: 6 sc in MR (6)
R2: inc ×6 (12)
R3–R4: sc around (12)
R5: dec ×6 (6)
Stuff lightly. The foot should be soft enough to flatten against the body.
Fasten off. Leave 20 cm tail.
Ears
Make 2. Yarn: pale blush pink.
R1: 6 sc in MR (6)
R2: (sc, inc) ×3 (9)
R3: (2 sc, inc) ×3 (12)
R4–R6: sc around (12)
R7: (2 sc, dec) ×3 (9)
R8: sc around (9)
R9: (sc, dec) ×3 (6)
Do not stuff. Flatten each ear with the decrease seam centered at the back.
Fasten off. Leave 22 cm tail.
Cheek Patches
Make 2. Yarn: rose pink.
R1: 6 sc in MR (6)
R2: inc ×6 (12)
Sl st to first stitch.
Fasten off. Leave 18 cm tail.
Press flat before sewing; bulky cheeks will push the eyes out of alignment.
Muzzle, Nose, and Mouth Embroidery
Thread: dark brown embroidery thread.
Insert the needle between the eyes, one round below the eye line. Make a tiny vertical nose stitch over one stitch. Bring the thread down two rounds, then split into a shallow “w” mouth. Knot inside the head or bury the thread through the back of the head. Keep the mouth no wider than 4 stitches.
Puffy Heart
Make 1. Yarn: rose pink.
First lobe:
R1: 6 sc in MR (6)
R2: inc ×6 (12)
R3: sc around (12)
Fasten off first lobe only.
Second lobe:
R1: 6 sc in MR (6)
R2: inc ×6 (12)
R3: sc around (12)
Do not fasten off.
Join:
R4: sc 12 around second lobe, sc 12 around first lobe (24)
R5: sc around (24)
R6: (2 sc, dec) ×6 (18)
R7: (sc, dec) ×6 (12)
Add a small pinch of stuffing. Close the center gap between lobes with the first lobe tail.
R8: dec ×6 (6)
Fasten off. Leave 25 cm tail for sewing between the arms.
Bow
Make 1: 2 loops plus center wrap. Yarn: rose pink.
Bow loop, make 2:
R1: 6 sc in MR (6)
R2: inc ×6 (12)
R3: sc around (12)
R4: (sc, dec) ×4 (8)
Flatten each loop. Fasten off each loop with a 15 cm tail.
Center wrap:
Ch 6.
Row 1: sc in second ch from hook and across (5)
Row 2: ch 1, turn, sc across (5)
Fasten off. Leave 18 cm tail.
Place the two flattened loops side by side. Wrap the center strip around the join and stitch it closed at the back. Add the optional heart bead to the front center before attaching the bow.
Keychain Hanger
Make 1. Yarn: pale blush pink.
Ch 10, sl st to first ch to form a small ring.
R1: 14 sc around the chain ring, sl st to first sc (14)
Fasten off. Leave 25 cm tail.
This crochet hanger sits between the ears and takes the pull from the metal jump ring.
Assembly
- Sew the body to the underside of the head with the body opening centered under R15–R17 of the head.
- Pin both ears on top of the head between R3 and R5, leaving 3 stitches between the inner ear bases.
- Sew the keychain hanger between the ears before the bow is added.
- Attach the bow at the base of one ear, angled slightly toward the eye on that side.
- Sew cheek patches below the eyes, centered between R10 and R12 of the head.
- Stitch the nose and mouth after the cheeks are fixed so the mouth does not drift.
- Pin the back legs to the lower body between R7 and R10, 4 stitches apart.
- Sew the arms to the front sides of the body at R5–R7, tilted inward.
- Place the heart between the arms and stitch it to the body first, then tack each arm over its side edge.
- Add the jump ring through the crochet hanger, then attach the split ring and lobster clasp.
The finished bunny is a clasp-ready amigurumi charm with all visible photo parts attached.
7 Technical Tips
- Marker drift: a missed marker shifts the face by one stitch every round. At R12 of the head, the eye columns should still sit 7 stitches apart.
- Stuffing collapse: under-stuffing makes the head cave in around the keychain hanger. Fill the head until the surface rebounds about 2–3 mm under fingertip pressure.
- Visible decreases: standard decreases can leave six diagonal dents on the lower head. Work each dec through FLO only on R13–R17.
- Eye timing: late washer placement can crack the stitch fabric after stuffing. Install the 8 mm eyes between R9 and R10 before starting R13.
- Loose worsted tension: gaps show as white stuffing dots around the cheeks. With a 3.0 mm hook, the first four head rounds should measure about 3.2–3.5 cm across.
- Pinning failure: unpinned limbs rotate once the heart is sewn on top. Pin both arms and the heart together, then sew the heart before final arm stitches.
- Tail weaving failure: short yarn tails pull loose on bag charms. Leave 18–30 cm tails on sewn parts and bury each tail through at least 4 cm of stuffed fabric.
Conclusion
Treat the charm as a small engineered object: heavy head, light body, reinforced crown, flat accessories. The rounds above keep the rabbit compact enough for a zipper pull while leaving room for the bow, cheek patches, and heart. Before sewing the clasp, test the hang angle by holding the ring above the ears; adjust the bow or heart one stitch left or right if the face tilts. Save the chart to Pinterest, then post the finished piece on Instagram with #BlushBowBunnyCharm. The final next step is a stitch-count check on the head and body. For this bunny amigurumi keychain pattern, would you tilt one ear behind the bow or keep both ears upright?









