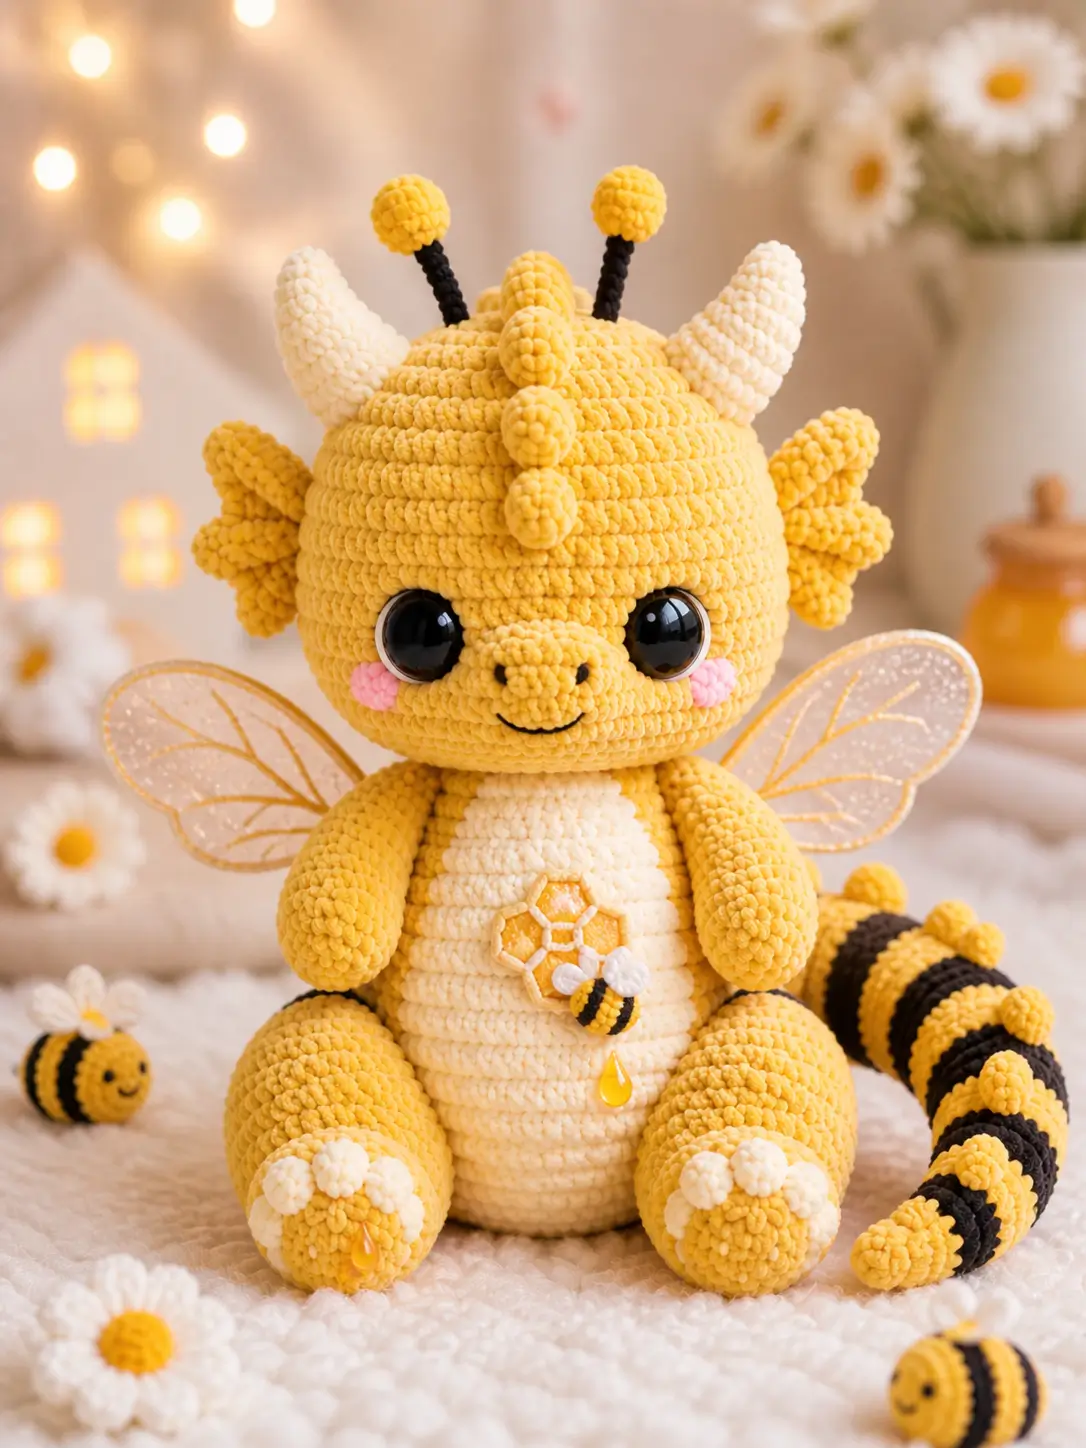
Bee dragons need antennae, horns, wings, stripes, and a snout before this bee dragon amigurumi crochet pattern reads as one creature instead of a bee in costume. Work it in chunky velvet/chenille with a 5.0 mm hook for a 24–25 cm seated plush, rated intermediate because of shaping and appliqué. The finished toy gives a clear honey theme for market tables or nursery display.
The Design: What Makes the Bee Dragon Different
The head carries most of the identity, so it uses a large 42-stitch plateau and keeps the snout small. Oversizing the muzzle turns a crochet bee dragon into a bear; undersizing the horns turns it back into a bee. The body stays oval with a separate cream belly panel because color-changing the entire torso would distort the front line in velvet yarn. Wings sit behind the arms, not behind the head, so the plush dragon crochet pattern keeps a stable seated silhouette. The striped tail needs a wide 24-stitch base; a thin tail will twist under the weight of chenille and pull the dragon amigurumi backward. The common mistake is stacking every feature on the face. Spread the features across head, back, belly, and tail.
Project Info at a Glance
| Skill Level | Time | Finished Size | Hook | Best For |
|---|---|---|---|---|
| Intermediate | 6–8 hr editorial build estimate | 24–25 cm seated | 5.0 mm | Plush display, market stock, themed nursery shelf |
Materials and Tools
Yarn
- Golden yellow — chunky velvet/chenille — approx. 120 g — Hobbii Honey Bunny, Himalaya Dolphin Baby, or similar
- Cream — chunky velvet/chenille — approx. 45 g — belly, horns, toe tufts
- Black — chunky velvet/chenille — approx. 25 g — antenna stems, tail stripes, tiny bee stripes
- Pink — chunky velvet/chenille — approx. 5 g — cheek patches
- White — chunky velvet/chenille scraps — tiny bee wings and toe highlights
- Honey amber — cotton or velvet scraps — honeycomb cells and drops
Tools
- Hook 5.0 mm
- 30 mm safety eyes
- Polyester stuffing
- Yarn needle
- Locking stitch markers
- Pins
- Black embroidery thread
- Optional organza or mesh for translucent wings
Abbreviations
MR = magic ring; sc = single crochet; inc = increase; dec = decrease; sl st = slip stitch; ch = chain; BLO = back loop only; FO = fasten off; st = stitch.
Invisible decrease means working through the front loops of the next two stitches before pulling through, which reduces the gap that chenille stuffing can show.
Pattern — Step by Step
Continuous spiral unless noted. Counts appear in brackets.
Head
Yarn: golden yellow
R1: 6 sc in MR (6)
R2: inc ×6 (12)
R3: (sc, inc) ×6 (18)
R4: (2 sc, inc) ×6 (24)
R5: (3 sc, inc) ×6 (30)
R6: (4 sc, inc) ×6 (36)
R7: (5 sc, inc) ×6 (42)
R8–R15: sc around (42)
R16: (5 sc, dec) ×6 (36)
R17: (4 sc, dec) ×6 (30)
R18: (3 sc, dec) ×6 (24)
R19: (2 sc, dec) ×6 (18)
Place safety eyes between R11 and R12, 9 stitches apart. Start stuffing firmly before the opening narrows.
R20: (sc, dec) ×6 (12)
R21: dec ×6 (6)
Fasten off. Close the hole and hide the tail.
Body
Yarn: golden yellow
R1: 6 sc in MR (6)
R2: inc ×6 (12)
R3: (sc, inc) ×6 (18)
R4: (2 sc, inc) ×6 (24)
R5: (3 sc, inc) ×6 (30)
R6: (4 sc, inc) ×6 (36)
R7–R13: sc around (36)
R14: (4 sc, dec) ×6 (30)
R15: sc around (30)
R16: (3 sc, dec) ×6 (24)
R17: (2 sc, dec) ×6 (18)
R18: (sc, dec) ×6 (12)
Stuff to a firm oval. Leave the top slightly flat for head attachment.
R19: dec ×6 (6)
Fasten off. Leave a 30 cm tail.
Cream Belly Panel
Yarn: cream
R1: ch 7, sc in second ch from hook and across (6)
R2: inc, 4 sc, inc (8)
R3: inc, 6 sc, inc (10)
R4–R10: sc across (10)
R11: dec, 6 sc, dec (8)
R12: dec, 4 sc, dec (6)
Fasten off. Leave a 40 cm tail for sewing.
Snout
Yarn: golden yellow
R1: 6 sc in MR (6)
R2: inc ×6 (12)
R3–R4: sc around (12)
Lightly stuff. Flatten into a short oval before sewing.
Fasten off. Leave a 30 cm tail.
Cheek Patches
Yarn: pink — Make 2
R1: 6 sc in MR (6)
R2: inc ×6, sl st to first stitch (12)
Fasten off. Leave a 20 cm tail.
Antennae
Yarn: black and golden yellow — Make 2
Stem: With black, ch 9, sl st in second ch from hook and across (8). Fasten off.
Tip R1: With golden yellow, 6 sc in MR (6)
Tip R2: inc ×6 (12)
Tip R3–R4: sc around (12)
Tip R5: dec ×6 (6)
Stuff lightly. Sew the yellow ball to the black stem.
Cream Horns
Yarn: cream — Make 2
R1: 6 sc in MR (6)
R2: sc around (6)
R3: inc ×6 (12)
R4–R5: sc around (12)
R6: (sc, inc) ×6 (18)
R7–R8: sc around (18)
Stuff lightly. Fasten off and leave a 35 cm tail.
Dorsal Bumps
Yarn: golden yellow — Make 3
R1: 6 sc in MR (6)
R2: inc ×6 (12)
R3–R5: sc around (12)
R6: dec ×6 (6)
Fasten off. Leave tails for sewing along the center top of the head.
Side Wings
Yarn: cream or translucent organza alternative — Make 2
R1: ch 5, sc in second ch from hook and across (4)
R2: inc, 2 sc, inc (6)
R3: inc, 4 sc, inc (8)
R4: inc, 6 sc, inc (10)
R5: sc across (10)
R6: dec, 6 sc, dec (8)
Border: sc evenly around the wing edge, placing 3 sc at the outer tip.
Fasten off. Leave a 35 cm tail. For the photo-matched version, cut two organza wings and couch the edges with yellow yarn.
Front Legs / Arms
Yarn: golden yellow — Make 2
R1: 6 sc in MR (6)
R2: inc ×6 (12)
R3–R7: sc around (12)
R8: dec ×6 (6)
Stuff the lower half only so the arm hangs close to the body.
Fasten off. Leave a 25 cm tail.
Back Legs
Yarn: golden yellow — Make 2
R1: 6 sc in MR (6)
R2: inc ×6 (12)
R3: (sc, inc) ×6 (18)
R4–R7: sc around (18)
R8: (sc, dec) ×6 (12)
R9–R10: sc around (12)
R11: dec ×6 (6)
Stuff firmly. Fasten off and leave a 35 cm tail.
White Toe Clusters
Yarn: cream — Make 6
R1: 6 sc in MR (6)
R2–R3: sc around (6)
Fasten off. Leave a 15 cm tail. Sew three toes to each back foot.
Striped Tail
Yarn: golden yellow and black
R1: With golden yellow, 6 sc in MR (6)
R2: inc ×6 (12)
R3–R5: sc around (12)
R6: With black, (sc, inc) ×6 (18)
R7–R8: sc around (18)
R9: With golden yellow, sc around (18)
R10–R11: With black, sc around (18)
R12: With golden yellow, (2 sc, inc) ×6 (24)
R13–R15: sc around (24)
R16–R18: With black, sc around (24)
R19–R21: With golden yellow, sc around (24)
R22–R24: With black, sc around (24)
R25–R26: With golden yellow, sc around (24)
Stuff as you go. Fasten off and leave a 45 cm tail.
Tail Bumps
Yarn: golden yellow — Make 7
R1: 6 sc in MR (6)
R2: inc ×6 (12)
R3: sc around (12)
R4: dec ×6 (6)
Fasten off. Sew along the upper tail ridge after tail placement.
Honeycomb Appliqué
Yarn: honey amber — Make 3 cells
R1: 6 sc in MR, sl st to first stitch (6)
R2: ch 1, sc in same st, ch 1, (sc, ch 1) in each stitch around, sl st to first sc (6 sc, 6 ch spaces)
Fasten off. Pinch into a hexagon shape and sew three cells together on the belly panel.
Tiny Bee Accessory
Yarn: yellow, black, white
Body R1: With yellow, 6 sc in MR (6)
R2: inc ×6 (12)
R3: With black, sc around (12)
R4: With yellow, sc around (12)
R5: With black, sc around (12)
R6: With yellow, sc around (12)
R7: dec ×6 (6)
Fasten off. Add two white wings: ch 4, sl st in second ch from hook and across (3). Sew to the top of the bee.
Honey Drops
Yarn: honey amber — Make 2
R1: 6 sc in MR (6)
R2: inc ×6 (12)
R3–R4: sc around (12)
R5: dec ×6 (6)
Ch 2, sl st into the base of the chain to form the pointed drop.
Fasten off.
Face Embroidery
Yarn: black embroidery thread
Work two small nostrils on the snout, each one stitch wide. Stitch the smile in a shallow curve under the snout, anchoring each side below the eye line.
Assembly
- Sew the body under the head, adding stuffing at the neck before closing the final 5 cm.
- Attach the cream belly panel to the front of the body, centered from upper chest to lower belly.
- Sew the snout between the eyes, with its top edge one round below the eye line.
- Add cheek patches outside the snout, aligned with the lower third of each eye.
- Sew antennae behind the eye line, then place cream horns wider and slightly lower than the antennae.
- Attach dorsal bumps down the center of the head from forehead toward crown.
- Sew arms to the sides of the body, angled forward.
- Sew back legs to the lower body and add three cream toes to each foot.
- Attach wings behind the arms and sew the striped tail to the back base.
- Add tail bumps, honeycomb cells, tiny bee, honey drops, nostrils, and smile.
The finished bee dragon should sit without rear support when the tail base is sewn level with the lower body.
7 Technical Tips
- Stitch marker drift: Velvet hides the first stitch, so the start marker may move diagonally after 8–10 rounds. Reset the marker every round on the head plateau or the snout will sit off center.
- Stuffing firmness: A 42-stitch chenille head needs firm stuffing at the lower back of the head. Soft stuffing creates a forward nod after the horns and antennae are attached.
- Invisible decrease gaps: Standard decreases can leave 4–5 mm holes in chunky yarn. Use invisible decreases on every closing round from 36 stitches downward.
- Eye placement timing: Insert 30 mm eyes before R18 of the head closes the opening. After that point, washer pressure can distort the face and flatten the cheek line.
- Velvet tension: Chenille can worm if stitches are loose by more than 2 mm between posts. Keep the 5.0 mm hook tight enough that stuffing is not visible under room light.
- Pinning sequence: Pin the wings, arms, and tail before sewing any one of them. A tail placed 1 cm too high will tip the body forward.
- Tail weaving: Leave at least a 45 cm tail yarn strand on the striped tail. Shorter strands make it harder to pass through body, tail, and body again for a locked seam.
Conclusion
This build works because the bee elements and dragon elements are separated by function: antennae and stripes identify the bee, while horns, wings, dorsal bumps, and tail build the dragon structure. Make one test head first, check the eye spacing, then complete the full plush after the face reads correctly from 1 meter away. Save the assembly image for Pinterest and post the finished plush on Instagram with the hashtag #BeeDragonHoneycomb. The final mention for search is bee dragon amigurumi crochet pattern. Which feature should sit higher on your version: the cream horns or the black antennae?









