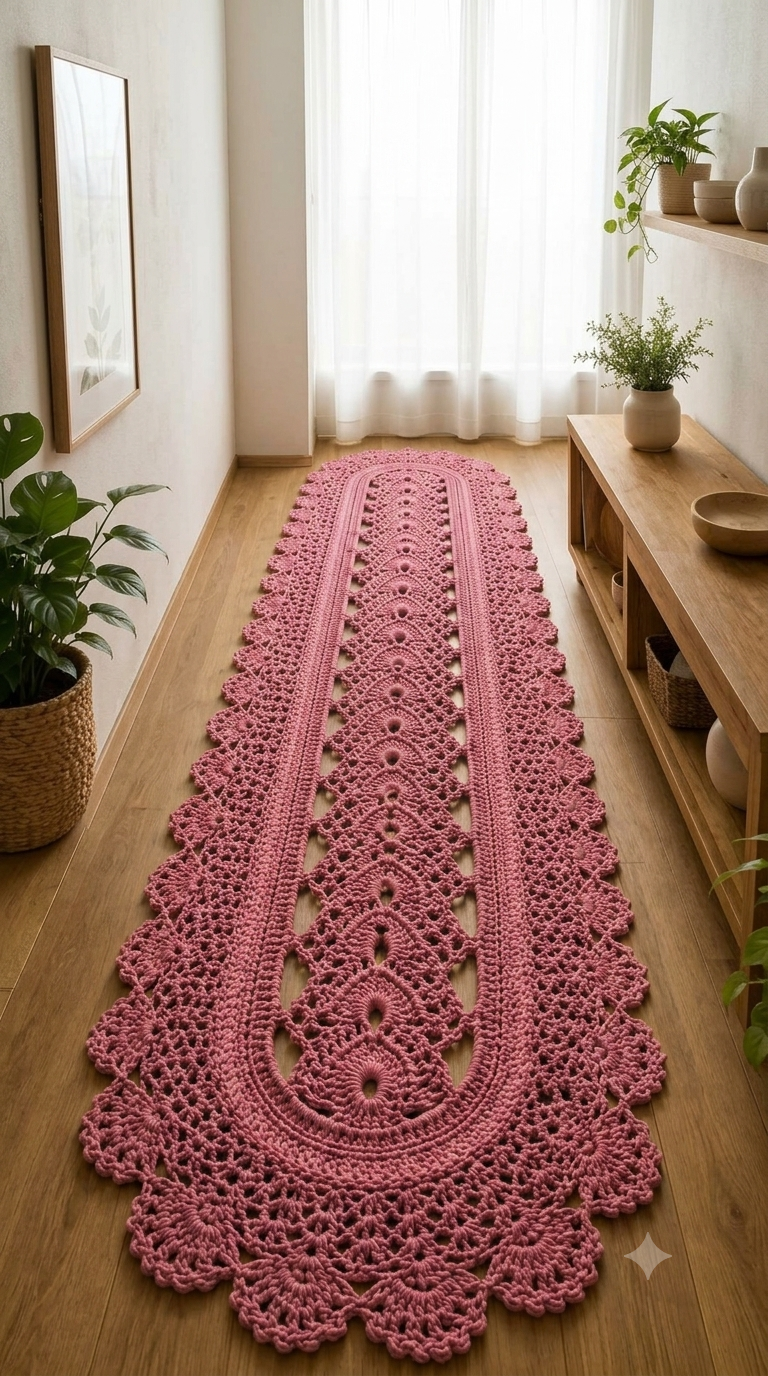
The repeated teardrop fans running through this runner’s center dictate the entire construction. This oval crochet table runner pattern uses DK cotton, a 3.5 mm hook, open chain spaces and a scalloped border to produce an adjustable long runner. A 28 × 100 cm DK runner provides a useful sizing reference, while the photographed version is considerably longer. Intermediate stitch control is required, particularly at the lace edges.
The Design: What Makes This Lace Runner Different
Three structural decisions define the design. First, the narrow openwork center is repeated lengthwise rather than building the complete runner from one enormous oval. That keeps length adjustment independent from most of the width.
Second, solid longitudinal bands separate the central motifs from the outer lace. These bands matter because a completely open fabric can distort when an elongated runner is blocked. The denser stitches create visual and structural rails.
Finally, the outer scalloped crochet runner border uses repeating fans to reproduce the large rounded edge visible in the reference. A frequent mistake with a lace crochet table runner is adding too many stitches around the border. Excess stitches produce waves that blocking cannot fully remove. Too few create cupping. The border therefore needs measured spacing rather than arbitrary shell placement.
Project Info at a Glance
| Skill Level | Time | Finished Size | Hook | Best For |
|---|---|---|---|---|
| Intermediate | 12–20+ hours | Adjustable; reference size 28 × 100 cm | 3.5 mm | Dining tables, consoles, long display surfaces |
The 28 × 100 cm size and 3.5 mm hook are published specifications for a DK cotton runner, not exact measurements of the photographed piece.
Materials and Tools
Yarn
- Dusty rose DK cotton or cotton blend — approximately 175 g minimum for a roughly 28 × 100 cm runner.
- Extra-long version — approximately 500–750 g DK cotton as a planning estimate. Purchase enough yarn from the same dye lot.
A long version similar to the photograph requires considerably more yarn than a standard table runner. The final quantity depends on length, width, gauge and the density of the scalloped border.
Tools
- 3.5 mm crochet hook
- Tapestry needle
- Locking stitch markers
- Scissors
- Tape measure
- Blocking mats
- Rust-resistant blocking pins
Abbreviations
- ch — chain
- sc — single crochet
- hdc — half double crochet
- dc — double crochet
- tr — treble crochet
- sl st — slip stitch
- sp — space
- sk — skip
- st/sts — stitch/stitches
- RS — right side
- WS — wrong side
- shell — multiple tall stitches worked into one space
Amigurumi abbreviations such as MR, inc and invisible dec are not required because this project is flat lace rather than stuffed crochet.
Gauge and Sizing
Work a lace swatch before committing to a two-metre runner. Gauge is less about matching an exact stitch count than controlling the relationship between the openwork and the dense side bands.
A DK cotton runner worked with a 3.5 mm hook can finish at approximately 28 × 100 cm. Other oval runners can measure approximately 36 × 68 cm depending on the yarn, hook and construction. These differences are why the photograph alone cannot provide trustworthy finished measurements.
For a long table runner, measure the intended surface first. Subtract roughly 10–20 cm from the target length if the runner should remain entirely on top of the table. For a decorative floor runner, leave enough clearance around doors and furniture legs.
Pattern — Step by Step
Construction note: The photograph does not expose every stitch clearly enough to reconstruct an unidentified designer’s exact pattern. These instructions use an original photo-inspired construction based on the visible arrangement: central lace, dense rails, outer mesh and large scallops.
Center Foundation
Yarn: dusty rose DK.
Ch 43.
Row 1: Dc in fourth ch from hook and in each ch across. Turn. (40 dc)
Row 2: Ch 3, dc in next 3 sts, *ch 2, sk 2 sts, dc in next 4 sts* across. Turn.
Row 3: Ch 3, dc in each dc and work 2 dc in every ch-2 sp. (40 dc)
The 40-stitch foundation forms a controlled-width center. Length comes from repeating the motif section rather than continually increasing the stitch count.
Central Openwork Motif
Row 4: Ch 3, dc in next 7 sts, ch 5, sk 5 sts, dc in next 14 sts, ch 5, sk 5 sts, dc in remaining sts. Turn.
Row 5: Ch 3. Dc to first ch-5 sp, work 7 dc into ch-5 sp, continue across center, work 7 dc into second ch-5 sp, dc to end.
Row 6: Ch 3, dc in first section, *ch 1, sk 1, dc in next st* across each seven-dc fan, keeping the central solid stitches aligned.
Row 7: Ch 3, work dc into dc and 1 dc into each ch-1 sp across.
Row 8: Ch 3, dc in first 10 sts, ch 7, sk 7, dc across center until 17 sts remain, ch 7, sk 7, dc in final 10 sts.
Row 9: Work dc to each ch-7 sp; place 9 dc into each space.
Row 10: Ch 3, *dc, ch 1* across each fan section while maintaining the solid center.
Row 11: Dc across, filling each ch-1 sp with one dc.
These rows create an open fan unit inspired by the structure visible in the reference rather than a stitch-for-stitch reproduction.
Length Repeat
Repeat Rows 4–11 until the center reaches approximately 15–20 cm shorter than the desired finished length.
Place a stitch marker after every repeat. Counting complete repeats is more reliable than measuring stretched lace.
For a 100 cm runner, stop the center near 80–85 cm. For a 200 cm runner, continue until approximately 180–185 cm. The exact allowance depends on how deeply the end borders extend.
Rounded End — First End
Join yarn at one short edge.
End Row 1: Work 40 sc evenly across. (40)
End Row 2: Ch 3, 2 dc in first st, dc in next 8 sts, 2 dc in next st, dc in next 18 sts, 2 dc in next st, dc to final st, 2 dc in final st. (44)
End Row 3: Ch 3, dc across. (44)
End Row 4: Work four evenly distributed increases. (48)
End Row 5: Ch 3, *dc, ch 1, sk 1* across.
End Row 6: Dc in each dc and each ch-1 sp.
The gradual expansion creates a broader rounded end without forcing the lace into a sharp rectangular shape.
Rounded End — Second End
Repeat the six end rows on the opposite short edge. Count both ends before starting the side bands. Mismatched end counts become considerably more visible after blocking.
Dense Side Band — First Side
Join at the corner of one long edge.
Band Row 1: Work sc evenly down the full side. Use approximately 2 sc per dc-row edge, adjusting locally so the strip lies flat.
Band Row 2: Ch 2, hdc in every st.
Band Row 3: Ch 1, sc in every st.
Band Row 4: Ch 3, dc in every st.
Band Row 5: Ch 1, sc in every st.
Band Row 6: Ch 2, hdc in every st.
Fasten off.
This compact six-row section creates the prominent solid rail positioned between the center and the outer lace.
Dense Side Band — Second Side
Repeat Band Rows 1–6 on the opposite long edge.
Before proceeding, place the runner on a flat surface. Both bands should have comparable lengths without pulling the central panel sideways.
Outer Lace Panel — First Side
Join to the outer edge of the first dense band.
Lace Row 1: Ch 3, dc in first st, *ch 2, sk 2 sts, dc in next st* across.
Lace Row 2: Ch 3, work 3 dc in each ch-2 sp across.
Lace Row 3: Ch 5, *sc in center dc of next 3-dc group, ch 5* across.
Lace Row 4: Sl st into first ch-5 sp, ch 3, 5 dc in same sp, *sc in next sp, 7 dc in next sp* across.
Lace Row 5: Ch 5, sc in center of next shell, *ch 5, sc in center of next shell* across.
Lace Row 6: Work 7 dc in each alternate ch-5 sp with sc in intervening spaces.
Lace Row 7: Work ch-5 arches across the complete edge.
Lace Row 8: Work alternating 5-dc and 7-dc fans into the arches, adjusting only at the rounded ends.
Stop and inspect the edge on a flat surface. If it forms strong waves before blocking, reduce the number of arches or shells.
Outer Lace Panel — Second Side
Repeat Lace Rows 1–8.
Count the shell groups on both sides. A difference of even one or two groups becomes visible on a runner this long, particularly when the piece is placed beside straight table or floor edges.
End Lace
Continue the openwork around each rounded end while maintaining the same ch-5 arch spacing.
Where the curve requires expansion, place two arches into one larger space rather than increasing the number of dc inside every shell. Distribute these expansion points evenly across the curve.
The straight sections maintain their established repeat. Most additional width is introduced only around the curves.
Scalloped Outer Border
The photographed runner uses large, clearly separated scallops around its perimeter.
Border Round 1: Sc evenly around the entire runner, working additional stitches only where required around the curves.
Border Round 2: *Sc in next designated anchor, sk approximately 2 sts, 7 dc in next anchor, sk approximately 2 sts.* Repeat around.
Border Round 3: Sl st to center of first shell. *Ch 3, sc in next dc, ch 3, sc in next dc* across each shell. Sl st through the valley between shells.
Border Round 4: Work 3 sc in each ch-3 sp across each scallop. Place one sl st in each valley.
Fasten off and weave the tail through at least 5 cm of dense border stitches.
Blocking the Crochet Runner
Blocking determines whether this construction finishes as a controlled elongated shape or an uneven strip.
Wash or thoroughly dampen the runner according to the yarn manufacturer’s care instructions. Remove excess water without twisting the crochet. Place the center on blocking mats and establish the longitudinal center line first.
Pin both ends to the target length. Next, measure outward from the center line at regular intervals and pin corresponding points on the left and right sides to equal widths.
Shape every scallop individually. Avoid pulling the scalloped points so far outward that the dense longitudinal bands begin to bow.
Allow the runner to dry completely before removing the blocking pins.
Assembly and Finishing Order
- Finish the central panel to the planned length and record the total number of motif repeats.
- Work both rounded ends and compare their final stitch counts.
- Add the first dense longitudinal band without stretching the row edges.
- Repeat the same six-row band on the opposite side.
- Measure from the center line to each outer band edge at three or more locations.
- Crochet the first outer lace panel and record its number of arches and shells.
- Repeat those counts on the second side while adding curve increases only where required.
- Continue the lace around both ends so the border forms one visually continuous perimeter.
- Add the final scalloped border, weave tails at least 5 cm through dense stitches, then trim them.
- Wet-block to the planned measurements, checking the width repeatedly along the runner before allowing it to dry.
The completed piece consists of a stable central strip, two matching side structures and a continuous scalloped perimeter.
7 Technical Tips for a Flat, Symmetrical Runner
- Stitch-marker drift: Place a marker after every complete center repeat. Missing one eight-row repeat can shift the two ends by several centimetres before the error becomes obvious.
- Border rippling: If the outer edge develops waves exceeding roughly 2 cm while lying unstretched, reduce the number of arches or shells. Blocking cannot fully correct excessive border density.
- Foundation contraction: Compare the foundation edge with Row 3 after the first 20 cm. If the foundation is visibly shorter, use a hook 0.5 mm larger for the foundation chain.
- Shell inconsistency: Keep every standard outer shell at 7 dc unless the instructions specify another count. Random six- and eight-stitch shells produce inconsistent scallop widths.
- Side-band distortion: Measure the distance from the center to the band edge at least every 25 cm. A progressive difference indicates that one side is receiving more edge stitches.
- Curve cupping: Add expansion around the rounded ends when the edge begins lifting from the surface. Extra stitches placed along the straight sections can produce waves.
- Tail failure: Weave each finishing tail at least 5 cm through the dense band or border and reverse direction once. Large lace openings provide too little friction for a short straight tail.
Why Cotton Works Well for This Runner
Cotton is practical where stitch definition matters. The open spaces, fan groups and scallops remain clearly separated, while blocking can impose more exact geometry on the finished runner.
DK cotton also gives the project enough weight to lie flat without turning the lace into an excessively heavy fabric. A smaller hook produces tighter definition, while a larger hook makes the openwork broader and can increase the final dimensions substantially.
For an extra-long runner approaching the scale shown in the photograph, purchase the yarn from one dye lot. A shade difference can become conspicuous because the project contains large uninterrupted sections of one color.
How to Adjust the Length
Length is the easiest measurement to change because it is controlled primarily by the repeated center section.
Crochet one complete motif repeat and measure it after lightly blocking the sample. If one repeat measures 8 cm and the center needs another 80 cm, add ten complete repeats.
Do not crochet until the unblocked strip simply matches the desired finished measurement. Cotton lace can change dimensions after wet blocking, particularly when the design contains large chain spaces.
Width adjustments require more control. Add complete lace rows symmetrically to both sides instead of adding arbitrary stitches to one border. For a narrower runner, remove an outer lace row while retaining the dense side bands and final scalloped edge.
Conclusion
A long runner like the photographed piece depends on symmetry more than complicated individual stitches. Complete the center first, record every repeat, then construct matching dense bands before adding the outer lace. Check the fabric on a flat surface after each major section; a border that already forms deep waves needs its stitch spacing corrected before blocking. For the next step, make one center repeat and one seven-dc shell swatch in the selected DK cotton, then measure both. Save this oval crochet table runner pattern to Pinterest and share the blocked version on Instagram with #OvalLaceRunner. Which width would suit your version better: a narrow table runner or the broad floor-runner proportion shown in the photograph?









