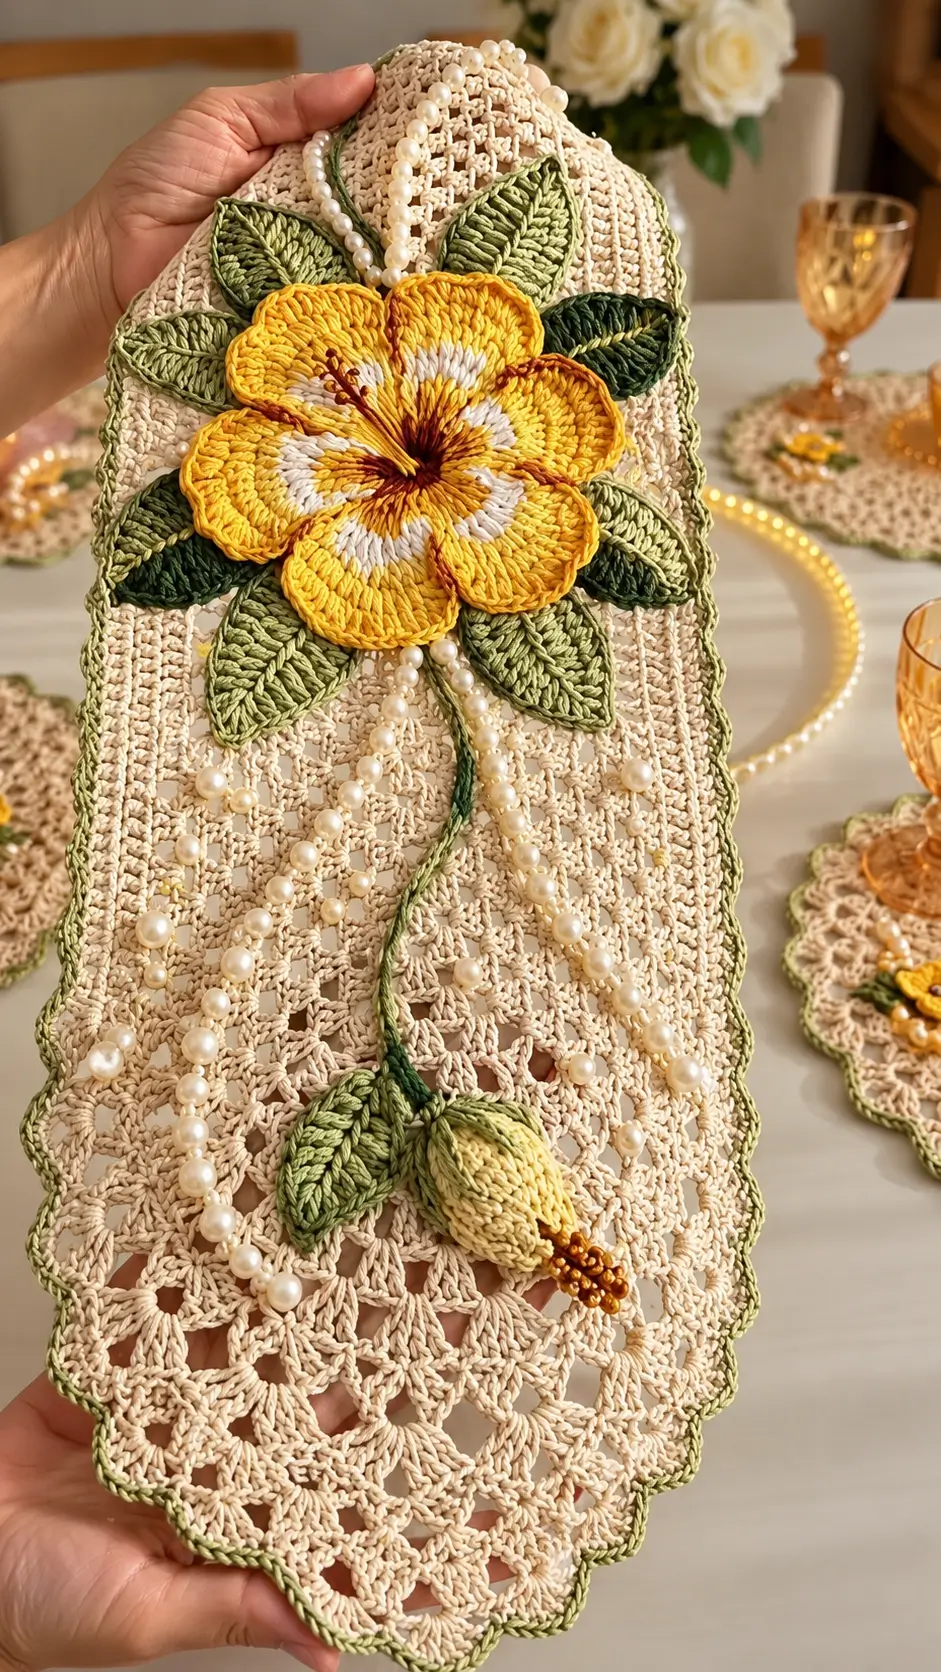
A hibiscus needs five broad petals and a projecting stamen before the flower reads correctly at table-runner scale. This crochet hibiscus table runner pattern combines those features with DK cotton, a 3.5 mm hook, layered leaves, lacework, and pearl accents. The reference flower measures about 11 cm across. Intermediate crochet skills are appropriate, and the removable appliqué construction makes the runner easier to wash.
The Design: What Makes the Hibiscus Runner Different
The flower is built separately from the runner so its five petals can overlap without pulling the lace panel out of shape. Each petal widens rapidly near the outer edge, producing the broad profile required for a recognizable crochet hibiscus flower pattern. A contrasting throat and narrow central stamen create depth without stuffing.
Leaves are worked independently and distributed behind the bloom rather than arranged in a flat ring. That decision matters: the photographed design uses foliage to expand the motif vertically while keeping the flower dominant.
The lower runner changes to open lace, reducing visual weight beneath the dense appliqué. A frequent error in a crochet flower table runner is sewing every leaf edge down. That flattens the botanical layers. Attach leaves along their center lines and bases instead.
Project Info at a Glance
| Skill Level | Time | Finished Size | Hook | Best For |
|---|---|---|---|---|
| Intermediate | 8–12 hours | Flower approx. 11 cm; runner length adjustable | 3.5 mm | Table centerpiece, dresser runner, floral display |
The 11 cm flower and 3.5 mm hook are based on a DK-cotton reference project. Runner dimensions remain adjustable because the photograph does not provide a reliable physical scale.
Materials and Tools
Yarn
- Natural ivory — DK cotton — approximately 120–180 g for an adjustable runner.
- Golden yellow — DK cotton — approximately 8–12 g for the five petals.
- White — DK cotton — approximately 3–5 g for the petal throats.
- Rust/burgundy — DK cotton — approximately 2–3 g for the flower center and stamen.
- Sage green — DK cotton — approximately 8–12 g for foliage.
- Olive green — DK cotton — approximately 8–12 g.
- Forest green — DK cotton — approximately 5–8 g.
- Pale yellow — DK cotton — approximately 4–6 g for the hanging flower bud.
The runner quantities are working estimates because the supplied photograph does not reveal its exact yarn brand, gauge, or physical dimensions. A smooth DK cotton provides the stitch definition required for the flower and leaves.
Tools
- 3.5 mm crochet hook
- Tapestry needle
- Stitch markers
- Scissors
- Blocking pins
- Pearl beads or faux-pearl strand
- Small amber or brown beads
- Matching sewing thread
- Optional 0.3–0.5 mm craft wire for the stamen
- Blocking mat
Safety eyes are not required because this is a botanical crochet project rather than a stuffed amigurumi character.
Abbreviations
- MR — magic ring
- sc — single crochet
- hdc — half double crochet
- dc — double crochet
- tr — treble crochet
- inc — two stitches in one stitch
- dec — decrease
- sl st — slip stitch
- ch — chain
- BLO — back loop only
- sp — space
- st/sts — stitch/stitches
- RS — right side
An invisible decrease is mainly required for the small flower bud. Insert the hook through the front loops of the next two stitches before completing one single crochet.
Pattern — Step by Step
The main runner is worked flat. The flower center and flower bud use rounds where stated. Stitch counts are included where a fixed count is structurally required.
Main Lace Runner
Yarn: natural ivory.
Foundation: Ch 63.
Row 1: Dc in fourth ch from hook and in each ch across. Turn. (60 dc)
Row 2: Ch 3, dc in next 2 sts, *ch 2, skip 2 sts, dc in next 4 sts*; repeat across, adjusting the final repeat so three dc remain at each side. Turn.
Row 3: Ch 3, dc across, working 2 dc into every ch-2 sp. (60 dc)
Row 4: Ch 1, sc across. (60 sc)
Repeat Rows 2–4 until the dense upper section measures approximately 35–40 cm.
Open Lace Section
Lace Row 1: Ch 4, skip 2 sts, dc in next st, *ch 2, skip 2, dc in next st* across.
Lace Row 2: Ch 3, *(2 dc, ch 2, 2 dc) in next ch-2 sp* across.
Lace Row 3: Sl st to first ch-2 sp, ch 3, 4 dc in same sp, *sc in next ch-2 sp, 5 dc in next ch-2 sp* across.
Repeat the three-row lace sequence until the desired runner length is reached.
Fasten off.
Scalloped Border
Yarn: sage green.
Join the yarn at an upper corner.
Round 1: Work sc evenly around the entire runner, placing 3 sc at each corner. Join with sl st.
Round 2: *Skip 1 st, 5 dc in next st, skip 1 st, sl st in next st.* Repeat around, modifying the spacing slightly at the corners when required.
Fasten off and block the runner before attaching the flower.
Hibiscus Center
Yarn: burgundy.
R1: 6 sc in MR. (6)
R2: Inc ×6. (12)
R3: (sc, inc) ×6. (18)
Fasten off, leaving a 20 cm tail for sewing.
Hibiscus Petals — Make 5
Yarn: golden yellow, white, and burgundy.
Ch 13.
Row 1: Sc in second ch from hook, sc, 2 hdc, 4 dc, 2 tr, dc, hdc. Turn. (12)
Row 2: Ch 2, hdc in first st, dc in next 2, 2 dc in each of next 3 sts, dc in next 3, hdc in next 2, sc in final st. Turn. (15)
Row 3: Change to white for the lower central section. Ch 1, sc in first 3 sts, hdc in next 3, 2 dc in each of next 3 sts, hdc in next 3, sc in final 3 sts. (18)
Row 4: Return to golden yellow. Ch 1 and sc around the curved outer edge, placing an occasional 2 sc in one stitch at the broadest edge to create a light ripple.
Fasten off. Leave a 25 cm sewing tail.
Arrange the five petals around the burgundy center. Overlap each neighboring petal by approximately 8–12 mm. Keep the outer edges free so the flower retains its dimensional appearance.
Large Leaves — Make 4
Yarn: sage or olive green.
Ch 17.
Row 1: Sc in second ch, hdc, dc in next 3, tr in next 6, dc in next 3, hdc, 3 sc in final ch. Continue down the opposite side with hdc, dc in next 3, tr in next 6, dc in next 3, hdc, sc.
Row 2: Ch 1. Work sc around, placing 2 sc at the leaf tip and skipping one stitch near each lower side to draw the base inward.
Surface vein: Join a contrasting green yarn at the base and sl st along the center line toward the tip.
Fasten off with a 20 cm sewing tail.
A leaf around 8 × 4 cm works well beside an approximately 11 cm hibiscus flower.
Small Leaves — Make 4
Yarn: forest or olive green.
Ch 12.
Row 1: Sc in second ch, hdc, dc in next 2, tr in next 3, dc in next 2, hdc, 3 sc in last ch. Continue down the opposite side in reverse stitch order.
Row 2: Sc around. Work 2 sc into the tip stitch.
Fasten off. Leave approximately 15 cm for sewing.
Hanging Stem
Yarn: dark green.
Ch 45.
Row 1: Sl st in second ch from hook and every ch to the beginning. (44 sl st)
Fasten off with long tails at both ends.
For a firmer hanging stem, the chain can be crocheted around thin craft wire.
Hanging Flower Bud
Yarn: pale yellow.
R1: 6 sc in MR. (6)
R2: Inc ×6. (12)
R3: (sc, inc) ×6. (18)
R4: Sc around. (18)
R5: Sc around. (18)
R6: Sc around. (18)
R7: Sc around. (18)
R8: Sc around. (18)
R9: (sc, dec) ×6. (12)
Add a small amount of stuffing at this point if a rounded three-dimensional bud is wanted.
R10: Dec ×6. (6)
Fasten off and close the remaining opening.
Bud Sepals — Make 3
Yarn: sage green.
Ch 8.
Row 1: Sl st in second ch, sc, hdc, dc in next 2, hdc, sc.
Fasten off.
Sew all three sepals around the upper section of the pale-yellow bud.
Hibiscus Stamen
Yarn: burgundy with amber or brown beads.
Ch 18.
Sl st back along the entire chain to produce a narrow cord.
Fasten off.
Thread approximately five to eight small amber or brown beads onto matching sewing thread. Secure the beads around the final 15–20 mm of the crocheted cord.
The stamen should project from the center of the flower rather than lie completely flat against the petals.
Pearl Drapes
Use faux pearls already strung on cord or sew individual pearl beads onto strong matching thread.
Prepare three strands measuring approximately 18 cm, 25 cm, and 32 cm. These staggered lengths reproduce the descending pearl arrangement visible in the reference design.
Anchor each strand behind the flower so the attachment stitches remain hidden.
If the runner will be moved regularly, add one or two discreet attachment points farther down each strand. Do not attach a heavy pearl strand to a single open chain space.
Assembly
- Block the ivory runner to its final shape and allow it to dry completely before attaching the dimensional crochet pieces.
- Position the hibiscus approximately one-third of the way down from the upper edge rather than directly in the center of the runner.
- Arrange the five petals around the flower center, overlapping neighboring petals by approximately 8–12 mm. Sew only the inner section of each petal so the outer edges remain raised.
- Attach the burgundy center over the inner petal edges. Position the white throat sections so the ivory runner does not show through the center of the flower.
- Place the four large leaves behind the flower at diagonal angles. Sew primarily along the central vein and lower section instead of attaching the complete perimeter.
- Add the four smaller dark-green leaves between the larger leaves. Alternate the shades of green to reproduce the layered foliage effect.
- Attach the stamen firmly to the center of the hibiscus. Angle the beaded tip slightly downward and secure the beads with sewing thread.
- Sew the hanging green stem behind the lower petals. Attach the flower bud and three green sepals to the lower end.
- Fix the three pearl strands behind the hibiscus. Add discreet anchoring stitches where required to prevent their weight from stretching the open lace.
- Weave each yarn tail through at least 4–5 cm of matching stitches. Trim the ends and re-block any section disturbed during assembly.
The completed runner has one five-petal hibiscus, eight layered leaves, a suspended flower bud, a projecting stamen, scalloped edging, and staggered pearl decoration.
7 Technical Tips for a Cleaner Hibiscus Table Runner
- Prevent a drifting lace count: Place a stitch marker in the first and last usable stitch of every repeat row. One missing ch-2 space can shift the shells above it and create a diagonal runner edge.
- Avoid overstuffing the flower bud: Add only enough filling to support its tapered profile. Excess stuffing turns the bud into a sphere and can expose filling between the stitches.
- Hide bud decreases: Work R9 and R10 with front-loop invisible decreases. A conventional sc2tog can leave visible horizontal bars across the pale-yellow surface.
- Check flower placement before sewing: Pin the complete flower-and-leaf arrangement and inspect the runner from about 1 m away. Moving the flower by only 2–3 cm can noticeably alter the balance of the design.
- Control cotton tension: Keep the same 3.5 mm hook for petals and leaves when using comparable DK cotton. An accidental hook-size change can alter leaf length by 1 cm or more.
- Do not flatten the foliage: Pin each leaf at its base and center vein before sewing. Attaching the entire outer edge removes the raised botanical structure visible in the finished design.
- Protect the lace from pearl weight: Anchor pearl thread through a dense sc or dc section. Attaching a heavy strand to one chain space can permanently stretch that opening.
Finishing the Crochet Hibiscus Table Runner
Block the runner before attaching any raised component; this sequencing prevents the flower, leaves, and pearl strands from interfering with lace shaping. Make one test petal in the intended DK cotton and compare its scale with an approximately 11 cm completed flower before producing the remaining four.
The finished crochet hibiscus table runner pattern can be photographed flat for Pinterest and vertically for Instagram so the layered foliage, pearl strands, and suspended flower bud remain visible. Use #HibiscusTableRunner when sharing the project.
For a second version, decide which detail should change first: keep the yellow-and-white hibiscus throat shown here, or work the petals in one solid color with only the burgundy center providing contrast?









