Introduction
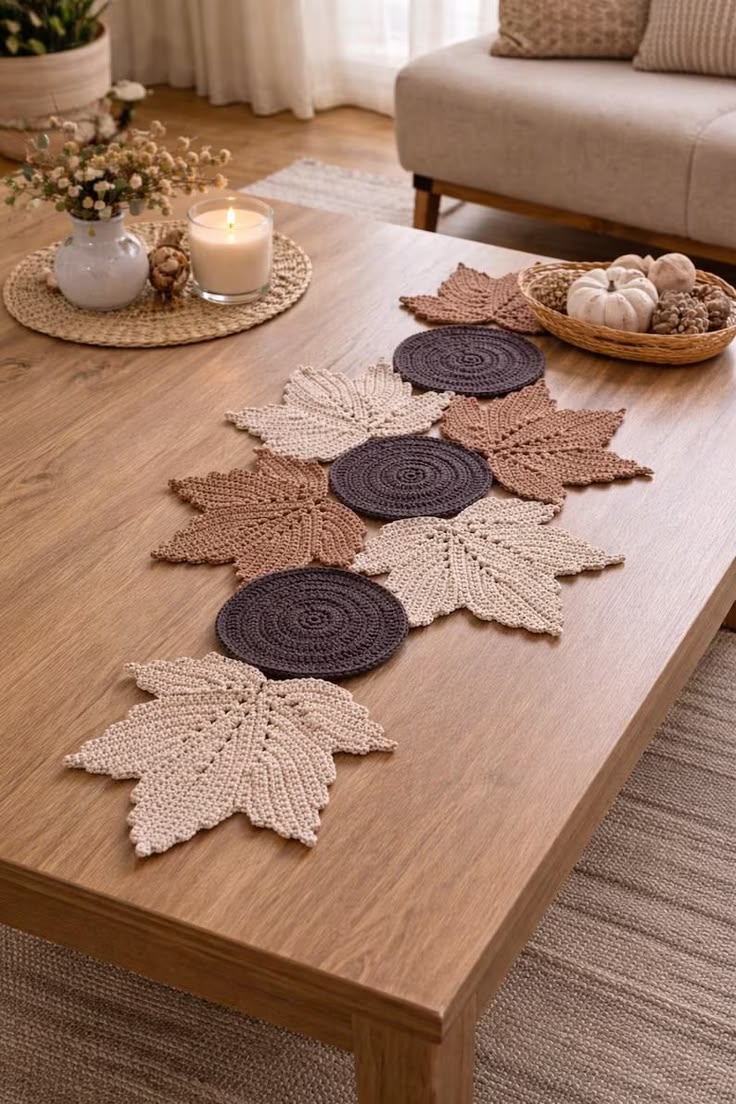
Five-point maple leaves alternate with dark circular medallions instead of forming a conventional rectangular strip. This maple leaf crochet table runner pattern uses worsted cotton, a 4 mm hook, separate cream and taupe leaves, and three espresso-brown circles. The intermediate reconstruction targets approximately 38 × 125 cm after assembly, creating a flexible centerpiece that fits particularly well on a coffee table or narrow dining table.
The instructions below are an original photo-inspired reconstruction based on visible structure; published patterns cited later are used only for sizing, gauge, and material benchmarks.
The Design: What Makes This Maple Leaf Runner Different
The reference is assembled from independent motifs rather than crocheted as one rectangular fabric. Large five-point leaves overlap three dense circles along a loose central axis, allowing the wooden tabletop to remain visible between shapes. Cream and warm taupe alternate through the leaf motifs, while dark brown circles create visual breaks and stabilize the composition. This maple leaf crochet table runner pattern therefore treats every component as a finished object before joining. The leaves use a circular 24-stitch center followed by five shaped lobes and a short stem; the circles remain deliberately plain so they do not compete with the leaf texture. A common mistake is joining motifs before blocking. Maple points curl easily, and sewing an unblocked leaf to a rigid circle can permanently distort both components.
Project Info at a Glance
| Skill Level | Time | Finished Size | Hook | Best For |
|---|---|---|---|---|
| Intermediate | Reconstruction estimate: 8–11 hours | Reconstruction target: approximately 38 × 125 cm | 4 mm | Coffee tables, dining tables, autumn centerpieces |
The dimensions above are inferred reconstruction targets rather than measurements of an identified original. Published maple-leaf patterns demonstrate substantial variation by yarn and hook: Bikkis hive lists approximately 5 × 5.5 inches for a light-worsted leaf with a 3.25 mm hook, while Lovable Loops reports approximately 10 × 10 cm using worsted yarn and a 4 mm hook. Zamiguz documents a substantially larger 10 × 9 inch maple leaf using medium-weight cotton and a 3.5 mm hook.
Materials and Tools
Yarn
- Natural cream — worsted #4 cotton — reconstruction estimate: 110–130 g
- Warm taupe — worsted #4 cotton — reconstruction estimate: 90–110 g
- Espresso brown — worsted #4 cotton — reconstruction estimate: 70–90 g
A smooth cotton or cotton-rich yarn is preferable because the five leaf points need enough body to remain defined after blocking. Avoid highly elastic yarn for the dark circles; excessive stretch makes the medallions oval when the neighboring leaves are attached.
Tools
- 4 mm crochet hook
- Tapestry needle
- Scissors
- Blocking mats
- Rust-resistant pins
- Stitch markers
- Measuring tape
Abbreviations
- MR — magic ring
- ch — chain
- sl st — slip stitch
- sc — single crochet
- hdc — half double crochet
- dc — double crochet
- tr — treble crochet
- inc — two stitches in one stitch
- sp — space
- st/sts — stitch/stitches
- RS — right side
An invisible decrease works through the front loops of two neighboring stitches before completing one single crochet; no decreases are required in these flat motifs.
Motif Plan
The photograph shows a free-form arrangement rather than a strict row. For this reconstruction make:
- 3 cream maple leaves
- 3 warm-taupe maple leaves
- 3 espresso-brown round medallions
Each blocked leaf should measure approximately 20–22 cm wide × 21–23 cm long including the stem. Each brown circle should measure approximately 16–18 cm across.
The motifs overlap during assembly, so nine pieces do not produce a runner equal to the sum of their individual dimensions.
Pattern — Step by Step
Large Five-Point Maple Leaf — Make 6
Make 3 in cream and 3 in warm taupe. The following construction is an original photo-inspired reconstruction.
Leaf Center
R1: Work 12 hdc in MR. Join with sl st. (12)
R2: Ch 2, work 2 hdc in each stitch around. Join. (24)
Do not fasten off.
The 24-stitch center supplies five lobe attachment areas plus the lower section used for the stem.
First Small Side Lobe
Working directly into R2:
Skip 1 st.
In next stitch work 7 dc.
Skip 1 st, sl st in next stitch.
You have used four positions of the center round: one skipped stitch, one shell anchor, one skipped stitch, and one slip-stitch anchor.
First Large Side Lobe
Skip next stitch.
Work 9 tr in next stitch.
Skip next stitch, sl st in next stitch.
Center Lobe
Skip next stitch.
Work 11 tr in next stitch.
Skip next stitch, sl st in next stitch.
Second Large Side Lobe
Skip next stitch.
Work 9 tr in next stitch.
Skip next stitch, sl st in next stitch.
Second Small Side Lobe
Skip next stitch.
Work 7 dc in next stitch.
Skip next stitch, sl st in next stitch.
Twenty center positions have now been consumed by the five four-stitch lobe units. Four center stitches remain for the lower leaf and stem transition.
Shaping the Five Maple Points
The shell round creates five rounded lobes. The next pass turns those lobes into recognizable maple points.
Shape a 7-dc Small Lobe
Work across the seven shell stitches:
Sc in first dc, hdc in next dc, dc in next dc, (tr, ch 3, sl st in first ch, tr) in center dc, dc in next dc, hdc in next dc, sc in final dc.
Sl st into the valley stitch between lobes.
Repeat this formula on the second 7-dc lobe.
Shape a 9-tr Large Lobe
Across a 9-tr shell work:
Sc, hdc, dc, tr, (2 tr, ch 3, sl st in first ch, 2 tr) in center stitch, tr, dc, hdc, sc.
Sl st in the valley.
Repeat on the second 9-tr lobe.
Shape the 11-tr Center Lobe
Across the center shell work:
Sc, hdc, dc, tr, tr, (2 tr, ch 4, sl st in first ch, 2 tr) in center stitch, tr, tr, dc, hdc, sc.
The ch-4 picot makes the center point slightly taller than the four side points.
Leaf Stem
After shaping the final small lobe, sl st toward the four unused stitches at the bottom of the center.
Work sc in next 2 center stitches.
Ch 11.
Starting in second chain from hook, work:
Sl st in first 2 chains, sc in next 6 chains, hdc in next 2 chains.
Sl st into the next unused center stitch.
Work sc in the final unused stitch.
Fasten off with a 30 cm tail.
The stem contains exactly 10 return stitches after the 11-chain foundation.
Surface-Crocheted Center Vein
The leaves in the photograph have strong central lines running toward the major points.
Join matching yarn at the lower center immediately above the stem.
Surface sl st toward the center lobe point for approximately 6–7 cm.
Fasten off.
For the two large side lobes, join at the same lower center and work a surface-sl-st line diagonally toward each point for approximately 4–5 cm.
Do not work surface lines into the two smallest lobes. Leaving them plain keeps the vein structure from becoming crowded.
Blocking the Maple Leaves
Wet block each motif before joining.
Pin the center lobe first.
Stretch the two large side points to equal distances from the center.
Pin the two smaller points last.
Target approximately 20–22 cm across.
The center point should project approximately 1–2 cm farther from the round center than either large side point.
Pin the stem straight or angle it slightly to match the free-form arrangement in the photograph.
Espresso Round Medallion — Make 3
Yarn: espresso brown.
The dark motifs are intentionally dense and simple. Their purpose is to separate the more detailed maple leaves.
R1: 12 dc in MR. Join. (12)
R2: 2 dc in each stitch around. Join. (24)
R3: *Dc in next st, 2 dc in next st.* Repeat ×12. (36)
R4: *Dc in next 2 sts, 2 dc in next st.* Repeat ×12. (48)
R5: *Dc in next 3 sts, 2 dc in next st.* Repeat ×12. (60)
R6: *Dc in next 4 sts, 2 dc in next st.* Repeat ×12. (72)
R7: *Dc in next 5 sts, 2 dc in next st.* Repeat ×12. (84)
R8: Sc in each stitch around. (84)
Fasten off with a 40 cm tail.
Block to approximately 16–18 cm diameter.
Every increase round adds exactly 12 stitches, preserving the flat circular geometry.
Optional Textured Circle
For stronger concentric ridges, work R4 and R6 through the back loop only.
Return to both loops for the following rounds.
This produces subtle circular lines without changing the stitch count or finished diameter.
Do not use raised post stitches throughout the medallion because they can reduce the effective circumference and cause cupping.
Runner Layout
Arrange the motifs on a flat surface before sewing.
From one end to the other, use this reconstruction sequence:
Cream leaf → brown circle → taupe leaf → cream leaf → brown circle → taupe leaf → cream leaf → taupe leaf → brown circle.
Do not place the motifs in one perfectly straight line.
Rotate alternate leaves approximately 15–30 degrees left or right. Allow some leaves to sit beside a circle rather than directly above it.
The final outline should remain irregular, with the maple points extending beyond the narrower central axis.
How Much the Motifs Should Overlap
Overlap a leaf and circle by approximately 2–3 cm.
Where two leaves meet, overlap only the lower side lobe or stem area by approximately 1.5–2 cm.
Avoid placing one leaf point completely over another motif. The five-point silhouette should remain readable after assembly.
Pin every component before making the first permanent seam.
Joining a Leaf to a Circle
Use the leaf color for the sewing strand.
Pass the needle through the back loops of approximately 4–5 cm of overlapping fabric.
Take small stitches every 6–8 mm.
Do not sew around the complete overlap perimeter.
A short hidden attachment lets the free leaf points retain a slight three-dimensional lift.
Joining Two Leaves
Position the lower lobe of one leaf over the side of the neighboring leaf.
Sew through approximately 2 cm of overlapping fabric.
Add a second concealed attachment near the leaf center if the motifs rotate when lifted.
Keep all five pointed tips free.
Stabilizing the Finished Runner
Once every motif is connected, lift the runner from both ends.
If a joint stretches more than approximately 5 mm, add a second line of concealed stitches.
Pay particular attention to circle-to-leaf joins because the dense circles weigh more than the pointed motifs.
The runner should move as one connected textile while still appearing to be assembled from separate pieces.
Assembly
- Crochet three cream and three taupe maple leaves, keeping the 24-stitch center and all five lobe attachment positions identical from motif to motif.
- Shape every seven-, nine-, and eleven-stitch lobe into a pointed maple section, then add the 11-chain stem and matching surface-crocheted veins.
- Wet block all six leaves to approximately 20–22 cm wide, checking that corresponding side points differ by no more than 5 mm.
- Crochet three espresso medallions through the 84-stitch seventh round, add the final single-crochet edge, and block each circle to 16–18 cm.
- Arrange the nine motifs along a roughly 125 cm axis, alternating cream, taupe, and espresso while rotating neighboring leaves approximately 15–30 degrees.
- Overlap leaf-to-circle connections by 2–3 cm and leaf-to-leaf connections by 1.5–2 cm, keeping all pointed lobe tips visible.
- Pin the complete arrangement and measure the overall dimensions before sewing; adjust motif angles until the reconstruction is approximately 38 × 125 cm.
- Sew each connection from the reverse through 4–5 cm of overlapping fabric, using stitches approximately 6–8 mm apart and yarn matching the upper motif.
- Lift the assembled runner from both ends and reinforce any connection that opens more than 5 mm under its own weight.
- Weave every tail through at least 4 cm of matching crochet, give the assembled runner a final light block, and reshape every free maple point before drying flat.
The completed runner contains six five-point maple leaves and three dense circular medallions connected into one irregular, reversible centerpiece.
7 Technical Tips
- The maple leaf looks like a flower: make the center lobe visibly longer than the two large side lobes. A center point that projects 1–2 cm farther creates the directional silhouette associated with a maple leaf.
- The leaf points curl under: pin every picot separately during wet blocking. A point left unpinned can retract by more than 5 mm as cotton dries and lose its sharp outline.
- The brown circle cups: verify that R3–R7 increase by exactly 12 stitches per round. A missing increase reduces the circumference and pulls the medallion upward instead of allowing it to lie flat.
- The circle ruffles: check that no increase was worked twice inside the same repeat. Extra circumference accumulates rapidly across an 84-stitch medallion and cannot be corrected reliably by aggressive blocking.
- The assembled runner twists: block every motif before sewing and pin the complete 125 cm arrangement first. Joining even one damp or curled leaf can rotate the next two motifs away from the central axis.
- The leaf-to-circle seam becomes visible: keep the attachment approximately 2 cm inside the overlap rather than sewing along the exposed edge. A recessed seam lets the upper motif conceal the joining stitches.
- The finished centerpiece stretches when lifted: reinforce each major connection over at least 4 cm of overlapping crochet. A single tack stitch becomes a pivot point and allows heavy circular motifs to rotate independently.
Why the Runner Uses Separate Motifs
The supplied image leaves substantial areas of bare tabletop visible. A conventional rectangular foundation would remove that negative space.
Independent components solve the problem. Each maple leaf can project beyond the central line, while the circles provide stable joining zones without filling every gap.
The method also makes length adjustment easier. One leaf-and-circle unit can be removed for a coffee table or added for a longer dining surface without rewriting a large rectangular stitch pattern.
Published Maple Leaf Size Benchmarks
Bikkis hive’s Ravelry maple leaf is an Irish-crochet-style motif worked in one piece. The published information states that size-10 crochet thread with a 2.75 mm hook produces approximately a 3.5 × 4 inch leaf, while light-worsted yarn with a 3.25 mm hook produces approximately 5 × 5.5 inches.
That variation illustrates why yarn substitution should be tested before producing all six motifs.
Published 10 cm Maple Leaf Benchmark
Lovable Loops documents an advanced-beginner maple leaf made with worsted-weight yarn and a 4 mm hook. Its finished size is approximately 4 × 4 inches, or 10 × 10 cm.
The reconstruction here is intentionally larger because the photographed leaves occupy substantially more table area than small appliqués. Additional lobe height and a larger blocked target create the required centerpiece scale.
Published Large Cotton Leaf Benchmark
Zamiguz documents a larger maple leaf using worsted #4 mercerized cotton and a 3.5 mm hook. The published finished measurement is approximately 10 inches tall × 9 inches wide, with about 93 yards / 85 m of main yarn reported for each displayed leaf.
That approximately 23 × 25 cm scale is particularly relevant to the large motifs visible in the photograph and supports a reconstruction target around 20–22 cm wide.
Published Bulky Maple Leaf Benchmark
Pretty Darn Adorable publishes a maple-leaf design using #5 bulky yarn and a 5.5 mm hook. Its construction begins from a six-stitch center, expands through circular rounds, and shapes the characteristic points afterward.
This demonstrates another established approach to maple geometry: create a stable center first, then build the pointed outline separately rather than attempting to shape all five lobes directly from chains.
Published DK Maple Leaf Benchmark
Crochet Pattern Studio reports approximately 11 cm wide × 10–11.5 cm tall including the stem for a maple leaf made with DK cotton and a 3.5 mm hook.
That smaller scale would suit a narrow runner. For the photographed centerpiece, worsted cotton provides enough area for each motif to function as a substantial part of the overall runner rather than as a small appliqué.
Why the Dark Circles Stay Plain
The maple leaves already contain five points, veins, stems, and several stitch heights. Adding comparable detail to the brown circles would make the entire runner visually dense.
Concentric double-crochet rounds create a calmer countershape. They also supply broad attachment zones that are much easier to sew to irregular leaves than another pointed motif would be.
The espresso shade is useful for the same reason: it separates cream from taupe without adding another warm autumn color.
Making the Runner Shorter
For a compact coffee table, use four leaves and two circles.
Arrange the six motifs with approximately the same 2–3 cm overlaps.
A practical reconstruction target is approximately 35–38 cm wide × 80–90 cm long.
Keep two cream and two taupe leaves so the neutral palette remains balanced.
Making the Runner Longer
Add one leaf and one circle near the center rather than attaching them to an already narrow end.
One additional overlapping pair contributes roughly 15–20 cm to finished length, depending on rotation.
For a runner near 145 cm, seven leaves and four circles should provide sufficient material at the same motif scale.
Pin the full layout before calculating the exact final length.
Using Autumn Colors
Replace cream and taupe with rust, mustard, olive, or muted burgundy while retaining espresso circles.
Keep neighboring leaves different when possible.
The free-form arrangement benefits from controlled color repetition; too many isolated shades can make nine separate motifs look unrelated rather than assembled intentionally.
Using One Neutral Color
All six leaves can be worked in natural cotton while retaining the dark circles.
In that version, emphasize texture by working the surface veins through a slightly smaller 3.5 mm hook.
The tighter surface stitches produce stronger relief without requiring a second leaf color.
Turning the Leaves into Coasters
Work individual leaves in worsted cotton and stop after blocking.
For functional coasters, reduce the hook to 3.5 mm and target approximately 12–15 cm rather than the oversized runner dimensions.
Published maple-leaf patterns are commonly adapted as coasters, including designs from Pretty Darn Adorable and HandmadebyRaine.
Using the Circle Motif as a Coaster
Stop the espresso medallion after R5 or R6 depending on gauge.
A coaster target around 10–12 cm is sufficient for a mug.
Work the final round in single crochet to stabilize the perimeter.
Make four or six matching pieces from leftover yarn.
Correcting a Maple Leaf That Is Too Round
Check the blocking first.
The five picots must be pulled outward individually, with the center point stretched farther than the others.
If the motif still reads as a rounded flower, increase the center-lobe picot from ch 4 to ch 5 and the two large side-lobe picots from ch 3 to ch 4.
Do not lengthen the two smallest lobes.
Correcting an Uneven Leaf
Fold the blocked motif vertically through the center lobe and stem.
The corresponding left and right large points should align within approximately 5 mm.
Check the seven- and nine-stitch shell counts if they do not.
Rework the incorrect lobe rather than stretching one side aggressively during blocking.
Correcting a Wavy Circle
Lay the brown medallion on a hard surface without pins.
If the perimeter forms repeated waves, too much circumference has been added.
Verify the round totals: 12, 24, 36, 48, 60, 72, 84.
Those counts increase by exactly 12 each round. Correct the first round where the count differs.
Correcting a Runner That Will Not Lie Flat
Inspect each motif independently before changing the joins.
A cupped circle or curled leaf can lift the entire assembly.
If all nine components lie flat individually, the problem is probably excessive overlap or an overly tight sewing seam.
Reduce overlap toward 2 cm and loosen the hidden attachment stitches.
Yarn Planning
Make one complete leaf and one circle before purchasing final quantities when possible.
Weigh both blocked samples.
Multiply the leaf weight by six and the circle weight by three, then add approximately 10–15% for surface veins, swatching, joining, and gauge differences.
This method is more dependable than estimating the project from rectangular area because much of the finished runner consists of open tabletop between irregular motifs.
Care and Storage
Follow the yarn manufacturer’s washing instructions.
Support the complete runner with both hands when wet because the connections between motifs carry more load than the centers themselves.
Reshape all five points on every leaf during drying.
For storage, lay the runner flat or roll it loosely rather than folding through the pointed lobes. A hard crease across a blocked cotton point can remain visible when the runner is returned to the table.
Sources
Ravelry — Crochet Maple Leaf by Bikkis hive — published thread and light-worsted size benchmarks, including approximately 5 × 5.5 inches with light-worsted yarn and a 3.25 mm hook.
Lovable Loops — Crochet Maple Leaf Pattern — worsted-weight yarn, 4 mm hook, and approximately 10 × 10 cm published finished size.
Zamiguz — Maple Leaf Crochet Pattern — worsted cotton, 3.5 mm hook, approximately 10 × 9 inch finished dimensions, and published main-yarn usage.
Pretty Darn Adorable — Crochet Maple Leaf — bulky-yarn maple-leaf construction using a 5.5 mm hook and a center-out shaping method.
Crochet Pattern Studio — Easy Crochet Maple Leaf — DK cotton, 3.5 mm hook, approximately 11 cm width, and picot-based point shaping.
Moara Crochet — Crochet Maple Leaf — center-out leaf construction and pointed lobe shaping reference.
HandmadebyRaine — Crochet Leaf Coaster — maple-leaf coaster application and larger/smaller leaf references.
Etsy — Autumn Crochet Table Runner Pattern — contemporary example combining flat circular motifs and decorative leaves in a free-form seasonal centerpiece.
Conclusion
The five maple points must remain readable after assembly, so block every leaf before deciding where motifs overlap. Keep the three espresso circles flat, attach neighboring pieces through only 2–3 cm of fabric, and leave the pointed edges free rather than sewing around each silhouette. Your next step is to crochet one taupe leaf and confirm a blocked width of roughly 20–22 cm before making the remaining motifs. Save this maple leaf crochet table runner pattern to Pinterest or share the finished centerpiece on Instagram with #NeutralMapleLeafRunner. For this specific layout, would you keep the three dark circular medallions espresso brown or replace them with a softer charcoal? “`0









