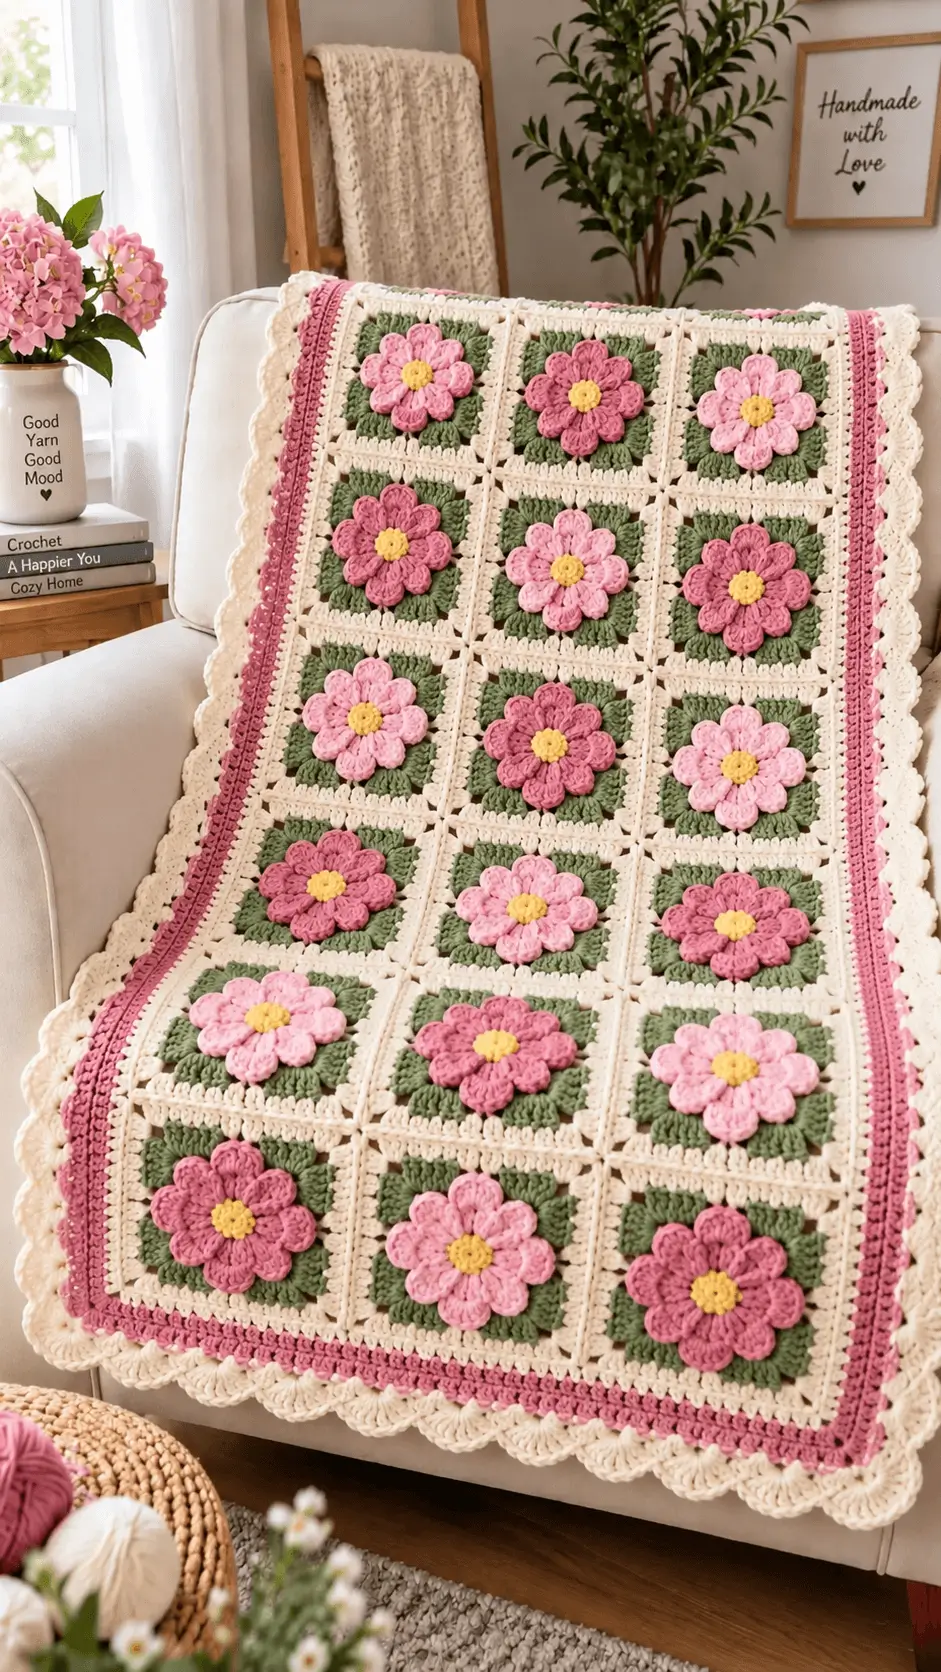
Eight raised petals, not a flat daisy, give this blanket its distinctive flower geometry. This 3D flower granny square blanket uses DK yarn, a 4.5 mm hook and 18 sage-backed motifs to build an approximately throw-length project. The construction suits an intermediate crocheter comfortable with double crochet, clusters and joining. Individual squares also make the project practical to transport before final assembly.
The Design: What Makes This Flower Blanket Different
The flower is constructed before the square background so the pink petals remain visibly raised instead of becoming absorbed into the granny-square surface. Eight petals create broad, clearly separated lobes that closely match the dimensional flowers shown in the reference blanket.
A sage background supplies strong separation between the pink petals and cream joining grid. The raised flower granny square also needs enough background depth to stop the petals from distorting the corners. Finally, cream joins are treated as a visible design line rather than hidden seams.
A common failure in this type of flower granny square crochet pattern is excessive petal tension. Short, tight petals pull the flower center inward and can make the finished square cup. The background cannot correct severe cupping later, so check each motif on a flat surface before continuing.
Project Info at a Glance
| Skill Level | Time | Finished Size | Hook | Best For |
|---|---|---|---|---|
| Intermediate | Approx. 22–30 hours | Custom photo-inspired throw | 4.5 mm | Sofa throw / floral blanket |
A published DK flower blanket using a 4.5 mm hook measures 106 × 136 cm. Use that measurement as a general technical comparison rather than an exact measurement for the photographed blanket.
Materials and Tools
Yarn
Use smooth DK (#3) yarn with clear stitch definition.
- Cream/ivory — DK #3 — approximately 700–850 g
- Sage green — DK #3 — approximately 300–400 g
- Light pink — DK #3 — approximately 120–160 g
- Dusty rose — DK #3 — approximately 120–160 g
- Yellow — DK #3 — approximately 35–50 g
The quantities are planning estimates for the pictured 18-square construction. Actual yarn consumption depends on gauge, yarn brand, square dimensions and border depth.
Tools
- 4.5 mm crochet hook
- Tapestry needle
- Locking stitch markers
- Scissors
- Blocking mats
- Rust-resistant blocking pins
- Tape measure
Abbreviations
- MR — magic ring
- ch — chain
- sc — single crochet
- hdc — half double crochet
- dc — double crochet
- tr — treble crochet
- sl st — slip stitch
- sp — space
- st/sts — stitch/stitches
- BLO — back loop only
- rep — repeat
An invisible decrease is an amigurumi shaping technique and is not required for this flat modular blanket.
3D Flower Granny Square Blanket Pattern
This motif is a photo-inspired interpretation of the supplied blanket. Work joined rounds unless a section states otherwise.
Yellow Flower Center — Make 18
Yarn: yellow.
R1: MR, ch 1, work 8 sc into ring; join with sl st to first sc. (8)
Pull the magic ring firmly closed.
R2: Ch 1, 2 sc in each st around; join. (16)
Fasten off and weave the short starting tail securely toward the center.
The 16-stitch outer round gives eight petals two attachment points each. Keep this count intact because changing it affects the spacing of all eight petals.
Raised Pink Petals — Make 8 Per Square
Use light pink for nine squares and dusty rose for nine squares. Alternate the two colors when arranging the finished blanket.
Yarn: light pink or dusty rose.
Join pink yarn to any stitch of R2.
Petal 1: Ch 2, work 3 dc into same st, 3 dc into next st, ch 2, sl st into the same second st.
Petals 2–8: Sl st into next unworked stitch, ch 2, 3 dc in that stitch, 3 dc in next stitch, ch 2, sl st into that same stitch.
After Petal 8, join neatly at the base of the first petal.
Fasten off. Leave approximately 10 cm of yarn for weaving.
Push each petal slightly forward while working the green foundation behind the flower. Avoid catching the upper petal loops when attaching the background.
Sage Foundation Round
Yarn: sage green.
Turn the flower over. Join sage into a free loop or space at the base between two petals.
R1: Ch 3, 2 dc in same space, ch 1. Work 3 dc in each space between petals, ch 1 after each group; join to top of beginning ch-3. (8 groups)
This produces eight green groups behind the flower. Four groups will become corners and four will form the sides.
Squaring Round
R2: Sl st to first ch-1 sp. Ch 3, 2 dc, ch 2, 3 dc in same space for the first corner.
In next ch-1 sp, work 3 hdc, ch 1.
In next ch-1 sp, work 3 dc, ch 2, 3 dc for the next corner.
Repeat the sequence of one side group followed by one corner around. Join.
The motif should now have four clearly defined corners.
Green Background Expansion
R3: Sl st into first corner. Ch 3, 2 dc, ch 2, 3 dc in same corner.
Work 3 dc in each space across the first side, with ch 1 between groups.
At each corner work 3 dc, ch 2, 3 dc.
Continue around and join.
R4: Repeat R3, adding one additional 3-dc group on each side as the square expands.
Fasten off sage.
Measure the square without stretching it. Keep every motif within approximately 3–4 mm of the other completed squares before joining.
If one square is noticeably smaller, adjust the tension rather than aggressively stretching it during final assembly.
Cream Framing Round — Make on Every Square
Yarn: cream.
Join cream in any corner.
R5: Ch 3, 2 dc, ch 2, 3 dc in corner. Ch 1, then work 3 dc in each space across the side with ch 1 between groups. In each corner work 3 dc, ch 2, 3 dc.
Join with sl st.
R6: Ch 1. Work 1 sc in every dc and ch-1 sp across each side. In each ch-2 corner work sc, ch 2, sc.
Join and fasten off.
This final single-crochet round provides a stable edge for the visible cream joining.
Blanket Layout
Arrange the 18 completed squares in three columns and six rows.
| Row | Square 1 | Square 2 | Square 3 |
|---|---|---|---|
| 1 | Light Pink | Dusty Rose | Light Pink |
| 2 | Dusty Rose | Light Pink | Dusty Rose |
| 3 | Light Pink | Dusty Rose | Light Pink |
| 4 | Dusty Rose | Light Pink | Dusty Rose |
| 5 | Light Pink | Dusty Rose | Light Pink |
| 6 | Dusty Rose | Light Pink | Dusty Rose |
Rotate individual squares until all corner chains sit squarely and the flower petals point consistently.
Joining the Granny Squares
Yarn: cream.
The photographed blanket has substantial cream lines between its motifs. A visible slip-stitch join reproduces this structural effect better than a concealed seam.
Place two squares with wrong sides together.
Join cream through corresponding edge stitches of both squares. Work a slip-stitch join from corner to corner, keeping each stitch loose enough for the seam to remain flat.
Join the squares into six horizontal rows first. Join those completed rows vertically afterward.
Do not pull the joining yarn tightly. A shortened seam creates ridges and can pull an otherwise rectangular blanket out of shape.
Cream Foundation Border
Yarn: cream.
Join yarn in any outer corner.
Border R1: Ch 1, sc evenly around the entire blanket. At each outer corner work sc, ch 2, sc.
The exact stitch total depends on the finished square gauge. Count carefully so both long sides have identical stitch totals and both short sides have identical totals.
Border R2: Ch 3. Dc in every stitch around. In each corner ch-2 space work 2 dc, ch 2, 2 dc. Join.
Border R3: Ch 1. Sc in each stitch. Work sc, ch 2, sc in each corner.
Fasten off cream.
Dusty-Rose Border Bands
Yarn: dusty rose.
Border R4: Join at a corner. Ch 3 and dc in every stitch around. Work 2 dc, ch 2, 2 dc at each corner.
Border R5: Ch 1, sc in every stitch around; work sc, ch 2, sc at each corner.
Border R6: Repeat Border R4.
Fasten off dusty rose.
Three pink rounds create the pronounced dusty-rose stripe visible near the outer edge of the reference blanket.
Cream Outer Border
Yarn: cream.
Border R7: Sc evenly around, with sc, ch 2, sc in each corner.
Border R8: Dc in every stitch. Work 2 dc, ch 2, 2 dc in each corner.
Do not fasten off.
Scalloped Crochet Edge
The photographed blanket finishes with large cream shells around the perimeter.
Border R9: Skip 2 sts, work 7 dc in next st, skip 2 sts, sl st in next st.
Repeat the sequence along each side.
At a corner, adjust the number of skipped stitches by one when necessary so a shell sits close to the corner without forcing the fabric to buckle.
Continue around the complete blanket and join with a sl st.
Fasten off. Weave the final tail through at least 4–5 cm of neighboring stitches, reverse direction and trim.
Assembly
- Block all 18 flower squares to matching dimensions before joining.
- Arrange the motifs in a three-column by six-row rectangle.
- Alternate light-pink and dusty-rose flowers in a checkerboard sequence.
- Pin adjacent squares at their corners and side midpoints.
- Join each group of three squares horizontally with cream yarn.
- Join the six completed rows vertically while matching every corner intersection.
- Work the cream foundation border around the assembled rectangle.
- Add the three dusty-rose border rounds without changing corner placement.
- Complete the cream outer rounds and large shell edging.
- Weave all yarn tails through same-color stitches and block the complete blanket to rectangular measurements.
The finished blanket contains 18 dimensional flower motifs framed by cream joins, a dusty-rose border stripe and a cream scalloped perimeter.
7 Technical Tips for a Flat, Even Flower Blanket
- Control square-size mismatch: Keep completed motifs within approximately 3–4 mm of one another before joining. A difference approaching 1 cm becomes increasingly visible across six rows.
- Correct petal cupping early: If the eight petals pull the yellow center into a bowl, loosen the petal stitches or move up 0.5 mm in hook size for that section. Severe cupping should be corrected before the green background is added.
- Secure the flower centers: Leave at least 10 cm when cutting the magic-ring tail. Weave the tail back through the center stitches in the opposite direction before trimming.
- Prevent uneven joining: Place a stitch marker at every square corner and at the midpoint of each side. Matching these reference points prevents one motif from being stretched to fit its neighbor.
- Watch for border rippling: Count the first border round so opposite sides contain matching stitch totals. Excess stitches create waves that become more pronounced as additional border rounds are added.
- Protect the raised petals: Block the sage and cream sections around the flower rather than pinning through the tips of all eight petals. Heavy flattening reduces the dimensional flower effect.
- Test the shell spacing: Crochet at least three shells before continuing along the complete edge. If the border flares, increase the skipped-stitch spacing; if it contracts, reduce the spacing periodically.
Conclusion
The final border should be measured before the last yarn tail is cut because matching opposite edges provides a clear check that the six-row construction has remained rectangular. Photograph the completed blanket both flat and draped so the raised petals, cream joining grid and scalloped edging remain visible. Save the project to Pinterest with the square layout included, then share the finished blanket on Instagram with #3DFlowerGrannySquareBlanket. Your next practical step is to crochet one complete test motif and record its blocked dimensions before making all 18 squares. For your 3D flower granny square blanket, will you alternate the two pink shades or use one flower color throughout?









