Introduction
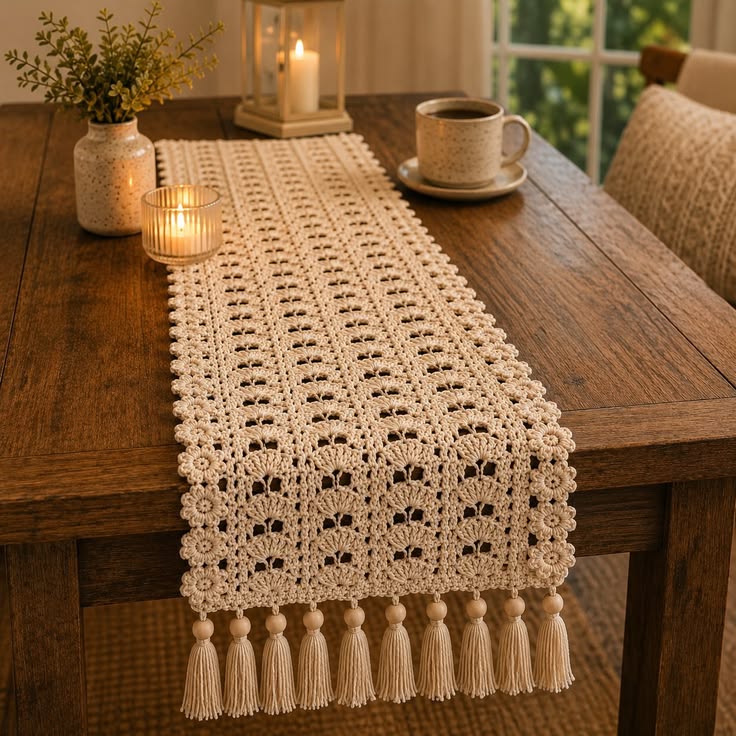
Five vertical columns of stacked fans terminate in a row of wooden-bead tassels while small crochet flowers reinforce both long edges. This fan lace crochet table runner pattern uses DK cotton, a 3.5 mm hook, open shell panels, floral edging, and ten tassels. The intermediate reconstruction targets approximately 30 × 120 cm before tassels, giving you a narrow runner sized for a dining or console table.
The instructions below are an original photo-inspired reconstruction based on visible structure; published patterns cited later are used only for sizing, gauge, and material benchmarks.
The Design: What Makes This Lace Runner Different
The photograph is organized as five narrow fan-lace columns rather than one uninterrupted shell fabric. Slim vertical rails separate those columns, controlling stretch while keeping the center open. Along both long sides, compact flower-like scallops create a denser outline; the short display end changes again, finishing with ten evenly spaced tassels and wooden beads. This fan lace crochet table runner pattern therefore uses a fixed 71-stitch width so the five fan panels and six separating rails remain mathematically stable from one end to the other. A common error with a crochet lace table runner is adding chains whenever a fan seems tight. That changes the repeat width and gradually pushes the outer edges apart. Maintain the fixed foundation count, then correct dimensions through gauge and blocking instead of inserting unplanned stitches.
Project Info at a Glance
| Skill Level | Time | Finished Size | Hook | Best For |
|---|---|---|---|---|
| Intermediate | Approx. 12–16 hours | Reconstruction target: 30 × 120 cm plus 10–12 cm tassels | 3.5 mm | Dining tables, console tables, farmhouse and neutral décor |
The dimensions above are reconstruction targets inferred from the supplied photograph. Current published runners vary substantially: Kotona Living documents a cotton runner at approximately 30 × 90 cm plus fringe with a 3 mm hook, while a 2026 fan-stitch tutorial reports 30 × 119 cm with a 3.5 mm hook. A separate tasselled fan runner measures 65 × 120 cm before its 10 cm tassels and also uses a 3.5 mm hook.
Materials and Tools
Yarn
- Warm ivory / natural — DK #3 cotton — approximately 250–300 g or 600–750 m for the runner, flowers, and tassel ties
- Matching ivory — reserve approximately 30 g from the total for edging flowers and finishing
A smooth cotton gives the fan openings a cleaner outline than a fuzzy acrylic. Mercerized cotton produces sharper lace; matte cotton gives a softer farmhouse appearance. The photograph appears substantially heavier than size-10 crochet thread, so DK cotton is the closer reconstruction choice.
Tools
- 3.5 mm crochet hook
- Ten wooden beads — approximately 18–22 mm, optional
- Cardboard tassel template — 11–12 cm high
- Tapestry needle
- Scissors
- Blocking mats and rust-resistant pins
- Measuring tape
- Stitch markers
Abbreviations
- ch — chain
- sl st — slip stitch
- sc — single crochet
- hdc — half double crochet
- dc — double crochet
- tr — treble crochet
- sp — space
- st/sts — stitch/stitches
- RS — right side
- WS — wrong side
An invisible decrease is worked through the front loops of two adjacent stitches before completing one single crochet; this runner is worked flat and does not require decreases in its main lace panel.
Gauge and Repeat Math
Work a swatch before beginning the full runner.
Target gauge after blocking:
Approximately 23 stitches × 11 rows = 10 × 10 cm in the lace pattern.
The reconstruction uses 71 foundation stitches. Those stitches are organized as six narrow structural rails surrounding five 11-stitch lace panels:
3 + 11 + 3 + 11 + 3 + 11 + 3 + 11 + 3 + 11 + 3 = 71 stitches.
This fixed structure produces five vertical fan columns resembling the repeated openwork channels visible in the photograph.
Pattern — Step by Step
Main Runner Foundation
Yarn: warm ivory DK cotton — original photo-inspired reconstruction.
Ch 72.
Row 1: Sc in second ch from hook and in every chain across. (71 sc)
Turn.
Place stitch markers after stitches 3, 14, 17, 28, 31, 42, 45, 56, and 59. These markers identify the transitions between the six rails and five lace panels.
Row 2 — Establish Five Open Panels
Ch 3; this counts as the first dc.
Dc in next 2 sts.
For each 11-stitch panel work:
Skip 2 sts, 5 dc in next st, skip 2 sts, sc in next st, skip 2 sts, 5 dc in next st, skip 2 sts.
After each panel, work dc in the next 3 rail stitches.
Repeat until all five panels are complete.
Turn.
Row 3 — Open Fan Row
Ch 3, dc in next 2 rail sts.
Across each lace panel work:
Ch 3, sc in center dc of first 5-dc fan, ch 3, 5 dc in center sc between fans, ch 3, sc in center dc of second fan, ch 3.
Work dc in each of the next 3 rail stitches.
Repeat the same sequence through all five panels.
Turn.
Row 4 — Fan Expansion
Ch 3, dc in next 2 rail sts.
Across each panel:
3 dc in first ch-3 sp, ch 2, 3 dc in same sp; sc in next sc; 7 dc in center dc of the 5-dc group; sc in next sc; 3 dc, ch 2, 3 dc in final ch-3 sp.
Work dc across the next 3-stitch rail.
Repeat through all five panels.
Turn.
Row 5 — Compress the Fans
Ch 3, dc in next 2 rail sts.
For each panel work:
Ch 3, sc in first ch-2 sp, ch 3, sc in center dc of 7-dc fan, ch 3, sc in second ch-2 sp, ch 3.
Work dc in the next 3 rail stitches.
Repeat through all five panels.
Turn.
Row 6 — Rebuild the Lower Fan
Ch 3, dc in next 2 rail sts.
For each panel work:
5 dc in first ch-3 sp, sc in next sc, 5 dc in next ch-3 sp, sc in next sc, 5 dc in next ch-3 sp, sc in next sc, 5 dc in final ch-3 sp.
Work dc in the next 3 rail stitches.
Repeat across.
Turn.
Row 7 — Return to Open Lace
Ch 3, dc in next 2 rail sts.
Across each panel:
Ch 3, sc in center dc of first fan, ch 3, sc in next sc, ch 3, sc in center dc of second fan, ch 3, sc in next sc, ch 3, sc in center dc of third fan, ch 3, sc in next sc, ch 3, sc in center dc of fourth fan, ch 3.
Work the 3-stitch rail in dc.
Repeat through all five panels.
Turn.
Main Length Repeat
Rows 3–7 form the principal fan-lace rhythm. Repeat Rows 3–7 until the runner measures approximately 116 cm from the foundation edge, ending after a Row 5 or Row 7 so the final edge is comparatively open.
At the target gauge, this generally requires approximately 125–132 total rows. Measure the actual work rather than depending only on row count because cotton tension changes noticeably between makers.
Finish with one stabilizing row:
Final Row: Ch 1, sc across, placing one sc in each dc or sc and enough sc in each chain space to maintain the established 71-stitch width. (71)
Fasten off.
Long-Side Stabilizing Border
Before making the flowers, add a narrow border to both long sides.
Join ivory at one foundation corner.
Side Row 1: Work approximately 2 sc around every dc-row end and 1 sc around every sc-row end. Keep the edge flat and record the final count.
Work the opposite long side to exactly the same stitch count.
Side Row 2: Ch 1, sc in every stitch.
Fasten off.
The second row provides a firm attachment line for the flower edging and prevents the lace body from stretching lengthwise during use.
Small Ivory Side Flower — Make 28
The reference shows repeated compact flowers along both long sides. Make approximately 14 flowers per side for a 120 cm runner.
Ch 4 and sl st in first chain to form a ring.
Round 1: Work 10 sc into ring. Join. (10)
Round 2: *Sl st in next st, (ch 3, 3 dc, ch 3, sl st) in next st.* Repeat ×5. (5 petals)
Fasten off with a 25 cm sewing tail.
Block each flower to approximately 3–3.5 cm across.
The petal math is exact: five petals consume two center stitches each, using all ten stitches from Round 1.
Positioning the Long-Side Flowers
Pin 14 flowers along each long edge.
Place the first flower approximately 2 cm from the short edge and the final flower approximately 2 cm from the opposite end.
Distribute the remaining 12 motifs evenly between them.
For a 116–120 cm lace body, flower centers will usually finish approximately 8–9 cm apart.
Sew each center to the stabilizing border at three points.
Attach one side petal of each flower to its neighboring flower. Leave the remaining petals free so the long edge retains the small scalloped profile visible in the photograph.
Alternative Crocheted Flower Edge
If you prefer not to sew separate motifs, use an attached five-petal edging.
Join yarn at one corner.
*Ch 3, skip approximately 6 border stitches, sl st in next stitch. In the resulting loop work 10 sc. Turn the loop outward. Work the same five-petal formula across those 10 sc.*
Continue at measured intervals.
Separate motifs are easier to space accurately on a long runner, while the attached version reduces sewing tails.
Short-End Border
The photographed display end is straighter than the floral long sides because it must support ten tassels.
Join ivory at one short corner.
End Row 1: Sc across all 71 foundation or finishing stitches. (71)
End Row 2: Ch 3, dc in each stitch across. (71)
End Row 3: Ch 1, sc in each stitch across. (71)
Fasten off.
Repeat at the opposite short end if a symmetrical runner is preferred. For the closest visual match to the supplied photograph, tassels may be concentrated at the visible hanging end while the far end remains flat beneath the table arrangement.
Ten Tassel Attachment Loops
Mark the short edge at ten evenly spaced positions.
With 71 stitches across the edge, place the attachment points approximately every 7 stitches.
Recommended anchor stitches:
1, 8, 15, 22, 29, 36, 43, 50, 57, and 64.
Join ivory at each marked stitch.
Ch 6 and sl st back into the same stitch to form a hanging loop.
Fasten off securely.
Tassel — Make 10
Cut a piece of cardboard approximately 11 cm high.
Wrap ivory yarn around the template 28 times.
Thread a 30 cm strand beneath the upper wraps and tie firmly.
Cut the yarn along the lower edge of the cardboard.
Remove the bundle.
Wrap a separate 25 cm strand around the tassel approximately 15 mm below the top. Knot securely and hide the ends inside the tassel.
Trim each tassel to approximately 9–10 cm long.
Adding the Wooden Beads
The photograph shows one natural wooden bead above each tassel.
Thread the tassel’s upper tie through a 18–22 mm bead.
Pass both tie ends through one crocheted attachment loop.
Knot on the reverse side of the short border.
Weave the remaining tie through approximately 4 cm of the border before trimming.
Keep the bead against the crochet edge rather than leaving a long exposed cord between bead and runner.
Optional Crochet Bead Substitute
If wooden components are not wanted, crochet ten small stuffed balls.
R1: 6 sc in MR. (6)
R2: Inc ×6. (12)
R3: Sc around. (12)
R4: Dec ×6. (6)
Add a small amount of fiberfill before closing.
Thread the tassel tie through the center of the crocheted bead and attach it exactly as described for the wooden version.
Making a Matching Far-End Tassel Row
For a runner that hangs from both ends of the table, make another ten tassels.
Repeat the same ten anchor positions on the opposite short edge.
The completed runner will then measure approximately 140 cm overall when 10 cm tassels extend from both ends of a 120 cm body.
This proportion is comparable to a current 2026 fan-stitch runner benchmark that measures 120 cm before tassels and 140 cm including its 10 cm tassels.
Blocking the Lace Body
Block before attaching beads and tassels.
Wet the runner according to the yarn manufacturer’s care instructions.
Remove excess water without twisting.
Pin one short edge to 30 cm.
Measure 120 cm along both long sides and pin the opposite short edge.
Check the diagonals.
For a square rectangle, both diagonal measurements should match within approximately 5 mm.
Pin the long edges next, opening each fan without stretching its structural rail.
Allow the runner to dry completely.
Assembly
- Work the 72-chain foundation and complete Row 1 with exactly 71 single crochets, then mark the five 11-stitch lace panels and six 3-stitch structural rails.
- Crochet the fan-lace sequence through Rows 2–7 and continue repeating Rows 3–7 until the body reaches approximately 116 cm before its finishing rows.
- Add the final 71-stitch stabilizing row, measure the rectangle, and correct any significant length or width discrepancy before working the decorative edges.
- Crochet two stabilizing rows along both long sides, recording the first side’s stitch count and matching that exact count on the opposite edge.
- Make 28 five-petal ivory flowers, block them to approximately 3–3.5 cm, and distribute 14 evenly along each long side.
- Sew every flower center to the long-side border and join neighboring flowers through one side petal while leaving the remaining petal edges free.
- Work three reinforcing rows across each short end, then mark ten tassel attachment positions at approximately seven-stitch intervals.
- Make ten 9–10 cm tassels using 28 wraps per bundle, thread each through an 18–22 mm wooden bead, and attach one assembly at every marked loop.
- Wet block the runner to approximately 30 × 120 cm before loading the tassels with tension, then straighten the five fan columns and all flower edging.
- Weave every remaining tail through at least 4 cm of matching crochet, trim the tassels to one level, and verify that all ten beads sit against the short border.
The finished reconstruction has five vertical ivory fan-lace panels, six narrow stabilizing rails, floral long-side edging, and a ten-tassel display end.
7 Technical Tips
- The five lace columns drift sideways: check the 71-stitch width at the end of every repeat. One accidental increase inside a fan panel moves the neighboring 3-stitch rail and becomes progressively more visible over 120 cm.
- The runner narrows through the center: measure its width every 20 rows without stretching the fabric. A loss greater than 5 mm usually means the chain spaces are being worked more tightly than the foundation row.
- The fan openings collapse after blocking: pin the chain spaces individually rather than pulling only at the four corners. Each open fan should retain at least 8–12 mm of visible negative space after drying.
- The flower border ripples: increase the center-to-center spacing before sewing the motifs permanently. Overlapping 3.5 cm flowers too heavily along a 120 cm edge creates more perimeter fabric than the runner can support.
- The long edge draws inward: compare the stitch count of both stabilizing borders before adding flowers. Missing even five edge stitches across 120 cm can produce a visible curve once the denser motifs are attached.
- The tassels hang at different heights: use one 11 cm cardboard template and trim every completed tassel to 9–10 cm after attachment. Measuring loose strands individually creates inconsistent finished lengths because the neck wrap shortens each bundle.
- The wooden beads pull the edge downward: keep each bead between 18 and 22 mm and reinforce its attachment through a 6-chain loop. Oversized beads concentrate too much weight on one stitch and can distort the final short border.
Why Fan Lace Fits the Photograph
The photographed runner has repeating arched openings stacked in vertical lines. Dense rails divide those openings into narrow channels.
A fan-and-chain construction reproduces that visual logic more closely than filet crochet because the lower edge of every opening spreads outward like a small shell. The alternating open and dense rows also give cotton enough structure to remain flat beneath tableware.
Current lace-runner tutorials continue to use the same basic vocabulary. A 2026 fan-lace tutorial recommends DK or a similar yarn, while another current tutorial combines fan stitches, chains, picots, and tassel finishing.
Why the Reconstruction Uses DK Cotton
Fine crochet thread can reproduce extremely delicate lace, but the supplied image has comparatively substantial stitches and pronounced edging flowers.
DK cotton bridges those requirements. It remains fine enough for open fan work while giving the flowers and short-end border enough body to support beads.
Current references span a wide range: Vika Alexandrovna’s motif runner uses 100% mercerized cotton thread with a 1–1.5 mm hook, while contemporary fan runners use heavier yarn with 3.5 mm hooks. The photographed scale sits closer to the latter.
Published 30 × 90 cm Cotton Runner Benchmark
Kotona Living published a cotton table runner in February 2026 with a finished measurement of approximately 30 × 90 cm plus fringe. The documented project uses 150 g of Novita Cotton Soft and a 3 mm hook.
Its published gauge states that five pattern repeats measure approximately 10 cm.
That project is shorter than this reconstruction, but its width, cotton fiber, and hook range provide a useful material benchmark.
Published 30 × 119 cm Fan Runner Benchmark
A September 2026 fan-motif table-runner tutorial reports finished dimensions of approximately 30 × 119 cm. The documented project weighs approximately 311 g and uses a 3.5 mm crochet hook.
Those dimensions closely support the 30 × 120 cm reconstruction target used here, although the photographed runner includes different edge flowers and tassels.
Published Tassel Runner Benchmark
A separate August 2026 tutorial documents a larger fan-stitch table runner measuring 65 cm wide × 120 cm long without tassels. Ten-centimeter tassels increase the overall length to approximately 140 cm.
The published project uses a 3.5 mm hook and weighs approximately 471 g.
Its larger width explains the substantially higher material requirement compared with this narrow five-column reconstruction.
Published Fine-Thread Runner Benchmark
Vika Alexandrovna’s Ravelry Table Runner uses 100% mercerized cotton thread listed at 280 m per 50 g. The published project requires approximately 560 m and specifies a 1–1.5 mm hook.
That reference represents the fine-thread end of the table-runner spectrum. Using the same thread here would create a much smaller motif unless the foundation and repeat counts were increased substantially.
Published Shell Lace Benchmark
A current shell-lace runner reference specifies approximately 12 inches × 72 inches, or roughly 30 × 183 cm, using #4 cotton and a 4.5 mm hook.
Its basic shell is a five-double-crochet group, demonstrating the same fundamental fan unit used in this reconstruction.
The heavier yarn and larger hook create a broader, less delicate fabric than the DK version described here.
Published 27 × 134 cm Tasselled Runner Benchmark
A current handmade beige crochet runner listing gives finished dimensions of approximately 27 × 134 cm and describes an open lace construction with tassel accents.
Those dimensions demonstrate that a width in the high-20-centimeter range is practical for a narrow dining-table runner. The reconstruction adds several centimeters to reach a 30 cm blocked target.
Making a Shorter Runner
Stop the main repeat when the lace body measures approximately 86 cm.
Add the finishing row and borders normally.
After blocking, target approximately 30 × 90 cm before tassels.
Reduce the long-side flowers from 14 per side to approximately 10 or 11, then redistribute them evenly rather than crowding the original quantity into the shorter edge.
Making a Longer Runner
Continue the Rows 3–7 repeat until the body reaches approximately 146 cm.
Finish and block to approximately 30 × 150 cm.
Add approximately three or four additional side flowers per long edge.
Keep the same 71-stitch width. Length changes do not require altering the five-column repeat.
Making the Runner Wider
Add one 11-stitch lace panel plus one 3-stitch structural rail.
The foundation width therefore increases by 14 stitches.
For six lace panels, work:
71 + 14 = 85 stitches.
Chain 86 for the foundation and work 85 sc in Row 1.
Continue applying the same panel-and-rail structure across the added width.
Removing the Wooden Beads
The tassels can attach directly to the six-chain loops.
Increase each finished tassel to approximately 11 cm if the missing bead makes the fringe appear too short.
Pass the upper tie through the loop, knot securely on the reverse, and bury the ends through the short-end border.
This creates a fully textile finish suitable for machine-washable cotton yarn.
Replacing the Flowers with Picots
For a less decorative long edge, omit the 28 flowers.
Join yarn to the stabilizing border and work:
*Sc in next 3 sts, ch 3, sl st in first ch, sc in next 3 sts.*
Repeat along both sides.
Picots reduce yarn consumption and bulk while retaining a small rhythmic edge.
Correcting a Runner That Flares
Check the rail stitches first.
Every structural rail must remain exactly three stitches wide.
If the rails are correct, compare the chain-space tension with the gauge swatch.
Oversized chains accumulate extra width across five panels, and repeated expansion over many rows can create a runner that is noticeably wider in the center than at the foundation.
Correcting a Runner That Pulls Inward
Measure the width at the foundation, midpoint, and final row.
If the center is more than approximately 1 cm narrower, the chain spaces are probably too tight.
Move up 0.5 mm for chain-heavy rows if necessary while keeping the 3.5 mm hook for dense fan rows.
Do not add random chains because that changes the repeat structure.
Correcting Uneven Fan Columns
Lay the runner flat and place a ruler along each 3-stitch rail.
The rail should travel in a straight line from one short edge to the other.
If it moves sideways, inspect the first row where the shift appears.
An omitted sc anchor or an extra fan stitch is usually located immediately beside that point.
Correcting a Heavy Tassel Edge
Remove two strands from every tassel bundle rather than reducing the number of tassels.
Ten attachment points create the even rhythm visible in the photograph.
A smaller bundle at every point preserves that spacing while reducing total edge weight.
For very soft cotton, 22–24 wraps may be sufficient instead of 28.
Yarn Planning
Work at least three complete fan repeats before estimating total yarn.
Weigh the swatch, calculate its area, and compare that with the planned 30 × 120 cm body.
Reserve approximately 15–20% of the total yarn for long-side flowers, stabilizing borders, tassels, and finishing.
If the yarn is sold by meterage rather than grams, purchase from one dye lot because warm ivory shades can vary visibly between batches.
Care and Storage
Follow the care instructions supplied with the selected cotton.
Remove detachable wooden-bead tassels before machine washing if the bead finish is not washable.
After cleaning, reshape the runner while damp and dry it flat.
Store loosely rolled around acid-free tissue or folded along fan rows rather than pressing sharp folds through the open shell columns.
Sources
Kotona Living — Crocheted Table Runner — 30 × 90 cm plus fringe, 150 g cotton yarn, 3 mm hook, and published repeat gauge.
Stringsandthreads — Easy Crochet Table Runner, Fan Lace Stitch Tutorial — current fan-lace construction reference using DK or a similar yarn.
Crochet by Glau — Crochet Table Runner with Fan Stitch and Tassels — 3.5 mm hook, 120 cm body length, 10 cm tassels, 140 cm total length, and 471 g published weight.
Ravelry — Table Runner by Vika Alexandrovna — mercerized cotton thread, 1–1.5 mm hook, and approximately 560 m published yarn requirement.
Fixie Craft — Shell Lace Table Runner — five-double-crochet shell construction, #4 cotton, 4.5 mm hook, and approximately 12 × 72 inch published dimensions.
Etsy — Handmade Beige Crochet Table Runner — contemporary 27 × 134 cm lace-runner size benchmark.
Ravelry — Vintage Charm Fabric & Crochet Table Runner — cotton crochet thread, 3–3.5 mm hooks, counted joins, and scalloped edging reference.
Conclusion
The critical measurement is the 71-stitch width: five lace panels must remain separated by six stable rails from the first row through the final repeat. Block the main rectangle before adding the weighted fringe, then distribute 28 flowers along the long sides and ten tassels across the short display edge. Your next step is to crochet three complete fan repeats and confirm that the swatch maintains the intended 30 cm finished width. Save this fan lace crochet table runner pattern to Pinterest or share the finished runner on Instagram with #IvoryFanLaceRunner. For this specific runner, would you keep the wooden beads above the tassels or use an all-crochet fringe? “`0









