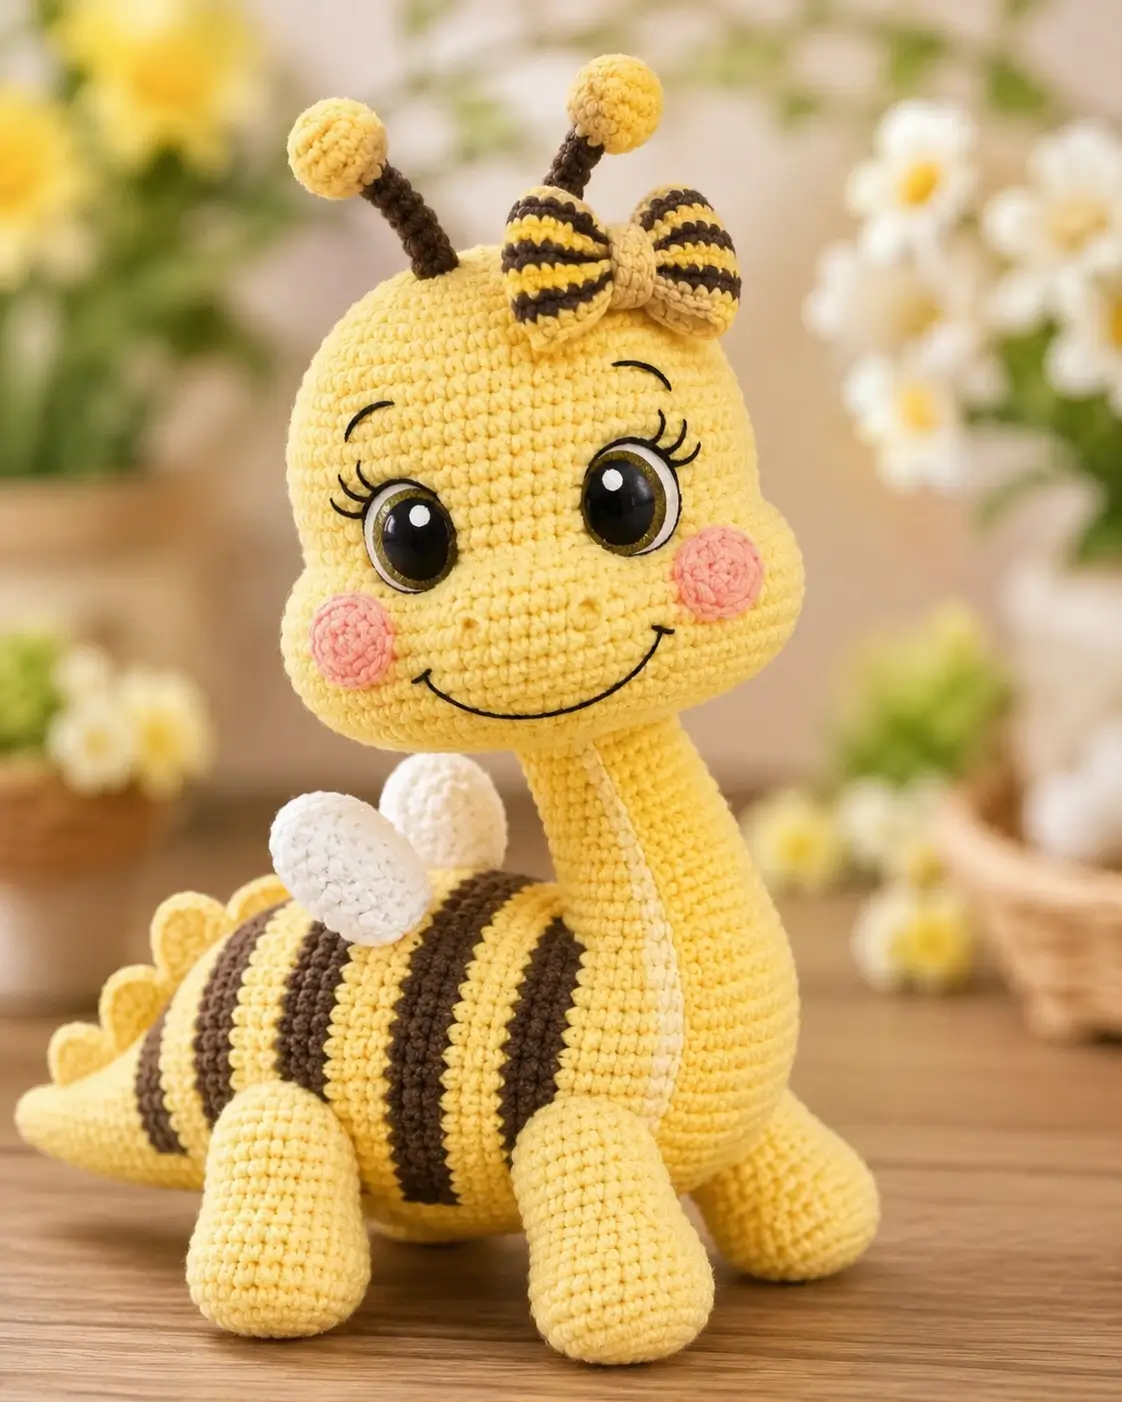
A bee-giraffe has antennae where ossicones should be, and that changes the head balance. This bee giraffe amigurumi crochet pattern uses DK yarn, a 2.75 mm hook, 15 mm safety eyes, and a large 42-stitch head plateau. You will make a 30 cm seated toy with striped abdomen, wings, bow, and embroidered face details. The maker needs confident color changes and firm assembly for nursery display.
The Design: What Makes This Bee-Giraffe Different
The head is wider than a standard giraffe head because the photo uses large eyes, cheek patches, and a broad smile as the face structure. A 42-stitch plateau gives enough surface for white eye rings without crowding the muzzle bumps. The neck stays narrow at 24 stitches so it reads as giraffe anatomy, not a bee body tube.
The striped body uses a long capsule form instead of classic giraffe spots. That choice supports the crochet giraffe bee pattern idea and gives the wings a clear attachment point. Antennae replace ossicones, while the bow sits between them as a separate accessory. One common mistake with a striped giraffe amigurumi is placing the neck too far forward; the head then pulls down and hides the front legs.
Project Info at a Glance
Sizing and material targets follow comparable DK giraffe-amigurumi data: a 30 cm sample with 2.75 mm hook and DK yarn is listed by Little Bear Crochets, while 26 cm DK patterns also commonly use hooks around 2.5 mm.
| Skill Level | Time | Finished Size | Hook | Best For |
|---|---|---|---|---|
| Intermediate | 8–10 hours | 30 cm seated | 2.75 mm | Display toy, nursery shelf, photo prop |
Materials and Tools
Yarn
- Soft yellow — DK / 8-ply — 80 g — Stylecraft Special DK Citron or similar
- Dark brown — DK / 8-ply — 10 g — Stylecraft Special DK Walnut or similar
- White — DK / 8-ply — 10 g — Stylecraft Special DK White or similar
- Pink — DK / 8-ply — 5 g — any smooth cotton-acrylic DK
- Black embroidery thread — small amount — for smile, lashes, brows, and nostril detail
Tools
- Hook 2.75 mm
- 15 mm black safety eyes
- Two 22 mm white felt circles or crocheted white eye rings
- Polyester stuffing
- Yarn needle
- Stitch markers
- Straight pins
- Scissors
- Black embroidery needle
Abbreviations
MR = magic ring; sc = single crochet; inc = 2 sc in same stitch; dec = invisible single crochet decrease; sl st = slip stitch; ch = chain; BLO = back loop only.
Invisible decrease means working through the front loops of the next two stitches before completing one single crochet; it reduces holes on the final head, body, and wing rounds.
Pattern — Step by Step
Continuous spiral unless noted. Main head and body forms use the large 42-stitch plateau required for this character size. Tubes, wings, cheeks, and accessories use smaller counts for proportion.
Head
Yarn: soft yellow — Source: standard amigurumi math.
R1: 6 sc in MR (6)
R2: inc ×6 (12)
R3: (sc, inc) ×6 (18)
R4: (2 sc, inc) ×6 (24)
R5: (3 sc, inc) ×6 (30)
R6: (4 sc, inc) ×6 (36)
R7: (5 sc, inc) ×6 (42)
R8–R16: sc around (42)
R17: (5 sc, dec) ×6 (36)
R18: (4 sc, dec) ×6 (30)
R19: (3 sc, dec) ×6 (24)
Insert safety eyes between R12 and R13, 11 stitches apart. Add white felt circles behind the eyes before locking the washers. Begin stuffing firmly.
R20: (2 sc, dec) ×6 (18)
R21: (sc, dec) ×6 (12)
R22: dec ×6 (6)
Fasten off. Close through front loops and weave tail inside.
White Eye Rings
Yarn: white — Source: standard amigurumi math.
Make 2 if not using felt circles.
R1: 6 sc in MR (6)
R2: inc ×6 (12)
R3: (sc, inc) ×6 (18)
R4: sl st around loosely (18)
Fasten off. Cut a center opening just large enough for the safety-eye post, or sew the ring around the eye after the head is closed.
Cheek Patches
Yarn: pink — Source: standard amigurumi math.
Make 2.
R1: 6 sc in MR (6)
R2: inc ×6 (12)
R3: (sc, inc) ×6 (18)
R4: sl st around (18)
Fasten off. Leave a 20 cm tail for sewing.
Muzzle Bumps
Yarn: soft yellow — Source: standard amigurumi math.
Make 2 small raised nostril bumps.
R1: 6 sc in MR (6)
R2: inc ×6 (12)
R3: sc around (12)
R4: dec ×6 (6)
Fasten off. Leave a 15 cm tail. Do not overstuff; each bump should rise about 8 mm from the face.
Neck
Yarn: soft yellow — Source: standard amigurumi math.
R1: 6 sc in MR (6)
R2: inc ×6 (12)
R3: (sc, inc) ×6 (18)
R4: (2 sc, inc) ×6 (24)
R5–R18: sc around (24)
R19: sc around in BLO (24)
Stuff firmly every 4 rounds. The finished neck should stand without collapsing when held at the base.
Fasten off. Leave a 35 cm tail for sewing to the head.
Striped Body
Yarn: soft yellow and dark brown — Source: standard amigurumi math.
Start with soft yellow.
R1: 6 sc in MR (6)
R2: inc ×6 (12)
R3: (sc, inc) ×6 (18)
R4: (2 sc, inc) ×6 (24)
R5: (3 sc, inc) ×6 (30)
R6: (4 sc, inc) ×6 (36)
R7: (5 sc, inc) ×6 (42)
R8–R9: dark brown sc around (42)
R10–R12: soft yellow sc around (42)
R13–R14: dark brown sc around (42)
R15–R17: soft yellow sc around (42)
R18–R19: dark brown sc around (42)
R20–R22: soft yellow sc around (42)
Stuff from R14 onward. Keep the stripe joins on the underside.
R23: (5 sc, dec) ×6 (36)
R24: sc around (36)
R25: (4 sc, dec) ×6 (30)
R26: (3 sc, dec) ×6 (24)
R27: (2 sc, dec) ×6 (18)
R28: (sc, dec) ×6 (12)
R29: dec ×6 (6)
Fasten off. Close through front loops. Leave tail hidden inside.
Front Legs
Yarn: soft yellow — Source: standard amigurumi math.
Make 2.
R1: 6 sc in MR (6)
R2: inc ×6 (12)
R3: (sc, inc) ×6 (18)
R4–R7: sc around (18)
R8: (sc, dec) ×6 (12)
R9–R16: sc around (12)
Stuff the foot firmly through R8. Lightly stuff the upper leg so it can sit flat against the body.
Fasten off. Flatten opening and leave a 25 cm tail.
Back Legs
Yarn: soft yellow — Source: standard amigurumi math.
Make 2.
R1: 6 sc in MR (6)
R2: inc ×6 (12)
R3: (sc, inc) ×6 (18)
R4–R8: sc around (18)
R9: (sc, dec) ×6 (12)
R10–R13: sc around (12)
Stuff the lower half firmly. Leave the top half softer for a seated angle.
Fasten off. Flatten opening and leave a 25 cm tail.
Wings
Yarn: white — Source: standard amigurumi math.
Make 2.
R1: 6 sc in MR (6)
R2: inc ×6 (12)
R3: (sc, inc) ×6 (18)
R4: (2 sc, inc) ×6 (24)
R5–R7: sc around (24)
R8: (2 sc, dec) ×6 (18)
R9: (sc, dec) ×6 (12)
Stuff lightly. Flatten the final round so each wing becomes an oval pad, not a ball.
Fasten off. Leave a 30 cm tail.
Antennae
Yarn: dark brown stem and soft yellow tip — Source: standard amigurumi math.
Make 2 stems and 2 tips.
Stem, dark brown:
R1: 6 sc in MR (6)
R2–R9: sc around (6)
Fasten off. Leave a 20 cm tail.
Tip, soft yellow:
R1: 6 sc in MR (6)
R2: inc ×6 (12)
R3–R4: sc around (12)
R5: dec ×6 (6)
Fasten off. Close and sew one tip to each stem.
Rear Tail Point
Yarn: soft yellow with one dark brown stripe — Source: standard amigurumi math.
R1: 6 sc in MR (6)
R2: sc around (6)
R3: inc ×6 (12)
R4: sc around (12)
R5: (sc, inc) ×6 (18)
R6: dark brown sc around (18)
R7–R9: soft yellow sc around (18)
Stuff lightly. The pointed end should extend from the rear body seam.
Fasten off. Leave a 25 cm tail.
Rear Dots
Yarn: soft yellow — Source: standard amigurumi math.
Make 3.
R1: 6 sc in MR (6)
R2: inc ×6 (12)
R3: sc around (12)
R4: dec ×6 (6)
Fasten off. Close each dot and leave a 15 cm tail.
Striped Bow
Yarn: soft yellow and dark brown — Source: standard amigurumi math.
Bow loops, make 2.
R1: soft yellow 6 sc in MR (6)
R2: inc ×6 (12)
R3: dark brown sc around (12)
R4: soft yellow sc around (12)
R5: dark brown sc around (12)
R6: soft yellow sc around (12)
R7: dec ×6 (6)
Fasten off. Flatten each loop.
Center band, soft yellow:
Ch 7.
Row 1: sc in 2nd ch from hook and across (6)
Rows 2–4: ch 1, turn, sc across (6)
Fasten off. Wrap around the pinched bow loops and stitch closed at the back.
Assembly
- Pin the neck to the lower center of the head, covering R19–R21 of the head base, then sew twice around the seam.
- Pin the neck to the front third of the striped body, not the top center, so the head angles forward like the photo.
- Sew the body to the neck with two passes, adding extra stuffing through the seam before the final pass.
- Place the eye rings, cheek patches, and muzzle bumps before embroidery; cheeks sit one round below the eyes and 3 stitches outward.
- Embroider two nostril marks on the muzzle bumps, then add a curved smile with black thread across 16–18 stitches.
- Add three lashes to the outer side of each eye and one small brow above each eye.
- Sew the front legs to the chest side of the body between R18 and R22, angled slightly forward.
- Sew the back legs under the widest body stripe between R9 and R15 so the toy sits without tipping.
- Attach wings to the upper back over the yellow stripe, then sew the rear tail point and three rear dots along the back line.
- Sew antennae to the top of the head 8 stitches apart, then place the striped bow between them and stitch through the bow center band.
The finished bee-giraffe measures about 30 cm when seated with the antennae upright.
7 Technical Tips
- Mark the first stitch of every stripe round with a locking marker. The failure mode is a drifting underside seam that becomes visible along the bee body.
- Stuff the neck to medium-firm density, about 80% full before sewing. Understuffing makes the 42-stitch head tilt forward after the bow and antennae are added.
- Use invisible decrease on R17–R22 of the head and R23–R29 of the body. Standard decreases leave six visible gaps around the face and rear end.
- Lock the 15 mm safety eyes before R20 of the head. Late placement can split the white eye ring or force the eyes too high above the cheek patches.
- Keep the wing stuffing under 5 g total. Overfilled wings roll outward and stop the body from sitting flat against a shelf.
- Pin the bow after the antennae are attached, not before. A bow placed 5 mm too far forward hides the brown stems and weakens the bee-giraffe silhouette.
- Weave every limb tail through at least 3 cm of body fabric before cutting. Short buried tails can work loose when the seated legs carry the body weight.
Conclusion
Work the body first, then compare the stripe spacing with the wings before sewing the neck in place. That sequence keeps the rear point centered and prevents the bow from hiding the right antenna. Save the assembly photo for later, because eye rings, cheeks, eyelashes, and smile placement decide whether the bee-giraffe reads as hybrid rather than plain safari toy. For the next step, cut all embroidery threads before pinning the face and test the bow angle in daylight. Share the finished bee giraffe amigurumi crochet pattern on Pinterest and Instagram with #BeeGiraffeAmigurumi. Which detail will you exaggerate: the striped bow or the yellow antenna tips?









