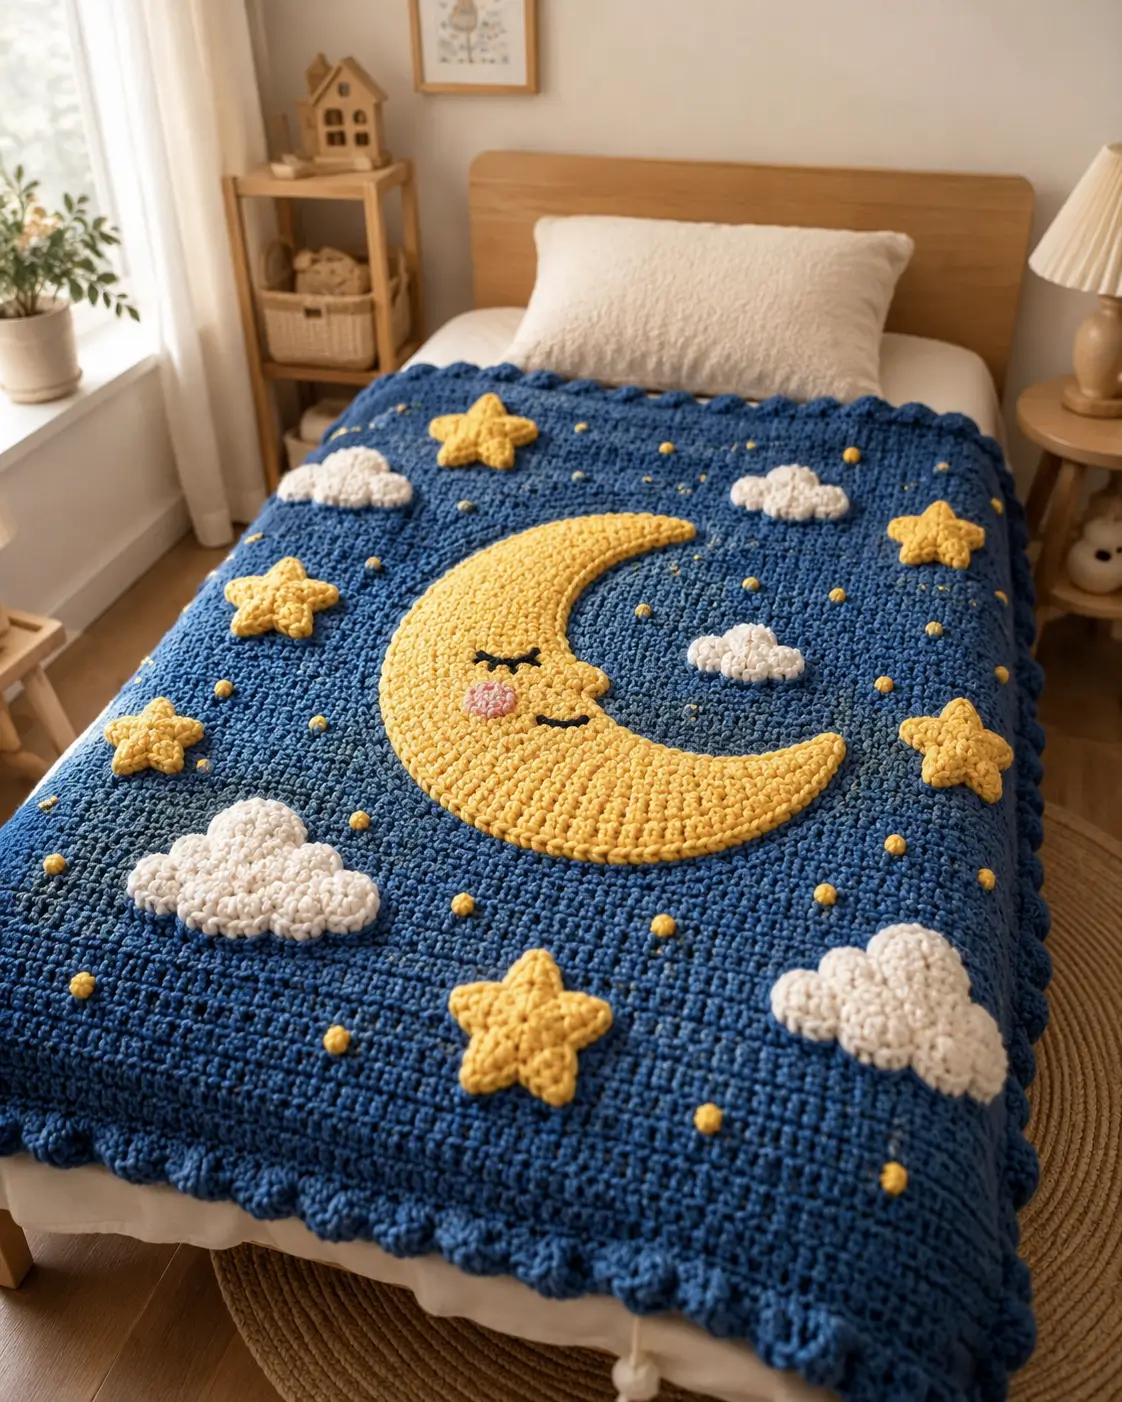
A crescent moon fails on proportion before stitch count; the inner curve has to read cleanly from across the room. This moon and stars crochet blanket pattern builds that contrast with a deep blue field, raised appliqué clouds, padded stars, and a large central moon sized for a bed throw. The project suits an intermediate crocheter and works as nursery decor, a themed gift, or a statement blanket for a child’s room.
The Design: What Makes This Moon Blanket Different
You are not making a plain rectangle with a motif dropped into the center. The surface layout carries the theme. That means the moon has to be large enough to anchor the blanket visually, while the stars and clouds break up the negative space without crowding the field. The second structural choice is texture. Raised appliqués create a layered result that reads better than flat color changes when the blanket is photographed or draped across a bed. Third, the border needs weight. A soft bobble or scalloped edge frames the dark background and prevents the blanket from looking unfinished.
Many celestial blanket tutorials rely on tapestry charts or granny-square assembly. That works for graphic contrast, but it often lacks the dimensional look visible in this photo. The usual mistake is placing the moon too high or making it too thin, which leaves the center of the blanket visually empty. A chunky celestial throw needs a broad crescent, balanced star spacing, and clouds that soften the layout instead of interrupting it.
Project Info at a Glance
| Skill Level | Time | Finished Size | Hook | Best For |
|---|---|---|---|---|
| Intermediate | 16–20 hours | Approx. 110 x 150 cm | 8 mm | Bed throw, nursery decor, gift project |
Materials and Tools
Yarn
- Navy blue — super bulky blanket yarn — approx. 1600 g — for the background
- Golden yellow — super bulky blanket yarn — approx. 350 g — for moon, stars, and dot accents
- White — super bulky blanket yarn — approx. 250 g — for clouds
- Pink — small amount — for cheek circles
- Black — small amount — for embroidered sleepy eyes
Tools
- Hook 8 mm
- Yarn needle
- Stitch markers
- Sharp scissors
- Measuring tape
Abbreviations
MR = magic ring
ch = chain
sc = single crochet
hdc = half double crochet
dc = double crochet
tr = treble crochet
inc = increase
dec = decrease
sl st = slip stitch
st = stitch
BLO = back loop only
Invisible decrease matters most on the moon shaping because the inner curve stays exposed against the blue background.
Pattern — Step by Step
Work the blanket body in rows. Appliqués are made separately and sewn on after blocking.
Blanket Body (Make 1)
Yarn: navy blue
Ch 82.
R1: hdc in 2nd ch from hook and in each ch across. (81)
R2: ch 1, turn, hdc across. (81)
R3: repeat R2. (81)
R4: repeat R2. (81)
R5: repeat R2. (81)
R6: repeat R2. (81)
R7: repeat R2. (81)
R8: repeat R2. (81)
R9: repeat R2. (81)
R10: repeat R2. (81)
R11–70: repeat R2. (81 each row)
Do not fasten off if you want to add the border immediately.
Bobble Border (Make 1)
Yarn: navy blue
Round 1: sc evenly around the entire blanket, working 3 sc in each corner. Join with sl st.
Round 2: *sl st in next 2 sts, 5 dc bobble in next st, sl st in next 2 sts*; repeat around, adjusting at corners as needed for even spacing.
Fasten off. Leave a 20 cm tail.
Moon (Make 1)
Yarn: yellow
Ch 31.
R1: sc in 2nd ch from hook and in next 9 sts, hdc 8, dc 10, 5 dc in last ch; working on opposite side of foundation ch, dc 10, hdc 8, sc 10. (61)
R2: ch 1, do not turn, sc 10, hdc 8, dc 10, 2 dc in each of next 5 sts, dc 10, hdc 8, sc 10. (66)
R3: ch 1, sc 10, hdc 8, dc 12, [2 dc in next st, dc 1] 5 times, dc 11, hdc 8, sc 10. (71)
R4: ch 1, sc 9, hdc 7, dc 10, dec 6 times across the inner curve section, dc 10, hdc 7, sc 9. (65)
R5: ch 1, sl st evenly around to smooth the outer edge. (65)
Shape the crescent by lightly steaming and curving the inner edge inward before sewing.
Fasten off. Leave a 40 cm tail.
Large Stars (Make 4)
Yarn: yellow
R1: 5 sc in MR. (5)
R2: *ch 4, sl st in 2nd ch from hook, sc, hdc, sl st in next base st*; repeat 5 times. (5 points)
Fasten off. Leave a 20 cm tail.
Small Stars (Make 3)
Yarn: yellow
R1: 5 sc in MR. (5)
R2: *ch 3, sl st in 2nd ch from hook, sc, sl st in next base st*; repeat 5 times.
Fasten off. Leave a 15 cm tail.
Clouds (Make 5)
Yarn: white
Ch 7.
R1: sc in 2nd ch from hook and across. (6)
R2: ch 1, turn, inc, sc 4, inc. (8)
R3: ch 1, turn, hdc 2, 3 dc in next st, hdc 2, 3 dc in next st, hdc 2. (12)
R4: ch 1, turn, sc across to smooth the base. (12)
Fasten off. Leave a 20 cm tail.
Cheek Patches (Make 2)
Yarn: pink
R1: 6 sc in MR. (6)
R2: inc x6. (12)
R3: sl st around. (12)
Fasten off. Leave a 12 cm tail.
Yellow Dot Accents (Make 40–50)
Yarn: yellow
R1: 6 sc in MR. (6)
R2: sl st around. (6)
Fasten off. Leave a 10 cm tail.
Sleepy Eyes (Embroider 2)
Yarn: black
Use backstitch or a shallow curved satin stitch to embroider two closed eyes on the inner side of the moon. Each eye should measure about 3 cm wide with a slight downward curve at the outer edge.
Assembly
- Lay the blanket body flat with the longer sides running vertically.
- Center the moon slightly below the midpoint so the top third has room for stars and clouds.
- Pin the large stars first to establish visual balance around the moon.
- Place the small stars next, filling wider gaps without clustering them tightly.
- Sew the clouds after the stars so the white shapes soften the layout.
- Attach the yellow dot accents last, spacing them irregularly for a night-sky effect.
- Sew the cheek patches onto the moon before embroidering facial features if you want exact face placement.
- Embroider the sleepy eyes with black yarn using short, controlled stitches.
- Weave all tails into matching color sections on the back only.
- Steam lightly from the wrong side and let the blanket cool flat.
The finished piece should read as a layered celestial throw with a centered crescent moon, scattered stars, and soft cloud contrast across the blue field.
7 Technical Tips
- Mark the blanket center before placing the moon. A moon shifted more than 3 cm off center becomes obvious once the stars are added.
- Do not flatten the inner crescent curve when sewing. Pulling the tail too tight turns the moon into an oval instead of a clear crescent.
- Place the largest cloud away from the moon points. Crowding those tips weakens the moon silhouette.
- Keep yellow dot accents at least 4 cm apart. Tight spacing makes the background look cluttered rather than celestial.
- Pin all appliqués before attaching anything permanently. The layout matters more here than stitch complexity.
- Use shorter embroidery lengths for the sleepy eyes. Long black floats show through plush yarn and blur the face.
- Check border tension every side. A tight bobble edge will pull the rectangle inward and distort the finished drape.
Conclusion
This moon and stars crochet blanket pattern works because the dark field stays simple while the appliqués carry the theme. The crescent does the visual anchoring. The clouds soften the composition. The stars and dot accents fill the background without turning it into noise. Start by swatching your navy yarn with the 8 mm hook, then measure ten rows before committing to the full body. Share the finished blanket on Pinterest and Instagram with a full overhead photo so the moon placement reads clearly. #MoonStarsBlanket Which cloud arrangement gave your version the best balance around the crescent?









