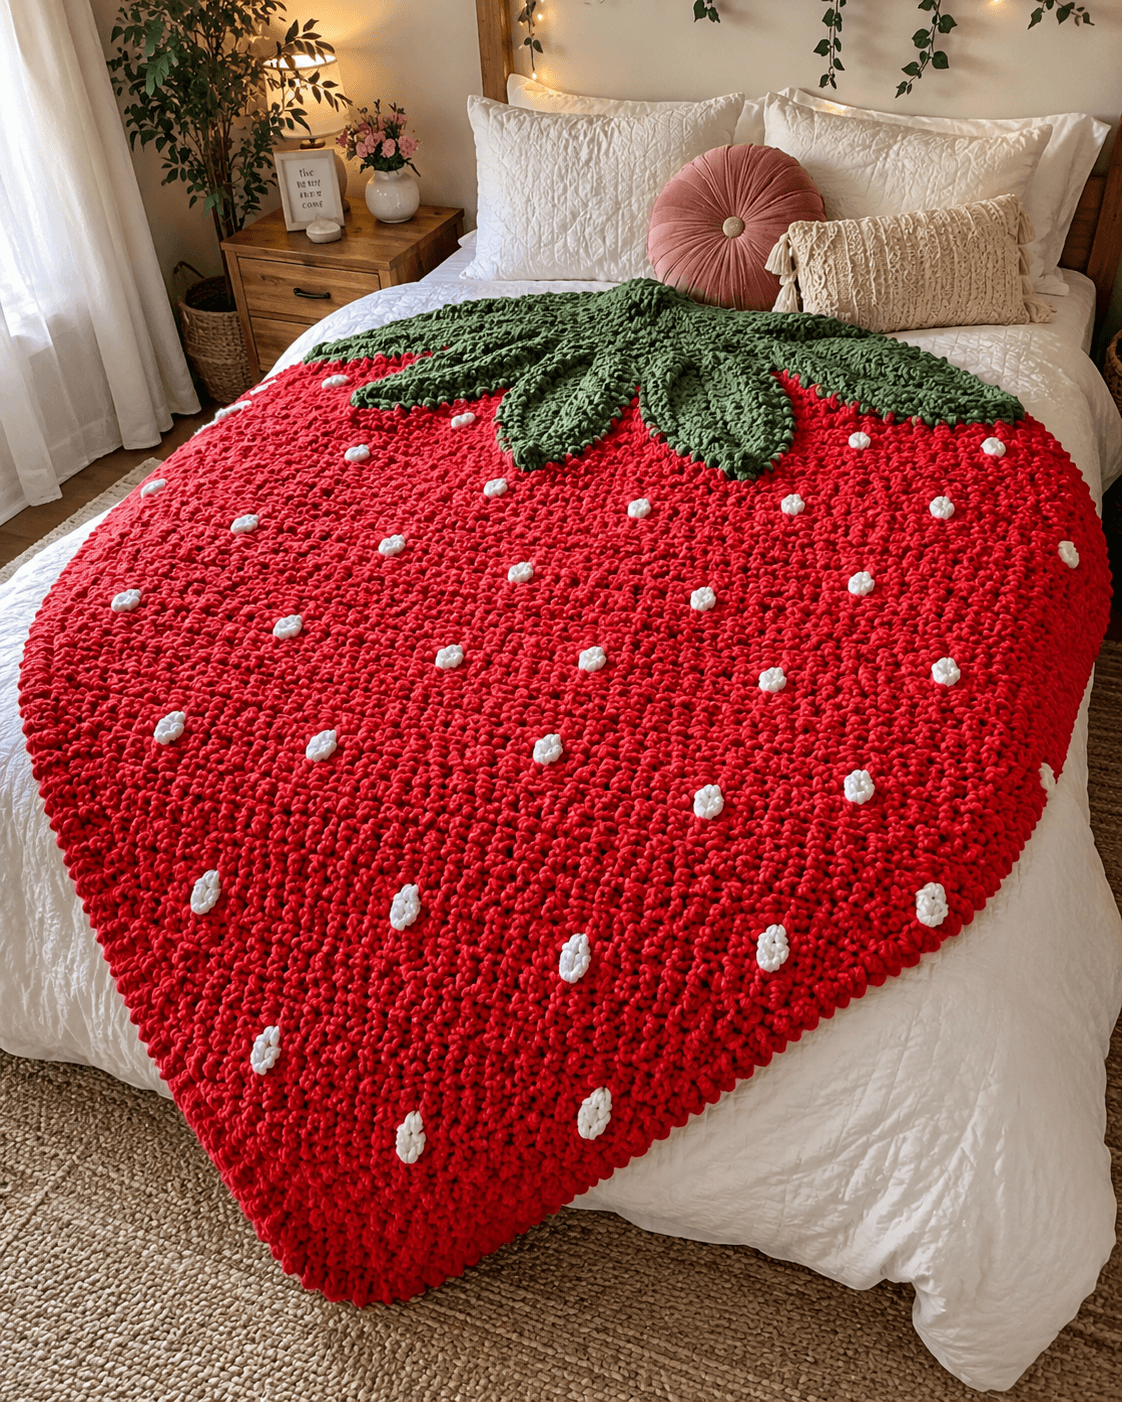
A strawberry blanket rises or falls at the crown. Miss the spread of the leaf cap and the whole silhouette reads as a red oval instead of fruit. This crochet strawberry blanket pattern is built for that problem first, using chunky chenille-style yarn, a broad berry body, a separate five-lobe leaf section, and simple sewn seed appliqués. The result is a large throw suited to a bed, reading nook, or photo prop, and it sits in the easy-to-intermediate range because the shaping is repetitive.
The Design: What Makes This Strawberry Different
The blanket in the photo works because the top edge is wider than the lower point, but it does not stop at a triangle. The leaf cap breaks the outline and gives the piece immediate recognition. That is the first structural choice in this version: the berry body and the crown are worked separately, then joined, so the leaf lobes can overlap the red field instead of sitting flat at the edge.
The second choice is texture. A chunky strawberry blanket looks flat very quickly if the seeds are only embroidered dots. Raised seed appliqués solve that. They add contrast, create small highlights across the surface, and stay readable from across the room. In a crochet berry blanket, scale matters more than detail count, so fewer larger seeds work better than many tiny stitches.
The third choice is width placement. The broadest section sits near the upper third rather than dead center. That keeps the lower section tapered and gives the throw the expected fruit profile. A common mistake in a strawberry blanket pattern is keeping the sides too straight for too long. The finished piece then reads as a rounded rectangle with a green top. This version corrects that with controlled increases early and a stable plateau through the midsection.
Project Info at a Glance
| Skill Level | Time | Finished Size | Hook | Best For |
|---|---|---|---|---|
| Easy–Intermediate | 12–18 hours with chunky yarn | Approx. 40 x 50 in / 100 x 127 cm | 10 mm for body, 8 mm for leaves and seeds | Throw blanket, bed accent, nursery photo prop |
Materials and Tools
Yarn
- Red — super bulky to jumbo chenille-style yarn — approx. 1800–2200 g — blanket body
- Green — super bulky to jumbo chenille-style yarn — approx. 350–500 g — leaf crown
- White — super bulky chenille-style yarn — approx. 80–120 g — seed appliqués
Tools
- 10 mm crochet hook for the berry body
- 8 mm crochet hook for leaves and seeds
- Yarn needle with a large eye
- Stitch markers
- Scissors
- Measuring tape
- Steam-free blocking setup or flat layout space
Abbreviations
ch = chain, sc = single crochet, hdc = half double crochet, dc = double crochet, sl st = slip stitch, inc = work 2 stitches in the same stitch, dec = single crochet 2 together, RS = right side, WS = wrong side, FO = fasten off.
For invisible decreases, insert the hook through the front loop of the next two stitches, yarn over, pull through both front loops, then complete the single crochet.
Pattern Notes
The blanket is worked in rows from the lower tip upward. The body is then topped with five separate leaf lobes that are sewn in place. White seeds are added last as small raised ovals. Because chenille yarn can vary by brand, use the measurements as the main checkpoint rather than row count alone. If your row gauge runs short, add straight rows before attaching the crown.
Pattern — Step by Step
Berry Body (Make 1)
Yarn: red
Ch 4.
Row 1: Sc in 2nd ch from hook and in next 2 ch. Ch 1, turn. (3)
Row 2: Inc in first st, sc 1, inc in last st. Ch 1, turn. (5)
Row 3: Inc, sc 3, inc. Ch 1, turn. (7)
Row 4: Inc, sc across to last st, inc. Ch 1, turn. (9)
Rows 5–20: Repeat Row 4. At the end of Row 20 you will have 41 sts.
Rows 21–34: Repeat Row 4. At the end of Row 34 you will have 69 sts.
Rows 35–44: Sc across. Ch 1, turn. (69)
Row 45: Inc, sc across to last st, inc. Ch 1, turn. (71)
Rows 46–52: Sc across. Ch 1, turn. (71)
Row 53: Inc, sc across to last st, inc. Ch 1, turn. (73)
Rows 54–64: Sc across. Ch 1, turn. (73)
Row 65: Dec, sc across to last 2 sts, dec. Ch 1, turn. (71)
Rows 66–68: Sc across. Ch 1, turn. (71)
Row 69: Dec, sc across to last 2 sts, dec. Ch 1, turn. (69)
Rows 70–72: Sc across. Ch 1, turn. (69)
Row 73: Dec, sc across to last 2 sts, dec. Ch 1, turn. (67)
Rows 74–76: Sc across. Ch 1, turn. (67)
Row 77: Dec, sc across to last 2 sts, dec. Ch 1, turn. (65)
Rows 78–80: Sc across. Ch 1, turn. (65)
Row 81: Work 1 row of sc evenly around the full berry body, placing 3 sc in the lower tip and 2 sc in each upper corner. Join with sl st. FO.
The body should now measure roughly 40 inches wide near the top and about 50 inches from leaf edge to tip after assembly.
Center Leaf Lobe (Make 1)
Yarn: green
Ch 18.
Row 1: Sc in 2nd ch from hook, sc 5, hdc 5, dc 5, 5 dc in last ch. Working along the opposite side of the foundation ch, dc 5, hdc 5, sc 6. Ch 1, do not turn. Continue working in joined rounds around the leaf.
Round 2: Sc 7, hdc 5, dc 7, inc x5 across the tip, dc 7, hdc 5, sc 7. Join with sl st.
Round 3: Sl st in next 2 sts, sc 5, hdc 5, dc 7, (dc, ch 2, dc) in center tip st, dc 7, hdc 5, sc 5, sl st in last 2 sts. FO, leaving a long tail.
Side Leaf Lobes (Make 2)
Yarn: green
Ch 16.
Row 1: Sc in 2nd ch from hook, sc 4, hdc 4, dc 4, 5 dc in last ch. Working back on the opposite side, dc 4, hdc 4, sc 5. Ch 1.
Round 2: Sc 6, hdc 4, dc 6, inc x5 across tip, dc 6, hdc 4, sc 6. Join with sl st.
Round 3: Sl st 2, sc 4, hdc 4, dc 6, (dc, ch 2, dc) in center tip st, dc 6, hdc 4, sc 4, sl st 2. FO, leaving a long tail.
Outer Leaf Lobes (Make 2)
Yarn: green
Ch 14.
Row 1: Sc in 2nd ch from hook, sc 4, hdc 3, dc 3, 5 dc in last ch. Working along opposite side, dc 3, hdc 3, sc 5. Ch 1.
Round 2: Sc 5, hdc 3, dc 5, inc x5 across tip, dc 5, hdc 3, sc 5. Join with sl st.
Round 3: Sl st 2, sc 3, hdc 3, dc 5, (dc, ch 2, dc) in center tip st, dc 5, hdc 3, sc 3, sl st 2. FO, leaving a long tail.
White Seed Appliqués (Make 34–40)
Yarn: white
Ch 4.
Round 1: 2 sc in 2nd ch from hook, sc 1, 3 sc in last ch. Working along opposite side of chain, sc 1, sc 1. Join with sl st. (8)
Round 2: Ch 1, [sc 1, inc] four times. Join with sl st. (12)
Round 3: Ch 1, sc around in back loop only. Join with sl st. FO, leaving a 20 cm tail for sewing.
Each seed should look like a small padded oval once sewn down.
Optional Edge Stabilizer (Make 1 round)
Yarn: red
If the sides ripple, join red yarn at the top corner and work one full round of slip stitches around the berry body before attaching the leaves. This firms the outline without adding visible bulk.
Assembly
- Lay the berry body flat with the widest straight edge at the top.
- Place the center leaf lobe first, pointing upward and overlapping the red body by 4 to 5 inches.
- Pin the two side leaf lobes so their inner edges sit slightly under the center leaf.
- Pin the two outer leaf lobes last, angling them outward to widen the crown.
- Sew all leaf lobes along their lower third only, leaving the tips free so the top stays layered.
- Mark vertical seed lanes across the red body. Keep the first row of seeds at least 3 inches below the leaf overlap.
- Sew the white seed appliqués in staggered spacing, wider at the top and slightly tighter through the lower half.
- Check both side edges. If one side pulls inward, add two or three extra seeds near the opposite side to balance the visual weight.
- Weave in tails through dense stitch paths only. Chenille yarn sheds if tails are cut too short.
- Spread the blanket flat for twenty-four hours so the body and crown settle into shape.
The blanket is complete once the top edge sits broad, the lower point hangs centered, and the leaf crown remains readable from a few steps away.
7 Technical Tips
- Use stitch markers every 10 stitches on Rows 35 through 64. That is the plateau zone, and missing one stitch there shifts the upper width enough to distort the leaf placement.
- Do not tighten the increase rows at the lower point. A hard pull in the first 20 rows creates a narrow spear shape instead of a berry tip.
- Keep the leaf overlap between 4 and 5 inches. Less overlap makes the crown look detached; more overlap shortens the red body too much.
- Sew seed appliqués after the body has rested flat. Adding them during active stitching often pulls the fabric upward around each oval.
- Place the first seed row no closer than 3 inches from the crown. Seeds jammed directly under the leaves make the top section look crowded.
- When weaving tails in chenille yarn, change direction at least three times over 2 to 3 inches. One straight path is not enough, especially on the leaf lobes.
- If your side edges flare, add the optional slip-stitch stabilizer before assembly. That single round corrects mild rippling better than trying to steam bulky polyester yarn.
Conclusion
This crochet strawberry blanket pattern depends on silhouette before detail. Build the broad upper body, keep the lower point centered, and treat the leaf crown as a separate structural unit rather than an afterthought. Once those parts are right, the white seeds only need clean spacing to finish the effect. Your next step is simple: swatch the body yarn with the 10 mm hook, check the width after Row 20, and adjust once before committing to the full throw. Share the finished blanket on Pinterest and Instagram with a flat lay and one folded-corner photo. Use the tag #StrawberryBlanketPattern. Which crown layout reads better in your version: wide outer leaves or a taller center leaf?









