Introduction
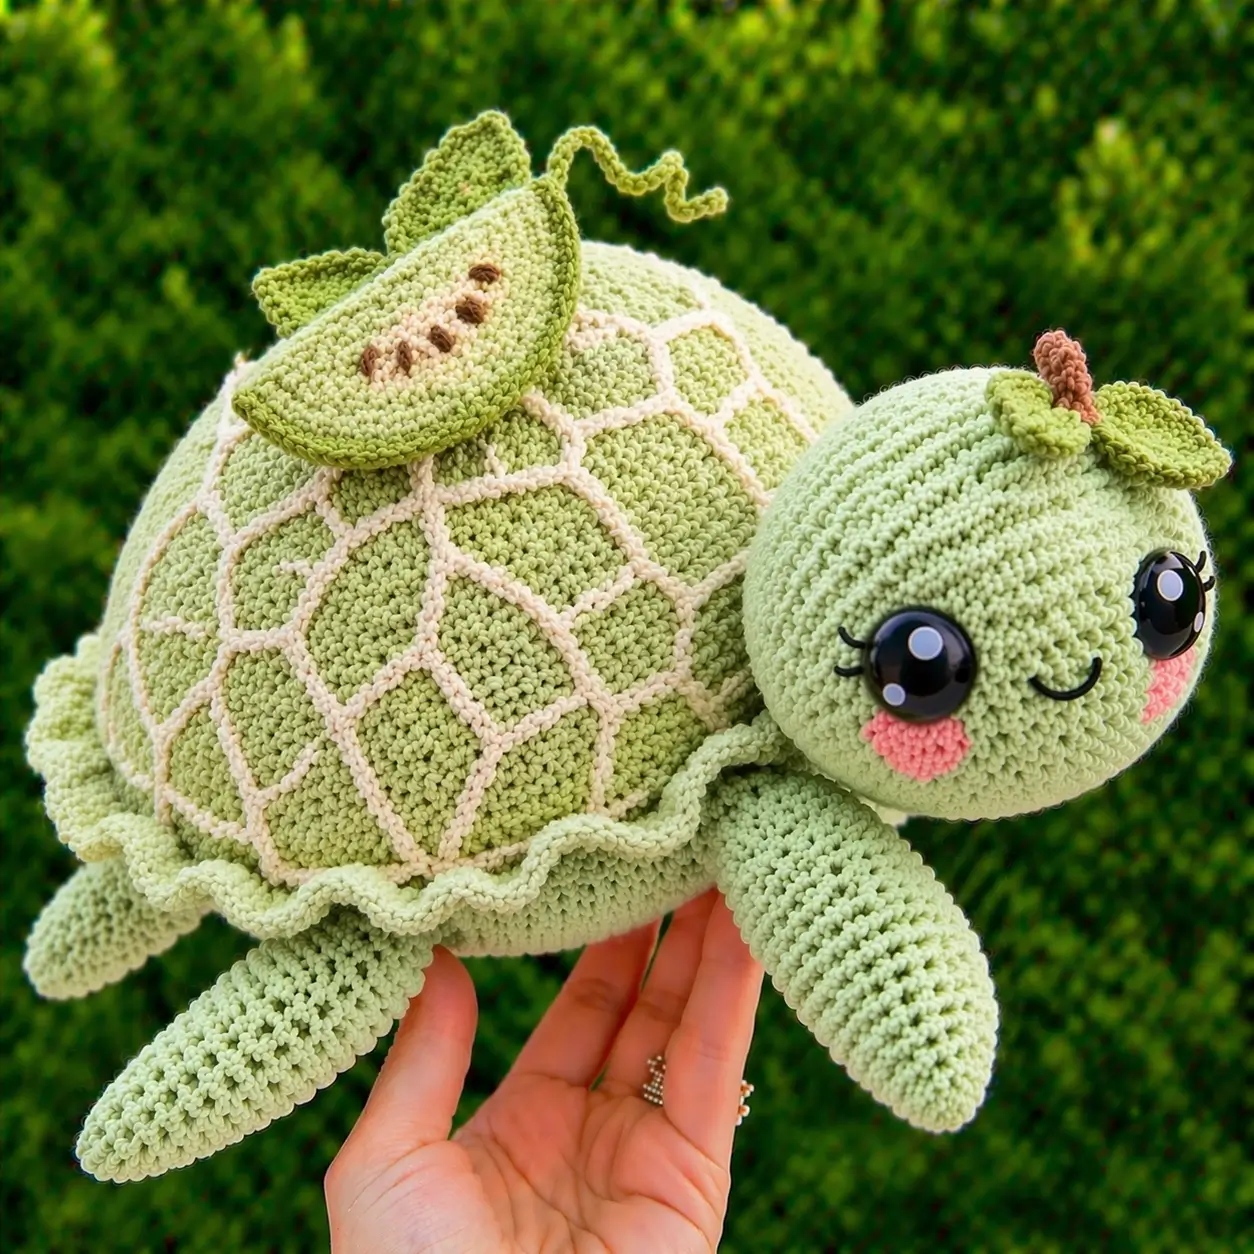
A cantaloupe shell only reads correctly when the dome stays high and the lattice stays flat. This turtle amigurumi crochet pattern uses super bulky plush yarn, a 5.0 mm hook, and 18 mm safety eyes to build a 32 cm display plush with intermediate shaping, decorative shell detailing, and a stable wide base. It works well as nursery decor because the shell texture carries the theme without extra loose trim.
The Design: What Makes This Turtle Different
This turtle is not a plain dome with four flippers. The shell needs three structural decisions. First, the body stays low while the shell sits high, which keeps the plush reading as a turtle rather than a round pillow. Second, the cantaloupe lattice is added as a surface detail instead of being color-changed into the shell itself; that keeps the lines raised and visible on plush yarn. Third, the scalloped lower edge breaks the shell silhouette and stops the body seam from looking blunt. A common failure with a plush turtle crochet pattern is oversizing the head until it drags the front edge downward. Here, the head remains large enough for oversized eyes but short enough to support the shell profile. The result lands between a themed display plush and a functional sea turtle amigurumi pattern variation.
Project Info at a Glance
| Skill Level | Time | Finished Size | Hook | Best For |
|---|---|---|---|---|
| Intermediate | 6–8 hours | 32 cm | 5.0 mm | Decor, themed gifts, nursery shelf |
Finished size and hook are benchmarked from comparable plush turtle references rather than this exact custom sample.
Materials and Tools
Yarn
- Pale green chenille — super bulky — 150–200 g — Himalaya Dolphin Baby or similar benchmark for plush turtle scale
- Cream chenille — super bulky — 100–150 g — contrast shell netting and underside benchmark
- Olive green chenille — small amount — leaves and melon rind
- Brown chenille or cotton — very small amount — stem
- Pink cotton or chenille — very small amount — cheek patches
Tools
- Hook 5.0 mm
- 18 mm safety eyes
- Stuffing
- Yarn needle
- Stitch markers
- Black embroidery thread for lashes and smile
Abbreviations
MR / sc / inc / dec / sl st / ch / BLO / FLO / hdc
Use invisible decrease in the final shaping rounds so the plush yarn does not open into visible gaps.
Pattern — Step by Step
Continuous spiral unless noted.
Head (Make 1)
Yarn: pale green — based on verified turtle head shaping and standard amigurumi math
R1: 6 sc in MR (6)
R2: inc x6 (12)
R3: (sc 1, inc) x6 (18)
R4: (sc 2, inc) x6 (24)
R5: (sc 3, inc) x6 (30)
R6: (sc 4, inc) x6 (36)
R7-R11: sc around (36)
Insert 18 mm eyes between R9 and R10, 9 stitches apart. Add lashes before locking if desired.
R12: (sc 4, dec) x6 (30)
R13: (sc 3, dec) x6 (24)
Begin stuffing firmly. Add embroidered smile low between the eyes.
R14: (sc 2, dec) x6 (18)
R15: (sc 1, dec) x6 (12)
R16: dec x6 (6)
Fasten off. Leave a 20 cm tail.
Body Base (Make 1)
Yarn: pale green — adapted from plush turtle body references and standard amigurumi math
R1: 6 sc in MR (6)
R2: inc x6 (12)
R3: (sc 1, inc) x6 (18)
R4: (sc 2, inc) x6 (24)
R5: (sc 3, inc) x6 (30)
R6: (sc 4, inc) x6 (36)
R7-R10: sc around (36)
R11: BLO sc around (36)
R12: sc around (36)
R13: (sc 4, dec) x6 (30)
R14: (sc 3, dec) x6 (24)
Stuff lightly only at the center. Keep outer edge flatter than the shell.
R15: (sc 2, dec) x6 (18)
R16: (sc 1, dec) x6 (12)
R17: dec x6 (6)
Fasten off. Leave a 25 cm tail.
Shell Dome (Make 1)
Yarn: pale green — shell plateau scaled to large size
R1: 6 sc in MR (6)
R2: inc x6 (12)
R3: (sc 1, inc) x6 (18)
R4: (sc 2, inc) x6 (24)
R5: (sc 3, inc) x6 (30)
R6: (sc 4, inc) x6 (36)
R7: (sc 5, inc) x6 (42)
R8: (sc 6, inc) x6 (48)
R9: (sc 7, inc) x6 (54)
R10-R15: sc around (54)
Fasten off. Leave a 35 cm tail.
Shell Ruffle (Worked onto Body BLO)
Yarn: pale green
Join yarn in exposed BLO from Body Base R11.
Rnd 1: (sl st, ch 2, 2 hdc in same st, sl st in next st) repeat around
Fasten off. Weave in ends.
Shell Lattice Overlay (Make 6 lines + 1 center ring)
Yarn: cream — inspired by raised shell detailing methods
For the center ring:
Ch 18, join into a ring with sl st.
For each lattice line, make 6:
Ch 22.
Fasten off each strip with a long tail.
Pin one cream ring slightly off center on the shell dome. Pin 6 lines radiating outward, then tack them down where they cross the ring and edge. This gives a melon-net look without forcing color changes into plush stitches.
Front Flippers (Make 2)
Yarn: pale green
R1: 6 sc in MR (6)
R2: inc x6 (12)
R3: (sc 1, inc) x6 (18)
R4-R9: sc around (18)
R10: (sc 1, dec) x6 (12)
R11-R13: sc around (12)
Flatten lightly and sc through both layers across 6 stitches to close.
Fasten off. Leave a 20 cm tail.
Back Flippers (Make 2)
Yarn: pale green
R1: 6 sc in MR (6)
R2: inc x6 (12)
R3-R7: sc around (12)
R8: (sc 1, dec) x4 (8)
R9-R10: sc around (8)
Flatten lightly and sc through both layers across 4 stitches to close.
Fasten off. Leave a 18 cm tail.
Tail (Make 1)
Yarn: pale green — based on turtle tail benchmarks
R1: 6 sc in MR (6)
R2-R3: sc around (6)
Flatten.
Fasten off. Leave a 15 cm tail.
Cheek Patches (Make 2)
Yarn: pink
R1: 6 sc in MR (6)
R2: inc x6 (12)
Sl st to close.
Fasten off. Leave a 10 cm tail.
Leaves (Make 2)
Yarn: olive green
Ch 9.
Work around chain: sc in 2nd ch from hook, hdc, dc 3, hdc, sc, 3 sc in final ch; on opposite side sc, hdc, dc 3, hdc, sc.
Sl st to first sc.
Fasten off. Leave a 15 cm tail.
Stem (Make 1)
Yarn: brown
Ch 8.
Starting in 2nd ch from hook, sl st 7.
Fasten off. Leave a 12 cm tail.
Curled Vine (Make 1)
Yarn: olive green
Ch 16.
Work 2 sc in each ch back down the chain.
Fasten off. Leave a 10 cm tail.
Melon Slice (Make 1)
Yarn: olive green, pale green, cream, brown
With olive green, ch 18.
Row 1: sc in 2nd ch from hook and across (17), ch 1, turn
Row 2: dec, sc 13, dec (15), ch 1, turn
Row 3: dec, sc 11, dec (13), ch 1, turn
Row 4: dec, sc 9, dec (11), ch 1, turn
Row 5: dec, sc 7, dec (9), ch 1, turn
Row 6: dec, sc 5, dec (7), ch 1, turn
Row 7: dec, sc 3, dec (5)
Fasten off olive.
Join pale green along the curved outer edge and work sc evenly around the curve only.
Join cream one row inside the olive edge and surface sl st a thinner stripe.
With brown, embroider 5 short seed dashes at the center.
Sew one leaf behind the slice. Add the second leaf overlapping if desired.
Assembly
- Sew the head to the front third of the body base, centered and angled slightly downward.
- Sew the shell dome onto the top of the body base, leaving enough room at front and rear for head and tail placement.
- Stuff the shell area more firmly than the underside so the dome stays high.
- Sew the front flippers at the lower front sides, slightly forward of the body midpoint.
- Sew the back flippers at the lower rear sides, matching angle and distance from the shell edge.
- Sew the tail to the rear center seam, pointing slightly outward rather than straight down.
- Attach the cheek patches under the eyes, one stitch outside each eye line.
- Sew the shell lattice ring and strips flat onto the shell dome, then tack the crossing points.
- Attach the stem, two leaves, and curled vine on top of the head.
- Sew the melon slice onto the shell top, offset toward the rear left quadrant.
The piece is complete when the shell dome remains centered without tipping the head forward.
7 Technical Tips
- Mark the first stitch of every round. Losing the round start by even one stitch will shift the shell seam and the flipper spacing.
- Keep the body softer than the shell. Overstuffing the base by more than about 20 percent makes the turtle sit like a ball instead of a low reptile.
- Use invisible decreases on the head and body closures. Standard decreases in plush yarn leave wider holes that show stuffing under tension.
- Insert the eyes before the head drops below 24 stitches. Waiting until the last two decrease rounds can distort spacing and pull the muzzle off center.
- Tighten the lattice tails in stages. Pulling one strip fully tight at once can dent the shell dome and flatten the melon effect.
- Pin all four flippers before sewing. A difference of just 1 cm front-to-back will make the turtle look twisted in shelf display photos.
- Weave tails through at least three direction changes. Plush yarn backs out faster than cotton, especially at the stem and melon-slice attachment points.
Conclusion
This melon-styled turtle amigurumi crochet pattern works because the shell is treated as a layered structure, not a single round cap. Build the body low, keep the dome high, and attach the cream lattice only after the shell shape is fixed. Post the finished turtle to Pinterest with a top-down shell photo, then share a side profile on Instagram so the ruffle and melon slice read clearly. Use #MelonTurtlePattern. One useful next step is testing the same shell on a darker sage body for stronger contrast. Would you place the melon slice off center, or directly over the shell midpoint like a real fruit display?









