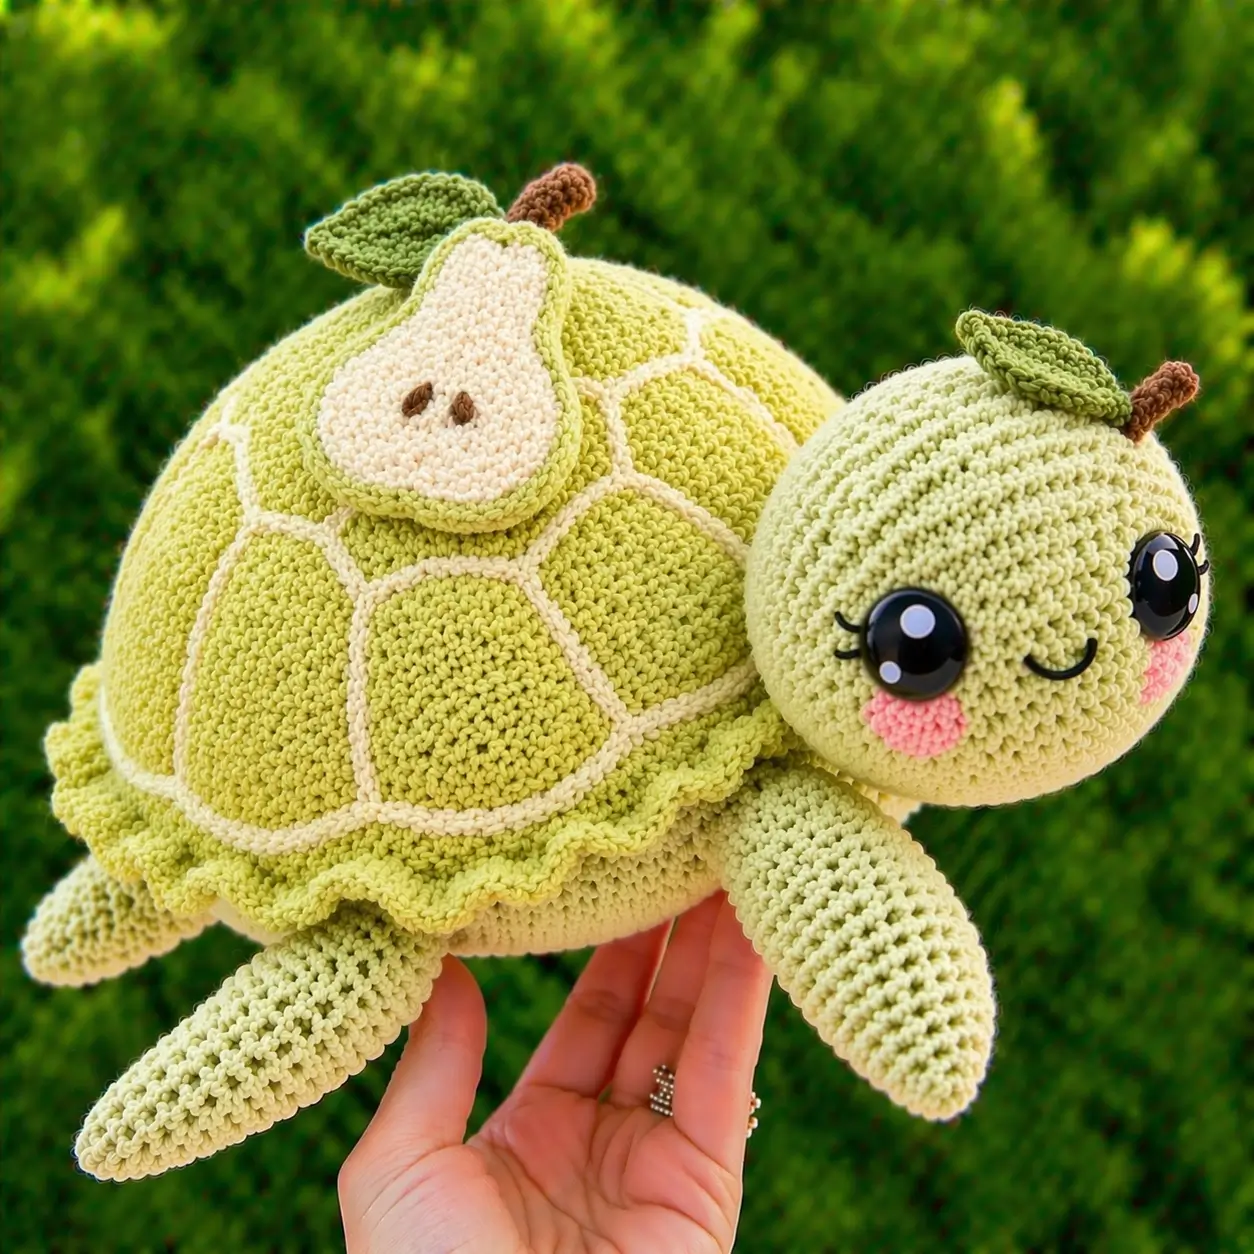
Pear-shaped shell panels change the geometry before the first flipper is sewn. This pear turtle amigurumi crochet pattern uses super bulky chenille yarn, a 5 mm hook, and 12 mm eyes to build a plush turtle at roughly 25 cm. The project suits an intermediate maker who wants a market-friendly design with a stronger silhouette than a plain dome shell.
The Design: What Makes Pear Turtle Different
A pear turtle has two visual systems layered together: turtle anatomy below, fruit branding above. That matters. The shell must stay wide and stable like a turtle, while the applique needs a vertical pear profile with a narrow neck and rounded base. For that reason, the shell is built as a large domed oval-cap form, then segmented with surface lines instead of pieced hexagons. The pear slice sits slightly off-center toward the top third so the shell still reads as a turtle from the side view. Another structural choice is the leaf-and-stem unit. It breaks the shell outline on purpose, giving the plush a fruit cue without changing the turtle body underneath. One common mistake in a fruit turtle crochet pattern is shrinking the flippers too much. Then the plush rolls forward and the head looks oversized. In a plush turtle crochet pattern, support beats novelty every time.
Project Info at a Glance
| Skill Level | Time | Finished Size | Hook | Best For |
|---|---|---|---|---|
| Intermediate | 5–7 hours | ~25 cm | 5 mm | Plush gifts, market makes, shelf display |
Verified size and hook are based on comparable plush-turtle and pear-turtle references.
Materials and Tools
Yarn
- Pale pear green — super bulky / weight 6 chenille — under 100 g — Himalaya Dolphin Baby or similar
- Cream — super bulky / weight 6 chenille — under 100 g — for pear flesh and lower shell/body
- Olive green — super bulky / weight 6 chenille — under 100 g — for leaf and shell contrast sections
- Brown — small amount — stem and optional nose embroidery
- Pink — small amount — cheek patches
- Black embroidery thread or thin yarn — lashes and smile
Tools
- Hook 5 mm
- 12 mm safety eyes
- Polyester stuffing
- Yarn needle
- Stitch markers
- Pins or clips for assembly
Abbreviations
MR = magic ring
sc = single crochet
inc = increase
dec = invisible decrease
sl st = slip stitch
ch = chain
BLO = back loop only
FO = fasten off
Invisible decrease keeps the decrease rounds flatter and reduces visible gaps, which matters most around the head closure and flipper tips.
Pattern — Step by Step
Continuous spiral unless noted.
Head (Make 1)
Yarn: pale pear green
R1: 6 sc in MR (6)
R2: inc x6 (12)
R3: (sc 1, inc) x6 (18)
R4: (sc 2, inc) x6 (24)
R5: (sc 3, inc) x6 (30)
R6: (sc 4, inc) x6 (36)
R7–12: sc around (36)
R13: (sc 4, dec) x6 (30)
R14: (sc 3, dec) x6 (24)
Insert 12 mm safety eyes between R10 and R11, 7 stitches apart. Add lashes before securing backs. Start stuffing.
R15: (sc 2, dec) x6 (18)
R16: (sc 1, dec) x6 (12)
R17: dec x6 (6)
FO. Leave 25 cm tail.
Body Undershell (Make 1)
Yarn: cream
R1: 6 sc in MR (6)
R2: inc x6 (12)
R3: (sc 1, inc) x6 (18)
R4: (sc 2, inc) x6 (24)
R5: (sc 3, inc) x6 (30)
R6: (sc 4, inc) x6 (36)
R7: (sc 5, inc) x6 (42)
R8: (sc 6, inc) x6 (48)
R9: (sc 7, inc) x6 (54)
R10: (sc 8, inc) x6 (60)
R11: sc around in BLO (60)
R12: sc around (60)
FO. Leave long tail.
Top Shell (Make 1)
Yarn: pale pear green
R1: 6 sc in MR (6)
R2: inc x6 (12)
R3: (sc 1, inc) x6 (18)
R4: (sc 2, inc) x6 (24)
R5: (sc 3, inc) x6 (30)
R6: (sc 4, inc) x6 (36)
R7: (sc 5, inc) x6 (42)
R8: (sc 6, inc) x6 (48)
R9: (sc 7, inc) x6 (54)
R10: (sc 8, inc) x6 (60)
R11–18: sc around (60)
Do not fasten off if you plan to add the ruffle immediately.
Shell Ruffle Edge (Attach to Top Shell)
Yarn: pale pear green
Round 1: In FLO of final shell round, (sc 2, inc) around (80)
Round 2: (sl st, sc, hdc, sc) in first 4 sts, repeat around for soft wave texture
FO. Weave in end.
Front Flippers (Make 2)
Yarn: pale pear green
R1: 6 sc in MR (6)
R2: inc x6 (12)
R3: sc around (12)
R4: (sc 1, inc) x6 (18)
R5–7: sc around (18)
R8: (sc 1, dec) x6 (12)
R9–16: sc around (12)
Stuff lightly at base only.
Flatten opening. FO. Leave 20 cm tail.
Back Flippers (Make 2)
Yarn: pale pear green
R1: 6 sc in MR (6)
R2: inc x6 (12)
R3–5: sc around (12)
R6: (sc 1, dec) x4 (8)
R7–12: sc around (8)
Stuff lightly at base only.
Flatten opening. FO. Leave 20 cm tail.
Tail (Make 1)
Yarn: pale pear green
R1: 4 sc in MR (4)
R2: (sc 1, inc) x2 (6)
R3–4: sc around (6)
R5: (sc 2, inc) x2 (8)
R6–8: sc around (8)
Do not stuff. Flatten lightly. FO. Leave 15 cm tail.
Pear Slice Applique (Make 1)
Yarn: cream center, pale green border
With cream:
R1: 6 sc in MR (6)
R2: inc x6 (12)
R3: (sc 1, inc) x6 (18)
R4: (sc 2, inc) x6 (24)
R5: sc 10, inc x4, sc 10 (28)
R6: sc 12, inc x4, sc 12 (32)
R7: sc around (32)
R8: dec, sc 12, dec x2, sc 12, dec (28)
R9: dec, sc 10, dec x2, sc 10, dec (24)
R10: sc around (24)
FO cream.
Join pale green border and work one edging round: sc evenly around, placing 3 sc at the top indentation and 3 sc at the lower curve point.
FO. Leave 30 cm tail for sewing.
Pear Seeds / Core Detail (Make 2 embroidered seeds)
Yarn: brown
Embroider two vertical satin stitches in the center of the pear slice, spaced about 1 cm apart.
Leaf (Make 1)
Yarn: olive green
Ch 8.
Row 1: Starting in 2nd ch from hook, sc 1, hdc 2, dc 2, hdc 1, sc 1. Rotate to opposite side of foundation chain and work sc 1, hdc 1, dc 2, hdc 2, sc 1, sl st to tip.
Row 2: Ch 1, work sc evenly around with (sc, ch 1, sc) at both pointed ends.
FO. Leave 20 cm tail.
Stem (Make 1)
Yarn: brown
R1: 4 sc in MR (4)
R2–5: sc around (4)
FO. Leave 12 cm tail.
Cheek Patches (Make 2)
Yarn: pink
R1: 6 sc in MR (6)
R2: inc x6 (12)
FO. Leave 10 cm tail.
Shell Segment Surface Lines
Yarn: cream
Use surface sl st to create one center vertical line and angled side panels on the top shell. Keep the lines shallow. Do not pull tight, or the shell cap will pucker.
Assembly
- Sew the head to the front of the undershell at rounds 9–12 span.
- Sew the front flippers slightly below the head seam, angled forward.
- Sew the back flippers near the rear third of the body.
- Attach the tail at the back center.
- Place the top shell over the undershell and pin all edges before closing.
- Stuff firmly through the remaining opening, especially the shell crown and front chest zone.
- Sew the shell closed to the undershell all the way around.
- Center the pear slice applique on the shell top and stitch it down flat.
- Sew the leaf and stem above the pear slice, offset toward the back.
- Add cheek patches, embroider lashes and smile, then weave in every tail through the shell interior.
The plush is complete when the shell sits level and the head projects forward without tipping the body.
7 Technical Tips
- Mark the first stitch of every round. Losing the start point on chenille yarn shifts the eye line, and a 2-stitch drift is visible on a round turtle head.
- Stuff the head in two stages. Add the first fill before R15, then compress again before the last decrease so the face stays round instead of pear-shaped by accident.
- Use invisible decreases only on visible curves. Regular decreases on chenille can leave ridges at the forehead and shell edge that show up under daylight photography.
- Install the eyes before the final third of head closure. For this size, placing 12 mm eyes between R10 and R11 keeps them centered; later placement distorts the muzzle.
- Do not over-tighten the shell surface lines. Surface slip stitches should sit on top of the fabric; if they sink in, the shell segments look dented rather than outlined.
- Pin the pear applique in at least six points. One pin at the top, one at the base, and two per side stops twist, which is common on asymmetrical fruit shapes.
- Weave tails through stuffed areas, not flat edges. Flat seam zones loosen faster, while passing yarn through the shell fill gives more friction and holds the parts in place longer.
Conclusion
This build works because the turtle base stays structurally correct while the fruit layer stays decorative. The verified references point to a plush format built with super bulky chenille yarn, a 5 mm hook, and a finished size around 25 cm, and that scale suits this pear turtle amigurumi crochet pattern well. The next step is practical: make the shell first, pin the applique before sewing, and check the balance with unstuffed flippers attached by clips. After finishing, share one top view on Pinterest and one side profile on Instagram with #PearTurtlePattern. A useful test question remains: did your leaf sit flat, or did the stem pull the top shell off center?









