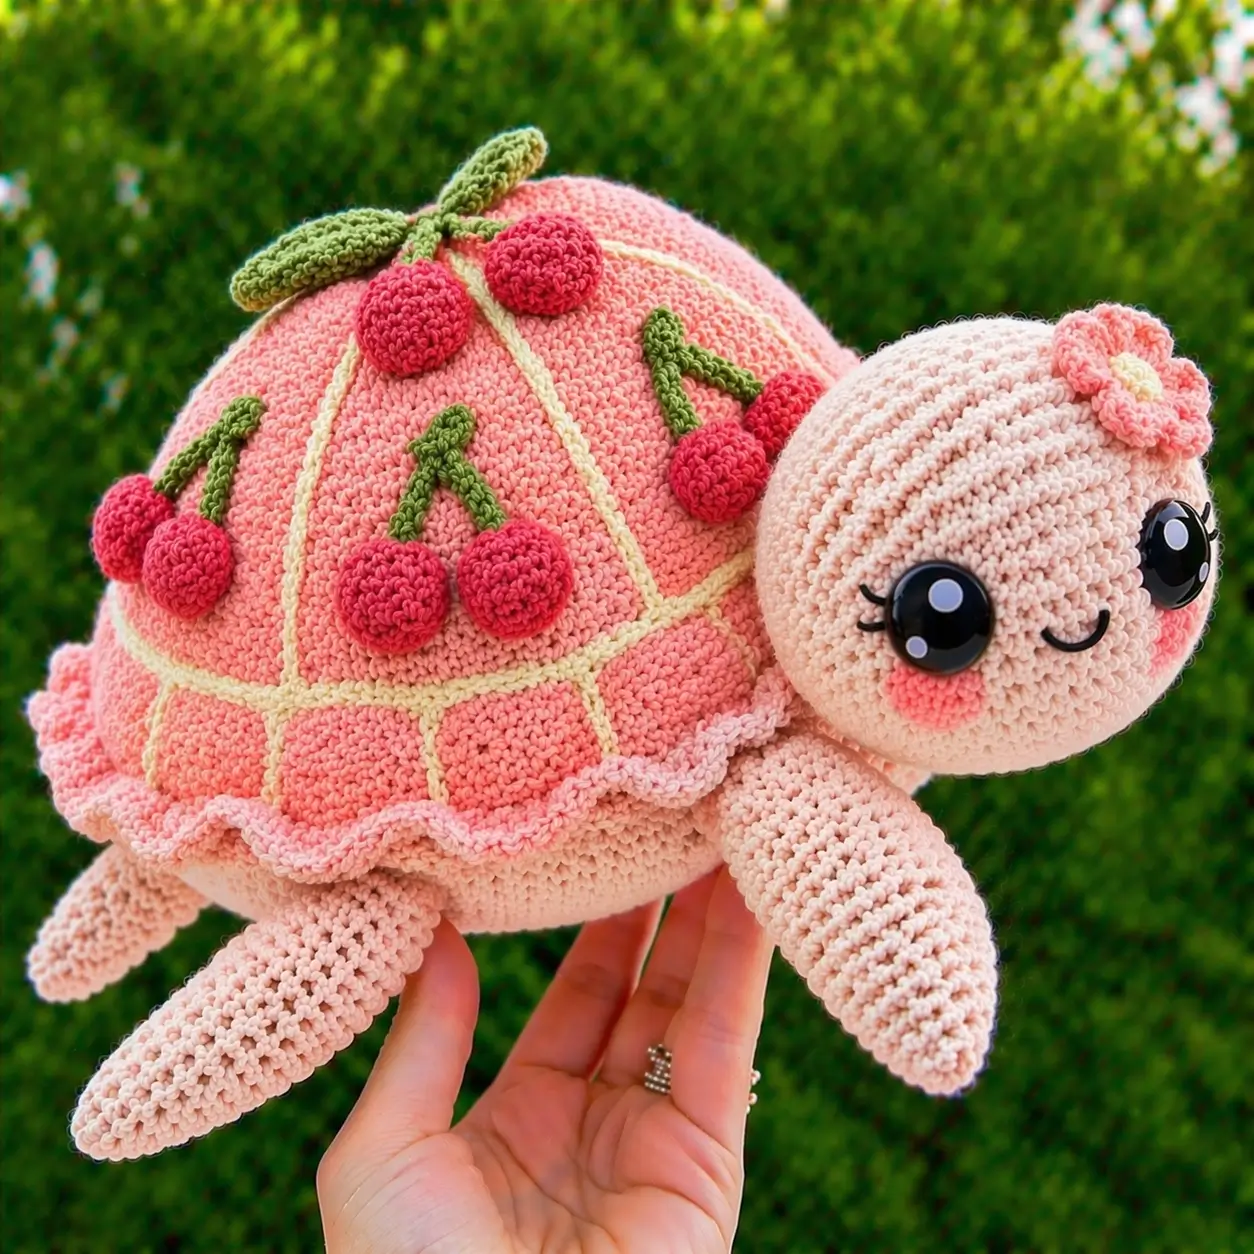
A turtle shell gives you fixed geometry before the face is even started. This turtle amigurumi crochet pattern turns that structure into a cherry-topped pink tortoise using cotton yarn, a 3.0 mm hook baseline, 10–12 mm eyes, and a medium build around 18 cm. The result suits an intermediate maker who wants a display plush with a broad shell, stable body, and clear applique zones. Verified turtle benchmarks commonly land near this size range.
The Design: What Makes Cherry Turtle Different
This turtle is not built like a flat sea turtle. The head projects forward, the legs hang lower, and the shell reads as a dome with panel seams rather than a single cap. That changes the whole construction sequence. The head needs enough width for large safety eyes, so a 36-stitch plateau suits the photo adaptation better than a tiny market mini. The body also needs a rounded lower section to stop the shell from collapsing between the front and back legs. Published turtle patterns often split into compact minis, no-sew sea turtles, or smooth tortoise bodies; this version borrows common turtle sizing logic but shifts it toward a decorative kawaii turtle amigurumi display piece with appliqué fruit and a scalloped edge. One common mistake is placing shell decoration too close to the ruffle, which makes the dome look shorter and wider than intended in a crochet turtle plush pattern.
Project Info at a Glance
| Skill Level | Time | Finished Size | Hook | Best For |
|---|---|---|---|---|
| Intermediate | 7–9 hours | 18 cm benchmark | 3.0 mm baseline | Display plush, gift make, themed market sample |
The size and hook reflect common published turtle pattern references used as the baseline for this photo-based variation.
Materials and Tools
Yarn
- Blush pink — cotton DK/light worsted — 50 g main body and shell base — Paintbox Cotton DK or similar
- Cream — cotton DK — 10 g shell seam lines and flower center
- Cherry red — cotton DK — 15 g cherries
- Olive green — cotton DK — 10 g leaves and stems
- Soft rose — cotton DK — 5 g cheek patches and flower petals
Tools
- Hook 3.0 mm
- Safety eyes 10–12 mm
- Polyester stuffing
- Tapestry needle
- Stitch markers
- Black embroidery thread for lashes and smile
The hook and size baseline come from current turtle pattern listings; cotton turtle patterns often use smaller hooks, while plush versions go larger. This design stays in the smaller-hook cotton lane to match the photo texture.
Abbreviations
MR / sc / inc / dec / sl st / ch / BLO / FLO
Use invisible decrease in all closing rounds to reduce gaps along the head and body curves; published turtle patterns call it out for cleaner shaping.
Pattern — Step by Step
Continuous spiral unless noted. This is an original photo-based adaptation using standard amigurumi math and turtle sizing benchmarks from the sources above.
Head (Make 1)
Yarn: blush pink — Standard amigurumi math adapted from photo
R1: 6 sc in MR (6)
R2: inc x6 (12)
R3: (sc, inc) x6 (18)
R4: (2 sc, inc) x6 (24)
R5: (3 sc, inc) x6 (30)
R6: (4 sc, inc) x6 (36)
R7–11: sc around (36)
Insert 10–12 mm safety eyes between R8 and R9, 8 stitches apart. Add embroidered lashes and smile before closing.
R12: (4 sc, dec) x6 (30)
R13: (3 sc, dec) x6 (24)
Stuff firmly, especially the muzzle side.
R14: (2 sc, dec) x6 (18)
R15: (sc, dec) x6 (12)
R16: dec x6 (6)
Fasten off. Leave a 25 cm tail.
Body (Make 1)
Yarn: blush pink — Standard amigurumi math adapted from photo
R1: 6 sc in MR (6)
R2: inc x6 (12)
R3: (sc, inc) x6 (18)
R4: (2 sc, inc) x6 (24)
R5: (3 sc, inc) x6 (30)
R6: (4 sc, inc) x6 (36)
R7–10: sc around (36)
R11: BLO sc around (36)
R12: sc around (36)
R13: (4 sc, dec) x6 (30)
R14: (3 sc, dec) x6 (24)
Begin stuffing. Keep the underside rounded, not flat.
R15: (2 sc, dec) x6 (18)
R16: (sc, dec) x6 (12)
R17: dec x6 (6)
Fasten off. Leave a 20 cm tail.
Front Legs (Make 2)
Yarn: blush pink — Standard amigurumi math adapted from photo
R1: 6 sc in MR (6)
R2: inc x6 (12)
R3: (sc, inc) x6 (18)
R4–8: sc around (18)
R9: (sc, dec) x6 (12)
R10–12: sc around (12)
Lightly stuff only the first half for a tapered drape.
Fasten off. Leave a 20 cm tail.
Back Legs (Make 2)
Yarn: blush pink — Standard amigurumi math adapted from photo
R1: 6 sc in MR (6)
R2: inc x6 (12)
R3: (sc, inc) x6 (18)
R4–7: sc around (18)
R8: (sc, dec) x6 (12)
R9–11: sc around (12)
Fasten off. Leave a 20 cm tail.
Tail (Make 1)
Yarn: blush pink — Shape benchmark informed by published turtle tails
R1: 6 sc in MR (6)
R2–3: sc around (6)
Fasten off. Leave a 12 cm tail.
Shell Dome Cover (Make 1)
Yarn: blush pink — Standard amigurumi math adapted from photo
R1: 6 sc in MR (6)
R2: inc x6 (12)
R3: (sc, inc) x6 (18)
R4: (2 sc, inc) x6 (24)
R5: (3 sc, inc) x6 (30)
R6: (4 sc, inc) x6 (36)
R7: (5 sc, inc) x6 (42)
R8–12: sc around (42)
Fasten off. Leave a long tail.
Shell Ruffle Edge (Work onto Shell Dome)
Yarn: pale blush or soft rose — Photo adaptation
Join yarn to outer edge of shell dome.
R1: (sl st in next st, 3 dc in next st, sl st in next st) repeat around to form scallops.
Fasten off neatly.
Shell Seam Lines (Make 6)
Yarn: cream — Photo adaptation
Ch 12.
Starting in 2nd ch from hook: sl st in each ch across (11)
Fasten off. Leave tails for sewing.
Cherries (Make 8)
Yarn: cherry red — Photo adaptation
R1: 6 sc in MR (6)
R2: inc x6 (12)
R3: (sc, inc) x6 (18)
R4–5: sc around (18)
R6: (sc, dec) x6 (12)
R7: dec x6 (6)
Stuff lightly so the fruit stays round, not hard.
Fasten off. Leave a 15 cm tail.
Cherry Stems (Make 4 pairs)
Yarn: olive green — Photo adaptation
Ch 8.
Starting in 2nd ch from hook: sl st 7 back down chain.
Make a second stem from the same base with ch 8, sl st 7.
Fasten off. Leave tails.
Leaves (Make 6)
Yarn: olive green — Photo adaptation
Ch 8.
Working back along chain: sl st, sc, hdc, dc, hdc, sc, sl st.
Work the opposite side of the chain for a fuller leaf: sl st, sc, hdc, dc, hdc, sc, sl st.
Fasten off. Leave a tail.
Flower (Make 1)
Yarn: soft rose and cream — Photo adaptation
With rose:
R1: 6 sc in MR (6)
R2: (ch 2, 2 dc in next st, ch 2, sl st in same st) x6 to form petals
Fasten off.
With cream: sew a tiny center knot or 4-stitch ring in the middle.
Leave a short tail.
Cheek Patches (Make 2)
Yarn: soft rose — Flat circle
R1: 6 sc in MR (6)
R2: inc x6 (12)
Fasten off. Leave a short tail.
Assembly
- Sew the head to the front of the body, centered across rounds 7–11 of the body.
- Attach the front legs one stitch lower than the back legs so the turtle appears to crawl.
- Sew the back legs evenly on the rear half of the body, matching the front-leg spacing.
- Attach the tail centered between the back legs.
- Pin the shell dome onto the BLO ridge of the body before sewing any decoration.
- Sew six cream seam lines from top center toward the lower shell edge to create pie-slice panels.
- Attach the ruffled shell edge so it sits slightly below the cream seam line ends.
- Sew cherry pairs and stems onto alternating upper shell panels, then add leaves near the top cluster and side fruits.
- Sew the flower to the upper right side of the head and attach the cheek patches below the eyes.
- Weave all tails inward, close any visible openings, and steam-block the leaves lightly if needed.
The piece is complete when the shell sits high, the head projects forward, and all four legs touch the same plane.
7 Technical Tips
- Stitch marker drift: Move the marker every round on the head and body. A one-stitch drift will throw off the centered face and shell panel alignment by the time you reach the closing rounds.
- Stuffing firmness: Pack the head to medium-firm and the shell body to firm. Too little stuffing under the dome causes the cream seam lines to buckle inward.
- Invisible decrease placement: Work every dec through the front loops only of the target stitches. Standard decreases leave a visible zipper on pale cotton.
- Eye placement timing: Insert the eyes before R13 of the head. Trying to force washers in after the 24-stitch stage can distort the cheek area.
- Ruffle depth control: Keep each scallop to 3 dc. A 4-dc scallop pushes the ruffle too low and hides the bottom shell line in side view.
- Pinning order: Pin seam lines first, then cherries, then leaves. If the fruit goes on before the cream lines, the shell panels lose symmetry.
- Tail weaving: Run each tail through at least 3 cm of internal stuffing path before trimming. Short tail weaving on cotton lets the applique edges lift after handling.
Conclusion
This cherry variation takes the standard turtle amigurumi crochet pattern format and pushes it toward decorative shell work instead of a plain cap. The key decisions are the 36-stitch head and body plateaus, the raised dome cover, and the measured placement of fruit appliqués above the ruffle. Next, swatch your chosen pink cotton with the 3.0 mm hook and confirm that the eye size still fits the head width before making all eight cherries. Share the finished turtle on Pinterest and Instagram with #CherryTurtlePattern. One useful question remains: did you place the top cherry cluster centered on a panel, or slightly across two seams like the photo sample?









