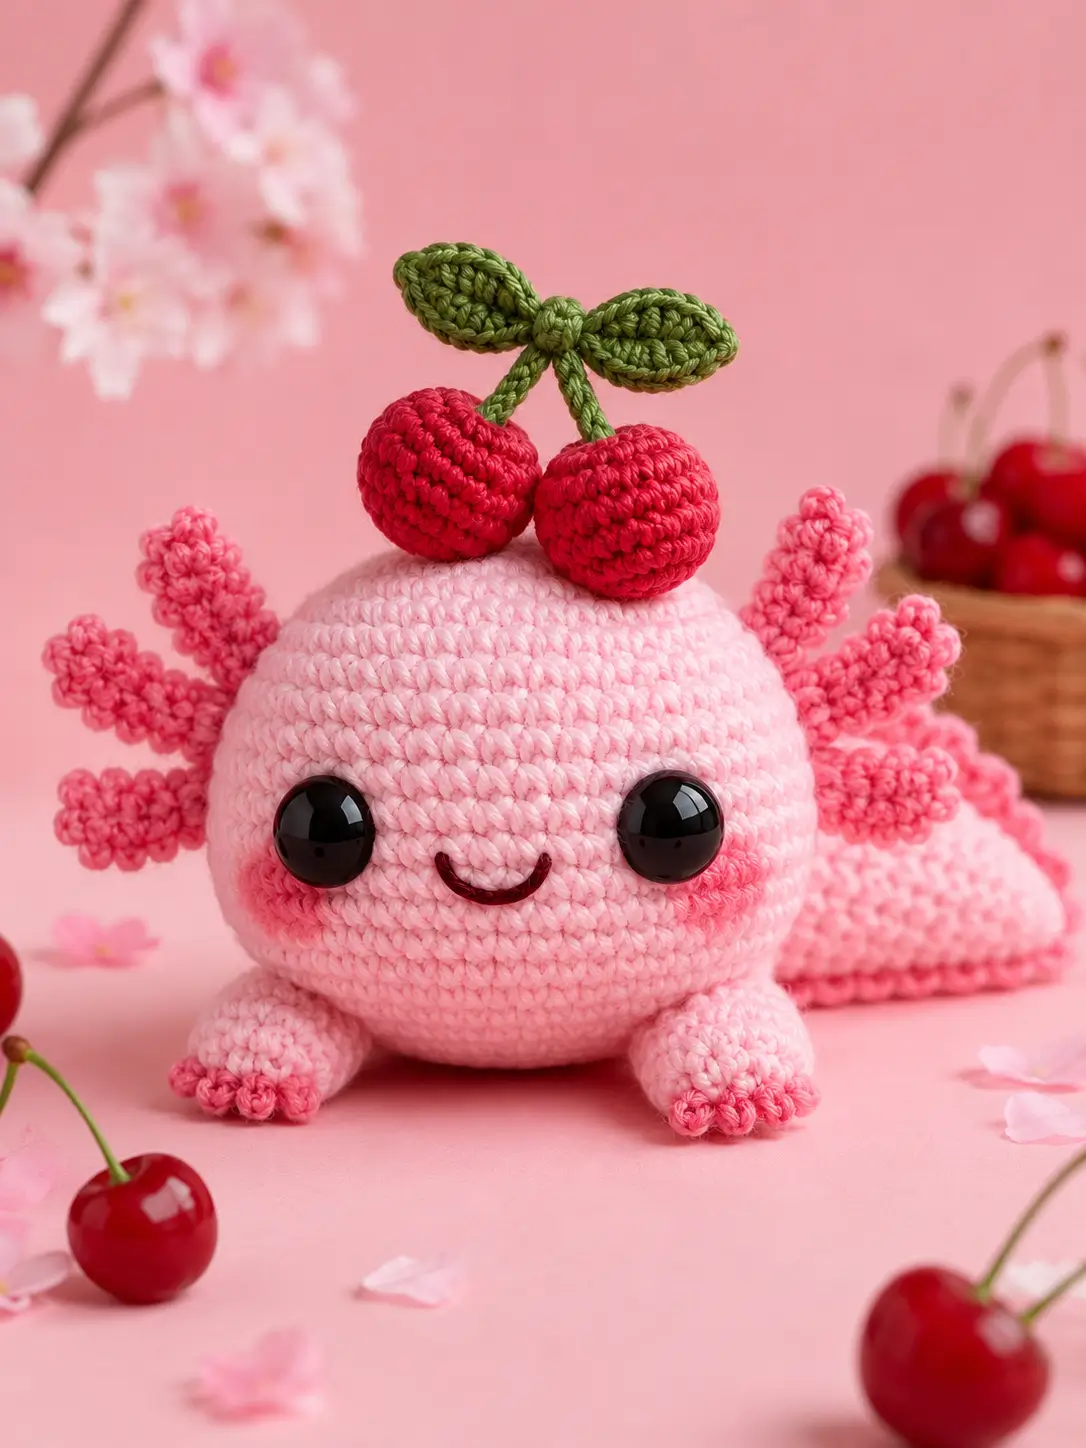
Axolotls keep six frilly external gills outside the head, so the cherry topper cannot sit just anywhere. This cherry axolotl amigurumi crochet pattern uses DK cotton, a 3.0 mm hook, 12 mm safety eyes, and a 14–15 cm sitting size for an advanced beginner. Make it as a shelf toy because the low body base resists tipping under the paired cherries.
The Design: What Makes Cherry Axolotl Different
The head is built as a wide oval, not a tight sphere, because the safety eyes, smile, cheek patches, gills, and cherry stems all need separate anchor zones. You work the face before the gill fans are sewn; then the maker pins each gill branch around the eye line so the face stays open. The body is flatter than a standard axolotl plush pattern because the cherry pair adds top weight. That base choice reduces forward roll. Another structural choice is the two-stem cherry yoke: it is attached through the head crown, not just glued or tacked onto surface stitches. A common maker mistake in a crochet axolotl pattern is placing the gills too far back, which hides them in side view and makes the head read as a plain blob.
Project Info at a Glance
| Skill Level | Time | Finished Size | Hook | Best For |
|---|---|---|---|---|
| Advanced beginner | 3–4 hours | 14–15 cm | 3.0 mm | Display plush, fruit-themed amigurumi, market table sample |
Materials and Tools
Yarn
- Pale cherry-blossom pink — DK/light worsted cotton or cotton-blend — 60–70 g — YarnArt Jeans, SMC Catania, or similar smooth amigurumi yarn
- Warm pink — same weight — 12 g — gills, cheek patches, and toe embroidery
- Cherry red — same weight — 18 g — two cherries
- Olive green — same weight — 10 g — stems, leaves, and crown knot
- Dark burgundy — embroidery floss or lace cotton — under 1 g — mouth
Tools
- Hook 3.0 mm
- 12 mm black safety eyes
- Polyester stuffing
- Yarn needle
- Stitch markers
- Pins
- Scissors
- Blunt embroidery needle
Abbreviations
MR = magic ring
sc = single crochet
inc = increase, 2 sc in one stitch
dec = invisible decrease unless stated
sl st = slip stitch
ch = chain
BLO = back loop only
FLO = front loop only
hdc = half double crochet
dc = double crochet
st = stitch
R = round or row
Invisible decrease works through the front loops of the next two stitches, reducing the visible gap at the closing rounds.
Pattern — Step by Step
Continuous spiral unless noted. Stitch counts are original for this photo-based design and follow standard amigurumi math: MR starts at 6, increase rounds add 6, and decrease rounds remove 6.
Head
Make 1. Yarn: pale cherry-blossom pink.
R1: 6 sc in MR (6)
R2: inc ×6 (12)
R3: [sc, inc] ×6 (18)
R4: [2 sc, inc] ×6 (24)
R5: [3 sc, inc] ×6 (30)
R6: [4 sc, inc] ×6 (36)
R7–R13: sc around (36)
R14: [4 sc, dec] ×6 (30)
R15: [3 sc, dec] ×6 (24)
R16: [2 sc, dec] ×6 (18)
R17: [sc, dec] ×6 (12)
R18: dec ×6 (6)
Place safety eyes between R9 and R10, 9 stitches apart, before closing R14. Stuff firmly through R17, then close the final opening.
Fasten off. Leave a 20 cm tail.
Body Base
Make 1. Yarn: pale cherry-blossom pink.
R1: 6 sc in MR (6)
R2: inc ×6 (12)
R3: [sc, inc] ×6 (18)
R4: [2 sc, inc] ×6 (24)
R5: [3 sc, inc] ×6 (30)
R6: [4 sc, inc] ×6 (36)
R7–R10: sc around (36)
R11: [4 sc, dec] ×6 (30)
R12: [3 sc, dec] ×6 (24)
R13: [2 sc, dec] ×6 (18)
R14: [sc, dec] ×6 (12)
R15: dec ×6 (6)
Stuff less firmly than the head so the underside sits flat. Press the base into a low oval before closing.
Fasten off. Leave a 35 cm tail for sewing to the head.
Front Legs
Make 2. Yarn: pale cherry-blossom pink.
R1: 6 sc in MR (6)
R2: inc ×6 (12)
R3–R5: sc around (12)
R6: dec ×6 (6)
Add a small pinch of stuffing only at the paw end. With warm pink yarn, embroider three short toe lines across R2.
Fasten off. Leave a 20 cm tail.
Back Legs
Make 2. Yarn: pale cherry-blossom pink.
R1: 6 sc in MR (6)
R2: inc ×6 (12)
R3: [sc, inc] ×6 (18)
R4–R6: sc around (18)
R7: [sc, dec] ×6 (12)
R8: dec ×6 (6)
Stuff the front half only so the back legs sit as flattened pads. With warm pink yarn, embroider three toe lines on the wider end.
Fasten off. Leave a 25 cm tail.
External Gill Fans
Make 2 fans; 3 branches per fan. Yarn: warm pink.
For each branch:
R1: 6 sc in MR (6)
R2–R6: sc around (6)
Do not stuff. Flatten each branch lightly and curve the tip with the yarn tail.
For each fan base:
R1: 6 sc in MR (6)
R2: inc ×6 (12)
Sew three branches to one base pad: upper branch angled up, center branch horizontal, lower branch angled down.
Fasten off each branch and base. Leave a 20 cm tail on every branch and a 25 cm tail on each base.
Tail Fin
Make 1. Yarn: pale cherry-blossom pink.
R1: 6 sc in MR (6)
R2: inc ×6 (12)
R3: [sc, inc] ×6 (18)
R4–R7: sc around (18)
R8: [sc, dec] ×6 (12)
R9: dec ×6 (6)
Stuff only R1–R4. Flatten R5–R9 into a soft paddle and sew the final opening closed.
Fasten off. Leave a 30 cm tail.
Cheek Patches
Make 2. Yarn: warm pink.
R1: 6 sc in MR (6)
R2: inc ×6 (12)
R3: sl st around loosely (12)
Keep the patches flat. Block with finger pressure before sewing.
Fasten off. Leave a 20 cm tail.
Cherry Orbs
Make 2. Yarn: cherry red.
R1: 6 sc in MR (6)
R2: inc ×6 (12)
R3: [sc, inc] ×6 (18)
R4–R5: sc around (18)
R6: [sc, dec] ×6 (12)
R7: dec ×6 (6)
Stuff each cherry firmly. Close the top with a small dimple by pulling the yarn tail through the center once.
Fasten off. Leave a 20 cm tail.
Cherry Stems, Leaves, and Crown Knot
Yarn: olive green.
Stem, make 2:
Row 1: ch 10, sl st in 2nd ch from hook and across (9)
Leaf, make 2:
Row 1: ch 9, sl st in 2nd ch, sc, hdc, dc, dc, hdc, sc, sl st; rotate and work on the other side of the chain: sl st, sc, hdc, dc, dc, hdc, sc, sl st (16)
Crown knot, make 1:
R1: 6 sc in MR (6)
R2: sc around (6)
Attach one stem to each cherry. Sew both stems into the crown knot, then sew the two leaves behind the knot so they form a bow shape.
Fasten off. Leave a 15 cm tail on stems and leaves, and a 25 cm tail on the knot.
Assembly
- Sew the body base to the lower back of the head, placing the seam around R12–R16 of the head so the face tilts slightly upward.
- Pin the head/body unit on a flat surface and check that it does not roll forward under finger pressure.
- Sew the cheek patches below the eyes, centered between R10 and R12 with 2 visible stitches between each patch and the smile zone.
- Embroider the mouth with dark burgundy thread across R12, making a shallow curve 5 stitches wide.
- Sew the front legs to the lower front edge of the body, 8 stitches apart.
- Sew the back legs to the side base, slightly behind the front legs, with the toe lines facing forward.
- Sew one gill fan to each side of the head, with the center branch aligned to the eye centerline.
- Sew the tail fin to the back center of the body base, angled slightly upward.
- Sew the two cherries to the head crown, then secure the stems through the crown knot with three passes of green yarn.
- Sew the leaves behind the knot, weave in all tails for at least 5 cm, and trim only after the toy sits level.
The finished toy has one seated body, six external gills, four legs, a tail, two cheek patches, and a two-cherry topper.
7 Technical Tips
- Stitch marker drift: If the marker moves more than 2 stitches from center back by R10 of the head, the gills will not mirror evenly. Move the marker back after a plain round rather than shifting during an increase round.
- Stuffing firmness: A loose head collapses under the cherry pair, and an overstuffed body rolls forward. The head should spring back after a 2-second thumb press, while the body base should stay slightly flattened.
- Invisible decrease gaps: Wide holes appear at R16–R18 of the head when decreases are worked through both loops. Work every dec through front loops only and add stuffing before the final 12-stitch round closes.
- Eye placement timing: Insert the eyes between R9 and R10, 9 stitches apart, before R14 blocks hand access. If the eyes sit higher than R8, the cherries crowd the expression.
- Cotton tension: With DK cotton and a 3.0 mm hook, no stuffing gap should exceed 1 mm. If white stuffing shows through the pale pink yarn, drop to a 2.75 mm hook for the head.
- Gill pinning: Pin each side fan with the center branch level to the eye and the upper/lower branches spread across three rounds. A fan placed 4 rounds behind the eye reads as an ear, not an axolotl gill.
- Tail weaving: Cherry stems and gill branches fail first when tails are buried too shallow. Weave each structural tail through at least 5 cm of fabric, reverse direction once, then trim.
Conclusion
This build is controlled by balance: the gill fans need side visibility, while the cherry pair needs a firm crown anchor. For your next step, pin the full toy before sewing the cherries, then test whether the base stays level on a table. Photograph the side view as well as the front view; that angle shows whether all three gill branches read clearly. Share the finished axolotl on Pinterest and Instagram with the project name, yarn weight, hook size, and eye size so other makers can compare scale. Final keyword note: cherry axolotl amigurumi crochet pattern. Use #CherryAxolotl. Which side branch angle makes your axolotl look most balanced under the cherries?









