Introduction
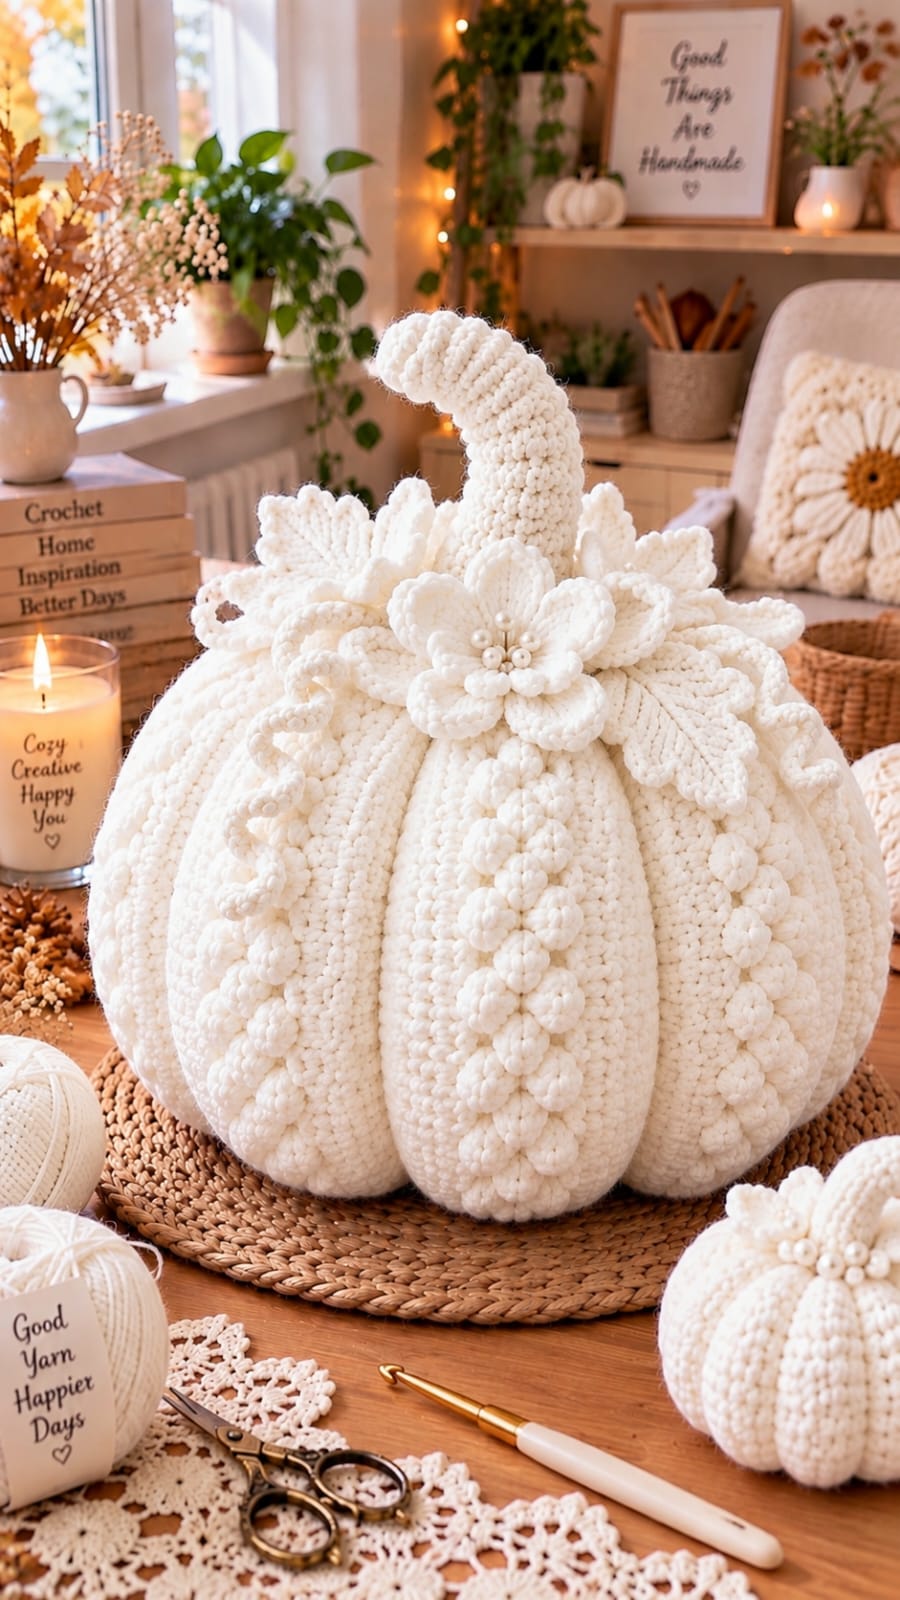
Three vertical chains of raised bobble blossoms turn this oversized ivory pumpkin into something structurally different from an ordinary ribbed gourd. This large white crochet pumpkin pattern with bobble flowers uses #6 super-bulky yarn, an 8 mm body hook, fiberfill, sculpting cord, dimensional flowers, leaves, tendrils, and a curved stem. The intermediate reconstruction targets approximately 30–32 cm wide for substantial tabletop autumn decoration.
The instructions below are an original photo-inspired reconstruction based on visible structure; published patterns cited later are used only for sizing, gauge, and material benchmarks.
The Design: What Makes This White Pumpkin Different
The reference combines three separate texture systems. First, eight broad lobes create the underlying pumpkin silhouette; a ribbed rectangle is used because it can supply enough circumference for a 30 cm body without forcing small-amigurumi stitch counts onto a large object. Second, raised floral trails run vertically across selected lobes, so those embellishments are made separately and sewn on after sculpting. That keeps the bobbles rounded instead of crushing them beneath shaping strands. Third, the crown is intentionally oversized: layered ivory flowers, pointed leaves, curled tendrils, and a tall bent stem spread across much of the upper surface. For this textured crochet pumpkin, restraint with stuffing matters. A common mistake in a giant crochet pumpkin is packing the center rigidly; the sculpting cord then cannot produce the deep channels visible in the photograph.
Project Info at a Glance
| Skill Level | Time | Finished Size | Hook | Best For |
|---|---|---|---|---|
| Intermediate | Reconstruction estimate: 9–13 hours | 30–32 cm wide × 27–30 cm body; about 43–46 cm including stem | 8 mm body; 5 mm details | Large autumn centerpieces, hearths, entry tables |
A published large pumpkin from The Unraveled Mitten uses #6 super-bulky yarn, a 9 mm hook, and a 10 × 22 inch starting rectangle; its finished pumpkin is about 5 inches high × 9 inches wide. Nicole Riley’s published Large Pumpkin uses bulky yarn, a 5 mm hook, 200–250 yards, and finishes at approximately 6.5 × 9 inches. Those benchmarks are smaller than this reconstruction, so the body below deliberately uses a larger measured rectangle rather than copying their stitch counts.
Materials and Tools
Yarn
- Warm ivory — #6 super bulky — reconstruction estimate: 400–500 g for body
- Warm ivory — #5 bulky — reconstruction estimate: 130–170 g for flowers, leaves, bobbles, and tendrils
- Optional pearl-white accent yarn — #4 worsted — 10–15 g
A structured super-bulky acrylic, wool blend, or dense polyester gives the body clearer ribs than extremely slippery chenille. The topper benefits from a slightly thinner yarn because its leaves and petals need defined edges.
Tools
- 8 mm crochet hook for body
- 5 mm crochet hook for stem, flowers, leaves, and bobble trails
- Polyester fiberfill — reconstruction estimate: 650–900 g
- Strong ivory cotton cord or doubled yarn for sculpting
- Large tapestry needle
- Long upholstery needle
- Locking stitch markers
- 10–15 mm craft pearls — optional flower centers
- Scissors and measuring tape
Abbreviations
- MR — magic ring
- ch — chain
- sc — single crochet
- hdc — half double crochet
- dc — double crochet
- tr — treble crochet
- sl st — slip stitch
- BLO — back loop only
- inc — two stitches in one stitch
- dec — decrease
- st/sts — stitch/stitches
An invisible decrease is made through the front loops of two adjacent stitches before completing one single crochet; it is used only in the stem because the main pumpkin body is constructed from a rectangle.
Construction and Gauge
The pumpkin body begins as one ribbed rectangle approximately 25–27 cm high × 74–78 cm long. Its short edges are joined to form a tube. The two open ends are gathered, the tube is stuffed, and four long sculpting strands create eight lobes.
Target body gauge is approximately 8 hdc × 7 rows = 10 cm in BLO ribbing with the 8 mm hook. Treat the measured rectangle as the controlling specification because super-bulky yarns differ considerably in diameter.
This construction follows the same broad rectangle-to-tube principle used by published ribbed pumpkin patterns. The Unraveled Mitten explicitly works its pumpkins in rows, seams the rectangle, cinches both ends, stuffs the body, and then segments the finished form.
Pattern — Step by Step
Large Ribbed Pumpkin Body
Yarn: warm ivory #6 super bulky. Hook: 8 mm.
Ch 22.
Row 1: Hdc in second ch from hook and across. (21)
Row 2: Ch 1, turn. Hdc BLO in every st across. (21)
Rows 3–54: Repeat Row 2. (21)
Do not fasten off.
Lay the rectangle flat without stretching. Target approximately 25–27 cm high × 74–78 cm long. If the fabric is shorter than 74 cm, add rows in pairs. If it exceeds 78 cm, remove pairs of rows.
The 54 rows create a broad tube with considerably more circumference than the smaller published 9-inch pumpkins used as benchmarks.
Body Seam
Fold the rectangle so Row 54 meets the foundation edge.
Insert the hook through one loop of the final row and one corresponding foundation loop.
Sl st through both layers across all 21 positions.
Fasten off with a 120 cm tail.
Turn the seam toward the inside.
Close the Pumpkin Base
Thread a doubled length of strong ivory yarn through the upholstery needle.
Run the needle through every second row-end around one opening, producing 27 gathering points.
Pull gradually until the opening closes.
Pass across the center three times.
Knot securely on the inside.
Stuff the Pumpkin
Turn the closed end downward.
Place fiberfill against the outside wall first, working around the complete circumference.
Fill the lower third, then the middle, then the upper third.
Keep a vertical core approximately 8 cm in diameter slightly softer than the surrounding lobes.
Before sculpting, the body should measure roughly 29–31 cm wide and remain compressible under firm hand pressure.
Close the Crown
Thread strong ivory yarn through every second row-end around the open top.
Pull until the opening measures approximately 3 cm.
Do not close it completely.
Knot securely. The remaining opening accommodates the stem and provides an anchor for the crown decorations.
Sculpt Eight Pumpkin Lobes
Cut four strong ivory strands approximately 170 cm long.
Thread the first strand through the bottom center, run it vertically through one natural rib valley, enter the crown center, and return down the directly opposite side.
Pull until both channels sink approximately 2–3 cm.
Knot underneath.
Install the second strand at 90 degrees to the first.
Place the third and fourth strands halfway between the existing channels.
You now have exactly eight broad lobes.
Adjust the four strands incrementally until the pumpkin measures approximately 30–32 cm wide × 27–30 cm high.
Raised Bobble Flower Trail — Make 3
The photograph shows dimensional floral lines descending across selected lobes. Separate strips keep the stitch math independent from the structural pumpkin fabric.
Yarn: ivory #5 bulky. Hook: 5 mm.
Ch 29.
Row 1: Sc in second ch and across. (28)
Fasten off with a 50 cm tail.
This 28-stitch strip becomes the hidden foundation for seven four-petal flowers.
Four-Petal Bobble Flower
Attach ivory yarn around foundation stitches 1–4.
In Stitch 1 make one bobble. Sl st in Stitch 2. Make one bobble in Stitch 3. Sl st in Stitch 4.
Rotate the work 180 degrees and add one bobble into the lower side of Stitch 1 and one into the lower side of Stitch 3.
Secure both lower bobbles to the foundation with slip stitches.
One four-petal flower now occupies a four-stitch section.
Repeat across foundation positions 5–8, 9–12, 13–16, 17–20, 21–24, and 25–28.
Each strip contains exactly seven raised flowers.
Bobble Stitch
Yarn over, insert the hook into the indicated stitch, yarn over and pull up a loop, then yarn over and pull through two loops.
Repeat that partial double crochet four additional times into the same stitch.
Yarn over and pull through all remaining loops.
Ch 1 firmly to close the cluster.
Attach the Three Floral Trails
Pin the first strip down the center of a front-facing lobe.
Place the second and third strips two lobes to either side so the decoration is visually distributed across the front half of the pumpkin.
Position the upper flower approximately 6 cm below the crown.
Stop the lowest flower approximately 5 cm above the base.
Sew only through the hidden foundation chain and the centers of the flowers.
Leave the bobble petals free.
Large Crown Flower — Make 1
Yarn: ivory #5 bulky. Hook: 5 mm.
Flower Center
R1: 6 sc in MR. (6)
R2: Inc ×6. (12)
R3: (Sc, inc) ×6. (18)
Fasten off.
Inner Petal Ring
Ch 4 and join into a ring.
R1: 10 sc in ring. (10)
R2: *Sl st in next st, (ch 4, 4 dc, ch 4, sl st) in next st* ×5.
Fasten off.
This creates exactly five inner petals.
Outer Petal Ring
Ch 4 and join.
R1: 10 sc in ring. (10)
R2: *Sl st in next st, (ch 6, 3 dc, 3 tr, 3 dc, ch 6, sl st) in next st* ×5.
Fasten off with a 50 cm tail.
Stack the larger ring behind the smaller ring. Place the 18-stitch center over both and sew through all three centers.
Add five or six optional craft pearls to the center only after the flower has been attached to the pumpkin.
Medium Crown Flower — Make 4
Ch 4 and join.
R1: 10 sc in ring. (10)
R2: *Sl st in next st, (ch 4, 3 dc, ch 4, sl st) in next st* ×5.
Fasten off with a 35 cm tail.
Make four identical flowers.
These are positioned behind and beside the large central flower so the topper spreads across the crown rather than forming one narrow cluster.
Large Pointed Leaf — Make 8
Yarn: ivory #5 bulky. Hook: 5 mm.
Ch 22.
Starting in the second chain, work into the next 20 chains while leaving the final chain untouched for the point:
Sl st in 1, sc in 2, hdc in 3, dc in 4, tr in 7, dc in 2, hdc in 1. (20)
Work 5 sc in the final chain.
Continue along the opposite side of the foundation chain:
Hdc in 1, dc in 2, tr in 7, dc in 4, hdc in 3, sc in 2, sl st in 1. (20)
Fasten off with a 35 cm tail.
Each leaf contains 45 stitches: 20 + 5 + 20.
Leaf Vein
Join ivory yarn at the base of one leaf.
Surface slip stitch along the exposed foundation-chain ridge.
Stop approximately 1.5 cm before the pointed tip.
Fasten off without tightening the vein.
Repeat on all eight leaves.
Small Pointed Leaf — Make 4
Ch 14.
Starting in the second chain, work across the next 12 chains, leaving the final chain for the tip:
Sl st in 1, sc in 2, hdc in 2, dc in 3, tr in 2, dc in 1, hdc in 1. (12)
Work 5 sc in the final chain.
Mirror the 12-stitch sequence along the opposite side.
Fasten off.
Each smaller leaf contains 29 stitches.
Curly Tendril — Make 4
Yarn: ivory #5 bulky. Hook: 5 mm.
Ch 31.
Starting in the second chain, work 3 sc in each chain across.
The increased stitch density forces the strip into a spiral.
Fasten off with a 30 cm tail.
For a shorter tendril, use Ch 21 and work the same three-sc-per-chain formula.
Tall Curved Stem
The reference stem is much taller than a standard pumpkin stalk and bends near its upper third.
Yarn: ivory #5 bulky. Hook: 5 mm.
R1: 6 sc in MR. (6)
R2: Inc ×6. (12)
R3: BLO sc around. (12)
R4: Sc around. (12)
R5: Sc around. (12)
R6: BLO sc around. (12)
R7: Sc around. (12)
R8: Sc around. (12)
R9: BLO sc around. (12)
R10: Sc around. (12)
R11: Sc around. (12)
R12: BLO sc around. (12)
Begin the curve.
R13: Sc in next 3, hdc in next 6, sc in final 3. (12)
R14: Sc around. (12)
R15: Sc in next 3, hdc in next 6, sc in final 3. (12)
R16: Sc around. (12)
R17: Sc in next 2, hdc in next 6, sc in final 4. (12)
R18: Sc around. (12)
R19: (Sc, dec) ×4. (8)
R20: Sc around. (8)
R21: Dec ×4. (4)
Fasten off and close the tip.
Target visible stem length is approximately 16–18 cm.
Stem Texture
Join a separate ivory strand at the stem base.
Surface slip stitch upward in an irregular spiral, occasionally crossing one round before returning to the previous column.
Keep the surface stitches loose.
The additional ridges reproduce the heavily textured appearance of the reference without altering the stem’s structural stitch count.
Stuff and Bend the Stem
Stuff Rounds 1–12 firmly.
Use progressively less fiberfill from R13 upward.
Bend the upper third while stuffing so the hdc sections remain on the outside of the curve.
For an all-textile stem, take two concealed stitches through the inside of the bend to hold approximately a 35-degree curve.
A wire core is unnecessary for a decorative pumpkin if the lower stem is packed firmly and the bend is secured with yarn.
Attach the Stem
Insert approximately 3 cm of the lower stem into the crown opening.
Sew around its 12-stitch base.
Take eight additional reinforcing stitches from the stem base into the eight pumpkin lobes.
Check the bend from the front before knotting.
The curved section should lean over the center rather than away from the pumpkin.
Arrange the Crown Foliage
Pin four large leaves around the stem first at roughly 12, 3, 6, and 9 o’clock.
Add the remaining four large leaves between them.
Position the four smaller leaves closer to the stem.
Allow approximately 5–7 cm of each large leaf to extend over the pumpkin shoulder.
Sew the lower third of every leaf firmly.
Leave the outer two thirds free so the points retain dimension.
Add the Crown Flowers
Place the large layered flower at the front of the stem base.
Position two medium flowers on each side and slightly behind it.
Sew the large flower through its center at six attachment points.
Secure each medium flower at three points around its center.
Do not stitch through the outer petal tips.
If craft pearls are being used, attach them individually with strong sewing thread after all crochet assembly is complete.
Add the Tendrils
Place one tendril on each side of the large central flower.
Allow the remaining two to emerge between the back leaves.
Sew only the first 3–4 cm of each spiral to the crown.
Leave the remaining curls loose.
The longest tendril can descend approximately 10–12 cm over one lobe, matching the cascading detail visible in the photograph.
Assembly
- Crochet the 21-stitch ivory body rectangle to 54 rows, then confirm approximately 25–27 cm height and 74–78 cm length before joining the short edges.
- Slip stitch the two short edges together across all 21 positions, gather the bottom through 27 evenly distributed row-end points, and secure the closure inside.
- Stuff the body from its outer wall toward the center, keeping an approximately 8 cm central core softer, then gather the crown to a 3 cm opening.
- Install four long sculpting strands through opposite sides of the pumpkin to create exactly eight valleys, adjusting the finished body to approximately 30–32 cm wide.
- Make three seven-flower bobble strips and sew them vertically onto three front-facing lobes without crossing any sculpting channel.
- Crochet eight large leaves, four small leaves, one large layered flower, four medium flowers, and four spiral tendrils, blocking only the leaves before assembly.
- Crochet the 21-round curved stem, stuff its lower 12 rounds firmly, shape the upper section to approximately a 35-degree bend, and add irregular surface slip-stitch texture.
- Insert 3 cm of the stem into the crown, secure its base to all eight lobe sections, and arrange the 12 leaves around it with their outer points left free.
- Sew the large flower at the front of the stem, distribute the four medium flowers around it, and attach the four tendrils beneath the floral cluster.
- Weave every tail into the stuffed body, reshape the eight lobes, lift the bobble petals and leaf tips, and check that the finished pumpkin stands flat without pressure on the crown decorations.
The finished reconstruction has eight ivory lobes, three raised floral trails, twelve pointed leaves, five crown flowers, four tendrils, and one tall curved textured stem.
7 Technical Tips
- The pumpkin becomes a rigid ball: stop stuffing while the center still compresses approximately 3 cm under firm hand pressure. An overfilled 30 cm body cannot form the 2–3 cm sculpted valleys visible in the reference.
- The bottom rocks on the table: keep fiberfill away from the exact center of the gathered base and press a shallow 5 cm indentation into it. A hard central mound makes a large pumpkin balance on its closure instead of its lobes.
- The bobble trails twist: pin each 28-stitch foundation strip at the top, center, and bottom before sewing. A lateral displacement of 1–2 cm becomes conspicuous because the flowers are supposed to follow one lobe vertically.
- The sculpting cord crushes the flowers: complete all eight body valleys before attaching any floral strip. The cord should remain entirely inside the recessed channels and never cross an applied bobble.
- The leaves curl into cups: stop each surface-crochet vein approximately 1.5 cm before its point. Shortening the center ridge by even 5 mm pulls the outer stitches inward.
- The tall stem falls sideways: insert at least 3 cm into the crown and secure its base at eight points around the pumpkin. Keep the lower 10–12 cm densely stuffed and place the bend only in the upper section.
- The crown becomes visually crowded: maintain approximately 2 cm between the centers of neighboring medium flowers and leave at least half of each large leaf visible. Overlapping every element hides the radial foliage structure shown in the reference.
Why a Large Ribbed Rectangle Fits This Pumpkin
The body in the photograph is much larger than a conventional amigurumi sphere. More importantly, the visible stitch direction follows the lobes vertically.
A BLO rectangle addresses both requirements. Its row ridges rotate into vertical lines when the rectangle becomes a tube, while the rectangle length supplies enough circumference for a 30-plus-centimeter stuffed form.
The Unraveled Mitten uses the same broad construction logic for its three published chunky pumpkin sizes: work in rows, seam the rectangle, cinch the ends, stuff, and segment. Its large version begins with a 10 × 22 inch rectangle and produces a pumpkin approximately 9 inches wide. The larger measured rectangle in this reconstruction accounts for the larger photo-inspired target.
Published Large-Pumpkin Benchmarks
The Unraveled Mitten specifies Lion Brand Wool-Ease Thick & Quick or another #6 super-bulky yarn, a 9 mm hook, and approximately 141 yards for its large pumpkin. Its published large rectangle measures approximately 10 × 22 inches, with a finished pumpkin around 5 inches high × 9 inches wide.
Nicole Riley’s published Large Pumpkin uses bulky Knit Picks Brava, a 5 mm hook, and approximately 200–250 yards / 183–229 m. Ravelry lists its finished measurement at approximately 6.5 × 9 inches.
Published Textured-Pumpkin Benchmark
Jen Hayes’ Fall Harvest Pumpkins are specifically designed around surface texture. Ravelry describes the collection as using camel and bobble stitches in different combinations; the large version incorporates consistent rows of bobbles and camel-stitch cables.
That benchmark is relevant to the photographed decoration because it confirms that raised bobble work can function as a primary pumpkin texture rather than only as a small appliqué. The reconstruction here keeps the bobbles on separate vertical foundations so the large body can be sculpted first.
Published Leaf Benchmark
GoldenLucyCrafts’ Pumpkin Leaf Applique uses medium #4 cotton yarn and a 5 mm hook. Its published finished measurement is approximately 3.5 inches including the stem.
The crown leaves in this reconstruction are intentionally larger. The 22-chain leaf is designed to extend across the shoulder of a pumpkin exceeding 30 cm in diameter, while the 14-chain version fills smaller gaps around the stem.
Published Ribbed-Pumpkin Gauge Benchmark
Handy Little Me’s ribbed crochet pumpkin is worked flat in back-loop single crochet before being seamed and gathered. Its published rectangle measures approximately 5 × 8 inches, and the listed ribbing gauge is approximately 6.6 stitches × 8 rows per 10 cm.
That pattern produces a pumpkin around 13 inches in circumference × 6 inches high. The difference between that compact example and this reconstruction illustrates why the photographed centerpiece requires a much longer starting rectangle.
Changing the Pumpkin Size
For a smaller pumpkin, reduce both dimensions of the body rectangle rather than simply removing stuffing.
A medium version can target approximately 19–21 cm high × 55–60 cm long. Retain the eight-lobe sculpting method but shorten each floral trail to five flowers.
For a larger version, increase the rectangle length first. Adding height without adequate circumference produces a tall cylinder rather than the broad shape in the photograph.
Keep the finished rectangle length approximately 2.8–3 times its height as a practical starting proportion, then confirm the result with your yarn and stuffing density.
Making the Pumpkin Without Pearls
The pearl centers are decorative rather than structural.
Replace them with a small crocheted center if the pumpkin will be handled frequently.
Make 6 sc in MR, fasten off, and sew the resulting disc over the large flower center.
For additional texture, work one small bobble into each of the six center stitches before fastening off.
This creates an entirely textile topper without loose hard components.
Making a Simpler Version
Keep the same eight-lobe body and stem but omit two floral trails, six large leaves, two small leaves, and three medium crown flowers.
Use one bobble trail on the front lobe, one large crown flower, two large leaves, two small leaves, and two tendrils.
The structural body pattern remains unchanged.
This reduction is useful when the selected super-bulky yarn already has substantial texture and the decorative elements would otherwise obscure the ribs.
Yarn Planning
Crochet the first ten body rows and weigh them before committing to the full project.
Multiply that weight by 5.4 to estimate the 54-row body. Add approximately 12% for the seam, gauge variation, gathering, and swatching.
Weigh one completed large leaf and multiply by eight. Repeat the process for one small leaf, one medium flower, and one bobble trail.
This component-based method is more dependable than borrowing yardage from a published 9-inch pumpkin because the reconstruction includes considerably more body fabric and a large botanical topper.
Blocking and Care
Block the leaves and flat petal rings before attaching them. Do not block the stuffed pumpkin body or rolled dimensional elements.
Follow the washing instructions for the selected yarn. If craft pearls are used, hand cleaning or careful spot cleaning reduces stress on their attachment thread.
After washing, support the body from underneath rather than lifting it by the stem. Reshape the eight channels while the yarn is damp.
Store the pumpkin upright with nothing resting on the stem or flower cluster. Long-term compression can flatten the bobble flowers and create permanent folds in the pointed leaves.
Sources
The Unraveled Mitten — Chunky Crochet Pumpkin Pattern — verified #6 super-bulky yarn, 9 mm hook, 141-yard large size, 10 × 22 inch starting rectangle, and rectangle-to-tube construction.
Ravelry — Large Pumpkin by Nicole Riley — bulky yarn, 5 mm hook, 200–250 yards, and approximately 6.5 × 9 inch finished dimensions.
Ravelry — Fall Harvest Pumpkins by Jen Hayes — textured pumpkin reference incorporating bobble and camel-stitch cable details.
Ravelry — Pumpkin Leaf Applique by GoldenLucyCrafts — worsted cotton, 5 mm hook, and approximately 3.5 inch published finished size.
Handy Little Me — Crochet Pumpkin Pattern — ribbed rectangle construction, published 5 × 8 inch rectangle, gauge, and finished pumpkin dimensions.
Oombawka Design Crochet — Last Minute Crochet Pumpkins — super-bulky Wool-Ease Thick & Quick benchmark with published yarn consumption and finished measurements.
Conclusion
The measured body rectangle controls the scale, while the four sculpting strands determine whether the finished form reads as eight broad pumpkin lobes or a stuffed cylinder. Crochet the 21-stitch body first, confirm a relaxed 74–78 cm length, and complete all sculpting before attaching a single bobble flower. Build the botanical crown only after the stem is secure so its leaves can be positioned around the actual curve. Your next step is a body-gauge swatch with the selected #6 yarn. Save this large white crochet pumpkin pattern with bobble flowers to Pinterest or share the finished centerpiece on Instagram with #IvoryFloralPumpkin. Would you keep all three cascading bobble-flower trails or place them on every second lobe?









