Introduction
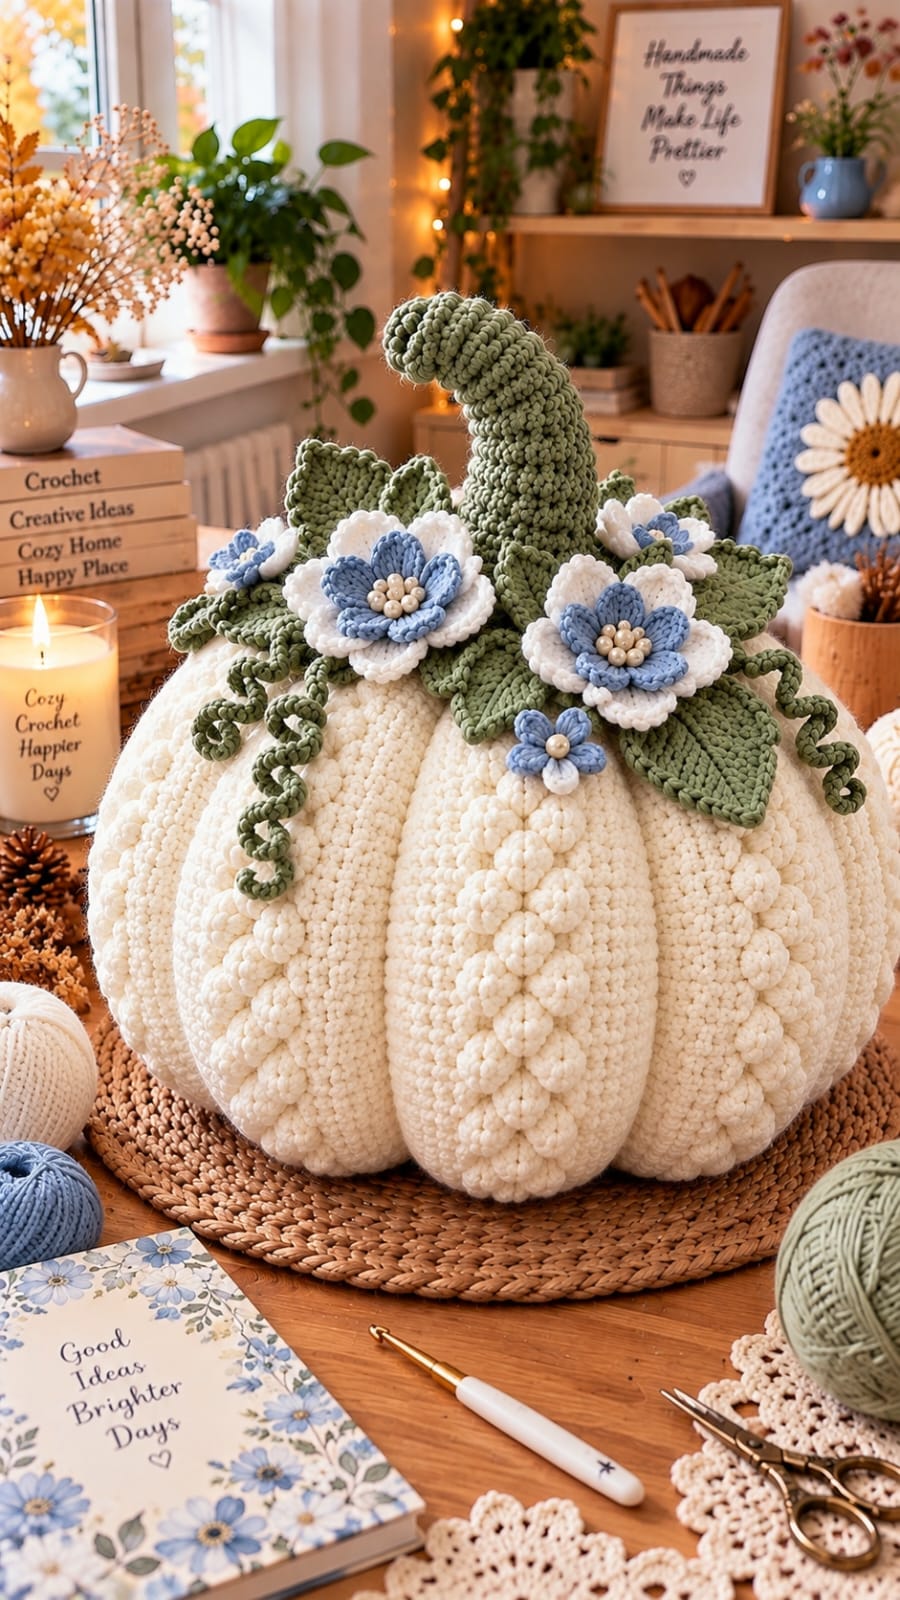
Powder-blue flower centers and long sage spirals make this ivory pumpkin structurally different from a standard ribbed fall gourd. This large white crochet pumpkin pattern with blue flowers uses #6 super-bulky yarn, an 8 mm body hook, sculpting cord, bobble-flower trails, layered blossoms, leaves, tendrils, and a curved stem. The intermediate reconstruction targets approximately 31–33 cm wide for a substantial tabletop centerpiece.
The instructions below are an original photo-inspired reconstruction based on visible structure; published patterns cited later are used only for sizing, gauge, and material benchmarks.
The Design: What Makes This Floral Pumpkin Different
The photograph combines an oversized eight-lobe body with decoration concentrated in two zones. Vertical ivory bobble trails follow selected lobes, reinforcing the pumpkin’s height without interfering with its sculpted valleys. At the crown, broad sage leaves create a radial foundation beneath layered white-and-blue flowers, while long spiral tendrils break the otherwise symmetrical outline. The tall sage stem curves forward rather than standing vertically, so its lower section needs considerably more support than the tip. A measured ribbed rectangle forms the body because circumference, not conventional amigurumi stitch count, controls a pumpkin exceeding 30 cm across. This floral crochet pumpkin should remain compressible after stuffing. The common mistake with a large decorative crochet pumpkin is overfilling the central core, which prevents deep channels from forming when the sculpting strands are tightened.
Project Info at a Glance
| Skill Level | Time | Finished Size | Hook | Best For |
|---|---|---|---|---|
| Intermediate | Reconstruction estimate: 10–14 hours | Reconstruction target: 31–33 cm wide × 28–30 cm body | 8 mm body; 5 mm details | Large tabletop, hearth, entryway, and autumn displays |
Published chunky-pumpkin benchmarks support the material scale. The Unraveled Mitten uses #6 super-bulky yarn and a 9 mm hook for pumpkins up to approximately 9 inches wide. Louise Bollanos likewise specifies super-bulky yarn, a 9 mm hook, and a gauge of 6.6 stitches × 8 rows per 4 inches. Nicole Riley’s bulky-yarn Large Pumpkin measures approximately 9 inches wide × 6.5 inches high with a 5 mm hook. The reconstruction is intentionally larger than those published examples.
Materials and Tools
Yarn
- Warm ivory — #6 super bulky — reconstruction estimate: 430–520 g for the pumpkin body
- Warm ivory — #5 bulky — reconstruction estimate: 100–140 g for flower petals and bobble trails
- Sage green — #5 bulky — reconstruction estimate: 150–190 g for stem, leaves, and tendrils
- Dusty powder blue — #4 or #5 yarn — reconstruction estimate: 35–50 g for flower centers and small blossoms
A structured super-bulky yarn gives the body clearer vertical ribbing than very slippery chenille. Published pumpkin patterns demonstrate considerable yarn variation: Oombawka Design’s super-bulky large pumpkin uses approximately 96 g / 60 yards, while Nicole Riley’s 9-inch bulky pumpkin uses 200–250 yards. Because this reconstruction is both larger and heavily decorated, the quantities above are project estimates rather than transferred published yardages.
Tools
- 8 mm crochet hook for body
- 5 mm crochet hook for stem, flowers, leaves, tendrils, and bobbles
- Polyester fiberfill — reconstruction estimate: 700–950 g
- Strong ivory yarn or cotton cord for sculpting
- Large tapestry needle
- Long upholstery needle
- Locking stitch markers
- 10–12 mm craft pearls — optional; approximately 18–24
- Scissors
- Measuring tape
Abbreviations
- MR — magic ring
- ch — chain
- sc — single crochet
- hdc — half double crochet
- dc — double crochet
- tr — treble crochet
- sl st — slip stitch
- BLO — back loop only
- inc — two stitches in one stitch
- dec — decrease
- st/sts — stitch/stitches
An invisible decrease is worked through the front loops of the next two stitches before completing one single crochet; this reconstruction uses it in the stem rather than the rectangular body.
Body Gauge and Construction
Target approximately 8 hdc × 7 rows = 10 cm in BLO ribbing with the 8 mm hook.
The finished body rectangle should measure approximately 25–27 cm high × 78–82 cm long without stretching. Measurement controls the final size more reliably than row count because #6 yarns differ substantially in diameter.
A circumference near 80 cm corresponds to a nominal circular diameter around 25.5 cm before stuffing changes the cross-section. Fiberfill pushes the flexible tube outward, while the gathered ends and eight sculpting channels redistribute the fabric into broad lobes. Target the finished stuffed measurement rather than assuming the unstuffed tube remains geometrically circular.
Pattern — Step by Step
Large Ivory Pumpkin Body
Yarn: warm ivory #6 super bulky. Hook: 8 mm.
Ch 22.
Row 1: Hdc in second ch from hook and across. (21)
Row 2: Ch 1, turn. Hdc BLO across. (21)
Rows 3–56: Repeat Row 2. (21)
Measure the relaxed rectangle.
If it measures less than 78 cm long, continue in pairs of rows until it reaches 78–82 cm. If it exceeds 82 cm substantially, remove rows in pairs.
Fasten off only after the length check.
Join the Body
Bring Row 56 and the foundation edge together with right sides facing.
Join yarn.
Sl st through one loop from the final row and the corresponding foundation loop across all 21 positions.
Fasten off with a 120 cm tail.
Turn the seam to the inside.
Gather the Base
Thread doubled ivory yarn through the upholstery needle.
Work through every second row-end around the lower opening.
With 56 rows, use approximately 28 evenly spaced gathering points.
Pull the opening closed gradually.
Pass through the center three times, knot firmly, and bury the ends inside.
Stuff the Body
Push fiberfill against the outer wall first.
Work around the entire circumference before filling the center.
Pack the lower third moderately firmly, then fill the equator.
Leave a vertical central core approximately 8–9 cm across noticeably softer.
The body should still compress by approximately 3 cm when squeezed firmly from opposite sides.
Gather the Crown
Run doubled ivory yarn through approximately 28 evenly spaced row-end points around the top.
Pull until the center opening measures approximately 3 cm.
Knot securely.
Do not close the hole completely because the sage stem will be inserted here.
Create Eight Deep Lobes
Cut four lengths of strong ivory sculpting yarn approximately 180 cm each.
Thread the first through the bottom center, carry it externally through a rib valley, pass into the crown opening, and return down the opposite side.
Pull until both channels sink approximately 2.5 cm.
Knot underneath.
Install the second strand at 90 degrees to the first.
Position the third and fourth strands halfway between the existing channels.
The result is exactly eight lobes.
Adjust all four strands in small increments until the body reaches approximately 31–33 cm across and the valleys have similar depth.
Ivory Bobble Flower Trail — Make 3
The photograph places raised ivory blossoms vertically on selected lobes rather than around the entire pumpkin.
Yarn: ivory #5 bulky. Hook: 5 mm.
Ch 29.
Row 1: Sc in second ch from hook and across. (28)
Fasten off with a 50 cm tail.
Divide the 28-stitch foundation into seven groups of four stitches.
Four-Petal Bobble
For each four-stitch group, make one bobble at the upper side of the first stitch and one at the upper side of the third stitch.
Rotate the foundation.
Make a matching bobble into the lower side of those same two positions.
Secure the four clusters around the foundation with small slip stitches.
Repeat across all seven groups.
Each trail contains exactly seven four-petal bobble flowers.
Bobble Stitch
Yarn over and insert the hook into the indicated position.
Pull up a loop, yarn over, and pull through two loops.
Repeat the partial double crochet four more times into the same position.
Yarn over and pull through every remaining loop.
Ch 1 to close the cluster.
Attach the Bobble Trails
Pin one trail down the center of the front lobe.
Place the other two approximately two lobes to either side.
Keep the upper flower approximately 6 cm below the crown decorations.
Position the final flower approximately 4–5 cm above the base.
Sew through the concealed foundation only.
Do not flatten the bobbles with the sewing yarn.
Large Sage Leaf — Make 7
Yarn: sage #5 bulky. Hook: 5 mm.
Ch 22.
Starting in the second chain, work across the next 20 chains while leaving the final chain unused for the turning point:
Sl st in 1, sc in 2, hdc in 3, dc in 4, tr in 7, dc in 2, hdc in 1. (20)
Work 5 sc into the final chain.
Continue along the opposite side:
Hdc in 1, dc in 2, tr in 7, dc in 4, hdc in 3, sc in 2, sl st in 1. (20)
Fasten off with a 40 cm tail.
Each large leaf contains 45 stitches: 20 + 5 + 20.
Medium Sage Leaf — Make 5
Ch 14.
Starting in the second chain, work across the next 12 chains, retaining the final chain for the point:
Sl st in 1, sc in 2, hdc in 2, dc in 3, tr in 2, dc in 1, hdc in 1. (12)
Work 5 sc into the final chain.
Mirror the 12-stitch sequence along the opposite side.
Fasten off.
Each medium leaf contains 29 stitches: 12 + 5 + 12.
Leaf Veins
Join sage yarn at the base of each leaf.
Surface slip stitch along the exposed foundation ridge.
Stop approximately 1.5 cm before the tip.
Fasten off without pulling the vein shorter than the leaf.
Block the leaves flat before assembly.
Large White-and-Blue Flower — Make 3
The dominant flowers show broad ivory outer petals, dusty-blue inner petals, and a pale central cluster.
Ivory Outer Petal Ring
Hook: 5 mm.
Ch 4 and join into a ring.
R1: 10 sc in ring. (10)
R2: *Sl st in next st, (ch 6, 3 dc, 3 tr, 3 dc, ch 6, sl st) in next st* ×5.
Fasten off with a 40 cm tail.
Five large ivory petals are complete.
Blue Inner Petal Ring
With dusty blue, ch 4 and join.
R1: 10 sc in ring. (10)
R2: *Sl st in next st, (ch 4, 4 dc, ch 4, sl st) in next st* ×5.
Fasten off.
Five smaller blue petals are complete.
Flower Center
With ivory, 6 sc in MR. (6)
R2: Inc ×6. (12)
Fasten off.
Stack the blue petal ring over the ivory petal ring.
Place the 12-stitch center over both.
Sew through the three center layers at six evenly spaced points.
Optional: attach five or six craft pearls individually over the center disc.
Small Blue-and-White Flower — Make 4
With dusty blue:
R1: 10 sc in MR. (10)
R2: *Sl st in next st, (ch 3, 3 dc, ch 3, sl st) in next st* ×5.
Fasten off.
With ivory, make a second identical five-petal flower.
Stack the blue flower over the ivory flower, rotating it approximately 36 degrees so the ivory petals remain visible between the blue ones.
Sew through the center.
Add one optional pearl or one small ivory bobble to the center.
Sage Spiral Tendril — Make 5
Yarn: sage. Hook: 5 mm.
Ch 36.
Starting in the second chain, work 3 sc in every chain.
The dense increase causes the strip to curl naturally.
Fasten off with a 30 cm tail.
For variation, make two of the five tendrils with Ch 26 instead.
Do not block the spirals.
Tall Curved Sage Stem
Yarn: sage #5 bulky. Hook: 5 mm.
R1: 6 sc in MR. (6)
R2: Inc ×6. (12)
R3: BLO sc around. (12)
R4: Sc around. (12)
R5: Sc around. (12)
R6: BLO sc around. (12)
R7: Sc around. (12)
R8: Sc around. (12)
R9: BLO sc around. (12)
R10: Sc around. (12)
R11: Sc around. (12)
R12: BLO sc around. (12)
R13: Sc around. (12)
R14: Sc around. (12)
Begin the forward bend.
R15: Sc in next 3, hdc in next 6, sc in final 3. (12)
R16: Sc around. (12)
R17: Sc in next 3, hdc in next 6, sc in final 3. (12)
R18: Sc around. (12)
R19: Sc in next 2, hdc in next 6, sc in final 4. (12)
R20: Sc around. (12)
R21: (Sc, dec) ×4. (8)
R22: Sc around. (8)
R23: Dec ×4. (4)
Fasten off and close the tip.
Target visible length: approximately 18–20 cm.
Stem Surface Texture
Join sage yarn at the base.
Surface slip stitch upward in an irregular spiral.
Cross between neighboring columns occasionally rather than following one perfectly straight path.
Stop approximately 2 cm before the tip.
Fasten off.
The additional surface work thickens the stem visually without changing its structural circumference.
Shape and Stuff the Stem
Stuff Rounds 1–14 firmly.
Reduce the fiberfill through the curved upper section.
Shape the hdc side as the outside of the bend.
Target approximately a 35–40-degree forward curve.
Take two concealed sage stitches through the inside of the curve if the stem springs upright.
Attach the Stem
Insert approximately 3 cm of the stem into the pumpkin’s crown opening.
Sew the 12-stitch base securely to the gathered body.
Add one reinforcing stitch into each of the eight lobe sections.
Test the pumpkin upright before fastening off.
The stem base should remain vertical even though its upper section bends strongly forward.
Arrange the Sage Leaves
Place four large leaves around the stem at the main compass points.
Add three remaining large leaves between them.
Use the five medium leaves to fill the inner crown and spaces beneath flowers.
Allow the longest leaves to extend approximately 7–9 cm over the pumpkin shoulder.
Sew only the lower third of each leaf.
Leave the pointed ends unattached.
Arrange the Flowers
Position one large white-and-blue flower directly in front of the stem.
Place the remaining two large flowers to its left and right, slightly farther back.
Distribute the four smaller flowers through the remaining crown spaces.
Sew each large flower through its center at six points.
Attach each small flower through three center points.
Leave every outer petal free.
Attach the Tendrils
Place the three longest sage spirals at the front-left, front-right, and side of the crown.
Position the two shorter tendrils toward the back.
Sew only the first 3 cm of each spiral.
Allow the longest tendril to descend approximately 14–16 cm over a front lobe.
Keep the spirals out of the sculpted valleys so their curls remain visible.
Assembly
- Crochet the ivory body to 56 rows, then measure the relaxed rectangle and add paired rows if necessary to reach the 78–82 cm length target.
- Join the short ends across all 21 positions, gather the base through approximately 28 evenly distributed row-end points, and secure the center from inside.
- Stuff the outer wall before the central core, leaving the center approximately 8–9 cm across softer than the lobes, then gather the crown to a 3 cm opening.
- Install four opposing sculpting strands to create exactly eight valleys and adjust them incrementally until the stuffed body measures approximately 31–33 cm across.
- Crochet three seven-flower ivory bobble trails and sew them onto selected front lobes, keeping every hidden foundation strip centered between sculpting valleys.
- Make seven large sage leaves, five medium leaves, three large layered flowers, four small layered flowers, and five spiral tendrils before beginning crown assembly.
- Crochet and stuff the 23-round sage stem, form its 35–40-degree upper bend, add irregular surface slip-stitch texture, and insert 3 cm into the crown.
- Sew the stem to all eight lobe sections, arrange the 12 leaves radially around its base, and secure only the lower third of each leaf.
- Attach the three large flowers and four smaller blossoms over the leaf bases, then sew the five tendrils beneath the flowers with their curls left free.
- Weave all yarn tails into the stuffed body, reshape the eight lobes, lift every flower petal and leaf point, and adjust the base until the pumpkin stands without rocking.
The finished reconstruction has eight ivory lobes, three vertical bobble-flower trails, twelve sage leaves, seven layered flowers, five curled tendrils, and a tall forward-curving sage stem.
7 Technical Tips
- The eight lobes remain shallow: the stuffed body should compress approximately 3 cm before the sculpting strands are installed. A rigid center prevents the cord from producing 2–3 cm valleys.
- The pumpkin rocks after assembly: leave a shallow 5–6 cm depression around the lower gathering point. Dense stuffing directly beneath that point creates a rounded base instead of a stable footprint.
- The bobble trails wander sideways: pin each 28-stitch foundation at its first stitch, midpoint, and final stitch before sewing. Keep the complete strip within approximately 1 cm of the lobe centerline.
- The large leaves cup inward: end each surface-crochet vein approximately 1.5 cm before the leaf point. A center vein pulled 5 mm shorter than the surrounding fabric can visibly distort a bulky leaf.
- The blue inner petals disappear: rotate the inner five-petal layer before sewing so each blue petal sits between two ivory edges. Attach only through the flower center rather than stitching the blue petals flat.
- The 18–20 cm stem falls at its base: keep the lower 14 rounds firmly stuffed and insert approximately 3 cm into the crown. Reinforcing the base at eight evenly distributed body points prevents the bend from transferring to the attachment seam.
- The spiral tendrils stretch into waves: work exactly three sc into each foundation chain and avoid blocking them afterward. Sewing more than the first 3 cm of a tendril suppresses the free coil visible in the reference.
Why the Body Uses a Ribbed Rectangle
The photograph shows stitches running vertically along the lobes. A rectangle worked in BLO creates horizontal ridges while flat, but those ridges become vertical after the short edges are joined into a tube.
The method also makes scale measurable before stuffing. That is important here because a 31–33 cm decorative pumpkin requires substantially more circumference than a palm-sized amigurumi body.
The Unraveled Mitten uses the same broad rectangle-to-tube construction for its chunky pumpkins: crochet a rectangle, seam it, cinch one opening, stuff the form, close the second opening, and add external shaping. Its largest published version finishes approximately 9 inches wide. This reconstruction increases the measured starting fabric to match the much larger photographed centerpiece.
Published Chunky Pumpkin Benchmarks
The Unraveled Mitten specifies #6 Lion Brand Wool-Ease Thick & Quick and a 9 mm hook. Published finished sizes are approximately 3 × 5 inches, 4 × 7 inches, and 5 × 9 inches for small, medium, and large. The pattern also describes external yarn wrapping to divide the stuffed form into segments. :contentReference[oaicite:0]{index=0}
Louise Bollanos’ Chunky Pumpkin specifies super-bulky yarn, a 9 mm hook, approximately 50–60 yards, and a gauge of 6.6 stitches × 8 rows per 4 inches. The Ravelry listing states that approximately 50 g of yarn is required per pumpkin. :contentReference[oaicite:1]{index=1}
Published Large Pumpkin Benchmark
Nicole Riley’s Large Pumpkin uses bulky Knit Picks Brava and a 5 mm hook. The published size is approximately 6.5 × 9 inches, with a listed requirement of 200–250 yards / 183–229 m. The design uses linked treble crochet rather than the ribbed construction used here. :contentReference[oaicite:2]{index=2}
Those figures also illustrate why yarn consumption cannot be predicted from diameter alone. Stitch height, yarn density, texture, and construction method all change the amount required.
Current Chunky-Yarn Benchmark
Bella Coco’s September 2026 Chestnut Falls Pumpkin tutorial uses Lion Brand Hue + Me, a #5 bulky yarn, with a 6 mm hook. The yarn is listed at 125 g / 125 m per ball, and the project is demonstrated in three sizes. The construction includes a flat foundation, folding, closing the base, stuffing, closing the top, pulling the top and bottom together, and attaching a separate stem. :contentReference[oaicite:3]{index=3}
That recent example reinforces the continued use of flat-to-stuffed construction for textured decorative pumpkins rather than requiring conventional spherical amigurumi shaping.
Super-Bulky Yarn Quantity Benchmark
Oombawka Design’s current Last Minute Crochet Pumpkins pattern uses Lion Brand Wool-Ease Thick & Quick #6. The published large pumpkin weighs approximately 96 g and uses about 60 yards / 55 m. The yarn itself is listed at 170 g and 106 yards per skein. :contentReference[oaicite:4]{index=4}
That project is considerably smaller than this reconstruction and does not include the extensive sage-and-blue crown. Its yarn quantity should therefore be treated as a material benchmark rather than a purchasing figure for this centerpiece.
Changing the Pumpkin Size
Resize the body by changing both rectangle dimensions.
For a medium pumpkin around 22–24 cm wide, target a rectangle approximately 20–21 cm high × 58–62 cm long. Shorten each bobble trail to five flowers and use five large leaves instead of seven.
For a pumpkin exceeding 35 cm, increase the circumference first. A rectangle around 88–94 cm long provides a better starting point than simply adding height.
Keep all four sculpting strands even. Unequal compression produces alternating narrow and wide lobes rather than the regular eight-section geometry in the photograph.
Making the Flowers Without Pearls
The hard centers are optional.
For an all-yarn version, make a small ivory bobble cluster over the 12-stitch flower center.
Join yarn to one stitch, work a bobble, sl st in the next stitch, and repeat around six times.
Fasten off underneath the flower.
The resulting center remains dimensional while keeping the decoration entirely textile.
Changing the Blue Accent
Dusty blue provides the clearest visual contrast against ivory and sage in the supplied photograph.
For a more autumn-specific palette, replace blue with muted rust, ochre, or dusty rose. Keep the ivory outer petals unchanged if you want the layered flower construction to remain obvious.
Do not substitute another green close to the stem color for every flower center. Low contrast causes the floral cluster to merge visually with the foliage.
Yarn Planning
Make and weigh the first 10 body rows.
Multiply that weight by 5.6 for a 56-row body, then add approximately 12% for the seam, gathering, sculpting, swatching, and gauge variation.
Weigh one finished large leaf and multiply by seven. Repeat for a medium leaf, large flower, small flower, tendril, and bobble trail.
Finally add approximately 10% to the combined detail-yarn figure. Component weighing is more dependable than scaling the yardage of a published 9-inch pumpkin to a highly decorated 32 cm centerpiece.
Blocking and Care
Block the sage leaves and flat petal rings before assembly. Do not block the stuffed body, stem, bobble trails, or spiral tendrils.
Follow the yarn manufacturer’s washing instructions. If craft pearls are attached, careful hand cleaning reduces strain on their sewing thread.
Support the pumpkin underneath whenever it is moved after washing. Never lift a saturated stuffed pumpkin by the stem.
Store upright without pressure on the crown. Long-term compression can flatten the blue petals, distort the leaf points, and remove the natural curl from the sage tendrils.
Sources
The Unraveled Mitten — Chunky Crochet Pumpkin Pattern — #6 super-bulky yarn, 9 mm hook, published 3 × 5, 4 × 7, and 5 × 9 inch sizes, plus rectangle-to-tube construction. :contentReference[oaicite:5]{index=5}
Ravelry — Chunky Pumpkin by Louise Bollanos — super-bulky yarn, 9 mm hook, 50–60 yards, approximately 50 g, and published gauge. :contentReference[oaicite:6]{index=6}
Ravelry — Large Pumpkin by Nicole Riley — bulky yarn, 5 mm hook, 200–250 yards, and approximately 6.5 × 9 inch finished dimensions. :contentReference[oaicite:7]{index=7}
AllFreeCrochet — Large Crochet Pumpkin Using Linked Crochet — 5 mm hook, bulky yarn, gauge, materials, and 9-inch-diameter benchmark. :contentReference[oaicite:8]{index=8}
Oombawka Design Crochet — Last Minute Crochet Pumpkins — #6 Wool-Ease Thick & Quick, 6.5/9 mm hooks, and published 96 g / 60 yard large-pumpkin material benchmark. :contentReference[oaicite:9]{index=9}
Crafting Each Day — Free Chunky Crochet Pumpkin — #6 super-bulky yarn, 9 mm hook, 30 yards, 8-stitch × 8-row gauge, and approximately 13-inch circumference. :contentReference[oaicite:10]{index=10}
Conclusion
The 78–82 cm body rectangle establishes the scale, but the final shape depends on keeping the center compressible enough for four sculpting strands to form eight deep valleys. Complete the pumpkin body first, adjust every lobe, and only then attach the three bobble trails and elaborate crown. The practical next step is a 20 cm BLO swatch in the selected #6 ivory yarn so the body dimensions can be checked before 56 rows are worked. Save this large white crochet pumpkin pattern with blue flowers to Pinterest or share the finished centerpiece on Instagram with #BlueSageFloralPumpkin. Would you keep all five cascading sage tendrils, or reduce the crown to two longer spirals?









