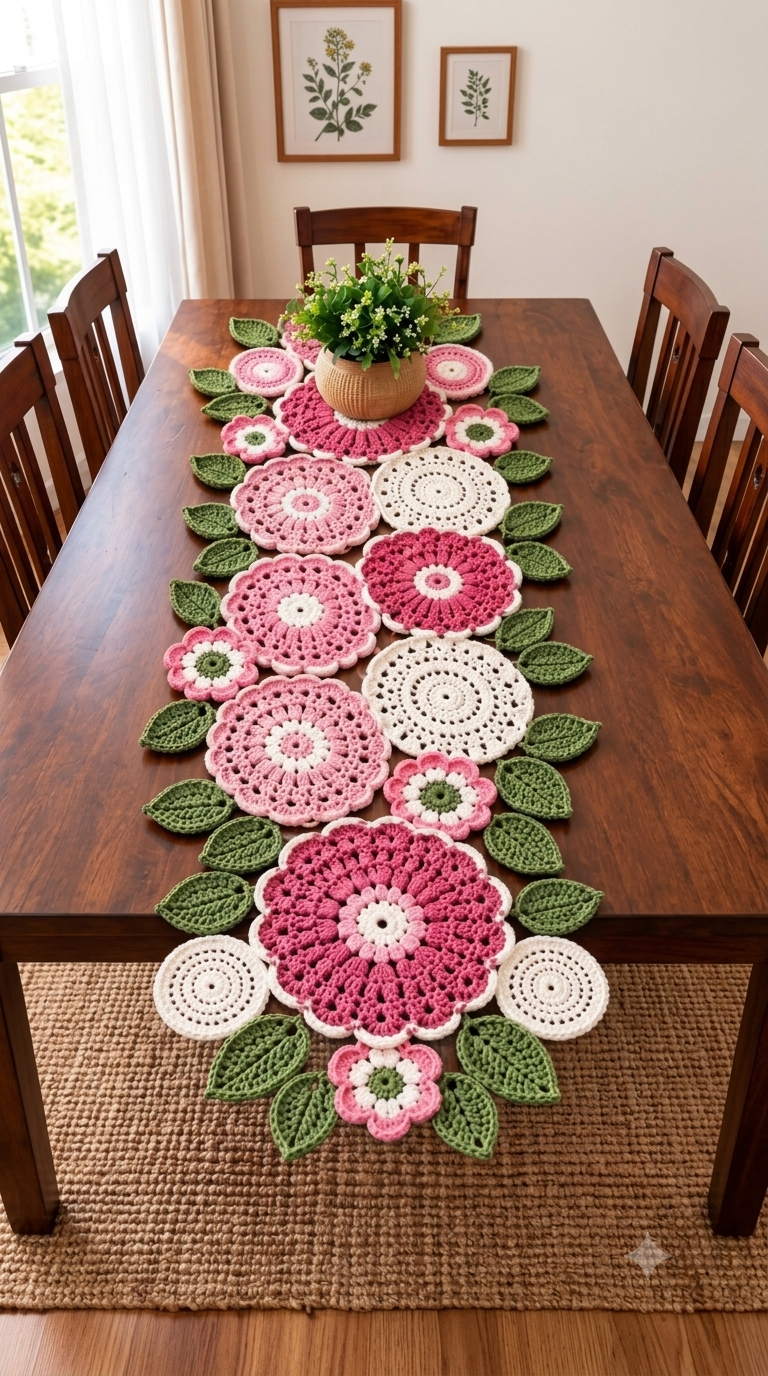
Thirty-plus pointed green leaves have to frame these pink medallions without turning the table runner into a shapeless vine. This crochet flower table runner pattern uses DK cotton, a 3.5 mm hook and modular motifs to target approximately 38 × 145 cm. Intermediate crochet skills are appropriate. Separate flowers and leaves also make the runner practical for using several coordinated partial skeins.
The Design: What Makes This Floral Runner Different
The photographed runner has no conventional rectangular foundation. Large pink and raspberry medallions create its central axis, while cream circles interrupt that color sequence and prevent the finished piece from becoming one solid strip.
Leaves perform a structural as well as decorative job. They project from both sides of the pink crochet table runner, filling gaps between circular motifs while preserving the irregular edge. Small flowers then cover selected transitions where larger components meet.
Scale is the third important decision. Large, medium and small circles prevent the crochet floral table runner from reading as a row of identical doilies. A common mistake is sewing every leaf on at the same angle. That produces a rigid herringbone border rather than the staggered botanical outline visible in the reference.
Project Info at a Glance
| Skill Level | Time | Finished Size | Hook | Best For |
|---|---|---|---|---|
| Intermediate | 14–20 hours | Approx. 38 × 145 cm | 3.5 mm | Dining tables, sideboards, long coffee tables |
The 38 × 145 cm measurement is the target for this photo-inspired reconstruction. Exact dimensions depend on yarn, tension, blocking and the number of motifs used.
Materials and Tools
Yarn
Use smooth cotton with enough stitch definition to hold the leaf points and scalloped edges.
- Dusty pink — DK cotton — approximately 90 g
- Raspberry pink — DK cotton — approximately 80 g
- Cream/ivory — DK cotton — approximately 80 g
- Olive green — DK cotton — approximately 90 g
- Optional pale pink — DK cotton — approximately 20 g for centers and edging
Allow approximately 300–350 g of yarn for a runner around 145 cm long. Actual consumption changes with gauge, motif diameter and the final number of leaves.
Tools
- 3.5 mm crochet hook
- Tapestry needle
- Sharp scissors
- Locking stitch markers
- Blocking mat
- Rust-resistant blocking pins
- Tape measure
Abbreviations
- MR — magic ring
- ch — chain
- sc — single crochet
- hdc — half double crochet
- dc — double crochet
- tr — treble crochet
- inc — 2 sc in one stitch
- sl st — slip stitch
- st/sts — stitch/stitches
- sp — space
- BLO — back loop only
An invisible decrease is designed primarily for shaped three-dimensional crochet and is not required for these flat floral motifs.
Crochet Flower Table Runner Pattern — Step by Step
Work the circular components in joined rounds unless a section states otherwise. Block the major motifs before final assembly so differences in diameter can be corrected before sewing.
Large Pink Medallion — Make 3
Yarn: raspberry or dusty pink.
R1: 6 sc in MR. (6)
R2: inc ×6. (12)
R3: (sc, inc) ×6. (18)
R4: (2 sc, inc) ×6. (24)
R5: (3 sc, inc) ×6. (30)
R6: (4 sc, inc) ×6. (36)
R7: (5 sc, inc) ×6. (42)
R8: Ch 1, sc in first st, *ch 3, skip 1 st, sc in next st* around. Adjust the final repeat at the join if required to keep the spaces evenly distributed.
R9: Sl st into first ch-3 sp. Work 5 dc into each ch-3 sp, placing sc at the anchoring points between shells.
R10: Join pale pink. Work sc across each shell, placing ch 2 between adjacent shells.
R11: Join cream. In each ch-2 sp work (sc, hdc, 3 dc, hdc, sc) to form the contrasting scalloped perimeter.
Block the motif flat. Target approximately 16–18 cm across.
Fasten off. Leave approximately 25 cm of yarn where the motif will be joined to its neighbor.
Large Pale Pink Medallion — Make 3
Yarn: pale or dusty pink with cream center.
R1: With cream, 6 sc in MR. (6)
R2: inc ×6. (12)
R3: Change to pale pink. (sc, inc) ×6. (18)
R4: (2 sc, inc) ×6. (24)
R5: (3 sc, inc) ×6. (30)
R6: (4 sc, inc) ×6. (36)
R7: (5 sc, inc) ×6. (42)
R8: *Ch 3, skip 1 st, sc in next st* around.
R9: Work (sc, hdc, 3 dc, hdc, sc) into each available ch-3 space.
R10: Join cream and sc around the perimeter. Place 2 sc at a petal peak when needed to keep the edge flat.
The pale medallions should finish close to the diameter of the raspberry motifs.
Fasten off. Leave a 25 cm joining tail.
Cream Lace Medallion — Make 4
Yarn: cream or ivory.
R1: 6 sc in MR. (6)
R2: inc ×6. (12)
R3: (sc, inc) ×6. (18)
R4: (2 sc, inc) ×6. (24)
R5: Ch 3, dc in next st, *ch 1, dc in next st* around.
R6: Ch 3, dc in each dc and each ch-1 sp around.
R7: *Sc in next dc, ch 3, skip next dc* around.
R8: Work 3 dc into every ch-3 sp.
R9: *Sc between adjacent 3-dc groups, ch 4* around.
R10: Work (sc, hdc, 3 dc, hdc, sc) into each ch-4 sp.
Fasten off and weave in the working end. A separate sewing strand can be used for assembly.
Small Accent Flower — Make 5
Yarn: cream, pink and olive green.
R1: With olive green, 6 sc in MR. (6)
R2: inc ×6. (12)
R3: Change to cream. *(Sl st, ch 3, 2 dc, ch 3, sl st) in next st; sl st in following st.* Repeat six times to create six compact petals.
R4: Join pink behind the cream petals. Work *(sc, hdc, 3 dc, hdc, sc)* around the outer side of each petal base to create the larger pink layer.
Fasten off. Leave a 20 cm tail for joining.
Pointed Crochet Leaf — Make 30–34
Yarn: olive green.
Row 1: Ch 11.
Starting in the second ch from hook, work: sl st, sc, hdc, dc in next 4 ch, hdc, sc, then 3 sc in the final ch.
Rotate the work and crochet along the unused loops on the opposite side of the foundation chain.
Work sc, hdc, dc in the next 4 foundation loops, hdc, sc, sl st. Join at the base.
Row 2: Ch 1. Sc evenly around the leaf edge. At the tip work (sc, ch 2, sc) to maintain a defined point.
Row 3: Sl st through the exposed center loops from the base toward the tip to create a raised central vein.
Fasten off. Leave a 20 cm tail for attachment.
Smaller Crochet Leaf — Make 6
Yarn: olive green.
Row 1: Ch 8.
Starting in the second ch from hook, work sl st, sc, hdc, dc in next 2 ch, hdc, sc. Work 3 sc into the terminal ch.
Continue along the opposite side with sc, hdc, dc in next 2 loops, hdc, sc, sl st.
Row 2: Sc around the perimeter, working (sc, ch 2, sc) at the tip.
Fasten off. Leave approximately 15 cm for sewing.
Use the smaller leaves around accent flowers and narrow spaces where a full-size leaf would make the table runner too wide.
Pink Center Disc — Make 3
Yarn: pale pink, cream and raspberry.
R1: With pale pink, 6 sc in MR. (6)
R2: inc ×6. (12)
R3: Change to cream. (sc, inc) ×6. (18)
R4: Change to raspberry. (2 sc, inc) ×6. (24)
Fasten off.
Use these small discs where extra center definition is required. Avoid adding one to every medallion because variation between the flower centers is part of the design.
How to Assemble the Crochet Flower Table Runner
- Block every large circular motif independently. Keep matching motif diameters within approximately 5 mm of each other.
- Arrange the raspberry, pale-pink and cream circles along a center line approximately 145 cm long. Alternate the colors instead of grouping all dark motifs together.
- Overlap neighboring medallions by approximately 15–25 mm. Sew through the back loops at the overlap to keep the connection less visible from the front.
- Position the small accent flowers in larger gaps between medallions. Attach each flower at three or four points.
- Position the first pair of green leaves diagonally outward beside a large flower. Keep the pointed ends beyond the circular edge.
- Add the remaining leaves in staggered pairs. Change their angles by approximately 10–25 degrees instead of creating two identical rows.
- Place smaller leaves around narrow gaps and small flowers. Check the runner width regularly and keep it near 38 cm.
- Turn the runner over and inspect every connection. Add a hidden tack anywhere a motif lifts more than approximately 10 mm from an adjoining component.
- Weave each joining tail through at least 3–4 cm of dense crochet on the reverse side. Change direction once before trimming the yarn.
- Wet-block the completed runner to approximately 38 × 145 cm. Pin the large medallions first, followed by every individual leaf point, and dry the runner flat.
The completed piece should form a stable botanical strip without requiring a separate rectangular crochet background.
7 Technical Tips for Better Results
- Control stitch-marker drift. Mark the first stitch of every circular round. A one-stitch shift repeated over several rounds can move the increase line and distort the medallion.
- Correct motif cupping before assembly. A circle that rises into a shallow bowl usually needs its expansion checked. Do not sew a badly cupped medallion into the runner and expect assembly to flatten it.
- Check leaf symmetry. Count the tall stitches on both sides of the foundation chain. A missing dc on one side can make the leaf twist after blocking.
- Keep overlaps controlled. Limit the overlap between major medallions to approximately 15–25 mm. Larger overlaps shorten the runner and produce thick raised sections.
- Pin before sewing. Arrange all major circles before permanently attaching the leaves. Adding leaves during freehand assembly can gradually push the finished width beyond the 38 cm target.
- Distribute the darkest pink. Place raspberry medallions at intervals rather than consecutively. Alternating cream and pale pink between darker flowers maintains the color pattern visible in the design.
- Secure every joining tail. Weave attachment tails through at least 3–4 cm of dense crochet and reverse direction once. Short straight tails can pull through during washing or reblocking.
Adjusting the Table Runner Length
The modular construction makes the length adjustable without changing the individual crochet motifs. For a shorter dining table, remove one large medallion and the associated leaves from the central sequence. For a longer table, add another large flower or cream medallion before completing the final leaf arrangement.
Measure the layout while the motifs are blocked but not yet joined. Because neighboring circles overlap by approximately 15–25 mm, adding a 17 cm flower does not necessarily add a full 17 cm to the finished runner.
Keep the width comparatively stable. Additional length should come from motifs added along the central axis rather than from larger leaves at the sides.
Blocking the Floral Motifs
Blocking is particularly important for this crochet flower table runner pattern because the design depends on circles and leaves maintaining different but controlled shapes.
Pin the large medallions to their target diameters first. Pull scallops outward individually rather than stretching the entire circle from only four points. For each leaf, secure the base, outer edges and pointed tip.
After individual blocking, assemble the runner and perform a second light blocking of the complete piece. Check the center line with a tape measure before it dries. The floral medallions should remain visually centered even though the leaf border is deliberately irregular.
Conclusion
Measure one blocked large flower before committing to the full runner. Its diameter determines how many medallions are required for your table and whether the leaf border can remain near the planned 38 cm width. Next, crochet one large flower, one small flower and two leaves as a gauge set; block them and test the overlap before producing duplicates. Save this crochet flower table runner pattern to Pinterest or share the completed layout on Instagram with #PinkBotanicalTableRunner. When changing the palette, retain a light neutral between repeated dark medallions. Which element would you change first: the raspberry flowers, cream lace circles or olive leaves?









