Introduction
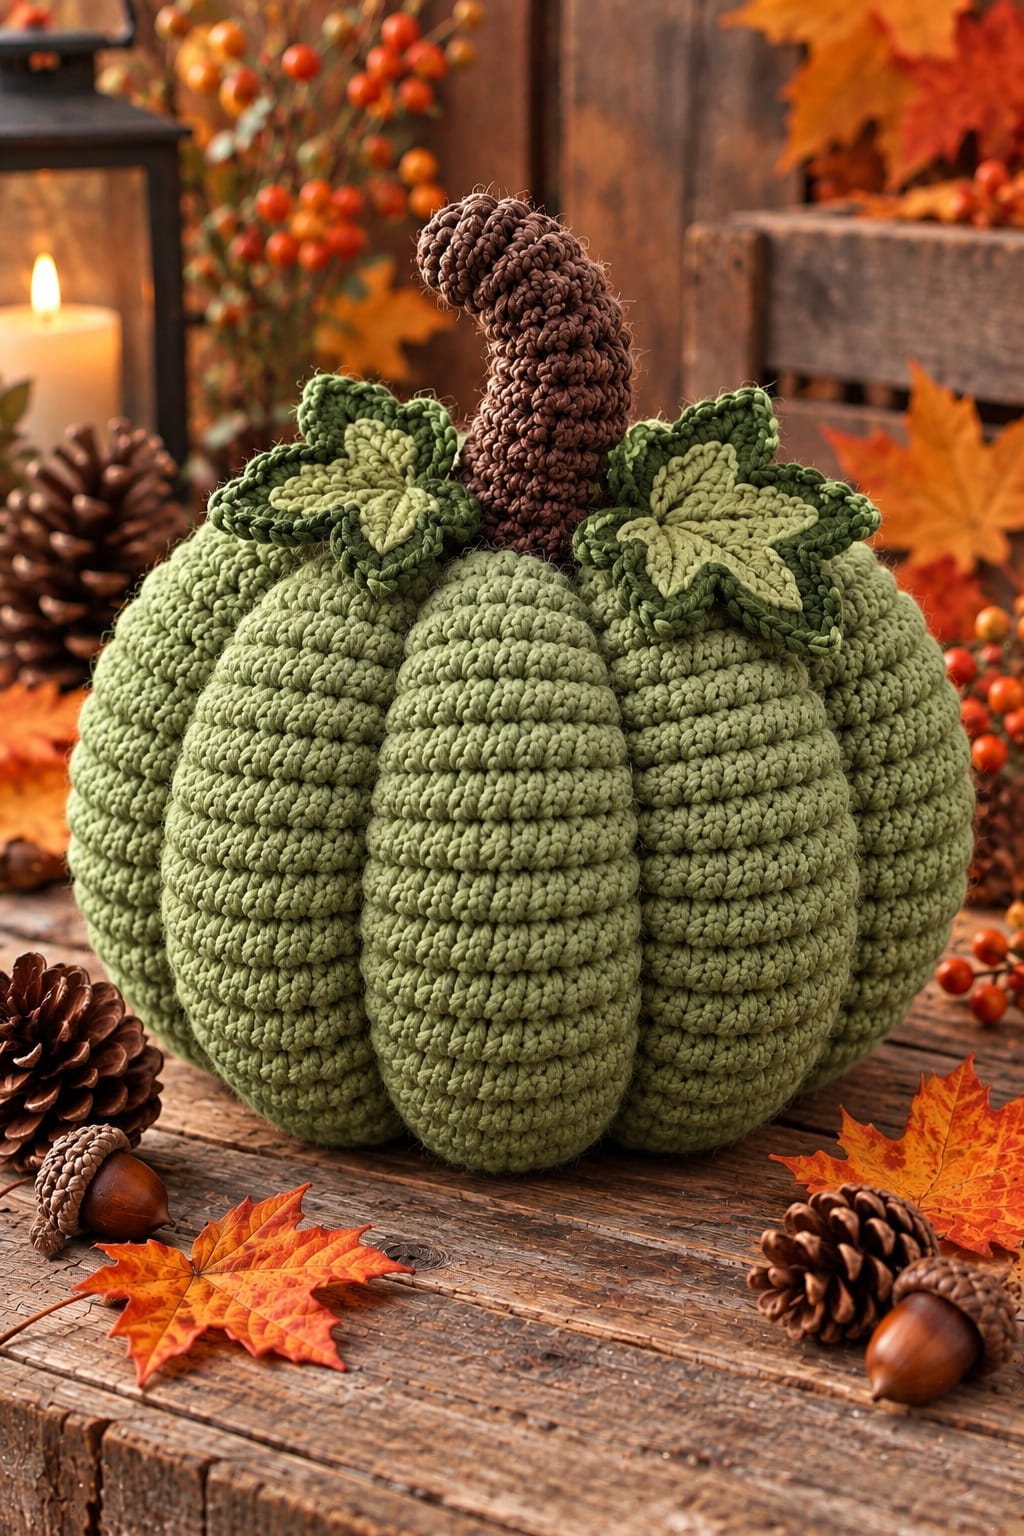
Eight oversized sage lobes rise beneath a hooked chocolate stem and two layered five-point leaves. This large sage green crochet pumpkin pattern uses super-bulky yarn, a 9 mm hook, external sculpting, a textured stem, and two-tone foliage. The intermediate reconstruction targets approximately 28–30 cm wide and 26–28 cm overall, producing a substantial freestanding pumpkin for autumn table, mantel, or hearth displays.
The instructions below are an original photo-inspired reconstruction based on visible structure; published patterns cited later are used only for sizing, gauge, and material benchmarks.
The Design: What Makes This Sage Pumpkin Different
The photograph depends on eight deep channels rather than shallow decorative ribs. A broad sage body is crocheted first, stuffed to moderate firmness, compressed vertically, and divided afterward with separate sculpting strands. Thick yarn matters here: published chunky-pumpkin references pair super-bulky yarn with 8–9 mm hooks, making a large body possible without an impractical number of stitches. Two five-point leaves use a pale moss center surrounded by dark olive edging, while the tall chocolate stem bends gradually above the crown. This large sage green crochet pumpkin pattern separates crochet structure from final shaping so every groove can be adjusted independently. The usual failure is overstuffing. A rigid sphere resists compression, produces shallow valleys, and prevents the broad lobe centers visible in the photograph from projecting outward.
Project Info at a Glance
| Skill Level | Time | Finished Size | Hook | Best For |
|---|---|---|---|---|
| Intermediate | Reconstruction estimate: 6–9 hours | Reconstruction target: 28–30 cm wide × 26–28 cm overall | 9 mm body; 5 mm stem; 4 mm leaves | Large autumn centerpiece and freestanding fall décor |
The finished dimensions above are reconstruction targets inferred from the supplied photograph. Published chunky-pumpkin references support the material scale: Crochet 365 Knit Too specifies super-bulky yarn with an 8 mm hook and a gauge of 9 stitches per 4 inches, while Louise Bollanos specifies super-bulky yarn with a 9 mm hook and a gauge of 6.6 single crochets per 4 inches. Brittany Dickson’s three-size pumpkin pattern also includes #6 super-bulky yarn and a 9 mm hook.
Materials and Tools
Yarn
- Sage / muted olive green — #6 super-bulky — reconstruction estimate: 280–340 g
- Chocolate brown — #5 bulky or doubled worsted — reconstruction estimate: 45–60 g
- Dark forest olive — worsted #4 — reconstruction estimate: 25–35 g
- Light moss green — worsted #4 — reconstruction estimate: 15–25 g
Use a matte yarn with enough twist to keep the horizontal stitch rows visible. The quantities are reconstruction allowances, not yardages measured from the photographed object. Published chunky pumpkin patterns range widely in consumption because construction, gauge, and finished scale differ.
Tools
- 9 mm crochet hook for the pumpkin
- 5 mm crochet hook for the stem
- 4 mm crochet hook for foliage
- Polyester fiberfill — reconstruction allowance: 450–600 g
- Long upholstery or doll needle — approximately 25–30 cm
- Large tapestry needle
- Stitch markers
- Scissors
- Measuring tape
Abbreviations
- MR — magic ring
- ch — chain
- sl st — slip stitch
- sc — single crochet
- hdc — half double crochet
- dc — double crochet
- tr — treble crochet
- inc — 2 sc in one stitch
- dec — invisible decrease
- BLO — back loop only
- st/sts — stitch/stitches
An invisible decrease is worked through the front loops of two adjacent stitches before completing one single crochet; this keeps the closing rounds compact and reduces visible gaps around the crown.
Pattern — Step by Step
Large Sage Pumpkin Body
Yarn: sage #6 super-bulky. Work continuously in a spiral and mark the first stitch of every round.
R1: 6 sc in MR. (6)
R2: Inc ×6. (12)
R3: (1 sc, inc) ×6. (18)
R4: (2 sc, inc) ×6. (24)
R5: (3 sc, inc) ×6. (30)
R6: (4 sc, inc) ×6. (36)
R7: (5 sc, inc) ×6. (42)
The body now reaches its 42-stitch plateau. At this yarn thickness, that count produces a substantially larger object than the same count worked in ordinary worsted yarn.
R8: Sc around. (42)
R9: Sc around. (42)
R10: Sc around. (42)
R11: Sc around. (42)
R12: Sc around. (42)
R13: Sc around. (42)
R14: Sc around. (42)
R15: Sc around. (42)
R16: Sc around. (42)
R17: Sc around. (42)
R18: Sc around. (42)
R19: Sc around. (42)
R20: Sc around. (42)
R21: (5 sc, dec) ×6. (36)
R22: (4 sc, dec) ×6. (30)
R23: (3 sc, dec) ×6. (24)
Begin stuffing now. Place small pieces against the outside wall first and keep the central column softer.
R24: (2 sc, dec) ×6. (18)
R25: (1 sc, dec) ×6. (12)
Add the final stuffing. The lobe centers should feel full, but the crown must still compress under firm finger pressure.
R26: Dec ×6. (6)
Fasten off with a 70 cm tail. Pass the tail through the six remaining front loops and pull the opening closed.
Body Gauge Check
Do not judge the finished pumpkin from the unsculpted body. Before compression it will look taller and rounder than the photograph.
Published chunky-pumpkin gauges illustrate why the yarn specification matters. Crochet 365 Knit Too lists approximately 9 stitches per 4 inches in super-bulky half double crochet with an 8 mm hook, while the Handy Little Me chunky pumpkin lists approximately 6.6 single crochets per 4 inches with a 9 mm hook.
If your 42-stitch body is dramatically smaller than the reconstruction target, change yarn or hook rather than packing it with excessive stuffing.
Vertical Compression
Cut approximately 120 cm of strong matching sage yarn.
Thread it through the long upholstery needle.
Enter at the exact bottom center and exit through the crown center.
Return the needle through the center to the base.
Pull until the body loses approximately 3–4 cm of vertical height.
Repeat the path once more, knot securely underneath, and bury the ends inside the pumpkin.
This operation establishes the broad silhouette before the individual lobes are formed.
Sculpting Eight Pumpkin Lobes
Mark eight positions around the widest circumference. Each division represents approximately 45 degrees.
Cut eight strong sage strands approximately 100 cm long.
Anchor the first strand at the bottom center.
Carry it externally over the pumpkin to the crown.
Insert the needle through the crown center and bring it out at the bottom center.
Pull gradually until the first valley becomes clearly recessed.
Tie securely but do not bury the tail yet.
Make the opposite groove next. Continue with the two perpendicular grooves, then complete the four diagonal divisions.
The working order is therefore:
12 o’clock → 6 o’clock → 3 o’clock → 9 o’clock → four diagonal channels.
Working in opposing pairs reduces distortion while the stuffing is still shifting.
Refining the Eight Lobes
Set the pumpkin upright.
Push filling away from each groove and toward the middle of the neighboring lobes.
Retighten individual sculpting strands only after the stuffing is redistributed.
The final grooves should be narrow enough to remain visible from several viewing angles, while the lobe centers should stay broad and rounded.
Target a body measurement near 28–30 cm wide × 18–20 cm high before adding the stem.
Curved Chocolate Stem
Yarn: chocolate brown #5 bulky or two strands of worsted held together. Hook: 5 mm. Leave a 70 cm starting tail before the MR because this tail remains at the broad attachment end.
R1: 6 sc in MR. (6)
R2: Inc ×6. (12)
R3: (1 sc, inc) ×6. (18)
R4: BLO sc around. (18)
R5: Sc around. (18)
R6: (4 sc, dec) ×3. (15)
R7: Sc around. (15)
R8: (3 sc, dec) ×3. (12)
R9: Sc around. (12)
R10: Sc around. (12)
R11: Sc around. (12)
R12: Sc around. (12)
R13: (2 sc, dec) ×3. (9)
R14: Sc around. (9)
R15: Sc around. (9)
R16: Sc around. (9)
R17: Sc around. (9)
R18: (1 sc, dec) ×3. (6)
R19: Sc around. (6)
R20: Sc around. (6)
Stuff the lower two-thirds firmly. Place substantially less filling in the upper third.
Fasten off, close the six-stitch opening, and bury only the tip tail. Preserve the long starting tail at the 18-stitch base.
Creating the Hooked Stem Shape
The reference stem bends progressively rather than at one abrupt point.
Thread approximately 70 cm of brown yarn through a tapestry needle.
Beginning near R7 on the intended inside curve, take running stitches upward through the stem wall to approximately R18.
Pull gradually until the upper stem bends around 30–40 degrees.
Secure the shaping yarn inside the stem.
Target a finished stem length around 13–15 cm.
Texturing the Brown Stem
The photographed stem has a dense, irregular bark-like surface.
Join brown yarn near the base.
Surface sl st vertically toward the tip for approximately 10–12 cm.
Fasten off.
Repeat three or four times at irregular intervals around the stem.
For additional texture, work occasional loose surface sc over one or two stitches, but keep the embellishment flexible enough for the stem to retain its curve.
Large Two-Tone Five-Point Leaf — Make 2
Center: light moss. Border: dark olive. Hook: 4 mm.
With light moss, ch 4 and sl st to first ch to form a ring.
R1: 10 sc into ring. Join. (10)
R2: *Sc in next st; in next st work (hdc, dc, tr, ch 3, sl st in first ch, tr, dc, hdc).* Repeat ×5.
Fasten off light moss.
The ten center stitches are consumed by five exact two-stitch repeats: one anchoring sc plus one stitch containing the shaped lobe.
Dark Olive Leaf Border
Join dark olive at the valley beside any lobe.
Sc along the first side of the lobe.
At the ch-3 point work (sc, ch 2, sl st in first ch, sc).
Sc down the opposite side.
Sl st in the valley.
Repeat around all five lobes.
Fasten off with a 45 cm tail.
Block the larger leaf to approximately 14–15 cm across and the second to approximately 12–14 cm.
Adding the Light Leaf Veins
Join light moss at the central ring.
Surface sl st toward the first point.
Stop approximately 5 mm before the tip.
Fasten off.
Repeat toward the other four points.
Keep every vein slightly relaxed. A tight surface line shortens the center of the lobe and makes the leaf cup.
Alternative Pointed Pumpkin Leaf
For a more conventional pumpkin leaf, ChristaCoDesign documents a worsted-weight leaf worked around both sides of a foundation row using a 5 mm hook. The same source uses #4 yarn for a stem, leaf, and curly vine topper.
The five-point motifs above are used instead because they more closely reproduce the broad star-shaped foliage in the supplied image.
Optional Curly Vine
The photograph does not prominently display a tendril, so this component is optional.
With dark olive and the 4 mm hook, ch 24.
Starting in second chain from hook, work 3 sc in each of the next 20 chains.
Sl st in each of the final 3 chains.
Fasten off with a 25 cm tail.
The concentrated increases make the first section curl naturally while the final three slip stitches provide a straighter attachment end. ChristaCoDesign uses the same principle—multiple stitches into each foundation chain—to create a pumpkin curlicue.
Attaching the Stem
Place the 18-stitch stem base directly over the crown recess.
Thread the reserved starting tail.
Sew through the stem base and deeply into the pumpkin fabric at approximately 1 cm intervals.
Complete two passes around the base.
Add three longer reinforcement stitches from the lower stem wall into the crown at roughly equal intervals.
The stem should remain stationary when its curved upper section is moved gently.
Attaching the Leaves
Position the larger leaf on one side of the stem and the smaller leaf on the opposite side.
Rotate them so the five points do not align with the eight pumpkin grooves.
Sew each center ring securely to the crown.
Attach approximately the inner 2–3 cm of each lobe.
Leave the pointed outer sections free.
This partial attachment preserves the raised foliage visible around the stem.
Assembly
- Crochet the sage body through R26 with #6 super-bulky yarn, keeping the 42-stitch plateau unchanged and stuffing the lobe areas more firmly than the central core.
- Close the six-stitch crown, then compress the crown and base toward one another by approximately 3–4 cm before installing any external groove strands.
- Mark eight positions at approximately 45-degree intervals and sculpt the first four channels as opposing pairs before adding the four diagonal grooves.
- Redistribute the filling toward the centers of all eight lobes and adjust individual sculpting strands until the body measures roughly 28–30 cm across.
- Crochet the tapered chocolate stem from its 18-stitch base to its six-stitch tip, leaving the long starting tail at the broad attachment end.
- Stuff the lower stem firmly, shape a gradual 30–40-degree hook through the upper section, and add several irregular vertical surface-crochet ridges.
- Crochet two light-moss five-point leaves, add dark-olive borders and relaxed center veins, then block them to two slightly different sizes.
- Sew the stem into the crown with two complete passes around its base plus three long reinforcement stitches through the lower stem wall.
- Attach the leaf centers and inner lobe sections around the stem while leaving the outer points free; add the optional vine behind one leaf if desired.
- Weave every remaining tail through at least 5 cm of matching fabric, reshape the eight valleys, and flatten an 8–10 cm area at the base so the pumpkin stands without rocking.
The completed pumpkin has eight deeply sculpted sage lobes, a tall hooked chocolate stem, and two layered five-point leaves in light moss and dark olive.
7 Technical Tips
- The body becomes a ball instead of a pumpkin: shorten the vertical axis by approximately 3–4 cm before sculpting the grooves. Pulling eight exterior strands around an uncompacted sphere creates narrow channels without producing the broad squat profile shown in the image.
- The eight lobes finish at different widths: mark the widest circumference at 45-degree intervals before inserting any shaping strand. A channel shifted only 10 degrees can make the neighboring lobe visibly wider on a monochrome sage body.
- The grooves remain shallow: move stuffing away from each intended valley before increasing strand tension. A rigidly packed 30 cm body resists compression and may damage stitches if the sculpting yarn is pulled excessively.
- Fiberfill appears between stitches: add filling in small pieces and keep it away from isolated weak stitches. Large compact clumps push directly against the super-bulky fabric and widen gaps that were not visible before stuffing.
- The hooked stem folds at one round: reduce stuffing gradually through the upper third and distribute the shaping stitches across 8–10 cm. Concentrating all tension at one point creates a hinge rather than a continuous curve.
- The leaf centers pucker: leave approximately 5 mm of slack in each surface-crocheted vein before fastening off. A vein shorter than its lobe pulls the two-tone leaf upward even if the border itself is correctly tensioned.
- The pumpkin rocks after assembly: flatten an 8–10 cm base area before burying the final sculpting knots. A body balanced on its center point becomes less stable after the 13–15 cm stem adds weight above the crown.
Why Super-Bulky Yarn Matches the Photograph
The pumpkin is large, yet individual stitches remain prominent across every lobe. Thick yarn is the practical way to produce both characteristics simultaneously.
Crochet 365 Knit Too specifies super-bulky yarn and an 8 mm hook for its chunky pumpkin, with a published gauge of 9 stitches per 4 inches. Handy Little Me’s chunky pumpkin uses Lion Brand Wool Ease Thick & Quick or another super-bulky yarn with a 9 mm hook and reports 50–60 yards for its design.
Brittany Dickson’s pumpkin pattern spans #4, #5, and #6 yarns and recommends hook sizes up to 9 mm, further demonstrating that yarn thickness is a primary scaling tool for decorative pumpkins.
Published Super-Bulky Pumpkin Benchmarks
The Ravelry listing for Crochet 365 Knit Too’s Chunky Pumpkin specifies super-bulky yarn, an 8 mm hook, 9 stitches per 4 inches, and approximately 55–60 yards. The design is ribbed and constructed differently from this reconstruction, so those figures are used only as material and gauge references.
Handy Little Me’s Chunky Pumpkin specifies super-bulky yarn, a 9 mm hook, approximately 6.6 single crochets per 4 inches, and 50–60 yards. That dense large-hook fabric provides another useful benchmark for a sculpted decorative body.
Published Multi-Weight Pumpkin Benchmark
Brittany Dickson’s Ravelry pumpkin pattern supports #4 medium, #5 bulky, and #6 super-bulky yarn with corresponding 5.5, 6.5, and 9 mm hooks. The published finished circumferences include approximately 14, 15, and 21 inches.
The pattern uses a different construction method, but its size range illustrates how yarn weight and hook selection change pumpkin scale without requiring a very high stitch count.
Published Bulky Large-Pumpkin Benchmark
Nicki’s Homemade Crafts publishes a large pumpkin in bulky yarn with a 5 mm hook. The documented finished size is approximately 9 inches in diameter × 6.5 inches high.
That design uses linked crochet and a different body architecture. Its smaller diameter compared with the photographed reconstruction is one reason the present version moves up to #6 super-bulky yarn and a 9 mm body hook.
Why External Sculpting Is Used
The reference shows horizontal stitch rows running across each lobe while deep vertical valleys separate those lobes. External sculpting reproduces both features at once.
The crochet fabric can remain structurally simple. After the body is closed, eight independent strands determine the final segmentation.
This also provides adjustment after stuffing. One shallow groove can be tightened without altering the other seven, while stuffing can be massaged from a valley into an adjacent lobe before the knot is secured permanently.
Why the Pumpkin Has Eight Lobes
Eight sections fit the visible proportions of the photograph. The frontal view displays several broad lobes, with additional sections wrapping around both sides.
Mathematically, eight grooves also create an uncomplicated layout:
360 degrees ÷ 8 = 45 degrees per lobe.
Six sections would be noticeably broader. Ten would create a narrower, more deeply fluted appearance. Eight provides the intermediate proportion used in this reconstruction.
Why the Stem Is Crocheted from the Base Up
The broadest 18-stitch section must contact the pumpkin. Starting there leaves the initial yarn tail exactly where it is needed for assembly.
The stem narrows through 18 → 15 → 12 → 9 → 6 stitches. That gradual reduction creates a thick base and narrower hooked tip without requiring internal wire.
A soft upper third can then be shaped with concealed running stitches while the firmer lower section supports the stem vertically.
Why the Leaves Are Two-Tone
The supplied image uses pale green internal sections surrounded by darker green outlines. That border makes each pointed lobe readable against a sage pumpkin that would otherwise provide relatively little color contrast.
Use light moss and dark olive for the closest reconstruction. Cream with forest green creates stronger contrast, while sage with dark olive gives a quieter result.
Keep the darker color on the perimeter. Reversing the values changes the outlined appearance significantly.
Making a Smaller Sage Pumpkin
Retain the same pattern but use #5 bulky yarn with a 6–6.5 mm hook. This reduces scale without changing the eight-lobe geometry.
Another option is to stop increasing after R6 at 36 stitches. Work approximately 10–11 plateau rounds before reversing the shaping sequence.
Use a proportionally shorter stem around 10–11 cm and reduce the leaf width to approximately 10–12 cm.
Making a Larger Pumpkin
For a body beyond approximately 30 cm, add another increase round rather than relying on additional stuffing.
R8: (6 sc, inc) ×6. (48)
For still more circumference:
R9: (7 sc, inc) ×6. (54)
Work enough straight rounds to establish the desired height, then reverse the same sequence during the decrease section.
Retain eight sculpting strands unless a deliberate change in lobe width is wanted.
Using a Rectangle Construction Instead
Several established chunky pumpkin patterns are worked as rectangles, seamed into tubes, gathered, and stuffed. Crochet 365 Knit Too and Handy Little Me both publish ribbed examples in super-bulky yarn.
That method is efficient when the desired texture consists of vertical ribs. The photograph here shows rounded lobe faces with strong horizontal crochet rows, making the stuffed center-out body and external shaping method a closer reconstruction.
Correcting a Pumpkin That Is Too Tall
Do not shorten it by tightening only the eight grooves.
Run a separate strand through the vertical center from base to crown.
Compress the body by another 1–2 cm, secure that strand, then reassess the groove tension.
Vertical compression changes the overall silhouette; lobe strands should primarily establish valleys.
Correcting a Pumpkin That Is Too Narrow
First check whether the body was over-compressed vertically and around the grooves.
Loosen the sculpting strands slightly and redistribute stuffing into the lobe centers.
If the crocheted circumference itself is too small, blocking will not add several centimeters safely. Remake the body with a larger hook, thicker yarn, or a 48-stitch maximum round.
Correcting Uneven Horizontal Rows
Move the stitch marker after every round. Because the body is worked in a spiral, losing the round start can make an accidental increase difficult to identify later.
Count the 42-stitch plateau periodically.
An unnoticed extra stitch changes the final closing math and can shift the apparent center of a sculpted lobe.
Correcting a Stem That Leans at the Base
The lower stem should rise vertically before the upper section bends.
If the whole piece leans, add three reinforcement stitches through the lower stem wall and pumpkin crown, spaced roughly 120 degrees apart.
Only the upper portion should be controlled by the curve-forming strand. Tightening the curve strand cannot correct a loose attachment base.
Correcting Leaf Curl
Block the leaves before sewing them to the pumpkin.
Pin the five tips first, then the valleys between them.
If one lobe still curls upward, inspect its light-green surface vein. Remove and remake that vein with looser slip stitches before altering the dark border.
Stuffing Strategy
Use small handfuls rather than large compressed balls of fiberfill. Push each piece outward toward the lobe walls.
Keep the exact center comparatively soft. The upholstery needle must pass through that region repeatedly during compression and sculpting.
The crown should also remain flexible enough to form a recess under the stem. A heavily packed crown sits high and makes the topper appear perched above the pumpkin instead of growing from it.
Optional Curly Vine Placement
If adding the optional tendril, sew its straight final three stitches beneath one leaf beside the stem.
Wrap the first curl loosely around the lower stem once.
Leave the remaining spiral unattached.
ChristaCoDesign’s pumpkin topper reference similarly leaves a long tail for attachment and uses multiple single crochets in each chain to generate the curl.
Yarn Planning
Published super-bulky pumpkins show how much construction changes consumption. Crochet 365 Knit Too reports approximately 55–60 yards for one chunky design, while Brittany Dickson’s multi-size pumpkin listing gives approximately 91–106 yards across its documented pattern information.
The photographed reconstruction is intentionally large and deeply sculpted, so the material list uses a higher allowance rather than claiming a published yardage applies directly.
Purchase all sage body yarn from one dye lot. Subtle olive and sage colors can show lot differences more readily across broad monochrome lobes.
Care and Storage
Follow the yarn manufacturer’s care label. Spot cleaning is practical for a firmly stuffed decorative pumpkin because complete immersion can make the filling slow to dry.
If washing is necessary, support the entire body while wet and dry it thoroughly in a ventilated area.
Store the pumpkin upright. Keep pressure off the curved stem and free leaf points, and reshape the lobe channels by hand after long-term storage.
Sources
Ravelry — Chunky Pumpkin by Crochet 365 Knit Too — super-bulky yarn, 8 mm hook, 9-stitch-per-4-inch gauge, and 55–60 yard material benchmark.
Ravelry — Chunky Pumpkin by Louise Bollanos — super-bulky yarn, 9 mm hook, 6.6-stitch single-crochet gauge, and 50–60 yard published range.
Ravelry — Crochet Pumpkin by Brittany Dickson — #4, #5, and #6 yarn options, 5.5–9 mm hooks, three sizes, and published 14–21 inch circumference benchmarks.
AllFreeCrochet — Large Crochet Pumpkin Pattern by Nicole Riley — bulky yarn, 5 mm hook, and published 9-inch diameter × 6.5-inch height benchmark.
ChristaCoDesign — Crochet Pumpkin Stem, Leaf and Vine — #4 worsted yarn, 5 mm hook, round stem construction, foundation-chain leaf construction, and three-single-crochet curly-vine method.
Doily Designs — Crochet Pumpkin Leaf Pattern — #4 worsted yarn, 5 mm hook, approximately 2.25-inch leaf benchmark, and two-sided foundation-chain construction.
The Caffeinated Snail — Crochet Pumpkin Pattern with Leaves — separate stem, paired leaves, curly vine, and assembled pumpkin-topper reference.
Ravelry — Wide Ribbed Pumpkin by Suzanne Carlson — super-bulky yarn, 9 mm hook, 8-stitch-per-4-inch single-crochet gauge, and chunky pumpkin construction benchmark.
Conclusion
The eight valleys control the silhouette of this pumpkin more than any single crochet round, so establish the broad body before tightening the sculpting strands. Keep the crown compressible, distribute stuffing into the lobe centers, and attach the hooked stem through its broad 18-stitch base. Block both two-tone leaves separately before sewing their inner sections around the crown. Your next step is to make the body through the 42-stitch plateau and compare its gauge with the published chunky benchmarks above. Save this large sage green crochet pumpkin pattern to Pinterest or share the finished piece on Instagram with #SageHarvestPumpkin. Would you make the leaf centers pale moss as pictured or use one continuous dark olive?









