Introduction
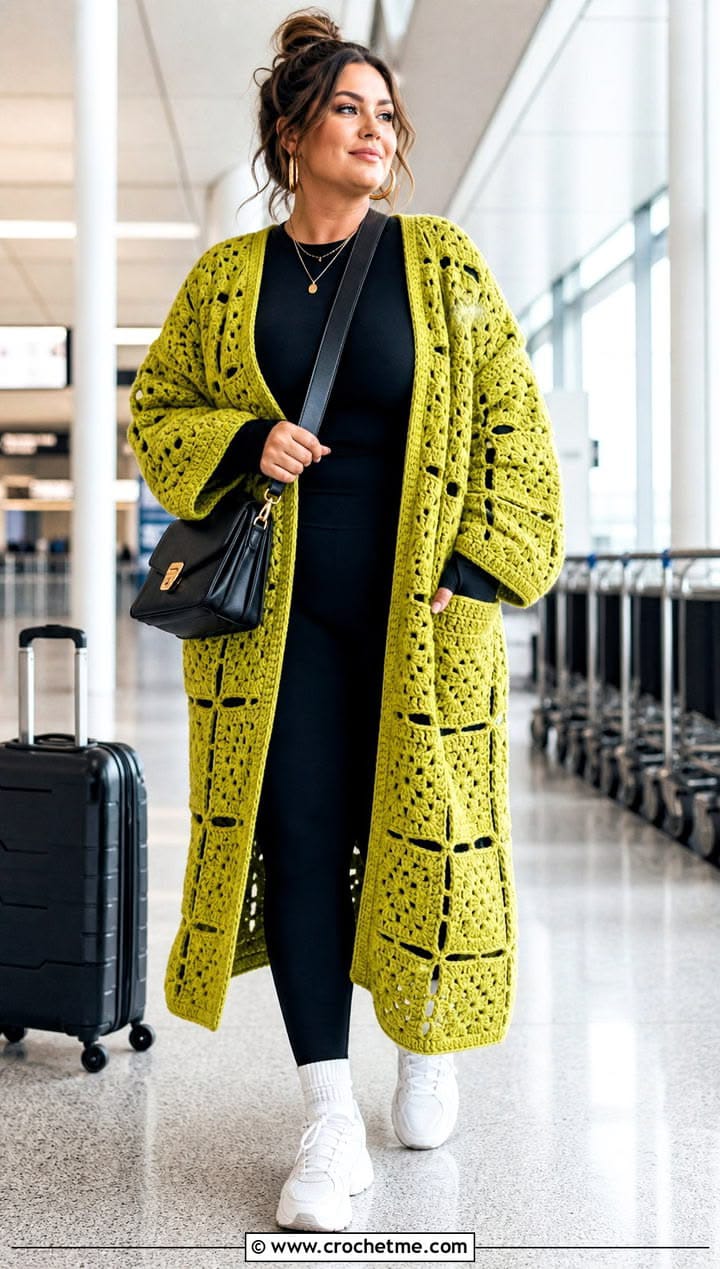
Large open squares run from shoulder to ankle while wide bell sleeves repeat the same chartreuse lattice. This granny square crochet duster cardigan pattern uses DK yarn, a 4 mm hook, modular lace squares, open fronts, and deep sleeve cuffs. The intermediate reconstruction targets a relaxed 112–118 cm bust and approximately 122 cm back length, making it a dramatic lightweight layering coat.
The instructions below are an original photo-inspired reconstruction based on visible structure; published patterns cited later are used only for sizing, gauge, and material benchmarks.
The Design: What Makes This Duster Different
The photograph combines a floor-skimming cardigan silhouette with oversized openwork motifs rather than dozens of small traditional granny squares. Each square needs enough negative space to keep a garment of this length from becoming excessively heavy. Narrow joins form strong vertical lines down the fronts and back, while the sleeves widen toward the cuffs instead of tapering toward the wrists. The front remains completely open and receives only a restrained edging, preserving the long uninterrupted vertical line. This granny square crochet duster cardigan pattern therefore uses 15 cm blocked lace squares and a planned modular layout. A frequent maker error is joining unblocked motifs. A difference of even 5 mm per square becomes several centimeters over seven or eight vertically stacked motifs and can make the two fronts finish at visibly different lengths.
Project Info at a Glance
| Skill Level | Time | Finished Size | Hook | Best For |
|---|---|---|---|---|
| Intermediate | Reconstruction estimate: 28–38 hours | Reconstruction target: 112–118 cm bust; approx. 122 cm back length | 4 mm | Long layering cardigan, travel outfit, spring/autumn outer layer |
The dimensions above are reconstruction targets rather than measurements of the photographed garment. King Cole’s published long granny-square cardigan uses Cottonsoft DK with a 4 mm hook and covers chest ranges from 71–78 cm through 112–127 cm. A separate Ravelry Long Granny Square Cardigan specifies Aran yarn with a 5 mm hook. Lion Brand’s current granny-square cardigan uses worsted yarn and reports a 12.5 cm blocked square, demonstrating how motif gauge directly controls garment sizing.
Materials and Tools
Yarn
- Chartreuse / acid olive — DK #3 cotton, cotton-acrylic, or smooth acrylic — reconstruction estimate: 1,250–1,500 g
The yarn quantity is a reconstruction allowance for the photographed ankle-length silhouette, not a published consumption figure. King Cole Cottonsoft DK contains 230 yards per 100 g and is a documented yarn choice for a long granny-square cardigan. Choose a yarn that blocks cleanly and is not excessively dense; a heavy pure cotton can make a garment of this length pull downward substantially.
Tools
- 4 mm crochet hook
- 4.5 mm hook optional for adjusting motif gauge
- Tapestry needle
- Locking stitch markers
- Scissors
- Blocking mats and pins
- Measuring tape
Abbreviations
- MR — magic ring
- ch — chain
- sl st — slip stitch
- sc — single crochet
- hdc — half double crochet
- dc — double crochet
- tr — treble crochet
- sp — space
- st/sts — stitch/stitches
- RS — right side
- WS — wrong side
An invisible decrease is worked through the front loops of two adjacent stitches before completing one single crochet; this flat modular garment does not require invisible decreases.
Gauge and Sizing
Block one complete motif before making the full set.
Target blocked square: 15 × 15 cm.
The reconstruction below is written around that motif size. If your square measures 14 cm, a vertical run of eight squares loses 8 cm. If it measures 16 cm, the same run gains 8 cm. Correct the individual square before producing the full quantity.
Lion Brand publishes a 12.5 cm blocked granny square for one current worsted-weight cardigan. Crochet Kingdom documents both 13.5 cm small squares and 28 cm sleeve squares in another cardigan construction. Those benchmarks demonstrate why the blocked motif measurement, rather than hook size alone, must govern assembly.
Garment Layout
This reconstruction uses approximately 58 full motifs, plus underarm and edging work:
- Back: 24 squares — 3 across × 8 long
- Left front: 8 squares — 1 × 8
- Right front: 8 squares — 1 × 8
- Left sleeve: 9 squares
- Right sleeve: 9 squares
The photo suggests large motifs and relatively narrow fronts. The reconstruction therefore avoids using three full square columns across each front, which would produce excessive overlap for an open duster.
Pattern — Step by Step
Open Lace Granny Square — Make 58
Yarn: chartreuse DK. Hook: 4 mm. Work joined rounds.
R1: Ch 4 and join with sl st to form a ring. Ch 3, 2 dc in ring, ch 3; *3 dc in ring, ch 3* ×3. Join to top of beginning ch 3. (12 dc; four ch-3 corners)
R2: Sl st into first corner. Ch 3, 2 dc, ch 3, 3 dc in same corner; ch 2. *(3 dc, ch 3, 3 dc) in next corner, ch 2.* Repeat around. Join. (24 dc; four ch-3 corners; four ch-2 side spaces)
R3: Sl st to corner. In corner work ch 3, 2 dc, ch 3, 3 dc; ch 2, 3 dc in next ch-2 side sp, ch 2. *(3 dc, ch 3, 3 dc) in corner, ch 2, 3 dc in next side sp, ch 2.* Repeat around. Join. (36 dc)
R4: Sl st to corner. Work (ch 3, 2 dc, ch 3, 3 dc) in corner; ch 2, 3 dc in next ch-2 sp, ch 2, 3 dc in next ch-2 sp, ch 2. Repeat the same sequence around all four sides. Join. (48 dc)
R5: Sl st to corner. Work (ch 3, 2 dc, ch 3, 3 dc) in corner. Across each side work ch 2, 3 dc in each of the next three ch-2 spaces, placing ch 2 between groups. In each corner work (3 dc, ch 3, 3 dc). Join. (60 dc)
R6: Sl st to corner. Work (ch 3, 2 dc, ch 3, 3 dc) in corner. Across each side work ch 2, 3 dc in each of the next four ch-2 spaces, with ch 2 between groups. Repeat the corner group at all four corners. Join. (72 dc)
Fasten off with a 25 cm tail.
Block to exactly 15 × 15 cm. Each side contains six 3-dc groups when the two corner groups are included, producing a consistent joining edge.
Optional More Open Final Round
The photographed motifs contain elongated openings. If your yarn produces a dense square, substitute ch 3 for each ch-2 side space in R6.
Do this on every motif, not selectively. Mixed chain-space lengths alter the blocked dimensions and make the seams difficult to align.
Back Panel
Arrange 24 squares as three columns × eight rows.
Orient every motif the same way.
Join the squares first into horizontal rows of three, then join those rows vertically.
With 15 cm motifs, the unedged back measures approximately 45 cm wide × 120 cm long.
Because the photographed cardigan has substantial ease, the front panels and underarm structure contribute additional circumference beyond the flat back measurement.
Joining the Squares
Place two motifs with wrong sides together.
Join yarn through corresponding corner spaces.
Work one sl st through both corner spaces.
Continue with one loose sl st through corresponding stitches and chain spaces across the entire edge.
Finish with one sl st through the final pair of corner spaces.
Fasten off.
Do not pull the slip stitches tighter than the square edges. A rigid seam shortens the joined panel and creates a raised ridge.
Left Front Panel
Join 8 squares into one vertical strip.
The strip should measure approximately 15 × 120 cm before edging.
Mark the upper square for shoulder placement.
Repeat for the right front.
Shoulder Construction
Place the back panel flat with the right side facing upward.
Position one front strip at each outer top corner.
Join the top edge of each front square to the outer portion of the back’s top row.
Leave the central back section open for the neckline.
The two fronts should hang parallel when the garment is lifted by the shoulders.
Side Seams and Armholes
Align each front strip with the corresponding outer edge of the back.
Starting at the hem, join upward.
Stop approximately 27–30 cm below the shoulder to create the armhole.
Crochet Kingdom documents armhole openings of approximately 20–25 cm in a granny-square cardigan. The slightly larger opening here accommodates the photographed loose sleeve and oversized silhouette.
Repeat on the opposite side.
Sleeve Layout — Make 2
For each sleeve, arrange 9 squares as follows:
Upper sleeve: two squares around the arm × three square lengths.
Lower bell section: add three squares around the final section so the cuff gains additional circumference.
Pin the layout around the armhole before permanently joining.
The sleeve should widen toward the wrist rather than taper.
Upper Sleeve Tube
Join six squares into a rectangle measuring approximately 30 cm around × 45 cm long.
Join the long sides to form a tube.
Leave one end open for the armhole.
The sleeve in the photograph is deliberately loose. Do not reduce the 30 cm circumference unless fitting measurements require it.
Bell-Sleeve Expansion
Join the remaining three sleeve squares around the lower end, allowing the circumference to expand.
Where necessary, use short granny-stitch gussets between the upper tube and wider lower section.
For each gusset:
Row 1: Join yarn at lower sleeve edge, ch 3, work 2 dc in same space, ch 1, 3 dc in next available space.
Row 2: Ch 3, 2 dc in first space, ch 1, 3 dc in next space.
Fasten off.
Repeat symmetrically where additional width is required.
Attaching the Sleeves
Turn the body inside out.
Insert the sleeve into the armhole with right sides together.
Match the sleeve seam to the underarm seam.
Mark the shoulder midpoint.
Distribute the remaining sleeve edge evenly between those two points.
Slip stitch through both layers around the armhole.
Repeat for the second sleeve.
Wide Sleeve Cuff
Join chartreuse at the wrist edge.
Cuff R1: Ch 1, sc evenly around, placing one sc in each dc and one or two sc in each chain space as required to keep the edge flat.
Cuff R2: Ch 2, hdc in each stitch around. Join.
Cuff R3: Ch 2, hdc in each stitch around. Join.
Cuff R4: Ch 1, sc in each stitch around. Join.
Fasten off.
The cuff should stabilize the openwork without drawing it tightly against the wrist.
Front and Neck Edging
Join yarn at the lower right-front corner.
Edging Row 1: Ch 1 and work sc up the right front, across the back neckline, and down the left front.
Place approximately 2 sc around each dc row-end and 1 sc in each shorter edge position. Record the stitch count for both front edges and correct any imbalance before continuing.
Row 2: Ch 2, hdc in each stitch around the entire opening.
Row 3: Ch 1, sc in each stitch around.
Fasten off.
The photographed duster has no obvious button closure, so the band remains narrow and open.
Hem Edging
Join yarn at one lower front corner.
Hem R1: Ch 1, sc across the complete lower edge.
Hem R2: Ch 2, hdc across.
Hem R3: Ch 1, sc across.
Fasten off.
Block the hem so both front corners finish at the same height.
Adding Length
One additional row of three back squares plus one square on each front adds approximately 15 cm before edging.
This is the cleanest way to extend the duster.
Jera’s Jamboree similarly notes that granny-square cardigan length can be adjusted through the modular construction, while another current granny-cardigan reference recommends adding squares to the bottom for a longer version.
Reducing Length
Remove the bottom square from each front and remove the bottom row of three squares from the back.
The garment will shorten by approximately 15 cm.
Keep the sleeve construction unchanged unless the wearer’s arm measurements also require adjustment.
Blocking the Completed Duster
Block the individual squares first and the finished garment a second time.
Lay the assembled cardigan flat.
Align the center back vertically.
Measure both fronts from shoulder to hem.
The difference should remain within approximately 5 mm.
Pin the side seams without stretching them.
Shape the bell sleeves last, keeping both cuffs the same circumference.
Assembly
- Crochet 58 chartreuse lace squares through six rounds and block every motif to exactly 15 × 15 cm before beginning garment assembly.
- Join 24 squares into a three-column by eight-row back panel, checking the width and length after every two joined rows.
- Join eight squares into each front strip, then attach the top square of each strip to the outer shoulder area of the back while leaving the center neckline open.
- Join the front and back side edges from the hem upward, stopping 27–30 cm below each shoulder to create two matching armholes.
- Assemble nine squares for each sleeve, using six for the loose upper tube and the remaining three to expand the lower sleeve into the photographed bell shape.
- Pin each sleeve into its armhole with the underarm seams aligned, distribute the remaining edge evenly, and slip stitch the layers together without stretching.
- Work four stabilizing cuff rounds around each wrist, measuring both finished cuffs before fastening off the second sleeve.
- Add three narrow rows around the complete front opening and neckline, keeping the two vertical front edges equal in stitch count and finished length.
- Work three hem rows across the complete lower edge, then weave every yarn tail through at least 5 cm of matching stitches.
- Wet block the assembled duster to its intended measurements, align the vertical motif columns, and allow the garment to dry completely before hanging or wearing.
The completed reconstruction forms an open-front chartreuse duster with large lace motifs, ankle-skimming length, relaxed shoulders, and wide bell sleeves.
7 Technical Tips
- The two fronts finish at different lengths: block every motif to exactly 15 cm before joining. A 5 mm difference repeated through eight vertically stacked squares creates a 4 cm discrepancy at the hem.
- The shoulder seam stretches downward: use slip-stitch joins that match the natural square-edge length rather than loose whip stitches. A shoulder seam that gains more than 1 cm under its own weight will continue stretching during wear.
- The armhole feels restrictive: measure the opening before attaching the sleeve and target approximately 27–30 cm vertically for this relaxed reconstruction. Closing one additional square edge can remove 15 cm of usable armhole length.
- The bell sleeve becomes too heavy: keep the open ch-2 spaces in the final motif rounds and avoid replacing them with dense double crochet. Additional fabric at nine sleeve motifs can noticeably increase downward pull at the shoulder.
- The square joins pucker: match every corresponding corner, cluster, and chain space before inserting the hook. Skipping one edge position shortens a 15 cm seam and pulls both neighboring motifs out of square.
- The neckline rolls outward: work the first edging row with a hook no larger than the 4 mm motif hook. A loose neckline band stretches under the weight of a 120 cm garment and can flare away from the neck.
- The finished duster grows after wearing: hang the assembled garment for 12–24 hours before the final wet block and remeasure the back length. Long DK crochet can gain several centimeters under its own weight, especially when made from cotton.
Why DK Yarn Fits the Photographed Garment
The cardigan is extremely long but still appears open and fluid. A dense worsted or bulky square construction would add considerably more weight.
King Cole’s published long granny-square cardigan uses Cottonsoft DK and a 4 mm hook, making it a useful material benchmark for this reconstruction. Its documented chest ranges extend through 112–127 cm, demonstrating that DK granny-square construction is practical for adult long cardigans.
A separate Ravelry Long Granny Square Cardigan by James Cummins uses Aran yarn with a 5 mm hook. That heavier option is workable, but the photographed lace appears better suited to the lighter DK approach.
Published Granny Square Gauge Benchmarks
Lion Brand’s current Granny Square Cardigan specifies worsted #4 yarn and a blocked granny-square measurement of 5 inches / 12.5 cm. The pattern is rated intermediate and includes finished bust measurements of 42, 46, and 58 inches.
Another published cardigan reference documents 13.5 × 13.5 cm small squares with 5 and 6 mm hooks. Its construction uses 36 small squares and larger sleeve motifs.
These references demonstrate that square size is a structural garment measurement. The 15 cm target used here is an original reconstruction choice based on the visibly large motifs in the supplied image.
Published Long Cardigan Benchmark
King Cole’s BK_FC_BK1 Long Granny Square Cardigan was published in 2024. The documented pattern uses DK cotton yarn and a 4 mm hook and includes chest ranges beginning at 71–78 cm and extending to 112–127 cm.
Its long-sleeve, granny-square coat construction is particularly relevant to the photographed silhouette, although the motif chart and assembly instructions here are independently reconstructed.
Published Aran Duster Benchmark
James Cummins’ Long Granny Square Cardigan lists Aran yarn and a 5 mm hook. The pattern is designed as a long cardigan and includes guidance for extending its size range.
That source provides a heavier-yarn comparison. If substituting Aran in this reconstruction, make a complete square first and reduce the hook or number of rounds until the blocked motif returns to the required 15 cm.
Why the Motifs Are Large
Large squares reduce the number of seams and reproduce the broad geometric openings visible in the image. They also make the ankle-length vertical columns easy to read from a distance.
A cardigan built from 10 cm squares would require many more motifs and produce a busier patchwork appearance.
The 15 cm square also makes length adjustments predictable. One extra vertical motif adds approximately 15 cm; one removed motif subtracts approximately the same amount before edging.
Why the Front Panels Stay Narrow
The photographed garment is worn open over a fitted black base layer. Its front edges descend almost vertically rather than overlapping across the torso.
One square-width front strips preserve that visual effect. The back carries most of the garment width, while side and underarm positioning provide additional ease.
If more coverage is required, add a half-width granny-stitch strip along each inner front rather than immediately adding another full 15 cm square column.
Adding Front Width
For greater bust coverage, work a granny-stitch extension along the inner edge of each front.
Join yarn at the lower corner.
Row 1: Ch 3, work 2 dc in the first edge space, ch 1; continue with 3 dc, ch 1 groups along the complete front edge.
Rows 2–4: Work 3 dc into each ch-1 space with ch 1 between groups.
Four rows add several centimeters without introducing another full square column.
Changing the Bust Size
Measure a cardigan that fits the intended wearer and compare its flat back width with the blocked motif layout.
For substantially larger sizing, increase the back from three to four square columns and reassess the front width before joining.
For a smaller garment, reduce individual motif dimensions rather than removing the central back column. A two-square-wide back would alter the shoulder and neckline proportions significantly.
Published granny-square cardigans are commonly sized through motif dimensions and layout changes. Lara Serbousek’s current Ravelry cardigan, for example, lists finished chest measurements from 36 to 60 inches and lengths from 18 to 30 inches.
Changing Sleeve Length
Measure from the shoulder to the desired cuff position.
Each full motif contributes approximately 15 cm before the cuff.
For shorter sleeves, remove one vertical motif section and replace the missing length with several granny-stitch rows if necessary.
For longer arms, add granny-stitch rounds at the cuff rather than another full square unless at least 12–15 cm of extra length is needed.
Making a Straighter Sleeve
Use six squares per sleeve instead of nine and omit the three-square lower expansion.
Continue the 30 cm upper tube to the required length with granny-stitch rounds.
Finish with the same four-round cuff.
This produces a lighter sleeve but removes the pronounced bell silhouette visible in the photograph.
Making the Bell Wider
Add granny-stitch increases in the final 10–15 cm before the cuff.
Place one extra 3-dc group at four evenly spaced positions around the sleeve.
Repeat once after two rounds if more flare is required.
Do not add all increases at the underarm; distributing them prevents the cuff from hanging asymmetrically.
Correcting a Square That Will Not Block to 15 cm
If the motif is under 14.5 cm, first try a 4.5 mm hook.
If it exceeds 15.5 cm, try a 3.5 mm hook or a slightly lighter DK yarn.
Do not stretch a 13 cm square to 15 cm during blocking. The square will contract after washing and the completed garment dimensions will become unreliable.
Correcting Uneven Vertical Seams
Lay each joined strip beside a ruler before adding the next column.
Every motif corner should align horizontally with the corresponding corner in the neighboring column.
If a seam begins drifting, inspect the first mismatched cluster. An omitted chain space or doubled join usually appears immediately before the shift.
Correcting Excessive Garment Weight
Do not compensate by making tighter seams. Tight joins concentrate more force at the shoulders.
Instead, use a lighter yarn with the same blocked motif gauge or remove unnecessary dense edging rounds.
Acrylic or cotton-acrylic DK may weigh less than some pure cotton yarns at the same length. Compare meterage per 100 g when selecting substitutions.
Correcting a Wavy Front Band
The first edging row controls the finished opening.
If the band ripples, too many stitches were placed into the vertical square edges.
Remove the edging and reduce the pickup count consistently on both fronts. If the band pulls upward, increase the pickups slightly rather than changing only one side.
Correcting Unequal Hem Corners
Measure from the shoulder seam to the bottom of each front before adding the hem.
Correct any discrepancy at the square joins first.
A decorative border cannot reliably hide a 2–3 cm difference between front panels. After correction, work identical edging rows across both lower corners.
Yarn Planning
Make and weigh one blocked square.
Multiply that weight by 58, then add approximately 15–20% for seams, cuffs, front bands, hem work, swatching, and gauge differences.
This project is unusually long, so purchasing all chartreuse yarn from one dye lot is preferable. Even a small shade change can become obvious when it occurs across an entire horizontal row of motifs.
Care and Storage
Follow the yarn manufacturer’s care instructions. Support the garment when wet because a soaked ankle-length cardigan can place considerable strain on the shoulder joins.
Dry flat to the measured dimensions. Avoid hanging the cardigan for long-term storage, particularly if it is made from cotton.
Fold it loosely with tissue or another clean textile between the sleeve and body layers. Before wearing after storage, lay it flat and check that the front edges remain equal.
Sources
Ravelry — King Cole Long Granny Square Cardigan — DK cotton, 4 mm hook, long-sleeve construction, and documented adult chest ranges.
Ravelry — Long Granny Square Cardigan by James Cummins — Aran yarn, 5 mm hook, and long-cardigan construction benchmark.
Lion Brand — Granny Square Cardigan — worsted yarn, 12.5 cm blocked square, intermediate skill level, and published bust measurements.
Crochet Kingdom — Granny Square Cardigan — 13.5 cm and 28 cm square benchmarks, 5–6 mm hooks, slip-stitch joins, sleeve gussets, and armhole construction.
Ravelry — Granny Square Cardigan by Lara Serbousek — published chest measurements from 36–60 inches and lengths from 18–30 inches.
Ravelry — Granny Square Cardigan by Joy of Motion Crochet — size-inclusive XS–5XL construction and documented 5.5–6.5 mm hook options.
LoveCrafts — Granny Square Cardigan Coat Duster — contemporary long coat/duster construction using granny-square motifs.
Dreamcrochets — Granny Squares Duster Cardigan Tutorial — long duster construction reference covering back squares, front panels, sleeves, shoulder seams, side seams, and front edging.
Conclusion
The blocked square is the controlling measurement for this garment, so confirm 15 cm before producing the remaining motifs. Keep the fronts narrow, leave 27–30 cm armholes, and build the sleeve flare separately rather than forcing extra fullness into the shoulder. Once assembled, hang the unfinished garment briefly to identify vertical growth before completing its final block. Your next step is to crochet and wash one test square, then record its relaxed dimensions. Save this granny square crochet duster cardigan pattern to Pinterest or share the finished coat on Instagram with #ChartreuseGrannyDuster. Would you keep the entire duster chartreuse as pictured, or use a darker olive only for the joins and cuffs?









