Introduction
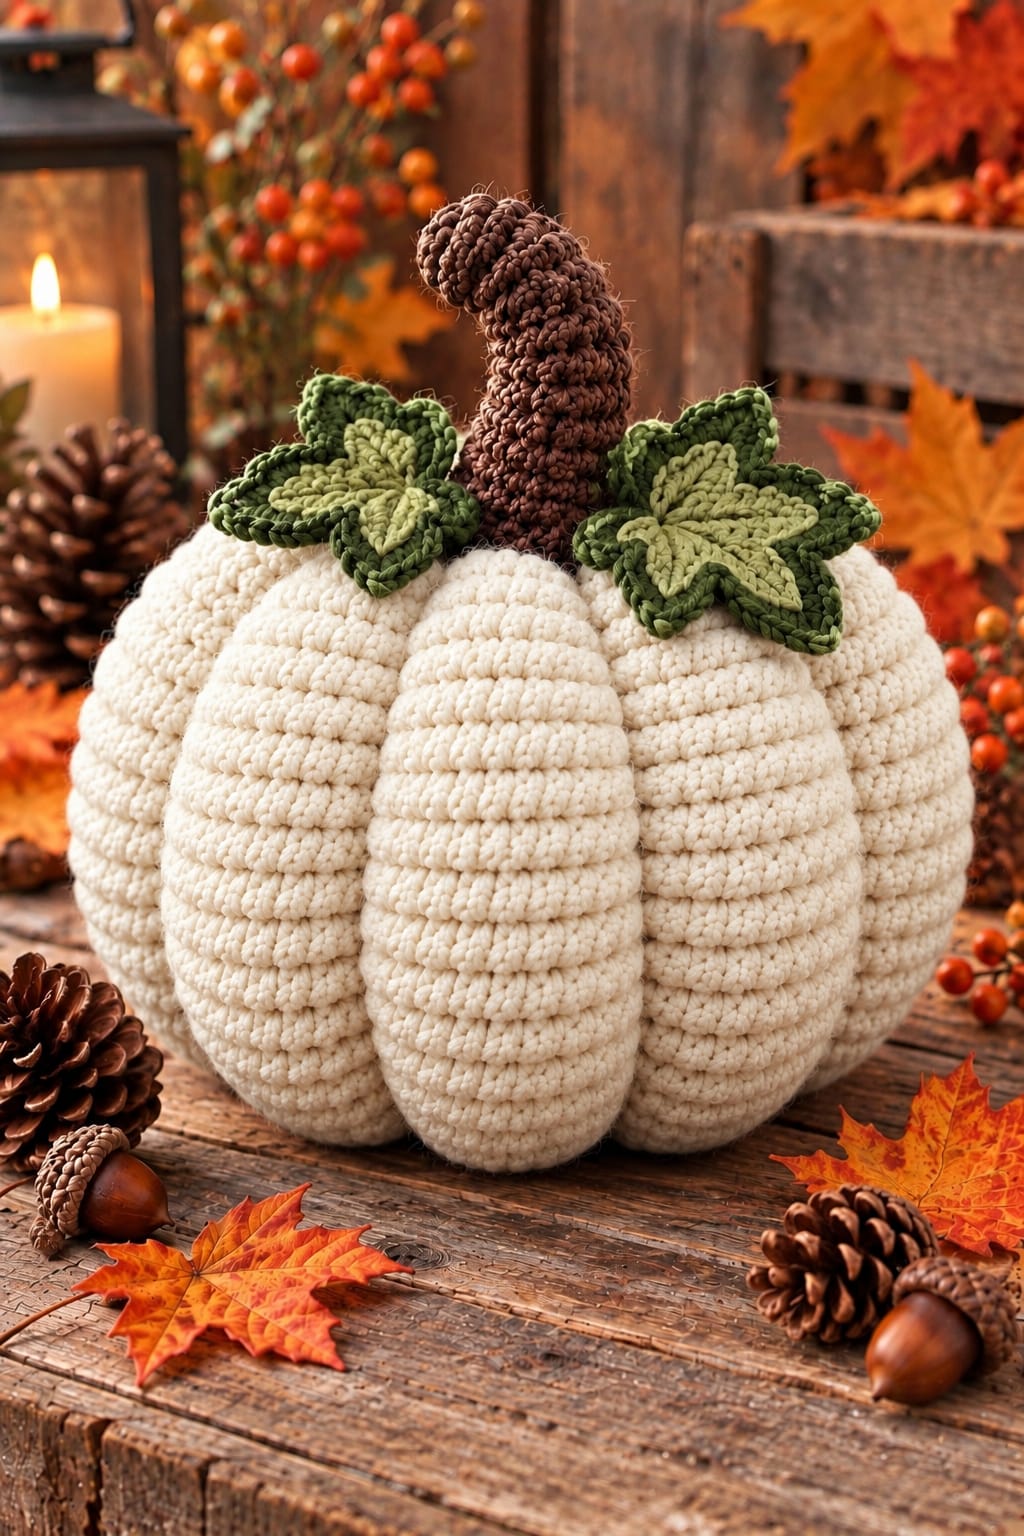
Eight deep ivory lobes converge beneath a hooked brown stem and two layered five-point leaves. This large white crochet pumpkin pattern uses super-bulky yarn, a 9 mm hook, external sculpting, a textured curved stem, and two-tone green foliage. The intermediate reconstruction targets approximately 28 cm wide and 27 cm overall, giving you a substantial freestanding pumpkin for a table, hearth, or autumn display.
The instructions below are an original photo-inspired reconstruction based on visible structure; published patterns cited later are used only for sizing, gauge, and material benchmarks.
The Design: What Makes This White Pumpkin Different
The photographed pumpkin depends on scale and unusually deep segmentation. Eight broad lobes remain visible from crown to base, so the body is first crocheted as a large stuffed form and then compressed with eight external sculpting strands. Super-bulky yarn is intentional: it reconciles the large 27–30 cm target with a manageable stitch count while preserving the thick horizontal crochet texture. The tall brown stem is built separately and bent before attachment, while two five-point leaves combine light olive centers with darker green borders. This large white crochet pumpkin pattern therefore separates body construction from final shaping. A common mistake is stuffing a decorative pumpkin until it becomes rigid. Excess filling resists the sculpting strands, leaving shallow valleys and turning a broad pumpkin into a nearly spherical form.
Project Info at a Glance
| Skill Level | Time | Finished Size | Hook | Best For |
|---|---|---|---|---|
| Intermediate | Reconstruction estimate: 6–9 hours | Reconstruction target: 27–30 cm wide × 25–28 cm overall | 9 mm body; 5 mm foliage/stem | Fall tables, hearths, mantels, neutral autumn décor |
The finished dimensions are reconstruction targets inferred from the photograph. Fairfield World’s published large super-bulky pumpkin measures about 11 inches / 28 cm in diameter and 7.5 inches / 19 cm high and uses a 9 mm hook. The Unraveled Mitten likewise specifies #6 super-bulky yarn with a 9 mm hook for its large chunky pumpkin. Those benchmarks support super-bulky yarn for the photographed scale more convincingly than a small worsted-weight amigurumi body.
Materials and Tools
Yarn
- Ivory / warm white — #6 super-bulky yarn — reconstruction estimate: 260–330 g
- Chocolate brown — #5 bulky or doubled worsted yarn — reconstruction estimate: 45–60 g
- Dark olive green — worsted #4 — reconstruction estimate: 25–35 g
- Light moss green — worsted #4 — reconstruction estimate: 15–25 g
Choose a matte or lightly twisted super-bulky body yarn rather than a slippery plush fiber. Fairfield World’s large-pumpkin benchmark uses three 3.5-ounce skeins of super-bulky yarn, while The Unraveled Mitten lists 141 yards for its large #6 pumpkin. Actual consumption here depends on stuffing density and gauge.
Tools
- 9 mm crochet hook for pumpkin body
- 5 mm crochet hook for stem
- 4 mm crochet hook for leaves
- Polyester fiberfill — approximately 450–600 g reconstruction allowance
- 30 cm upholstery or doll needle for sculpting
- Large tapestry needle
- Stitch markers
- Scissors
Abbreviations
- MR — magic ring
- ch — chain
- sl st — slip stitch
- sc — single crochet
- hdc — half double crochet
- dc — double crochet
- tr — treble crochet
- inc — 2 sc in one stitch
- dec — invisible decrease
- BLO — back loop only
- st/sts — stitch/stitches
An invisible decrease is worked through the front loops of two adjacent stitches before completing one single crochet, reducing bulk and limiting visible gaps during the closing rounds.
Pattern — Step by Step
Large Ivory Pumpkin Body
Yarn: ivory #6 super bulky. Work in a continuous spiral unless stated otherwise.
R1: 6 sc in MR. (6)
R2: Inc ×6. (12)
R3: (1 sc, inc) ×6. (18)
R4: (2 sc, inc) ×6. (24)
R5: (3 sc, inc) ×6. (30)
R6: (4 sc, inc) ×6. (36)
R7: (5 sc, inc) ×6. (42)
R8: Sc around. (42)
R9: Sc around. (42)
R10: Sc around. (42)
R11: Sc around. (42)
R12: Sc around. (42)
R13: Sc around. (42)
R14: Sc around. (42)
R15: Sc around. (42)
R16: Sc around. (42)
R17: Sc around. (42)
R18: Sc around. (42)
R19: Sc around. (42)
R20: Sc around. (42)
R21: (5 sc, dec) ×6. (36)
R22: (4 sc, dec) ×6. (30)
R23: (3 sc, dec) ×6. (24)
Begin stuffing. Fill the outside wall first and leave the center slightly softer than the lobes.
R24: (2 sc, dec) ×6. (18)
R25: (1 sc, dec) ×6. (12)
Add the final stuffing. Do not pack the crown rigidly.
R26: Dec ×6. (6)
Fasten off with a 60 cm tail. Thread the tail through the six remaining front loops and close the opening.
Why 42 Stitches Work at This Scale
The stitch count is intentionally paired with #6 super-bulky yarn rather than worsted yarn. A published Ravelry chunky-pumpkin benchmark lists a gauge of approximately 9 stitches per 4 inches in super-bulky half double crochet. At that general stitch scale, 42 stitches provide enough circumference for a substantial decorative form after stuffing and sculpting.
By contrast, a 42-stitch circumference in ordinary worsted yarn would produce a much smaller pumpkin. Yarn weight is therefore part of the size calculation, not merely a material substitution.
Flattening the Body
Thread a strong length of ivory yarn onto the upholstery needle.
Enter through the bottom center and exit through the crown.
Return through the center to the bottom.
Pull until the crown and base move approximately 3–4 cm closer together.
Repeat once, tie securely at the base, and bury the ends.
This compression changes the initial rounded body into the broad profile visible in the photograph.
Sculpting Eight Deep Lobes
Cut eight lengths of strong ivory yarn, each approximately 90–100 cm.
Mark the crown at eight approximately equal positions. Eight sections are separated by about 45 degrees.
For the first groove, anchor yarn at the bottom center.
Carry it externally over the body to the crown center.
Pass through the pumpkin’s center and return to the bottom.
Pull gradually until a clear groove forms.
Tie securely.
Repeat at the remaining seven marked positions.
Work opposite channels consecutively—first 12 and 6 o’clock, then 3 and 9 o’clock, followed by the four diagonal positions. This distributes compression more evenly than working around the pumpkin in one direction.
Refining the Lobe Shape
Set the pumpkin on a flat surface after all eight sculpting strands are installed.
Massage stuffing away from each groove and toward the center of each lobe.
The lobe centers should project outward while the channels remain narrow.
If one lobe is noticeably wider, loosen its neighboring sculpting strand rather than adding another groove.
Target a finished body around 27–30 cm wide and approximately 18–20 cm high before the stem.
Curved Chocolate-Brown Stem
Yarn: bulky #5 brown or two strands of worsted held together. Use a 5 mm hook. Leave a 60 cm starting tail before making the MR; this tail will attach the broad base to the pumpkin.
R1: 6 sc in MR. (6)
R2: Inc ×6. (12)
R3: (1 sc, inc) ×6. (18)
R4: BLO sc around. (18)
R5: Sc around. (18)
R6: (4 sc, dec) ×3. (15)
R7: Sc around. (15)
R8: (3 sc, dec) ×3. (12)
R9: Sc around. (12)
R10: Sc around. (12)
R11: Sc around. (12)
R12: Sc around. (12)
R13: (2 sc, dec) ×3. (9)
R14: Sc around. (9)
R15: Sc around. (9)
R16: Sc around. (9)
R17: Sc around. (9)
R18: (1 sc, dec) ×3. (6)
R19: Sc around. (6)
R20: Sc around. (6)
Stuff the lower two-thirds firmly enough to stand. Use only a small amount of stuffing in the final third so the stem can bend.
Fasten off, close the six-stitch tip, and bury the finishing tail.
Target approximately 13–15 cm long.
Shaping the Stem Curve
Thread approximately 60 cm of brown yarn through the inside curve of the stem.
Enter near R6 and take several small running stitches vertically toward R17.
Pull the strand until the upper stem curves approximately 30–40 degrees.
Tie securely inside the fabric and bury the ends.
The bend should occur gradually. Folding the stem sharply at one round creates a kink instead of the thick hooked profile visible in the photograph.
Adding Stem Texture
Join brown yarn at the base.
Work loose surface slip stitches vertically toward the tip, following one column of stitches.
Fasten off.
Repeat at three or four positions around the stem.
These raised lines add the rough bark-like appearance visible in the reference without changing the underlying stem dimensions.
Large Two-Tone Five-Point Leaf — Make 1
Use light moss for the center and dark olive for the border.
With light moss, ch 4 and join to form a ring.
R1: Work 10 sc into ring. Join. (10)
R2: *Sc in next st, (hdc, dc, tr, ch 3, sl st in first ch, tr, dc, hdc) in next st.* Repeat ×5.
Five pointed lobes are formed from the ten center stitches: one anchoring sc and one lobe stitch per repeat.
Fasten off light moss.
Dark Olive Leaf Border
Join dark olive at the base of any lobe.
Work sc along the first side.
At the ch-3 point work (sc, ch 2, sl st in first ch, sc).
Continue sc down the second side.
Sl st in the valley between lobes.
Repeat around all five lobes.
Fasten off with a 40 cm tail.
Block to approximately 13–15 cm across.
Second Five-Point Leaf — Make 1
Repeat the large leaf pattern.
For the photographed asymmetry, block the second leaf approximately 1 cm smaller and rotate it so only four or five points remain clearly visible beside the stem.
Optional Leaf Veins
Join light moss yarn at the center ring.
Surface sl st toward one point, stopping approximately 5 mm before the tip.
Fasten off.
Repeat toward the remaining four points.
Keep the surface stitches relaxed. Tight veins draw the broad lobes inward and make the leaf cup.
Attaching the Stem
Place the broad 18-stitch stem base over the crown recess.
Use the reserved 60 cm starting tail to sew through the stem base and pumpkin fabric.
Make two complete passes around the circumference.
Add three long anchoring stitches from the stem’s lower wall into the pumpkin body.
Test the stem by gently moving the hooked tip. The base should remain stationary.
Attaching the Leaves
Position one leaf to the left-front of the stem and the second to the right-rear.
Overlap each leaf center with the stem base by approximately 2 cm.
Sew the center ring and lower 2–3 cm of each lobe nearest the stem.
Leave the pointed outer halves unattached.
The free points should rest over the crown rather than being stitched tightly against the pumpkin grooves.
Assembly
- Crochet the ivory body through R26 with #6 super-bulky yarn, stuffing the outer wall firmly while leaving the crown and central core slightly softer.
- Close the six-stitch opening and compress the top and bottom centers toward one another by approximately 3–4 cm to establish the broad pumpkin profile.
- Mark eight sculpting positions at approximately 45-degree intervals and install the first four grooves as opposing pairs before adding the four diagonal channels.
- Adjust stuffing by hand until all eight ivory lobes project evenly and the finished body measures approximately 27–30 cm across.
- Crochet the tapered brown stem from its broad base upward, leaving a 60 cm starting tail and keeping the upper third only lightly stuffed.
- Shape a 30–40-degree stem curve with concealed running stitches, then add three or four vertical surface-crochet lines for bark-like texture.
- Crochet two five-point leaves with light moss centers and dark olive borders, then block them to approximately 13–15 cm across.
- Sew the stem securely into the crown recess using the reserved base tail and reinforce it with three long stitches through the lower stem wall.
- Arrange the two leaves asymmetrically around the stem, attaching their centers and inner sections while leaving the outer pointed lobes free.
- Weave all tails through at least 5 cm of matching fabric, reshape the eight channels, and set the pumpkin on a flat surface to check that the base remains stable.
The finished reconstruction has eight deep ivory lobes, a tall hooked chocolate stem, and two layered green five-point leaves arranged around the crown.
7 Technical Tips
- The pumpkin becomes spherical: compress the crown and base approximately 3–4 cm before tightening the eight exterior grooves. Sculpting a tall sphere without first reducing its height produces narrow vertical lobes instead of the broad sections shown in the photograph.
- One lobe becomes narrower than the others: mark all eight channels at 45-degree intervals before inserting sculpting yarn. A channel displaced by even 10 degrees becomes obvious on a monochrome white body.
- Stuffing appears through the stitches: use a super-bulky yarn that works densely at 9 mm and place stuffing in small layers. Forcing large clumps directly against the fabric stretches individual stitches and creates pale gaps between them.
- The sculpting strand cuts into the fabric: use strong matching yarn and distribute tension over two passes through the center. Thin sewing thread can disappear too deeply between super-bulky stitches and damage the outer surface.
- The stem collapses at its bend: keep the lower two-thirds firm and reduce stuffing only in the final third. An entirely soft 13–15 cm stem bends at its base instead of forming the controlled upper hook.
- The leaves cup after attachment: keep every surface-crocheted vein relaxed and block each leaf before sewing. A vein only 5 mm shorter than the leaf surface can pull a pointed lobe visibly inward.
- The finished pumpkin rocks on the table: flatten the bottom center before the final sculpting knots are buried. A stable base should contact the table across approximately 8–10 cm rather than balancing on one rounded central point.
Why Super-Bulky Yarn Fits This Pumpkin
The photograph shows a substantial pumpkin whose stitches remain individually visible. That combination requires thick yarn.
Fairfield World’s published large crochet pumpkin uses super-bulky yarn with a 9 mm hook and finishes at approximately 11 inches / 28 cm in diameter. Its material list calls for three 3.5-ounce skeins of body yarn. The project also uses a long upholstery needle specifically because ordinary yarn needles are impractical for sculpting a pumpkin of that diameter.
The Unraveled Mitten likewise pairs #6 yarn with a 9 mm hook for chunky decorative pumpkins. These benchmarks support the body yarn and hook selected for this reconstruction.
Published 9-Inch Bulky Pumpkin Benchmark
Nicki’s Homemade Crafts publishes a large pumpkin using bulky Brava yarn and a 5 mm hook. The finished pumpkin measures approximately 9 inches in diameter × 6.5 inches high, and the Ravelry listing gives approximately 200–250 yards / 183–229 m.
That project uses linked treble crochet and rectangle-based construction rather than a sculpted spiral body, so its stitch instructions are not used here. Its dimensions provide a useful comparison between bulky and super-bulky decorative pumpkin scales.
Published Chunky Rectangle Benchmark
The Unraveled Mitten’s large chunky pumpkin uses Lion Brand Wool-Ease Thick & Quick or another #6 super-bulky yarn, a 9 mm hook, and approximately 141 yards. Its large rectangle is documented at approximately 10 × 22 inches before assembly.
The published design is crocheted in rows and cinched after seaming. That construction differs from the center-out body here, but the yarn quantity and hook provide useful benchmarks for a large super-bulky pumpkin.
Published 13-Inch Plush Pumpkin Benchmark
A current large plush amigurumi pumpkin listing documents finished dimensions of approximately 33 × 29 cm. It uses 100 g / 120 m plush yarn and a 5 mm hook.
This confirms that crochet pumpkins can reach roughly the scale visible in the photograph without extreme stitch counts when thick yarn is selected. Fiber thickness, gauge, stuffing, and sculpting all contribute to final dimensions.
Why the Body Uses External Sculpting
Horizontal crochet rows are visible across the individual lobes in the supplied image. A vertically ribbed rectangle would create a different surface direction.
Working one stuffed body first preserves those horizontal rows. Exterior strands then create the deep vertical channels afterward.
The method also gives you direct control over eight sections. If one groove is shallow, its strand can be tightened independently without changing the surrounding crochet fabric.
Why There Are Eight Lobes
The front view reveals several broad sections, with additional lobes continuing around both sides. Eight provides a balanced reconstruction and divides the circumference into equal 45-degree sectors.
Six channels would produce much broader sections and fewer visible valleys. Ten would make the lobes substantially narrower.
Marking all eight positions before sculpting is important because white yarn provides almost no color variation to disguise uneven spacing.
Why the Stem Starts at the Base
The stem’s widest section must sit against the pumpkin crown. Beginning there with an 18-stitch base provides enough fabric for secure attachment.
The stem then narrows through 15, 12, 9, and finally 6 stitches as it approaches the tip.
Leaving the long attachment tail at the starting magic ring solves a practical problem: the sewing yarn is already positioned at the broad base when the stem is complete.
Why the Leaves Use Two Greens
The photograph shows pale green internal leaf areas framed by darker olive edges. That contrast makes the five-point shapes readable against the ivory pumpkin.
A single-color leaf will still work, but the layered appearance becomes less pronounced. When substituting colors, keep the border darker than the center rather than reversing the values.
Muted moss, sage, forest, and olive combinations fit the neutral body without competing with the brown stem.
Making a Smaller Pumpkin
Use #5 bulky yarn with a 6–6.5 mm hook and retain the same stitch counts.
The finished body should shrink substantially while preserving the eight-lobe proportions.
Alternatively, use super-bulky yarn but stop the increases after R6 at 36 stitches. Reduce the straight section by approximately three rounds before beginning the matching decreases.
Keep eight sculpting channels if the intended appearance remains similar to the photograph.
Making a Larger Pumpkin
For a body exceeding approximately 30 cm, increase beyond 42 stitches rather than simply overstuffing.
Add:
R8: (6 sc, inc) ×6. (48)
R9: (7 sc, inc) ×6. (54)
Work additional 54-stitch plateau rounds, then reverse the increases during the closing section.
Another option is a thicker #7 jumbo yarn with a correspondingly larger hook. Sarah Maker notes that increasing yarn thickness is one established way to scale crochet pumpkins without completely redesigning their proportions.
Using a Ribbed Rectangle Instead
Rectangle-based pumpkins are a documented alternative. CrochetNet’s current three-size pattern uses back-loop half double crochet, and its large worsted version begins with a chain of 41 and works 56 rows for approximately 16 cm finished height.
The Unraveled Mitten also works chunky pumpkins in rows before seaming and cinching.
Use that method when vertical crochet ribs are wanted. For this photograph, the sculpted stuffed body is closer because horizontal stitch rows remain visible across the individual lobes.
Correcting a Pumpkin That Is Too Tall
Do not immediately tighten the eight lobe strands.
First run a separate shaping strand from the bottom center through the crown and back again.
Shorten the body vertically by approximately 3–4 cm.
Only then tighten the eight grooves. The center compression changes the overall proportion; groove strands primarily control segmentation.
Correcting Shallow Grooves
Check stuffing density before pulling harder.
If the body feels rigid, remove a small amount of filling through the crown before final closure or redistribute filling away from the groove.
Then retighten the relevant sculpting strand.
Briana K Designs specifically identifies overstuffing as a common reason crochet pumpkins become spherical rather than squat and strongly ribbed.
Correcting Uneven Channels
Measure the distance between neighboring grooves at the pumpkin’s widest circumference.
The eight measurements should be approximately equal.
If one lobe is substantially wider, release one adjacent knot and reposition the strand toward the center of that section.
Do not add a ninth strand to correct an eight-lobe layout because the resulting geometry will become asymmetric.
Correcting a Loose Stem
Remove the leaves temporarily if they obstruct the base.
Add three long stitches from the stem’s lower wall into different sections of the pumpkin crown.
Space those anchors roughly 120 degrees apart.
Pull until the 18-stitch stem base sits directly against the crown recess, then knot on the underside of the foliage.
Correcting a Stem That Is Too Straight
Add another internal shaping strand along the intended inside curve.
Take small running stitches over approximately 8–10 cm of stem length.
Pull gradually until the upper section moves another 10–15 degrees.
Do not fold the stem sharply between two rounds; the photograph shows a continuous hook rather than a hinged bend.
Correcting Leaf Points
Wet the leaf and pin all five tips individually.
Pull the points outward from the center rather than sideways.
The ch-3 tip should create a clear triangular projection after drying.
If a point remains rounded, remake only the border around that lobe with slightly looser tension instead of stretching the complete leaf.
Stuffing Strategy
Add fiberfill in small pieces and push it toward the outer wall. Keep the core softer so the upholstery needle can pass through the body without excessive force.
The crown needs less stuffing than the lobe centers because it must recess beneath the stem and foliage. The base also benefits from moderate rather than maximum firmness, allowing it to flatten against the table.
After sculpting, additional filling cannot easily be inserted. Check the lobe surfaces for hollow areas before closing R26.
Yarn Planning
Large pumpkins vary considerably in consumption because yarn thickness and construction method differ. Published benchmarks range from approximately 141 yards for a large #6 rectangle pumpkin to 200–250 yards for a bulky linked-crochet pumpkin.
For this reconstruction, buy enough ivory yarn to avoid changing dye lots midway through the body. Complete the body before using leftover ivory for any optional embellishment.
Brown and green quantities are comparatively small, making the stem and leaves practical uses for partial skeins.
Display and Storage
Set the pumpkin on a broad flat base rather than balancing it directly on one lobe. Rotate the foliage so the larger leaf spreads laterally and the hooked stem remains visible from the primary viewing direction.
For storage, avoid compressing the stem beneath heavier decorations. Place the pumpkin upright in a box with loose tissue supporting the stem curve.
If the lobes flatten during storage, redistribute the filling by hand and retighten the external sculpting strands before the next display season.
Sources
Fairfield World — Large Crocheted Pumpkin — super-bulky yarn, 9 mm hook, approximately 11-inch diameter, 7.5-inch height, and upholstery-needle sculpting benchmark.
The Unraveled Mitten — Chunky Crochet Pumpkin Pattern — #6 super-bulky yarn, 9 mm hook, 141 yards for the large size, and rectangle-based pumpkin construction.
Nicki’s Homemade Crafts — Large Crochet Pumpkin — bulky yarn, 5 mm hook, approximately 9-inch diameter × 6.5-inch height, and linked-crochet construction.
Ravelry — Large Pumpkin by Nicole Riley — bulky yarn, 5 mm hook, 200–250 yards, and published 6.5 × 9 inch size benchmark.
Crafting Each Day — Free Chunky Crochet Pumpkin — #6 yarn, 9 mm hook, 30-yard smaller pumpkin benchmark, and wide-ribbed construction.
Sarah Maker — Free Crochet Pumpkin Pattern — guidance for scaling pumpkin dimensions through yarn weight and stitch-count changes.
CrochetNet — Crochet Pumpkin Pattern in Three Sizes — worsted and bulky yarn benchmarks, 5 mm and 6.5 mm hooks, and documented rectangle sizing.
Ravelry — Chunky Pumpkin by Crochet 365 Knit Too — super-bulky yarn, 8 mm hook, approximately 9 stitches per 4 inches, and published chunky-pumpkin yardage.
Conclusion
The eight grooves determine this pumpkin’s silhouette, so establish the broad body before tightening any individual sculpting channel. Use super-bulky ivory yarn for the photographed scale, keep the center slightly softer than the lobes, and reserve a long starting tail at the brown stem base for secure attachment. Your next step is to crochet the body through R10 and check its developing gauge before committing the remaining yarn. Save this large white crochet pumpkin pattern to Pinterest or share the finished decoration on Instagram with #IvoryIvyPumpkin. Would you keep both five-point leaves two-tone green, or make one entirely dark olive?









