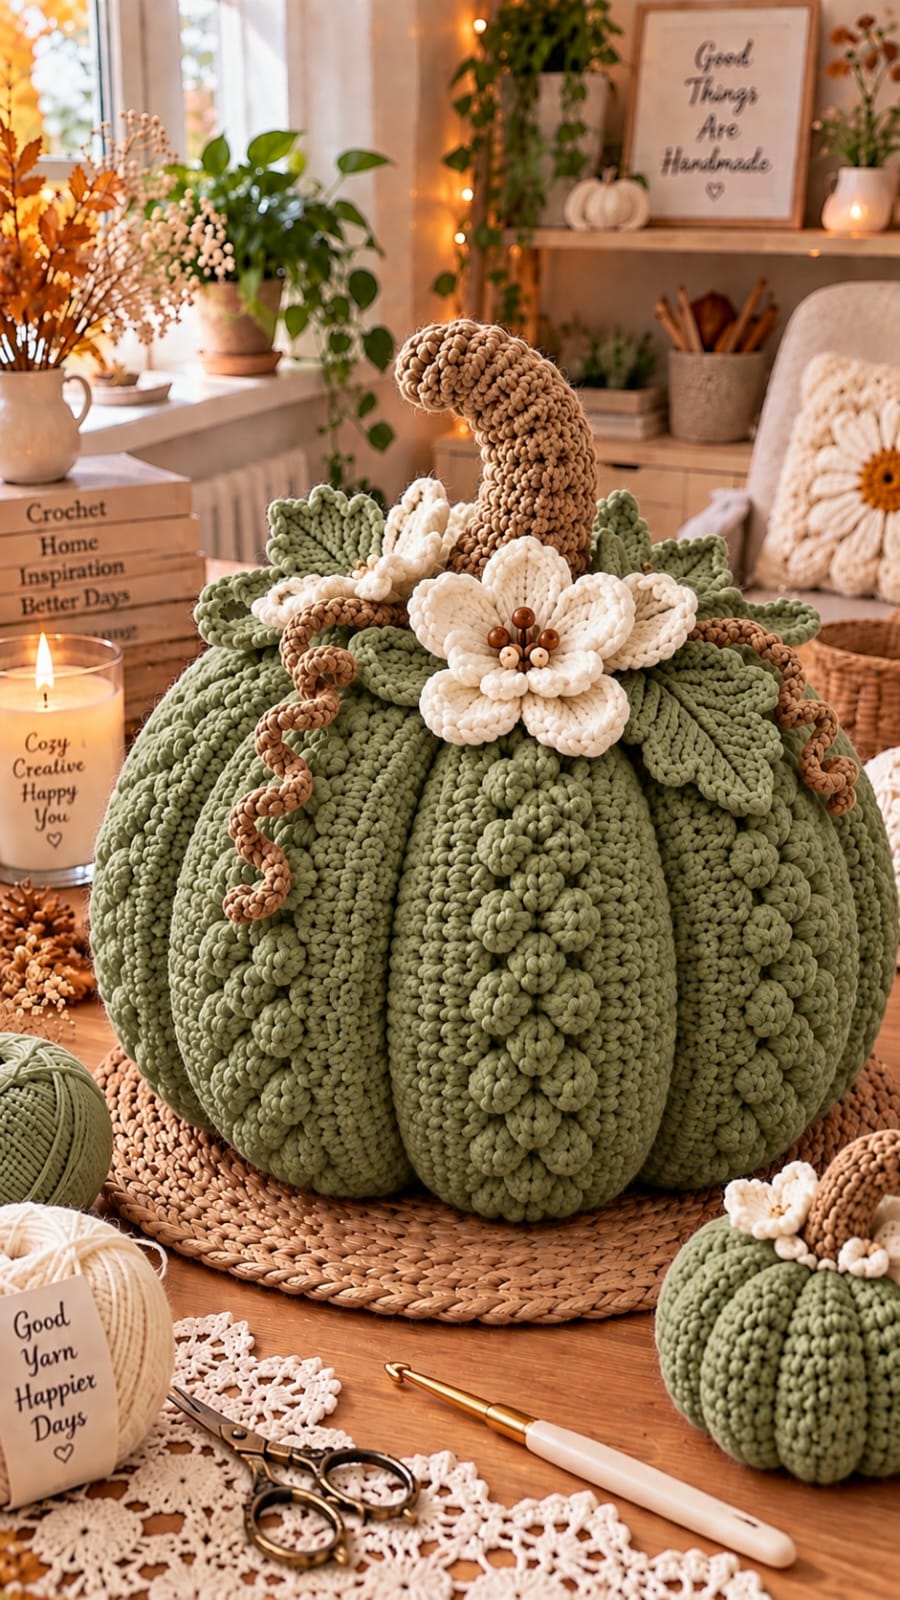
A sage pumpkin this broad needs deep vertical channels to keep the muted green body from reading as an oversized ball. This large crochet pumpkin pattern combines a super-bulky sculpted body with a tall curved brown stem, cream layered flowers, green crown leaves and spiral vines. The photo-inspired version targets approximately 35–40 cm across and 45–50 cm high including the stem. Intermediate crochet skills are appropriate.
The Design: What Makes This Crochet Pumpkin Different
The body is built as one large stuffed form and then sculpted into approximately ten pronounced lobes. That construction produces deeper channels than relying on surface stitches alone and allows the maker to control each segment after stuffing.
The crown provides the second structural layer. A tall hooked brown stem rises above overlapping sage leaves, while large cream flowers create contrast against the green body. Brown corkscrew vines extend beyond the crown and break up its circular outline.
Small raised green flowers run vertically down selected lobes. These details reinforce the direction of the ribs without covering the entire surface. The main failure point with a giant crochet pumpkin is excessive stuffing. A body packed completely rigid cannot be compressed sufficiently when the sculpting strands are tightened.
Project Info at a Glance
| Skill Level | Time | Finished Size | Body Hook | Yarn Weight |
|---|---|---|---|---|
| Intermediate | 9–13 hours | Approx. 35–40 cm wide × 45–50 cm high | 9 mm | Super Bulky #6 |
The measurements are targets for this photo-inspired reconstruction rather than measurements taken directly from the photograph. Final dimensions depend on yarn thickness, stuffing density, gauge and the depth of the sculpted ribs.
Materials and Tools
Yarn
- Sage green — Super Bulky #6 — approximately 550–700 g for the pumpkin body
- Sage green — Super Bulky #6 — approximately 100–150 g for leaves and raised flowers
- Cream — Super Bulky #6 — approximately 120–170 g for the layered flowers
- Warm brown — Super Bulky #6 — approximately 100–130 g for the stem
- Warm brown — Bulky or Super Bulky — approximately 40–60 g for curly vines
Allow approximately 900–1,150 g of yarn for the complete large pumpkin. Keep additional sage yarn available if making deeper ribs or more crown leaves.
Tools
- 9 mm crochet hook — pumpkin body
- 6.5 mm crochet hook — stem
- 5–6 mm crochet hook — flowers, leaves and vines
- Polyester fiberfill — approximately 900–1,300 g
- Long upholstery needle
- Large tapestry needle
- Locking stitch markers
- Sharp scissors
- Tape measure
Abbreviations
- MR — magic ring
- ch — chain
- sc — single crochet
- hdc — half double crochet
- dc — double crochet
- tr — treble crochet
- inc — 2 sc in one stitch
- dec — invisible single crochet decrease
- sl st — slip stitch
- BLO — back loop only
- st/sts — stitch/stitches
For an invisible decrease, insert the hook through the front loops of the next two stitches, yarn over and pull through both front loops, then complete the single crochet.
Gauge and Finished Size
A practical starting gauge is approximately 8 stitches per 10 cm using super-bulky yarn and a 9 mm hook. The exact gauge can vary, but the fabric must be dense enough to prevent white stuffing from showing between stitches.
The completed pumpkin body should measure approximately 35–40 cm across after sculpting. The tall stem adds roughly 15–20 cm above the crown.
Make a small swatch before beginning. Stretch it firmly between two fingers. If the openings become large enough for fiberfill to show clearly, use a smaller hook.
Large Sage Green Crochet Pumpkin Pattern
Work the pumpkin body in a continuous spiral. Mark the first stitch of every round and move the marker upward as each round is completed.
Sage Green Pumpkin Body
Yarn: sage green.
R1: 6 sc in MR. (6)
R2: inc ×6. (12)
R3: (sc, inc) ×6. (18)
R4: (2 sc, inc) ×6. (24)
R5: (3 sc, inc) ×6. (30)
R6: (4 sc, inc) ×6. (36)
R7: (5 sc, inc) ×6. (42)
R8: (6 sc, inc) ×6. (48)
R9: (7 sc, inc) ×6. (54)
R10: (8 sc, inc) ×6. (60)
R11: (9 sc, inc) ×6. (66)
R12: (10 sc, inc) ×6. (72)
R13–R27: Sc in every stitch around. (72)
The 72-stitch section creates the broad center. At this stage the piece should resemble a large rounded bowl rather than a segmented pumpkin.
R28: (10 sc, dec) ×6. (66)
R29: (9 sc, dec) ×6. (60)
R30: (8 sc, dec) ×6. (54)
R31: (7 sc, dec) ×6. (48)
Begin stuffing. Place small amounts of fiberfill around the lower perimeter before filling the center.
R32: (6 sc, dec) ×6. (42)
R33: (5 sc, dec) ×6. (36)
Add additional stuffing around the side walls. Keep the center slightly more compressible.
R34: (4 sc, dec) ×6. (30)
R35: (3 sc, dec) ×6. (24)
R36: (2 sc, dec) ×6. (18)
Finish stuffing before the opening becomes too narrow to reach the lower sections.
R37: (sc, dec) ×6. (12)
R38: dec ×6. (6)
Fasten off, thread the tail through the remaining six front loops and pull the opening closed.
How to Sculpt Deep Pumpkin Ribs
The stuffed body now needs external sculpting. The photograph shows approximately ten deep channels dividing the pumpkin into broad vertical lobes.
- Cut a strong sage yarn strand approximately 200–240 cm long.
- Thread the strand through a long upholstery needle.
- Insert the needle through the bottom center and bring it out through the crown.
- Run the yarn down the outside of the pumpkin to create the first channel.
- Insert the needle through the bottom center and return through the crown.
- Pull gradually until the yarn sinks into the stuffed body.
- Repeat the process at evenly spaced positions around the circumference.
- Create approximately ten lobes, checking their widths before final tightening.
- Adjust the stuffing by hand if one segment appears flatter than its neighbors.
- Knot the sculpting yarn securely at the crown where the knot will later be covered by the stem and leaves.
Do not pull one channel to maximum depth before establishing the others. Gradual tightening around the entire body produces more consistent lobes.
Tall Curved Brown Stem
Yarn: warm brown. Use a 6.5 mm hook.
R1: 6 sc in MR. (6)
R2: inc ×6. (12)
R3: (sc, inc) ×6. (18)
R4: BLO sc around. (18)
R5–R8: Sc around. (18)
R9: 13 sc, sl st in remaining 5 sts. (18)
R10: Sc around. (18)
R11: 12 sc, sl st in remaining 6 sts. (18)
R12: Sc around. (18)
R13: 11 sc, sl st in remaining 7 sts. (18)
R14–R15: Sc around. (18)
R16: (sc, dec) ×6. (12)
R17–R21: Sc around. (12)
R22: 8 sc, sl st in remaining 4 sts. (12)
R23–R25: Sc around. (12)
R26: dec ×6. (6)
Fasten off and close the final opening.
Stuff the lower two-thirds firmly. Use progressively less stuffing toward the tip so the upper stem can form the pronounced hook visible in the reference.
Leave approximately 35 cm of brown yarn for attachment.
Large Sage Leaves — Make 7
Yarn: sage green. Use a 5–6 mm hook.
Row 1: Ch 14.
Starting in the second chain from the hook, work:
Sl st, sc, hdc, dc, tr in the next 5 chains, dc, hdc, sc, then 3 sc into the final chain.
Rotate the work to crochet along the unused loops on the opposite side of the foundation chain.
Work sc, hdc, dc, tr in the next 5 loops, dc, hdc, sc and sl st at the base.
Row 2: Ch 1. Sc around the entire leaf. At the tip work (sc, ch 2, sc).
Row 3: Sl st along the center foundation chain from the base toward the tip to form a raised central vein.
Fasten off. Leave a 25 cm sewing tail.
Large Cream Layered Flower — Make 1
Yarn: cream with optional brown center.
R1: With brown, 6 sc in MR. (6)
R2: inc ×6. (12)
R3: Change to cream. Work *(sl st, ch 3, 3 dc, ch 3, sl st)* into every second stitch to create six inner petals.
R4: Working behind the petals, *ch 5 and anchor with sl st between adjacent petals*. Repeat around.
R5: Into each ch-5 space work (sc, hdc, 4 dc, hdc, sc).
R6: Behind the second layer, make six ch-6 loops.
R7: Into each ch-6 loop work (sc, hdc, dc, 3 tr, dc, hdc, sc).
Fasten off. Leave approximately 30 cm for sewing.
Keep the outer petals three-dimensional. Do not flatten them during assembly.
Secondary Cream Flower — Make 2
Yarn: cream.
R1: 6 sc in MR. (6)
R2: inc ×6. (12)
R3: Work *(sl st, ch 3, 2 dc, ch 3, sl st)* into every second stitch to create six petals.
R4: Behind each first-layer petal, make a ch-5 loop.
R5: Into each loop work (sc, hdc, 3 dc, hdc, sc).
Fasten off. Leave a 25 cm tail.
Small Sage Raised Flowers — Make 12–16
Yarn: sage green.
R1: 6 sc in MR. (6)
R2: In each stitch work (sl st, ch 2, 2 hdc, ch 2, sl st).
Fasten off. Leave approximately 15 cm for attachment.
These small motifs form the raised vertical flower trails on selected pumpkin lobes.
Brown Spiral Vines — Make 4
Yarn: warm brown.
Ch 36.
Beginning in the second chain from the hook, work 3 sc in every chain.
The high stitch density causes the strip to curl automatically into a spiral.
For a tighter lower section, work 4 sc into several consecutive chains near the end.
Fasten off and leave a 20 cm attachment tail.
Long Brown Corkscrew Vine — Make 1
Ch 50.
Beginning in the second chain, work 3 sc in each chain to the end.
Allow the vine to twist naturally. Do not stretch it straight after crocheting.
Fasten off. Leave approximately 25 cm for attachment.
Optional Crochet Flower Centers
The large cream flower in the reference includes small rounded brown and cream center details. An all-yarn version keeps the decorative elements soft and permanently attached.
For each brown center detail, make a small French-knot-style yarn knot or crochet a compact bobble and sew it through the flower center.
For cream details, repeat with a smaller strand of cream yarn. Secure every element through several stitches on the reverse of the flower.
Assembly
- Finish stuffing and sculpting the sage pumpkin before attaching any crown decorations.
- Position the brown stem over the top center. Pin the base and sew it through dense pumpkin stitches twice around the circumference.
- Arrange the seven sage leaves around the stem. Point several leaves outward and allow others to overlap neighboring leaves.
- Place the largest cream flower toward the front of the crown and slightly to one side of the stem.
- Position the two secondary cream flowers behind or beside the main flower to create an irregular cluster.
- Sew the small sage flowers vertically down two or three prominent pumpkin lobes.
- Attach the shorter brown spiral vines around the stem and beneath the leaves.
- Place the longest corkscrew vine at the front-left or front-right side and allow most of it to hang freely.
- Reshape the stem curve and separate overlapping flower petals after all components are secured.
- Hide the remaining yarn tails inside the body or beneath firmly attached crown components.
The completed pumpkin should show a broad sage body divided into deep lobes, a tall hooked brown stem, layered cream flowers and an irregular ring of green leaves and curling vines.
7 Technical Tips for Better Pumpkin Shaping
- Visible fiberfill: Stretch the body fabric before stuffing. If the openings expose the filling, reduce the body hook by approximately 0.5–1 mm.
- Shallow ribs: Keep the center of the pumpkin slightly softer than the outer lobes. Excessive stuffing prevents the sculpting yarn from producing deep channels.
- Uneven segments: Mark all ten channel positions before fully tightening the first one. Even spacing at the crown produces more consistent lobe widths at the widest point.
- Stem tipping: Sew through the bottom two rounds of the stem rather than only its final edge. A tall 15–20 cm stem places substantial pressure on a narrow attachment seam.
- Leaf rotation: Secure each large leaf at the base and at least one additional point approximately 2–3 cm above the base. A single stitch allows the heavy leaf to turn over.
- Flattened petals: Sew the cream flowers through their centers and inner petal bases. Attaching the complete perimeter removes the layered profile.
- Stretched corkscrews: Attach only the upper section of each spiral vine. Pulling the entire vine tightly against the pumpkin destroys the free curl visible in the design.
How to Make a Smaller Sage Crochet Pumpkin
The same design can be reduced by stopping the body increases earlier. Stop at 48 stitches for a medium pumpkin or 36 stitches for a substantially smaller decorative version.
After reaching the selected maximum count, work several plain rounds to establish height and then reverse the same six-stitch increase sequence as decreases. A 48-stitch body therefore decreases through 42, 36, 30, 24, 18, 12 and 6 stitches.
Reduce the crown components at the same time. Shorter leaves and a lower stem maintain the proportions of the original design.
How to Create Deeper Crochet Pumpkin Ribs
Do not rely on a single aggressive pull to create each channel. Establish all of the sculpting lines first, then work around the pumpkin a second time and increase their tension gradually.
If one channel remains noticeably shallow, add a second strand along the same path. Keep both strands centered in the existing groove rather than placing them side by side.
Check the bottom after tightening. The pumpkin should remain stable on a flat surface. Excessive tension through the center can pull the base upward and cause the finished piece to wobble.
Stuffing the Large Pumpkin Correctly
Use small handfuls of fiberfill instead of inserting one large mass. Push the first layers toward the lower side walls and gradually fill around the entire circumference.
Add stuffing to each lobe area before filling the central cavity. This produces enough outward pressure to maintain a full shape after the sculpting yarn is tightened.
Leave the central region slightly softer. The body should resist light pressure but still compress under a firm squeeze.
Before completing the final decrease rounds, place the pumpkin on a table and inspect the circumference. Correct flat spots while the opening is still large enough to reach through.
Choosing Colors for This Crochet Pumpkin
Sage green changes the character of the design compared with a conventional orange pumpkin. The muted body allows cream flowers and the warm brown stem to remain distinct without requiring additional accent colors.
For a cooler palette, substitute ivory with soft white and use a gray-brown stem. For a warmer variation, combine olive green with oatmeal flowers and a medium caramel stem.
Keep the body and raised flower trails in the same green when recreating the photographed arrangement. Matching those components makes the small flowers read as surface texture rather than a separate contrasting appliqué.
Adjusting the Flower Crown
The crown should remain asymmetrical. Position the largest cream flower first, then arrange the smaller flowers and leaves around it before sewing anything permanently.
Keep part of the brown stem visible at its base. Packing flowers completely around the stem removes the visual separation between the vertical stem and horizontal crown.
Pin all leaves before sewing. Their tips should extend beyond the flower cluster at several different angles. This produces the irregular botanical outline visible in the reference.
Finishing the Pumpkin
After assembly, rotate the pumpkin and inspect it from every side. Adjust the fiberfill manually if any lobe has become compressed while the crown was being sewn.
Check the stem by gently moving it from side to side. Add another hidden attachment round if the base shifts independently of the pumpkin.
Separate the cream flower petals with your fingers and reshape the corkscrew vines without stretching them. The largest flower should remain clearly visible from the front while the secondary flowers sit partly behind the surrounding leaves.
For storage, support the pumpkin body rather than lifting it by the stem. Avoid placing objects on top of the crown because prolonged compression can permanently flatten the curved stem and layered petals.
Conclusion
Complete the sage body and sculpt its ribs before deciding the final crown arrangement. The finished channels determine where the small raised flowers look balanced and how far the large leaves should extend over each lobe. Crochet one cream flower and one sage leaf next, pin both temporarily beside the stem and check their scale before making the remaining pieces. Save this large crochet pumpkin pattern to Pinterest or share the finished version on Instagram with #SageFloralCrochetPumpkin. For this specific design, would you keep the cream flower cluster concentrated at the crown or extend several smaller cream flowers down one sage rib?









