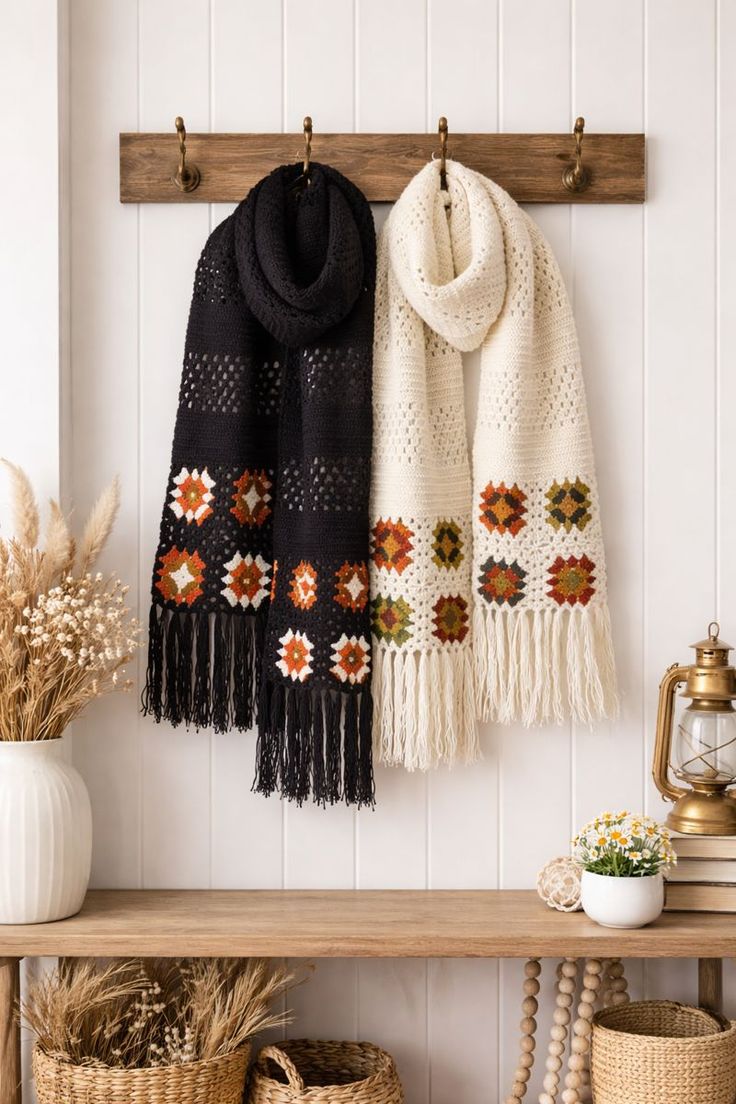
Four small autumn diamonds at each end change this scarf from a plain rectangular wrap into a colorwork project. This crochet granny square scarf pattern combines a solid main fabric, openwork bands, joined granny motifs and long fringe. The photo-inspired version targets approximately 24–27 cm wide and 175–190 cm long before fringe. DK yarn and a 4 mm hook keep the fabric flexible enough to drape around the neck.
The Design: What Makes This Crochet Scarf Different
The scarf uses three textures instead of repeating one stitch from end to end. Dense crochet forms most of the body, narrow openwork bands reduce bulk, and small granny-style motifs create the decorative lower sections.
The photograph shows two color versions: black and cream. Both use autumn accents in burnt orange, rust, olive, mustard and warm neutral shades. Keeping the accent palette consistent allows the same granny square scarf construction to produce two substantially different finished looks.
The motif placement is also important. Decorative squares remain concentrated near the scarf ends instead of continuing through the neck section. A common construction error is making the motif section much heavier than the plain fabric. Matching yarn weight and blocking every square to the same dimensions prevents the lower edges from widening.
Project Info at a Glance
| Skill Level | Time | Finished Size | Hook | Yarn |
|---|---|---|---|---|
| Intermediate | 8–12 hours | Approx. 24–27 × 175–190 cm before fringe | 4 mm | DK / Light Worsted |
The measurements are targets for this photo-inspired reconstruction rather than measurements taken directly from the photograph. Adjust the length before beginning the second decorative end if a shorter or longer scarf is required.
Materials and Tools
Yarn
- Black or cream main color — DK yarn — approximately 300–350 g
- Burnt orange — DK yarn — approximately 25 g
- Rust — DK yarn — approximately 20 g
- Olive green — DK yarn — approximately 20 g
- Mustard/gold — DK yarn — approximately 20 g
- Cream or beige accent — DK yarn — approximately 25 g
- Main-color fringe allowance — approximately 50–70 g
Allow approximately 450–500 g total if making a long scarf with dense fringe. Wool, acrylic, cotton blends or another smooth DK yarn can be used, but all colors should have approximately the same thickness.
Tools
- 4 mm crochet hook
- 3.5 mm crochet hook — optional for tighter granny centers
- Tapestry needle
- Sharp scissors
- Locking stitch markers
- Blocking pins
- Tape measure
Abbreviations
- ch — chain
- sc — single crochet
- hdc — half double crochet
- dc — double crochet
- sl st — slip stitch
- sp — space
- st/sts — stitch/stitches
- RS — right side
- WS — wrong side
No decreases are required for the main rectangular scarf. Consistent edge stitches are more important because even a one-stitch change can gradually alter the scarf width.
Gauge and Finished Measurements
A practical gauge for the solid fabric is approximately 18 stitches × 10 rows per 10 cm after light blocking. Exact gauge is less important than matching the width of the main scarf to the completed motif panel.
The target width is approximately 24–27 cm. The scarf body should measure approximately 175–190 cm before adding fringe.
Make one granny motif before starting the full project. Block it and measure the width. Four motifs arranged as two squares across and two rows high should fit the width of the scarf without being stretched.
Crochet Granny Square Scarf Pattern
The scarf is worked as a long rectangular body with decorative motif panels positioned near both ends. The instructions below create the same general structure visible in the reference while allowing either a black or cream main color.
Main Scarf Foundation
Yarn: black or cream main color.
Ch 47.
Keep the chain relaxed. It should measure approximately 24–26 cm without being stretched.
Row 1
Sc in the second chain from the hook and in every chain across. (46)
Ch 1 and turn.
Rows 2–12
Sc in every stitch across. (46)
Ch 1 and turn after each row.
This creates the dense lower section immediately above the future fringe.
First Openwork Band
Row 13
Ch 3, which counts as the first dc.
*Ch 1, skip 1 stitch, dc in next stitch.* Repeat across.
Turn.
Row 14
Ch 3.
*Ch 1, dc in next dc.* Repeat across, working into the previous row’s double crochets rather than the chain spaces.
Turn.
Row 15
Repeat Row 14.
Turn.
Row 16
Ch 1.
Sc in every dc and every ch-1 space across, returning to 46 stitches. (46)
Turn.
Solid Scarf Section
Rows 17–32: Sc in every stitch across. (46)
Ch 1 and turn after each row.
This section separates the first openwork band from the granny-square panel.
Autumn Granny Diamond Motif — Make 8
Make four motifs for each scarf end. Use different combinations of orange, rust, olive, mustard, cream and the scarf’s main color.
Motif Round 1
Use burnt orange, olive, mustard or rust.
Ch 4 and join with sl st to form a ring.
Ch 3, work 2 dc into the ring, ch 2.
*3 dc into ring, ch 2.* Repeat three more times.
Join with sl st to the top of the beginning ch-3.
You should have four 3-dc groups and four corner spaces.
Motif Round 2
Join the second accent color in any corner space.
Ch 3, 2 dc, ch 2, 3 dc in the same corner.
In each remaining corner work:
3 dc, ch 2, 3 dc.
Join with sl st.
Motif Round 3
Join cream, beige or another contrasting color in any corner.
In the first corner work:
Ch 3, 2 dc, ch 2, 3 dc.
Work 3 dc in the side space.
In the next corner work:
3 dc, ch 2, 3 dc.
Continue around, placing one 3-dc group in every side space and two 3-dc groups separated by ch 2 in every corner.
Join with sl st.
Motif Round 4
Join the scarf’s main color.
Work standard granny groups around the square, placing:
(3 dc, ch 2, 3 dc) in every corner and 3 dc in every side space.
Join and fasten off.
Block each motif to approximately 11–12 cm square.
Joining the Granny Squares
Arrange four motifs into a panel two squares wide and two squares high.
Rotate the motifs so their corners form the diamond-like color pattern visible in the scarf ends.
Use the main color to whipstitch or slip-stitch the squares together through corresponding edge stitches.
Keep the joining seam flexible. A very tight seam creates a ridge and pulls the motif panel inward.
Make two identical-size panels: one for each end of the scarf.
Attaching the First Granny Square Panel
Pin the first completed panel across the scarf width.
The motif panel and main fabric should be approximately equal in width after blocking.
With the main color, join through both layers using slip stitches or whipstitch.
Work evenly across the full width without gathering either component.
Continue the Main Scarf Body
Join the main yarn along the opposite side of the granny panel.
Work one setup row of sc evenly across, returning to approximately 46 stitches.
Continue in sc for approximately 20–25 cm.
Second Openwork Section
The reference scarf includes repeated lace-like bands through the upper body. These sections reduce the visual weight of the long solid rectangle.
Openwork Row 1
Ch 3.
*Ch 1, skip 1 stitch, dc in next stitch.* Repeat across.
Turn.
Openwork Row 2
Ch 3.
*Ch 1, dc in next dc.* Repeat across.
Turn.
Openwork Row 3
Repeat Openwork Row 2.
Turn.
Return Row
Ch 1.
Sc in each dc and ch-1 space across until the original stitch count is restored.
Turn.
Long Center Section
Continue working sc rows until the scarf measures approximately 115–125 cm from the first finished end, excluding fringe.
For a softer drape around the neck, replace every sixth solid row with a row of hdc. Keep the same total stitch count.
Measure the scarf while it lies flat. Do not stretch it lengthwise during measurement.
Mirror the Second Half
Repeat the openwork band sequence used in the first half.
After the final openwork band, work enough solid sc rows to position the second granny panel at approximately the same distance from the end as the first panel.
Attach the second four-square panel using the same joining method.
Continue with the main color beyond the panel.
Work approximately 12 rows of sc to create the final solid end section.
Fasten off.
Optional Textured Bands
The photograph contains subtle horizontal texture changes between the openwork sections. Add these without changing the overall stitch count.
Textured Row 1: Hdc in every stitch across. (46)
Textured Row 2: Sc in BLO across. (46)
Textured Row 3: Hdc in every stitch. (46)
Return to regular sc afterward.
Use these three-row bands sparingly. Too many raised sections make the scarf thicker around the neck than the photographed design.
Adding the Fringe
The long fringe is a major visual feature of both scarves in the reference.
Cut main-color yarn strands approximately 30–34 cm long. Each finished fringe will measure approximately 14–16 cm after folding and trimming.
For each fringe group:
- Hold two or three cut strands together.
- Fold the strands exactly in half.
- Insert the crochet hook through a stitch or space along the scarf end.
- Pull the folded center through the edge to create a loop.
- Pass all loose ends through that loop.
- Pull the knot firmly against the scarf edge.
- Repeat at evenly spaced positions across the end.
- Add additional groups if visible gaps remain.
- Repeat on the opposite end.
- Lay the scarf flat and trim both fringe edges to an even length.
The finished fringe should hang freely rather than forming a dense rigid edge.
Black Scarf Color Layout
For the black version, use black for the main scarf, motif borders and fringe.
Combine the motif centers in several arrangements:
- Burnt orange + cream + rust + black
- Olive + orange + cream + black
- Rust + beige + orange + black
- Cream + burnt orange + olive + black
Do not make every motif identical. The reference uses a coordinated palette while allowing individual squares to differ.
Cream Scarf Color Layout
For the cream version, use warm ivory or natural cream for the scarf body, outer motif rounds and fringe.
Good accent combinations include:
- Olive + mustard + rust + cream
- Burnt orange + brown + cream
- Mustard + olive + dark rust + cream
- Rust + orange + beige + cream
The darker autumn centers provide enough contrast against the pale scarf without requiring black outlines.
7 Technical Tips for a Granny Square Scarf
- Changing scarf width: Count all 46 stitches at least every ten solid rows. One missed edge stitch repeated several times produces a visible taper.
- Motif size mismatch: Block all eight granny squares to within approximately 5 mm of the same dimensions. Unequal motifs create a wavy joining line.
- Rigid joins: Do not pull the joining yarn tightly between granny squares. A stiff seam prevents the decorative panel from draping with the main scarf.
- Openwork distortion: Keep every ch-1 space relaxed. Tight chains make the lace section narrower than the surrounding solid rows.
- Heavy scarf ends: Use the same DK yarn weight for motifs and body. Switching to worsted yarn only for the squares adds unnecessary weight to both ends.
- Uneven fringe: Cut all strands against a fixed cardboard template measuring approximately 30–34 cm. Cutting individual strands by eye creates a visibly irregular lower edge.
- Loose color tails: Weave motif tails through at least 4 cm of matching-color stitches and reverse direction once. Granny-square color changes produce many short ends that can work loose with repeated wear.
How to Adjust the Scarf Width
For a narrower scarf, reduce the foundation chain while maintaining a width that matches the two-square motif panel. Make the granny squares first if exact sizing is important.
For a wider wrap, increase both the scarf body and motif panel. Three smaller motifs across can replace two larger motifs, or each square can be expanded with another granny round.
A finished width between approximately 22 and 30 cm works well for this style. Substantially increasing the width turns the project into more of a stole than a conventional scarf.
How to Adjust the Scarf Length
Modify length through the solid center section rather than altering the decorative ends. This keeps both granny-square panels positioned consistently above the fringe.
For a shorter scarf, remove solid rows from the center until the desired measurement is reached.
For a longer scarf, add identical groups of rows near the middle. Keep the openwork sections balanced on both sides of the center point.
Remember that fringe adds approximately 14–16 cm at each end but does not count as usable neck length.
Blocking the Granny Square Panels
Block every motif before joining. Pin each square to the same measurements and align all four corners.
After joining four motifs into one panel, block the complete panel again. Measure its width against the main scarf before sewing the two components together.
If the panel is slightly wider, reshape it during blocking rather than gathering it during sewing. If it is substantially narrower, add a simple sc round around the outside of the panel.
Perform a final light blocking after the entire crochet granny square scarf pattern is assembled. Keep the fringe outside the pinned area and straighten it separately.
Joining Granny Squares Without a Bulky Seam
Place two motifs with right sides facing each other. Insert the hook through the corresponding outer loops of both squares and work a loose slip stitch.
Continue across the edge while checking that corresponding stitches remain aligned.
Alternatively, use a tapestry needle and whipstitch through the back loops. This produces a flatter seam and works particularly well when the scarf uses soft DK yarn.
Whichever method is selected, use the same technique for every motif seam and for both decorative panels.
Choosing Yarn for Better Drape
The scarf should fold easily around the neck despite the granny-square sections. A smooth DK yarn gives enough stitch definition for the colored motifs while remaining lighter than bulky yarn.
Acrylic provides easy-care construction and stable color. Wool and wool blends add warmth but can change dimensions more noticeably during blocking. Cotton produces crisp granny motifs but may create heavier scarf ends.
Make the test motif with the exact yarn planned for the project. Its blocked measurement determines whether two squares will match the width of the scarf body.
Finishing the Crochet Scarf
Inspect both decorative ends before attaching the fringe. The two motif panels should sit approximately the same distance from their respective lower edges.
Weave in every remaining yarn tail before adding fringe. Once dozens of fringe strands are attached, locating a loose motif tail becomes more difficult.
Lay the finished scarf lengthwise on a flat surface. Align the side edges, straighten the openwork sections and check that neither granny panel twists.
Trim the fringe last. Measure from the scarf edge rather than from the neighboring strands so both ends finish at approximately the same length.
Conclusion
Make and block one granny motif before beginning the long scarf body. Its finished width determines whether two squares will match the planned 24–27 cm scarf width and prevents adjustment problems during assembly. Next, select four or five autumn colors and distribute them differently across the eight motifs instead of repeating one identical sequence. Save this crochet granny square scarf pattern to Pinterest or share the completed version on Instagram with #AutumnGrannyScarf. For this design, would you choose the high-contrast black background or the softer cream version for the autumn granny motifs?









