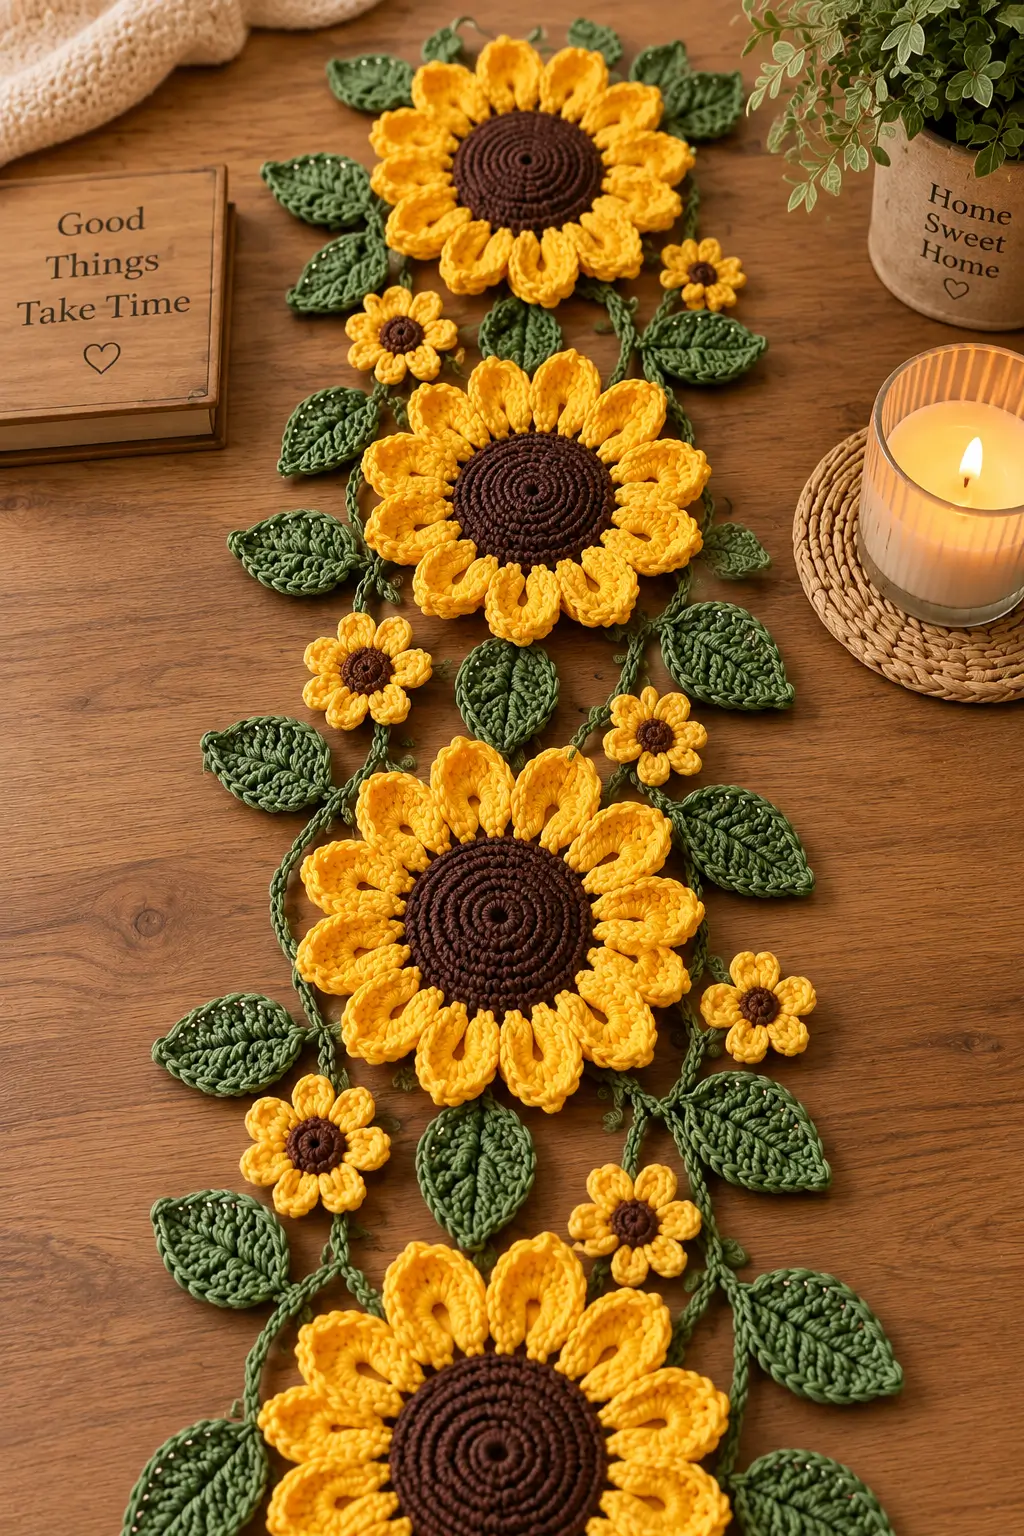
Three different flower structures prevent this botanical runner from turning into a repeated strip of identical motifs. This crochet floral table runner pattern combines layered blue flowers, a cream daisy, lavender petals, veined leaves and branching stems in one open appliqué arrangement. Use DK cotton with a 3.5 mm hook. The finished dimensions can be adjusted during assembly, making the design particularly useful for narrow dining tables, console tables and wooden countertops.
The Design: Why This Floral Runner Is Different
This runner does not depend on a conventional rectangular crochet foundation. Instead, individual flowers and leaves are joined through narrow branching stems. The table remains visible between the motifs, producing the open botanical structure shown in the reference design.
Three flower scales control the composition. Large layered flowers create the primary focal points, medium flowers fill the central spaces, and small blossoms cover transitions between stems. The leaves also change size rather than repeating one identical motif.
The most important construction decision is assembly order. Do not permanently join every flower as soon as it is crocheted. Make the major motifs first, block them separately, arrange the complete runner on a flat surface, then add stems and smaller leaves to fill the remaining spaces.
Project Information
| Skill Level | Hook | Yarn | Construction | Finished Size |
|---|---|---|---|---|
| Intermediate | 3.5 mm | DK cotton | Joined appliqué motifs | Adjustable |
The final length is controlled during assembly. For a dining-table runner, arrange the motifs until the piece reaches the required length before permanently joining the stems.
Materials and Tools
Yarn
- Dusty blue DK cotton — approximately 60 g
- Sage green DK cotton — approximately 70 g
- Cream DK cotton — approximately 35 g
- Lavender DK cotton — approximately 30 g
- Pale blue DK cotton — approximately 20 g
- Tan or medium brown DK cotton — approximately 10 g
- Pale yellow or cream DK cotton — approximately 5 g
Yarn quantities are working estimates for the complete photo-inspired runner rather than measurements from a published pattern. Lengthening the runner or adding extra foliage will increase the sage-green requirement first.
Tools
- 3.5 mm crochet hook
- Tapestry needle
- Sharp scissors
- Stitch markers
- Blocking mat
- Rust-resistant blocking pins
- Flexible measuring tape
Abbreviations
- MR — magic ring
- ch — chain
- sl st — slip stitch
- sc — single crochet
- hdc — half double crochet
- dc — double crochet
- tr — treble crochet
- inc — 2 stitches in the same stitch
- dec — decrease
- BLO — back loop only
- FLO — front loop only
- st/sts — stitch/stitches
For an invisible decrease, work through the front loops of the next two stitches before completing the single crochet.
Crochet Floral Table Runner Pattern
The runner is assembled from separate components. Crochet the large flowers first, followed by medium flowers, small blossoms, large leaves, small leaves and finally the connecting stems.
Large Layered Blue Flower — Make 2
Yarn: dusty blue with cream center.
Center
R1: 6 sc in MR (6)
R2: inc ×6 (12)
R3: (1 sc, inc) ×6 (18)
Fasten off the center color.
Inner Petals
Join dusty blue into any stitch.
Petal 1: Ch 7. Starting in the second chain from the hook, work 1 sc, 1 hdc, 2 dc, 1 hdc, 1 sc. Sl st into the next available center stitch.
Repeat around to create 9 inner petals. Space the attachment points evenly around the center.
Outer Petals
Join dusty blue behind the first petal layer.
Petal: Ch 10. Starting in the second chain from the hook, work 1 sc, 1 hdc, 2 dc, 3 tr, 1 dc, 1 sc. Sl st into the rear attachment point.
Repeat to create 10 outer petals.
Fasten off with a 25 cm tail. Block the petals so the outer layer remains visible between the inner petals.
Large Cream Daisy — Make 1
Yarn: cream petals with tan/brown center.
Brown Center
R1: 6 sc in MR (6)
R2: inc ×6 (12)
R3: (1 sc, inc) ×6 (18)
R4: (2 sc, inc) ×6 (24)
R5: 24 sc BLO (24)
Fasten off.
Cream Petals
Join cream yarn around the outer edge of the center.
Petal: Ch 9. Starting in the second chain from the hook, work 1 sc, 1 hdc, 2 dc, 2 tr, 1 dc, 1 sc. Sl st into the next attachment point.
Repeat until there are 12 petals around the center.
Fasten off. Leave a 30 cm sewing tail.
Large Lavender Flower — Make 1
Yarn: lavender with cream center.
Center
R1: 6 sc in MR (6)
R2: inc ×6 (12)
Change to lavender.
Petals
Petal: Ch 10. Starting in the second chain from the hook, work 1 sc, 1 hdc, 2 dc, 3 tr, 1 dc, 1 sc. Sl st into the next center attachment point.
Repeat to form 6 broad pointed petals.
For a raised outline, work surface slip stitches from the base to the tip of each petal and back down the opposite side.
Fasten off and block each petal individually.
Small Six-Petal Flowers — Make 5 to 7
Use pale blue, cream and lavender in different combinations.
R1: 6 sc in MR (6)
For each petal:
Ch 5. Starting in the second chain from the hook, work 1 sc, 1 hdc, 1 dc, 1 hdc. Sl st into the same base stitch.
Repeat once in each of the six stitches to produce 6 petals.
Fasten off. Use a contrasting French knot or a tiny crocheted circle for the center.
Tiny Five-Petal Flowers — Make 3 to 5
Yarn: lavender or pale blue.
R1: 5 sc in MR (5)
In each stitch work:
(sl st, ch 3, 2 dc, ch 3, sl st)
Repeat five times for five petals.
Fasten off with a 15 cm tail.
Large Veined Leaves — Make 6 to 8
Yarn: sage green or pale blue-green.
Ch 16.
Starting in the second chain from the hook:
1 sc, 1 hdc, 2 dc, 3 tr, 2 dc, 2 hdc, 3 sc, then work 3 sc into the final chain.
Continue along the opposite side of the foundation chain:
3 sc, 2 hdc, 2 dc, 3 tr, 2 dc, 1 hdc, 1 sc.
Sl st into the beginning stitch.
Do not fasten off yet.
Leaf Border
Ch 1 and work one sc around the complete edge. At the leaf tip, work sc, ch 2, sc into the same stitch to sharpen the point.
Sl st at the base.
Fasten off, leaving approximately 20 cm for attachment.
Central Leaf Vein
Join matching or slightly darker yarn at the base. Surface crochet slip stitches along the original foundation chain toward the leaf tip.
Fasten off at the point.
Medium Leaves — Make 8 to 12
Yarn: sage green and pale blue-green.
Ch 11.
Starting in the second chain from the hook:
1 sc, 1 hdc, 2 dc, 3 tr, 1 dc, 1 hdc, 1 sc.
Work 3 sc into the final chain.
Continue along the opposite side:
1 sc, 1 hdc, 1 dc, 3 tr, 2 dc, 1 hdc, 1 sc.
Sl st to close.
Fasten off with a 15 cm sewing tail.
Small Leaves — Make 18 to 24
Yarn: sage green.
Ch 7.
Starting in the second chain from the hook:
1 sl st, 1 sc, 1 hdc, 2 dc, 1 sc.
Ch 2 at the tip.
Work down the opposite side of the foundation chain:
1 sc, 2 dc, 1 hdc, 1 sc, 1 sl st.
Fasten off.
Make some leaves one chain shorter and others one chain longer. Small variations prevent the branches from looking mechanically repeated.
Leaf Buds — Make 10 to 14
Yarn: sage green.
Ch 5.
Starting in the second chain from the hook:
1 sc, 1 hdc, 1 dc, 1 sc.
Ch 1 and work along the opposite side:
1 sc, 1 dc, 1 hdc, 1 sc.
Sl st at the base.
Fasten off with a short sewing tail.
Main Stems
Yarn: sage green.
The stems are made as narrow crochet cords rather than broad strips.
For a long main stem, ch 45 to 70 depending on the distance between major flowers.
Starting in the second chain from the hook, sl st loosely into every chain.
Fasten off with a 20 cm tail.
Make several stems of different lengths. Long stems connect the major flowers, while shorter stems connect individual leaves and small blossoms.
Branching Stems
Join sage yarn directly to a completed main stem at the required branch point.
Ch 8 to 18 depending on the required distance.
Sl st back along every chain until reaching the main stem.
Fasten off or continue directly into another branch.
Attach small leaves near the ends of the branches rather than clustering every leaf at the center.
Assembly
- Block every large flower and leaf separately before beginning the final layout.
- Place the two large dusty-blue flowers near opposite thirds of the runner rather than directly beside one another.
- Position the cream daisy between the upper blue flower and the central section to create a contrasting focal point.
- Add the large lavender flower below the cream flower, keeping enough open space for visible green stems.
- Distribute the small pale-blue, lavender and cream blossoms between the large flowers without creating equal spacing.
- Place the largest leaves near the outer edges of the arrangement, turning their pointed tips away from the central stem.
- Run the main sage-green stems between the large flowers and pin every connection before sewing anything permanently.
- Add medium leaves, small leaves and buds to the branches, keeping approximately 2–5 cm of open stem visible between dense groups.
- Sew the motifs together from the reverse using matching yarn. Catch only the rear loops wherever possible so the joins remain inconspicuous from the front.
- Block the complete runner to its final dimensions, checking the centerline before allowing it to dry completely.
The finished runner should form one continuous botanical structure while leaving irregular open spaces between flowers, leaves and stems.
How to Arrange the Flowers
The arrangement is more important than strict symmetry. Begin with the largest motifs because they establish the visual weight of the runner. The two blue flowers should not sit at identical distances from the ends.
Use the cream daisy as a high-contrast transition. Its pale petals and brown center separate the surrounding blue, lavender and green sections.
Rotate every large flower slightly. Aligning every petal vertically creates an artificial grid that conflicts with the branching construction.
Next, position the large leaves. Their tips should generally point outward or diagonally along the length of the runner. A few inward-facing leaves can fill gaps, but avoid making paired leaves mirror one another repeatedly.
Small blossoms are gap-control components. Place them only after the large motifs and stems have been pinned.
How to Change the Runner Length
Do not enlarge every individual flower when making a longer runner. Add another section of stems, one medium or large flower, several small blossoms and a group of leaves instead.
For a short centerpiece, use three large flowers and reduce the number of branch sections. A longer dining-table version can use five or six large flowers with repeating botanical sections between them.
Measure the table before final assembly. For a runner that stays entirely on the tabletop, stop several centimeters before each end. If an overhanging arrangement is preferred, build the additional length into the stems rather than stretching the blocked flowers.
7 Technical Tips for Crochet Floral Appliqués
- Petals curling upward: block each large flower before assembly. Pin every petal at its tip and widest point; otherwise layered flowers can contract into a cup shape.
- Leaf veins twisting the leaf: keep surface slip stitches looser than the surrounding fabric. A tight central vein shortens the leaf’s centerline and causes both sides to curl inward.
- Stems becoming rigid: work the return slip stitches loosely. Tight slip stitches can shorten a 50-chain stem enough to pull adjacent flowers out of position.
- Flowers rotating after assembly: use at least three attachment points for every large flower. A single central stitch allows the entire motif to turn when the runner is moved.
- Visible sewing yarn: use the same color as the component being attached and catch only rear loops. Crossing a pale flower with green sewing yarn can produce visible green bars on the front.
- Uneven runner width: measure the distance from the center stem to the outermost leaves while the design is pinned. Check at least four positions before permanently joining the motifs.
- Small leaves disappearing under flowers: leave at least half of each small leaf visible beyond the petal edge. If less than approximately 50 percent remains visible, move the leaf farther along its branch.
Blocking the Finished Floral Runner
Blocking is necessary because the finished project contains components made in several directions. Individual flowers are circular, leaves are elongated and stems are linear. Sewing them together without final blocking can leave local twists at the joins.
Place the completed runner on a large blocking surface. Establish the main centerline first, then pin the largest flowers. Continue outward through the major leaves, smaller blossoms and branch tips.
Check the overall width at several points. The runner does not need perfectly parallel sides, but one section should not project dramatically farther than the others unless that asymmetry is intentional.
For cotton yarn, damp-block the completed arrangement and leave it pinned until completely dry. Do not stretch individual petals merely to make all flowers identical; slight differences support the botanical layout.
Using Different Yarn Weights
DK cotton with a 3.5 mm hook produces defined motifs without making the stems excessively heavy. Cotton also gives the pointed petals and leaf edges enough structure to remain visible after blocking.
For a smaller arrangement, use sport-weight cotton and a smaller hook appropriate to the yarn. Keep the same motif construction and allow the yarn change to reduce the dimensions naturally.
Worsted yarn produces substantially larger flowers and thicker stems. If using it, make a single large flower and one leaf first. Place both on the intended table before committing to the complete runner.
Finishing the Back
The reverse matters because the runner has no fabric backing to conceal yarn ends. Weave each tail through dense stitches of the same color for at least several centimeters before trimming it.
Avoid carrying dark yarn behind cream petals. The contrast can show through spaces between stitches.
At branch intersections, weave the green tail along the stem instead of directly across an open area. Large flower tails can be hidden around the center ring or along the lower edge of a petal.
After trimming, place the runner right side up and inspect it against a contrasting surface. Any loose ends visible through the open spaces should be corrected before final blocking.
Conclusion
The structure of this crochet floral table runner pattern comes from variation rather than repetition: layered blue flowers establish the largest focal points, the cream and lavender flowers interrupt the color sequence, and differently sized leaves connect the composition through narrow stems. Crochet and block the major motifs first, then test the complete arrangement directly on the intended table before sewing the branches permanently. Pinning at full size is the next practical step because it determines both the final length and the amount of foliage required. Save the finished runner to Pinterest and share your version on Instagram with #BotanicalCrochetRunner. Which section will you place at the center of the table: the cream daisy or one of the layered blue flowers? “`4









