Introduction
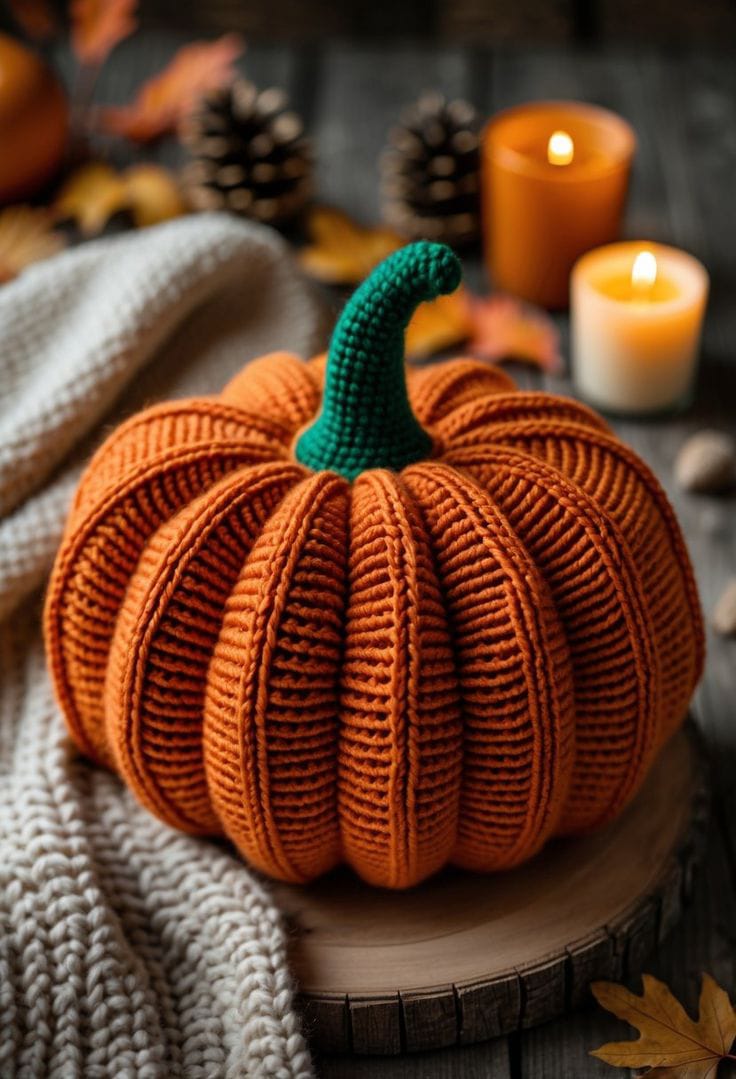
Fourteen narrow channels have to survive stuffing and center compression or this pumpkin becomes a plain orange cylinder. This large ribbed crochet pumpkin pattern uses bulky yarn, a 6.5 mm hook, a flat 30-stitch body panel, and a curved green stem. The photo-matched pumpkin measures approximately 30–34 cm across and 23–27 cm high before the stem, making it a substantial piece of autumn table or floor-level shelf décor.
The Design: What Makes This Ribbed Pumpkin Different
The body is not crocheted as a conventional amigurumi sphere. A rectangular panel forms the shell, and loop-specific half-double crochet creates uninterrupted vertical ribs from the bottom gathering point to the crown. That choice matters because the supplied pumpkin has narrow, architectural channels rather than six broad sculpted lobes. The panel is deliberately wider than it is tall after assembly, producing a low knit look crochet pumpkin rather than a round ball. Center compression makes the silhouette even flatter. A separately crocheted green stem introduces the only contrasting color and bends slightly near its tip. The most common failure with this construction is insufficient row count. If the panel barely wraps around the stuffing, every rib opens laterally and the finished large crochet pumpkin becomes tall and tight instead of broad and deeply segmented.
Project Info at a Glance
| Skill Level | Time | Finished Size | Hook | Best For |
|---|---|---|---|---|
| Intermediate | 6–8 hours | Approx. 30–34 cm diameter | 6.5 mm | Autumn centerpiece, mantel, shelf or table décor |
Materials and Tools
Yarn
- Burnt orange — bulky #5 — approximately 180–230 g — pumpkin body
- Forest green — worsted or bulky yarn — approximately 20–30 g — curved stem
- Matching orange sewing yarn — approximately 4–5 m — gathering and optional extra segmentation
A smooth plied wool-acrylic or acrylic yarn gives stronger rib definition than fluffy chenille. Choose a yarn that holds a visible stitch edge after stuffing.
Tools
- 6.5 mm crochet hook for the body
- 5.0–5.5 mm crochet hook for the stem
- Polyester fiberfill
- Long yarn needle
- Large-eye tapestry needle
- Locking stitch markers
- Sharp scissors
- Measuring tape
Abbreviations
MR — magic ring
sc — single crochet
inc — increase
dec — decrease
sl st — slip stitch
ch — chain
hdc — half double crochet
dc — double crochet
BLO — back loop only
3rd loop — horizontal loop behind the normal top loops of hdc
An invisible decrease is not required for the rectangular pumpkin body, but when used on the stem it is worked through the front loops of the next two stitches before completing one single crochet.
Pattern — Step by Step
The pumpkin body is worked flat. The photo-matched construction below uses alternating loop placement to create deep ribs and is based on standard ribbed-rectangle pumpkin geometry rather than copied rounds from any searched source.
Large Ribbed Pumpkin Body
Yarn: burnt orange.
Ch 32.
Row 1: hdc in second ch from hook and in each ch across (31).
Ch 1, turn.
Row 2: hdc BLO across (31).
Ch 1, turn.
Row 3: hdc in the third loop across (31).
Ch 1, turn.
Row 4: hdc BLO across (31).
Ch 1, turn.
Row 5: hdc in the third loop across (31).
Continue alternating Rows 4 and 5 until 42 total rows are complete.
Row 6: BLO hdc across (31)
Row 7: third-loop hdc across (31)
Row 8: BLO hdc across (31)
Row 9: third-loop hdc across (31)
Row 10: BLO hdc across (31)
Row 11: third-loop hdc across (31)
Row 12: BLO hdc across (31)
Row 13: third-loop hdc across (31)
Row 14: BLO hdc across (31)
Row 15: third-loop hdc across (31)
Row 16: BLO hdc across (31)
Row 17: third-loop hdc across (31)
Row 18: BLO hdc across (31)
Row 19: third-loop hdc across (31)
Row 20: BLO hdc across (31)
Row 21: third-loop hdc across (31)
Row 22: BLO hdc across (31)
Row 23: third-loop hdc across (31)
Row 24: BLO hdc across (31)
Row 25: third-loop hdc across (31)
Row 26: BLO hdc across (31)
Row 27: third-loop hdc across (31)
Row 28: BLO hdc across (31)
Row 29: third-loop hdc across (31)
Row 30: BLO hdc across (31)
Row 31: third-loop hdc across (31)
Row 32: BLO hdc across (31)
Row 33: third-loop hdc across (31)
Row 34: BLO hdc across (31)
Row 35: third-loop hdc across (31)
Row 36: BLO hdc across (31)
Row 37: third-loop hdc across (31)
Row 38: BLO hdc across (31)
Row 39: third-loop hdc across (31)
Row 40: BLO hdc across (31)
Row 41: third-loop hdc across (31)
Row 42: BLO hdc across (31)
Fasten off with a tail approximately 100 cm long.
The relaxed panel should be roughly rectangular, with the rib columns running parallel to the 31-stitch edge.
Seaming the Pumpkin Body
Bring Row 1 and Row 42 together with right sides facing.
Whipstitch through matching row-end loops from one edge to the other.
Do not tighten the seam more firmly than the crochet fabric.
Turn the resulting tube right side out.
The visible ribs must now run vertically around the complete tube.
Closing the Bottom
Thread a long orange yarn tail through the tapestry needle.
Weave through the row-end stitches around one open edge.
Take approximately one stitch from every row rather than skipping large sections.
Pull slowly until the opening closes.
Pass through the gathered center two additional times.
Knot firmly.
Push the knot inside the body.
Stuffing the Body
Add polyester fiberfill in small sections.
Fill the lower perimeter first.
Move around the wall of the pumpkin before filling the center.
The body should become broad and round without forcing the ribs completely open.
Stop adding stuffing when moderate hand pressure compresses the side by approximately 2 cm.
An overfilled tube becomes cylindrical and reduces the rib depth.
Closing the Crown
Using another long orange strand, weave through every row end around the upper opening.
Pull the opening down to approximately 3–4 cm.
Add the final small pieces of stuffing.
Pull completely closed.
Pass the yarn across the opening in several directions.
Knot firmly but leave at least 120 cm of working yarn for center shaping.
Center Compression
Thread the long tail onto a long yarn needle.
Insert through the exact crown center.
Push the needle through the middle of the stuffing and out through the bottom center.
Return through the body from bottom to top.
Pull gradually until the overall height decreases by approximately 3–5 cm.
Repeat the central pass twice.
Knot at the crown and bury the end.
This step produces the low, broad profile visible in the supplied image.
Optional Deep-Ridge Sculpting
The rib stitch already creates narrow grooves. Add external sculpting only when the filled pumpkin has lost too much definition.
Cut six orange strands approximately 80–100 cm long.
Position each strand inside an existing rib channel.
Pass from crown to base, through the center, and back to the crown.
Tighten only enough to deepen the existing groove by approximately 5–8 mm.
Do not create six large lobes. The reference contains many narrow ribs rather than a conventional six-section pumpkin.
Curved Green Stem
Yarn: forest green. Work in continuous rounds.
R1: 6 sc in MR (6)
R2: inc ×6 (12)
R3: BLO sc around (12)
R4: sc around (12)
R5: sc around (12)
R6: sc around (12)
R7: sc around (12)
R8: sc around (12)
R9: sc around (12)
R10: sc around (12)
R11: sc around (12)
R12: sc around (12)
Stuff through R8. Keep the upper rounds lightly filled so the tip can bend.
R13: (sc, dec) ×4 (8)
R14: sc around (8)
R15: sc around (8)
R16: sc around (8)
Fasten off with a 40 cm sewing tail.
Bend the final 4–5 cm slightly to one side.
Hold the curve in place with several hidden green stitches through adjacent stem rounds if the yarn straightens after release.
Assembly
- Seam the first and last body rows together and turn the orange tube right side out so every crochet rib runs vertically.
- Gather the bottom opening through all 42 row-end positions, close the center completely, and bury the first knot inside the pumpkin.
- Stuff around the perimeter in small pieces, keeping the center slightly softer and stopping before the ribs begin to flatten.
- Gather the top opening to 3–4 cm, add the last stuffing, then close the crown completely with several crossing stitches.
- Pass a long orange strand from crown to base and back twice, pulling until the pumpkin becomes approximately 3–5 cm shorter.
- Rotate the pumpkin and inspect every rib; add optional sculpting yarn only inside channels that are substantially shallower than their neighbors.
- Stuff the lower green stem firmly and leave its upper 4–5 cm flexible enough to bend.
- Center the 12-stitch stem base directly over the gathered crown and pin it at four quarter points.
- Sew twice around the stem base, then form the upper curve with two or three hidden stitches between neighboring stem rounds.
- Bury all tails inside the body, redistribute the stuffing by hand, and place the pumpkin on a hard surface to check that the gathered base sits flat.
The finished pumpkin should have a wide low profile, many narrow vertical channels, and one tall forest-green stem with a gentle side curve.
7 Technical Tips
- Ribs flatten after stuffing: This occurs when the tube is packed too firmly. Stop filling when side pressure of approximately 2 cm still compresses the body without exposing gaps between stitches.
- Visible side seam: A tight whipstitch column forms one unnaturally narrow rib. Keep seam stitches the same height as adjacent row ends and compare the seam after every 5 cm.
- Pumpkin becomes too tall: Insufficient center compression leaves a cylinder-like profile. Pull the crown-to-base shaping strand until body height decreases approximately 3–5 cm.
- Crown hole reopens: One gathering pass can loosen under stem pressure. Pass through the gathered center at least three times before attaching the green stem.
- Stem falls sideways: Stuffing the entire stem equally creates excess top weight. Fill the lower two-thirds firmly and leave the final 4–5 cm only lightly packed.
- Rib tension varies: Alternating BLO and third-loop rows with different yarn tension produces wide and narrow channels. Measure the panel every ten rows and keep its height variation below approximately 5 mm.
- Base rocks: A large knot or dense central stuffing can create a hard bump underneath. Bury the gathering knot inside and press a shallow 3–4 cm depression into the bottom center before final shaping.
Why Flat Construction Works for This Pumpkin
A round-by-round sphere would produce horizontal crochet rows around the pumpkin. The reference instead has strong vertical columns extending uninterrupted from base to crown.
Working a rectangle solves that structural problem.
Every row becomes one narrow vertical section after the short sides are seamed. Loop-specific crochet then folds the fabric naturally along those columns.
Published ribbed pumpkin patterns use the same broad construction family: make a rectangle, seam it into a tube, gather the bottom, stuff, and close the top. The exact stitch sequence can vary from BLO double crochet to third-loop half-double crochet or linked slip-stitch combinations. :contentReference[oaicite:24]{index=24}
Controlling the Knit-Look Ribbing
Rib depth comes from changing which loop carries each row.
BLO stitches push the unused front loop toward the surface. Third-loop hdc changes the hinge point again, making the top two loops roll forward like a knitted ridge.
The effect becomes stronger after the tube is stuffed.
Do not block the completed rectangle flat before assembly. Heavy blocking can weaken the folds that create the pumpkin texture.
If the chosen yarn has little elasticity, work a small ten-row swatch first and stretch it sideways. Distinct valleys should remain visible after release.
Choosing the Correct Panel Proportions
The image shows a pumpkin substantially wider than it is tall.
That proportion is controlled by both the chain length and number of rows.
The 31-stitch row establishes the vertical dimension. Forty-two rows establish circumference.
If your yarn produces a pumpkin taller than expected, remove two to four stitches from the starting chain rather than reducing the row count. Fewer rows reduce circumference and make the body tighter.
For an even wider pumpkin, add four rows while keeping the same 31-stitch height.
How Firmly to Stuff the Pumpkin
The correct filling level is lower than for standard amigurumi.
A tightly packed animal needs enough density to preserve a spherical head or solid limb. Ribbed fall décor needs space for the fabric to contract into channels.
Fill the perimeter first and repeatedly rotate the body.
If one rib begins flattening while another remains deep, move stuffing away from that area rather than adding more to the opposite side.
The top and bottom centers need less filling than the outer circumference because those points will be compressed together during shaping.
Forming the Low Pumpkin Profile
Gathering alone produces a rounded tube, not the squat form shown in the photograph.
The central shaping strand changes that.
After both openings are closed, a long needle travels directly through the center from crown to base. Pulling the two centers toward each other reduces height while forcing the sidewall outward.
Work in small adjustments.
Compress approximately 1 cm, rotate the pumpkin, and inspect it before pulling again. A total reduction of about 3–5 cm is usually enough for this scale.
Making the Stem Curve
The green stem is not a straight cylinder.
Its broad lower section rises vertically, while the last few centimeters bend to one side.
Stuffing controls most of that movement. Dense lower stuffing keeps the base upright. A softer tip can be curved manually and held with discreet stitches between adjacent rounds.
Do not insert rigid wire into décor that may later be handled as a toy. For display-only work, flexible internal support is possible, but the yarn-only shaping method already matches the reference well.
Scaling the Pattern Down
Published ribbed pumpkins demonstrate that this construction scales well. Current patterns range from small pieces around 5–6.5 cm high to six-size collections using 20–120 yd of yarn. :contentReference[oaicite:25]{index=25}
For a medium version, start with ch 24 and work approximately 32 rows.
For a small version, start with ch 18 and work approximately 24 rows.
Keep the rectangle’s circumference noticeably greater than twice its height. That relationship helps the finished piece remain pumpkin-shaped after gathering.
Scaling the Pattern Up
A floor-display pumpkin can use super-bulky yarn and a larger hook without changing the basic assembly.
Sierra’s Crafty Creations reports approximately 80 yd for a medium super-bulky version made with 32 rows. :contentReference[oaicite:26]{index=26}
For a larger photo-matched piece, yarn consumption rises quickly because both the panel area and stuffing volume increase.
Instead of predicting gram weight from another brand, crochet ten rows, weigh them, then multiply by 4.2 for this 42-row panel and add approximately 10% for seam and shaping yarn.
Choosing Orange Yarn
The reference sits between pumpkin orange and burnt rust.
A highly saturated neon orange would emphasize the ribs but change the autumn palette. A muted terracotta makes the shadows deeper but can move visually toward brown.
Select a medium burnt orange with enough color contrast against forest green.
Very fuzzy yarn hides the loop structure. Smooth plied yarn, roving-style wool blend, or defined acrylic performs better when the primary design feature is ribbing.
Competition Gap
Current ribbed pumpkin patterns frequently use small rectangles, cinnamon-stick stems, natural branches, bows, leaves, roses, or stacking sets. Several current designs emphasize simple beginner construction. :contentReference[oaicite:27]{index=27}
The supplied reference is more stripped down. There are no leaves, bows, flowers, twine, or face details. The visual emphasis stays on the dense orange ribs and one tall curved green stem.
Its larger scale also separates it from many tabletop miniatures. That creates a useful angle around a ribbed fall pumpkin decor pattern with pronounced knit-look channels rather than additional seasonal embellishments.
Finishing Checks
Set the completed pumpkin on a flat wooden or hard surface.
Check the base first. It should contact the surface across a broad central area instead of balancing on the gathering knot.
View the pumpkin from the side. Its width should exceed its orange-body height noticeably.
Rotate the piece through 360 degrees and inspect the rib spacing. No single seam channel should look twice as wide as its neighbors.
Look at the stem last. The base should emerge from the exact crown center, while only the upper section bends.
Redistribute stuffing by hand before trimming any accessible ends.
Conclusion
Make the complete 42-row rectangle before deciding whether to enlarge this large ribbed crochet pumpkin pattern, because row width and stitch height determine the finished proportions differently. Seam the panel without compressing the edge, fill it below standard amigurumi firmness, and use the crown-to-base strand to create the final squat profile. Attach the green stem only after the top gathering and center compression are fixed. Record the finished diameter and body height before making a matching set. Share a rib-detail close-up on Pinterest and the finished pumpkin on Instagram with #LargeRibbedCrochetPumpkin. Would you keep the stem forest green or change it to a natural brown?









