Introduction
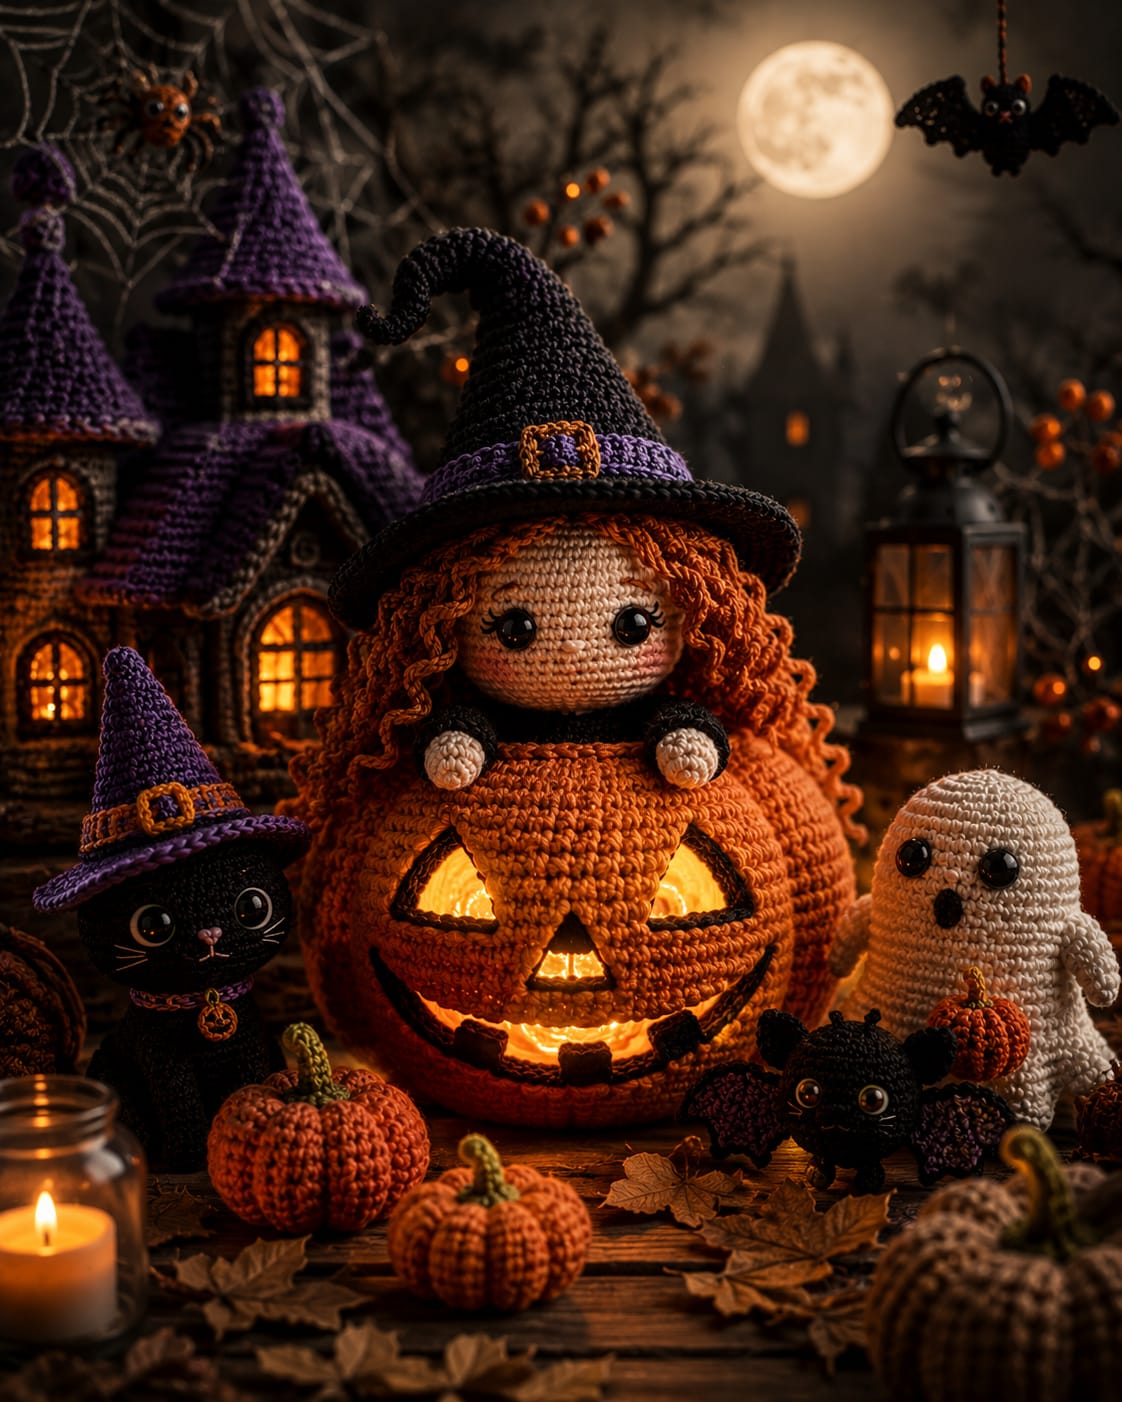
The witch has to emerge through the pumpkin crown without crushing either triangular jack-o’-lantern eye below her arms. This witch pumpkin amigurumi crochet pattern uses worsted yarn, a 3.5 mm hook, 10–12 mm eyes, a 42-stitch pumpkin body, sculpted lobes, curly hair, and a tall pointed hat. The finished Halloween figure measures approximately 31–35 cm high and works as substantial tabletop seasonal décor.
The Design: What Makes This Pumpkin Witch Different
The witch and pumpkin remain structurally separate even though they read as one figure. A large orange pumpkin supplies the seated base, while the smaller witch torso is anchored through its upper center. Six compressed channels create the pumpkin ribs without filling the surface with textured stitches. Above them, the witch uses a 36-stitch head so her face stays distinctly smaller than the 42-stitch pumpkin. Copper spiral hair projects beyond the hat brim and frames the face. The Halloween witch crochet pattern also uses a wide black hat with a purple band and gold buckle, keeping its darkest color above the orange body. One common mistake is sewing the jack-o’-lantern features before sculpting the pumpkin. The later ridge tension can rotate those appliqués several centimeters off-center, so all six lobes must be formed first.
Project Info at a Glance
| Skill Level | Time | Finished Size | Hook | Best For |
|---|---|---|---|---|
| Intermediate | 15–20 hours | Approx. 31–35 cm high | 3.5 mm | Halloween shelf, mantel or tabletop display |
Materials and Tools
Yarn
- Pumpkin orange — worsted / Aran #4 — approximately 190–230 g — pumpkin body and upper rim
- Black — worsted / Aran #4 — approximately 90–120 g — hat, sleeves and facial outlines
- Warm beige / skin tone — worsted / Aran #4 — approximately 45–60 g — head and hands
- Copper or rust orange — worsted / Aran #4 — approximately 55–75 g — curly hair
- Deep purple — worsted / Aran #4 — approximately 20–30 g — hat band
- Warm yellow — worsted / Aran #4 — approximately 15–20 g — jack-o’-lantern inserts
- Golden ochre — small amount — hat buckle
- Black embroidery yarn — small amount — eyelashes and mouth details
Tools
- 3.5 mm crochet hook
- 10–12 mm safety eyes ×2
- Polyester toy stuffing
- Long doll-making needle
- Large-eye yarn needle
- Locking stitch markers
- Straight pins
- Scissors
Do not place a candle, incandescent bulb or other heat-producing light inside crochet fabric. The yellow inserts below reproduce the illuminated jack-o’-lantern appearance without a heat source.
Abbreviations
MR — magic ring
sc — single crochet
inc — increase, 2 sc in one stitch
dec — invisible decrease
sl st — slip stitch
ch — chain
hdc — half double crochet
dc — double crochet
tr — treble crochet
BLO — back loop only
FLO — front loop only
For an invisible decrease, insert through the front loops of the next two stitches, draw up one loop, then complete one single crochet through both stitches.
Pattern — Step by Step
Work stuffed components in continuous spirals unless stated otherwise. This is an original photo-matched construction based on standard amigurumi shaping.
Large Pumpkin Body
Yarn: pumpkin orange — standard large amigurumi math.
R1: 6 sc in MR (6)
R2: inc ×6 (12)
R3: (sc, inc) ×6 (18)
R4: (2 sc, inc) ×6 (24)
R5: (3 sc, inc) ×6 (30)
R6: (4 sc, inc) ×6 (36)
R7: (5 sc, inc) ×6 (42)
R8: sc around (42)
R9: sc around (42)
R10: sc around (42)
R11: sc around (42)
R12: sc around (42)
R13: sc around (42)
R14: sc around (42)
R15: sc around (42)
R16: sc around (42)
R17: sc around (42)
R18: sc around (42)
Begin stuffing firmly. Keep the body broad rather than tall.
R19: (5 sc, dec) ×6 (36)
R20: sc around (36)
R21: (4 sc, dec) ×6 (30)
R22: sc around (30)
R23: (3 sc, dec) ×6 (24)
Add more stuffing through the widest middle section.
R24: (2 sc, dec) ×6 (18)
Do not close the top. The 18-stitch opening becomes the witch attachment area.
Fasten off with a 50 cm tail.
Pumpkin Sculpting
Yarn: strong orange yarn.
Cut a strand approximately 150 cm long.
Pass the long needle from the lower center through the upper opening.
Bring the yarn down the outside and return through the bottom center.
Pull gently to form one channel.
Create the second groove directly opposite the first.
Add four more evenly spaced channels until six rounded pumpkin lobes form.
Tighten the six grooves gradually and evenly.
Knot securely at the bottom and bury the ends.
Witch Head
Yarn: warm beige.
R1: 6 sc in MR (6)
R2: inc ×6 (12)
R3: (sc, inc) ×6 (18)
R4: (2 sc, inc) ×6 (24)
R5: (3 sc, inc) ×6 (30)
R6: (4 sc, inc) ×6 (36)
R7: sc around (36)
R8: sc around (36)
R9: sc around (36)
R10: sc around (36)
R11: sc around (36)
R12: sc around (36)
Insert 10–12 mm safety eyes between R9 and R10, approximately 7 visible stitches apart.
R13: (4 sc, dec) ×6 (30)
R14: (3 sc, dec) ×6 (24)
Stuff the forehead and cheeks firmly.
R15: (2 sc, dec) ×6 (18)
R16: (sc, dec) ×6 (12)
R17: dec ×6 (6)
Fasten off and close.
Upper Witch Torso
Yarn: black.
R1: 6 sc in MR (6)
R2: inc ×6 (12)
R3: (sc, inc) ×6 (18)
R4: (2 sc, inc) ×6 (24)
R5: sc around (24)
R6: sc around (24)
R7: sc around (24)
R8: sc around (24)
R9: (2 sc, dec) ×6 (18)
R10: sc around (18)
Stuff firmly enough to support the head.
Fasten off with a 35 cm sewing tail.
Hands and Arms — Make 2
Begin in skin tone, then change to black.
R1: 6 sc in MR (6)
R2: inc ×6 (12)
R3: sc around (12)
R4: sc around (12)
Change to black.
R5: sc around (12)
R6: sc around (12)
R7: sc around (12)
R8: sc around (12)
R9: sc around (12)
Stuff the hand lightly and leave the upper arm mostly unstuffed.
Flatten.
Fasten off with a 30 cm sewing tail.
Copper Hair Cap
Yarn: copper orange.
R1: 6 sc in MR (6)
R2: inc ×6 (12)
R3: (sc, inc) ×6 (18)
R4: (2 sc, inc) ×6 (24)
R5: (3 sc, inc) ×6 (30)
R6: (4 sc, inc) ×6 (36)
R7: sc around (36)
R8: sc around (36)
Fasten off with a 30 cm tail.
Do not stuff.
Curly Hair Strands — Make 18
Yarn: copper orange.
Ch 24.
Starting in second ch from hook, work 2 sc in each chain.
(46 sc)
The strand should coil automatically.
Fasten off with a 15 cm sewing tail.
Make several strands 18–20 chains long for the shorter curls around the forehead.
Pointed Witch Hat
Yarn: black.
R1: 6 sc in MR (6)
R2: sc around (6)
R3: sc around (6)
R4: inc ×6 (12)
R5: sc around (12)
R6: sc around (12)
R7: (sc, inc) ×6 (18)
R8: sc around (18)
R9: sc around (18)
R10: (2 sc, inc) ×6 (24)
R11: sc around (24)
R12: sc around (24)
R13: (3 sc, inc) ×6 (30)
R14: sc around (30)
R15: (4 sc, inc) ×6 (36)
R16: sc around (36)
For the brim:
R17: FLO (5 sc, inc) ×6 (42)
R18: sc around (42)
R19: sc around (42)
Fasten off.
The tip may be bent slightly to one side before final shaping.
Purple Hat Band
Yarn: deep purple.
Ch 37.
R1: starting in second ch, sc across (36)
R2: ch 1, turn, sc across (36)
Fasten off with a 20 cm tail.
Wrap around the hat immediately above the brim and sew the ends together.
Gold Buckle
Yarn: golden ochre.
Ch 18.
Form a small rectangle approximately 18–22 mm wide.
Sl st the ends together.
Surface stitch across two opposite sides to create a thicker frame.
Fasten off.
Sew over the front center of the purple band.
Yellow Jack-o’-Lantern Eye Inserts — Make 2
Yarn: warm yellow. Work flat.
R1: 6 sc in MR (6)
R2: inc ×6 (12)
R3: (sc, inc) ×6 (18)
Fasten off.
Fold or pinch each circle into a triangular shape while pinning it to the pumpkin.
Black Eye Outlines — Make 2
Yarn: black.
Ch 18.
Fasten off with a long tail.
Shape the chain around the three edges of each yellow eye insert and sew in place.
Yellow Nose Insert
Yarn: warm yellow.
R1: 6 sc in MR (6)
R2: inc ×6 (12)
Fasten off.
Pin into a compact triangle below the eyes.
Black Nose Outline
Yarn: black.
Ch 12.
Fasten off.
Shape the chain around the triangular yellow nose and stitch it flat.
Jack-o’-Lantern Mouth
Yarn: black.
Ch 38.
Fasten off with a long tail.
Arrange the chain into a broad upward-curving smile approximately 15–17 cm wide.
Pin before sewing.
Add three short vertical black stitches along the lower edge to create the block-like gaps visible in the photographed grin.
Yellow Mouth Panel
Yarn: warm yellow.
Ch 25.
R1: starting in second ch, sc across (24)
R2: ch 1, turn, sc across (24)
R3: ch 1, turn, sc across (24)
Fasten off.
Curve the panel behind the black mouth chain and stitch it to the pumpkin body.
Pink Cheek Shading — Make 2
Yarn: muted blush.
R1: 6 sc in MR (6)
Fasten off.
Sew below and slightly outside the safety eyes.
Eyelashes
Black embroidery yarn.
Add two short lashes to the outer edge of each safety eye.
Keep each stitch approximately 4–5 mm long.
Assembly
- Sculpt the stuffed pumpkin into six even lobes before positioning any face pieces, then place its deepest central groove at the rear rather than through the front face.
- Pin the two yellow eyes, nose, yellow mouth panel and black outlines to the front center of the pumpkin; check their spacing from at least one meter away before sewing.
- Insert the black witch torso approximately 2–3 cm into the 18-stitch pumpkin opening and stitch around the junction with orange yarn.
- Sew the witch head to the torso, packing additional stuffing into the neck so the head remains vertical under the weight of the hat.
- Fit the copper hair cap over the back and sides of the head, then distribute the spiral strands around the temples, cheeks and shoulders.
- Attach both arms high on the torso and angle the hands forward so they rest across the pumpkin crown without covering the triangular eyes.
- Place the black hat over the hair cap, bend the narrow tip slightly, then stitch only the inner brim to the hair so most of the outer edge stays free.
- Sew the purple band around the hat base and position the gold buckle above the center of the witch face.
- Attach pink cheek circles and embroider the eyelashes, then check that no hair curl crosses the safety-eye posts or covers more than roughly one-third of either cheek.
- Weave every remaining yarn tail into matching-color fabric, reshape the pumpkin lobes, arrange the curls and hat tip, and confirm the finished figure stands without leaning forward.
The completed figure should show a separate witch rising from the pumpkin center, two hands resting over the crown, six visible orange sections, and a jack-o’-lantern face positioned below the arms.
7 Technical Tips
- Pumpkin face rotation: Sculpting after adding the facial pieces can shift an eye into a groove. Complete all six pumpkin channels first and mark the front-center lobe before sewing any appliqué.
- Weak neck: A 36-stitch head plus a large hat can pull the torso forward. Pack the top 3–4 cm of the black torso until it compresses less than approximately 1 cm under finger pressure.
- Hair tangling: Eighteen spiral strands attached at random can form one dense bundle. Leave approximately one head stitch between neighboring curl bases around the lower hair-cap edge.
- Hat collapse: The narrow tip can fold sharply if every round is left empty. Add a very small amount of stuffing to the lower two-thirds while leaving the upper 3–4 cm unstuffed for the curved point.
- Arm obstruction: Hands positioned more than about 2 cm below the pumpkin opening can cover the triangular eyes. Pin both arms after the facial appliqués are already placed.
- Mouth distortion: Stretching the 38-chain smile while sewing produces a flat horizontal line. Pin the center and both ends first, maintaining approximately 2–3 cm of upward curve.
- Visible stuffing: Worsted yarn can open around the 42-stitch pumpkin plateau when overfilled. Move to a 3.25 mm hook if stretched gaps approach 2–3 mm.
Building the Large Jack-o’-Lantern Body
The pumpkin needs enough visual weight to support the witch above it.
A 42-stitch maximum produces a large amigurumi body while preserving the six-stitch progression used throughout the pattern. Long plateau rounds create width and height before the decreases narrow the crown.
The opening intentionally stops at 18 stitches rather than closing. That gives the witch torso somewhere to sit and avoids sewing a narrow body to the outside surface of a completed pumpkin.
Stuffing should be firmest through the lower half. The crown can remain slightly softer so the upper opening conforms around the torso.
Once shaped, the pumpkin should be wider than it is tall.
Sculpting Six Pumpkin Lobes
The reference uses deep ribs rather than color stripes.
Run each sculpting strand through the same upper and lower center points. Tighten opposite channels first, then divide the remaining spaces.
This sequence keeps the opening centered.
Six lobes suit the 42-stitch body because every section receives roughly seven stitches at the widest circumference.
Do not pull one groove to its final depth before forming the others. Build all six at moderate tension, rotate the pumpkin, then tighten them in a second pass.
Creating the Jack-o’-Lantern Face Without Heat
The supplied photograph gives the impression that the pumpkin is glowing internally.
A crochet decoration should not be built around an open flame or another hot light source.
The pattern recreates the appearance with warm-yellow fabric behind black outlines.
Yellow circles are pinched into triangular eyes and nose. The mouth uses a shallow rectangular panel curved behind a black chain.
From a normal display distance, the high yellow-and-black contrast produces the same bright-window effect while the pumpkin remains fully stuffed.
Keeping the Witch in Proportion
The head should remain visibly smaller than the pumpkin.
That is why the witch stops at a 36-stitch plateau while the pumpkin reaches 42.
The black torso narrows to 18 stitches before insertion into the pumpkin opening. Only a short section remains visible above the orange body.
If too much torso is exposed, the character appears to be standing behind the pumpkin rather than emerging from inside it.
Set approximately 2–3 cm of the torso below the orange rim before sewing.
Making the Copper Spiral Hair
The long curls are a major identifying feature of the crochet witch doll with pumpkin.
Each strand is formed by placing two single crochets in every foundation chain. The resulting increase creates a tight spiral without requiring separate shaping.
Use mixed lengths.
Long 24-chain pieces belong around the back and sides. Shorter 18–20 chain curls frame the forehead and cheeks.
The hat will hide the top attachment points, so concentrate the sewing near the lower edge of the hair cap.
Constructing the Bent Witch Hat
The hat grows from six stitches to a 36-stitch crown and finally a 42-stitch brim.
Spacing the increases across several rounds gives the cone a gradual taper rather than a short triangular shape.
The first three six-stitch rounds create the narrow tip.
Leave that portion unstuffed. It can then curve naturally after the lower cone receives a small quantity of fiberfill.
The FLO brim begins only after the crown reaches 36 stitches. Working in front loops makes a distinct angle between the cone and brim without adding another sewn piece.
Adding the Purple Band and Buckle
The purple band separates the black hat from the orange hair.
Two rows of single crochet are enough to make it visible without covering much of the cone.
Wrap the strip immediately above the brim.
The gold buckle should remain small—about 18–22 mm wide. A larger buckle competes with the witch’s face and pushes the Halloween palette toward yellow rather than purple and orange.
Position the buckle at the exact front of the hat after the hat has already been pinned to the head.
Eye and Hair Placement
The witch face uses relatively large eyes and very little embroidered detail.
Keep approximately seven visible stitches between the safety-eye posts.
The curls should frame those eyes rather than overlap them.
Attach the shorter hair strands after the safety eyes, cheeks and lashes are complete. That makes the final framing easier to judge.
If one curl repeatedly falls across an eye, stitch its upper spiral to the hair cap approximately 10–15 mm above the cheek rather than trimming the strand.
Choosing Yarn and Hook Size
Published pumpkin witches span several scales. A 2024 Ravelry design uses worsted yarn with a 3.5 mm hook and 9 mm eyes, while a free 2024 Hocus Pocus pumpkin uses DK with a 3.5 mm hook and 10 mm eyes. Larger 2025 chunky patterns move into heavier yarn and larger eyes.
For the photographed figure, smooth worsted yarn gives enough definition for the jack-o’-lantern outlines, hair spirals and buckle.
A 3.5 mm hook produces dense fabric without making the large pumpkin rigid.
If stuffing shows between stitches, use 3.25 mm rather than adding another layer of yarn.
Estimating Yarn Quantity
The pumpkin consumes most of the project yardage because it remains at 42 stitches through eleven plateau rounds.
Weigh the body after R18 before starting the decreases. That figure represents most of the orange requirement.
Reserve approximately 20% more orange for decreases, sculpting, sewing and gauge variation.
The black requirement comes mainly from the hat and torso, not the facial chains.
Copper hair can also use more yarn than expected because each curled strand contains nearly twice as many stitches as its foundation-chain length suggests.
Make five curls first, weigh them together and multiply that result before cutting the remainder of the copper yarn.
Competition Gap
Current pumpkin-witch patterns frequently combine the witch and pumpkin in other ways. Some use a pumpkin as the witch’s head. Others put a witch hat directly on a pumpkin. A 2024 Ravelry pattern is a miniature pumpkin witch, while current free versions often work a pumpkin-headed figure in a black dress.
The supplied reference reverses that arrangement.
A human-faced witch sits inside a much larger jack-o’-lantern, leaving her head, torso and hands visible above the pumpkin. Curly copper hair, a purple hat band, glowing-look facial panels and a broad smile further distinguish the construction.
That creates a strong niche for a pumpkin witch crochet pattern built as one large Halloween centerpiece rather than a small keychain-style character.
Finishing Checks
Set the completed piece on a hard, flat table.
The pumpkin base should support the figure without leaning toward the witch.
View the front from approximately one meter away.
Both triangular eyes should appear level, the nose should sit on the centerline, and the smile should follow the lower pumpkin curve.
Check the witch next. Her head should remain centered over the pumpkin opening, and both hands should rest above the eye line.
Rotate the piece through a full turn. Copper curls should remain distributed around both sides and the back, while the black brim should not pull the head off-center.
Conclusion
Shape the six pumpkin lobes before fixing the face, because their position controls every later feature in this witch pumpkin amigurumi crochet pattern. Insert the black torso through the 18-stitch crown, secure the witch head, then add curls, arms and the bent hat in that order. Use yellow crochet panels for the jack-o’-lantern effect rather than a heat-producing light source. Record the completed pumpkin diameter before making a second version so the witch-to-pumpkin proportion can be repeated. Share the jack-o’-lantern close-up on Pinterest and the full Halloween display on Instagram with #PumpkinWitchAmigurumi. Would you make the next hat band purple, dark green or burnt orange?









