Introduction
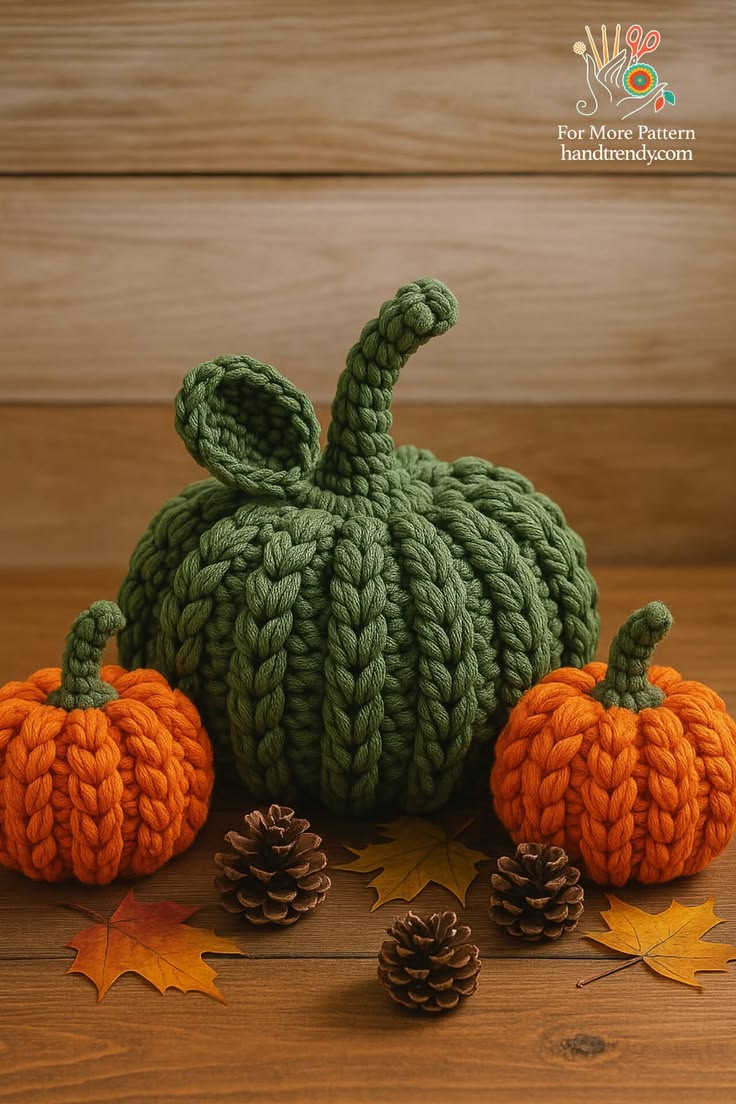
A pumpkin this heavily ribbed cannot rely on stuffing alone to create its vertical channels. This chunky crochet pumpkin pattern builds the body as a textured rectangle, then reinforces the silhouette with controlled center-to-center shaping. Super-bulky yarn and a 9 mm hook produce one large green pumpkin and two smaller orange pumpkins. The intermediate project works well for grouped fall displays because both sizes use the same construction system.
The Design: What Makes This Pumpkin Trio Different
The dominant feature is not the color but the depth of the vertical ribs. Raised columns remain visible after stuffing because the body fabric alternates ordinary half double crochet with back-loop and slip-stitch texture instead of depending entirely on yarn wrapped around a finished sphere. The large green pumpkin is intentionally wider and taller than the two orange pieces, creating a three-level arrangement without changing stitch vocabulary. Its stem is also longer, which prevents the broad body from looking visually compressed. A single green leaf adds width near the crown while keeping the palette restricted. One common failure in a ribbed crochet pumpkin is pulling the shaping strands until the sides collapse. The photographed pumpkins have rounded lobes between the ribs, so compression should define channels without flattening the surrounding stuffing.
Project Info at a Glance
| Skill Level | Time | Finished Size | Hook | Best For |
|---|---|---|---|---|
| Intermediate | Not established by verified source data | Large target: about 12.7 × 22.9 cm; small target: about 7.6 × 12.7 cm | 9 mm | Fall tables, shelves, entry displays, pumpkin groupings |
The size references above come from a published three-size super-bulky pumpkin design. Gauge, fiber composition, stuffing density, and rib tension can change both diameter and height, so check the body rectangle before seaming rather than relying only on the finished measurement.
Materials and Tools
Yarn
- Forest green — super bulky #6 — approximately 225–250 g for the large pumpkin, long stem, and leaf.
- Burnt orange — super bulky #6 — approximately 170–190 g total for two small pumpkins.
- Forest green — super bulky #6 — approximately 15–20 g additional allowance for two small stems if not taken from the large-pumpkin supply.
A published large chunky pumpkin uses 141 yards of #6 yarn, while its small version uses 53 yards. Those figures make one full large skein plus additional yarn a more practical allowance than trying to finish the centerpiece from a partial ball.
Tools
- 9 mm crochet hook
- Polyester fiberfill
- Long doll or upholstery needle
- Tapestry needle
- Stitch markers
- Straight pins
- Scissors
Abbreviations
MR — magic ring
sc — single crochet
hdc — half double crochet
sl st — slip stitch
inc — 2 stitches in one stitch
dec — decrease over 2 stitches
ch — chain
BLO — back loop only
FLO — front loop only
st/sts — stitch/stitches
R — round or row
An invisible decrease is worked through the front loops of the next two stitches before completing one single crochet, which reduces the visible bulk at the decrease point.
Pattern — Step by Step
The large and small pumpkin bodies are worked flat because a constant-width rectangle gives better control over strong vertical ribbing than spherical increases. After seaming, each tube is gathered at both ends, stuffed, and sculpted. Stems are worked in continuous rounds.
Large Green Pumpkin Body — Make 1
Yarn: forest green — Original photo-matched construction based on standard ribbed-pumpkin geometry.
Ch 19.
Row 1: starting in second ch from hook, hdc across (18).
Row 2: ch 1, turn, BLO hdc across (18).
Row 3: ch 1, turn, sl st across (18).
Row 4: ch 1, turn, hdc across (18).
Row 5: ch 1, turn, BLO hdc across (18).
Row 6: ch 1, turn, hdc across (18).
Rows 7–36: repeat Rows 2–6 six times (18).
Do not stretch the slip-stitch rows while measuring. The compressed rows form the narrow channels, while the hdc rows expand outward as the body is stuffed.
Fasten off after Row 36. Leave a 90 cm tail for seaming.
Small Orange Pumpkin Body — Make 2
Yarn: burnt orange — Original construction scaled from the large body.
Ch 11.
Row 1: starting in second ch from hook, hdc across (10).
Row 2: ch 1, turn, BLO hdc across (10).
Row 3: ch 1, turn, sl st across (10).
Row 4: ch 1, turn, hdc across (10).
Row 5: ch 1, turn, BLO hdc across (10).
Row 6: ch 1, turn, hdc across (10).
Row 7: ch 1, turn, BLO hdc across (10).
Row 8: ch 1, turn, sl st across (10).
Row 9: ch 1, turn, hdc across (10).
Row 10: ch 1, turn, BLO hdc across (10).
Row 11: ch 1, turn, hdc across (10).
Row 12: ch 1, turn, BLO hdc across (10).
Row 13: ch 1, turn, sl st across (10).
Row 14: ch 1, turn, hdc across (10).
Row 15: ch 1, turn, BLO hdc across (10).
Row 16: ch 1, turn, hdc across (10).
Row 17: ch 1, turn, BLO hdc across (10).
Row 18: ch 1, turn, sl st across (10).
Row 19: ch 1, turn, hdc across (10).
Row 20: ch 1, turn, BLO hdc across (10).
The short rectangle should remain elastic across its width. A rigid panel will resist gathering and leave a hole at the pumpkin center.
Fasten off. Leave a 60 cm sewing tail on each small pumpkin.
Large Curved Stem
Yarn: forest green — Standard six-stitch amigurumi math adapted to the long stem visible in the photograph.
R1: 6 sc in MR (6)
R2: inc ×6 (12)
R3: 12 sc (12)
R4: 12 sc (12)
R5: 12 sc (12)
R6: 12 sc (12)
R7: 12 sc (12)
R8: 12 sc (12)
R9: 12 sc (12)
R10: 12 sc (12)
R11: 12 sc (12)
R12: 12 sc (12)
R13: 12 sc (12)
R14: 12 sc (12)
R15: 12 sc (12)
R16: 12 sc (12)
Stuff R1–R8 moderately. Reduce the amount from R9 upward so the upper section can bend rather than crease.
Fasten off. Leave a 35 cm sewing tail.
Small Stems — Make 2
Yarn: forest green — Standard amigurumi math.
R1: 6 sc in MR (6)
R2: inc ×6 (12)
R3: 12 sc (12)
R4: 12 sc (12)
R5: 12 sc (12)
R6: 12 sc (12)
R7: 12 sc (12)
R8: 12 sc (12)
Add only a narrow amount of stuffing. The small stems should remain slimmer than the lobes beneath them.
Fasten off. Leave a 25 cm tail on each stem.
Large Leaf — Make 1
Yarn: forest green — Original flat-leaf construction matched to the photographed accessory.
Ch 11.
Starting in the second chain from the hook, work:
sl st in next ch,
sc in next ch,
hdc in next ch,
hdc in next ch,
3 hdc across the next 3 chains,
sc in next ch,
sl st in next ch,
3 sc in final chain.
Continue along the opposite side of the foundation chain:
sl st in next ch,
sc in next ch,
3 hdc across the next 3 chains,
hdc in next ch,
hdc in next ch,
sc in next ch,
sl st in final ch.
Fasten off. Leave a 30 cm tail.
Block the leaf only by hand. Strong flattening removes the slightly cupped profile visible beside the tall stem.
Large Pumpkin Shaping Strands — Make 8
Yarn: forest green — structural shaping component.
Cut eight strands approximately 110 cm long.
Each strand passes from the bottom center through the stuffed body to the top center, returns around one exterior channel, and is tightened only until the rib becomes clearly defined.
Small Pumpkin Shaping Strands — Make 12
Yarn: burnt orange — six strands for each small pumpkin.
Cut twelve strands approximately 65 cm long.
Use six around each orange pumpkin. Six divisions give the smaller bodies broad lobes without crowding the surface.
Assembly
- Bring the first and final rows of the large green body together. Whipstitch through matching row ends to create a tube, keeping the raised channels aligned from top to bottom.
- Repeat the same seam on both orange body panels. Turn all three tubes so knots and seam ridges face the interior.
- Thread a long matching yarn strand around the lower edge of each tube, passing through approximately every second row end. Pull the openings closed and knot them securely.
- Stuff the large green pumpkin first, packing the outer wall more firmly than the central core. Repeat with both orange pumpkins, stopping before the bodies become rigid spheres.
- Gather the top of every pumpkin until each opening measures roughly 10–15 mm. Add the final stuffing through the gap, then close and knot the gathering yarn.
- Run eight green shaping strands through the center of the large pumpkin and six orange strands through each small pumpkin. Pull one channel at a time and compare the lobes from above before tying the strands.
- Shape the long green stem by running a matching yarn strand along one inner side from approximately R5 to R14. Pull gradually until the upper third curves, then secure the shaping yarn inside the base.
- Sew the large stem over the center opening of the green pumpkin. Attach the two smaller green stems to the orange pumpkins, angling each slightly rather than setting them completely vertical.
- Position the green leaf beside the base of the large stem. Sew along its lower third only so the outer half remains raised from the pumpkin surface.
- Set all three pumpkins on a flat surface and check the bases. Redistribute stuffing or adjust one shaping strand if a pumpkin rocks, then bury every remaining tail through the interior.
The completed set should consist of one broad green centerpiece with eight strong ribs and two smaller orange pumpkins with six clearly separated lobes each.
7 Technical Tips
- Collapsed ribs: Loose slip stitches expand after stuffing and remove the raised channels. Keep each slip-stitch row approximately 15–20 percent shorter in relaxed height than the adjacent hdc rows.
- Hard spherical body: Overfilling the center prevents a shaping strand from pulling through the pumpkin. Pack the outer 2–3 cm of the body firmly while leaving the central core noticeably softer.
- Uneven segmentation: Starting a shaping strand without marking the body can leave one lobe twice as wide as another. Mark all eight positions on the large pumpkin and all six positions on each small pumpkin before pulling the first strand.
- Visible stuffing: A 9 mm hook can create openings when tension becomes loose in super-bulky yarn. If gaps exceed about 4 mm before stuffing, move down to an 8 mm hook rather than packing fiberfill behind an open fabric.
- Stem hinge: Filling all 16 stem rounds to the same firmness produces one sharp fold instead of a gradual curve. Reduce stuffing above R8 and distribute the shaping pull across at least six rounds.
- Leaf rotation: Sewing the leaf at one point allows its weight to turn around the stem base. Secure at least 25–30 mm of the lower leaf edge while leaving the tip free.
- Tail migration: Thick yarn ends can pull back through the large spaces between super-bulky stitches. Leave at least 15 cm, route each tail through the stuffed body in two different directions, then trim where it reappears.
Conclusion
The large pumpkin depends on eight controlled shaping channels, while each small pumpkin needs only six to preserve its rounded proportion. Check the bodies from above before attaching the stems; unequal rib spacing becomes harder to correct after the crown is covered. Record the hook, body-row count, stuffing amount, and final diameter if you plan to scale the set again. Share the finished trio on Pinterest and Instagram with #ChunkyPumpkinTrio. This chunky crochet pumpkin pattern also works as a color-series template: the next concrete step is choosing one additional super-bulky shade. Would you add a cream pumpkin or keep the entire set green and orange?









