Introduction
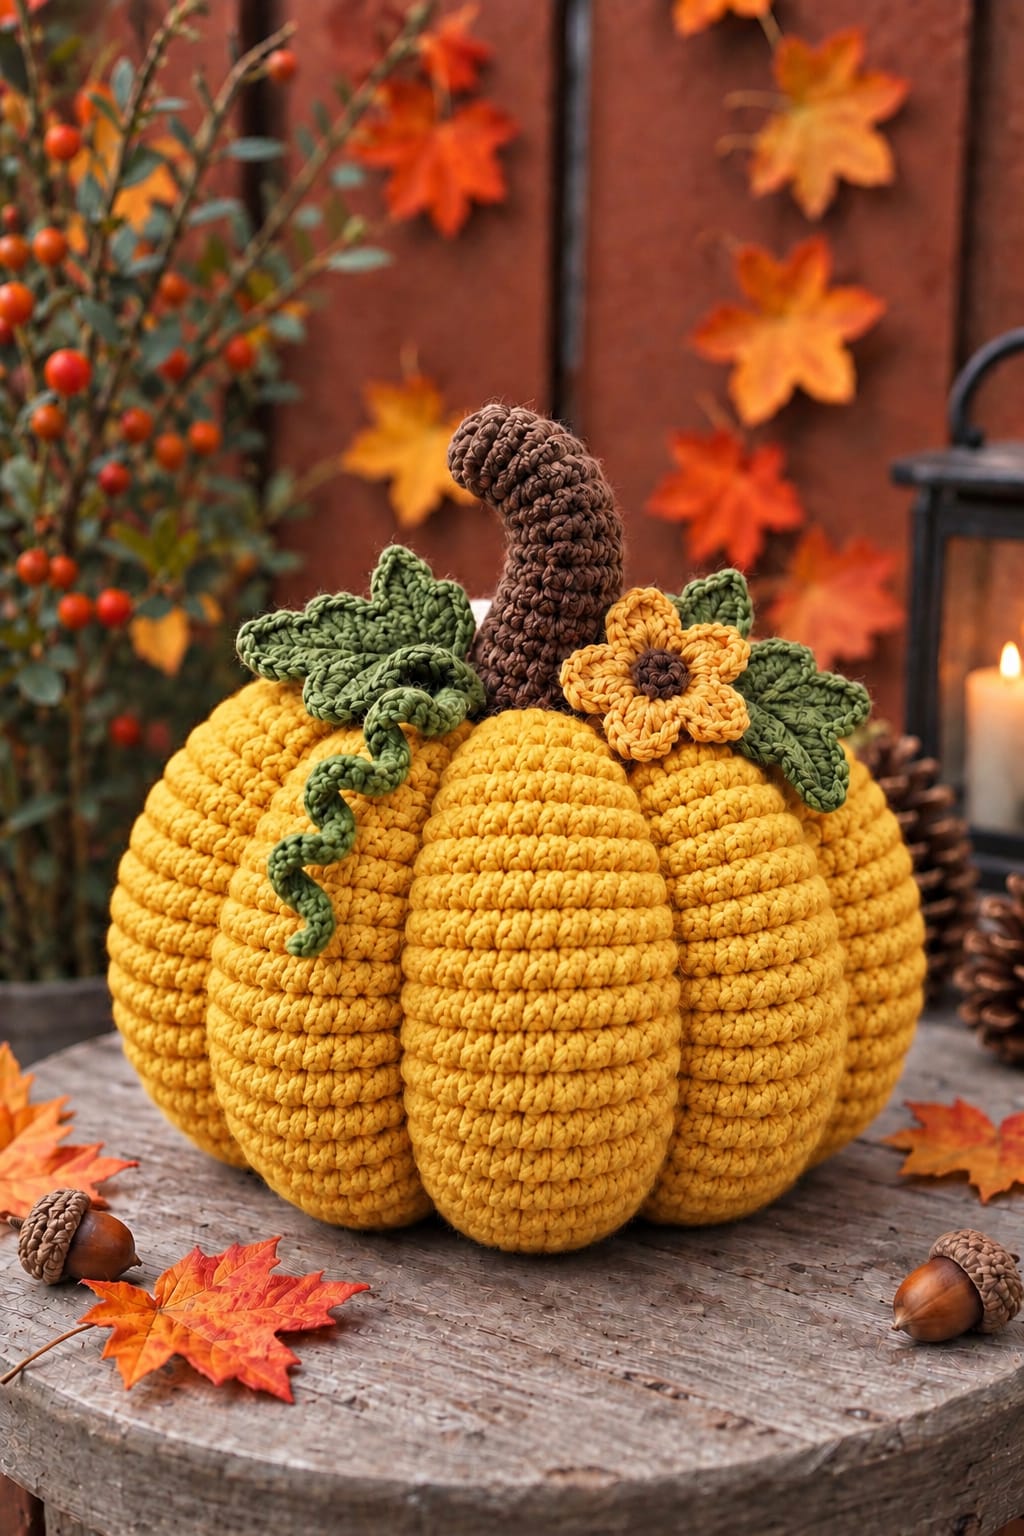
A tall brown stem bends over six deep mustard lobes while a five-petal flower occupies the crown instead of the pumpkin’s side. This large mustard crochet pumpkin pattern uses medium-weight yarn, a 5 mm hook, fiberfill, olive leaves, and a spiral vine. The intermediate reconstruction targets approximately 25 cm wide × 22 cm overall and creates a freestanding autumn centerpiece with controlled sculpting.
The instructions below are an original photo-inspired reconstruction based on visible structure; published patterns cited later are used only for sizing, gauge, and material benchmarks.
The Design: What Makes This Mustard Pumpkin Different
The photographed pumpkin combines a broad stuffed body with unusually deep vertical channels, so the body is crocheted first as one continuous form and sculpted only after stuffing. Six exterior shaping passes create the prominent lobes while preserving the horizontal single-crochet texture. A tall curved brown stem supplies the second structural challenge: its lower rounds need enough diameter and firmness to resist leaning at the attachment point. Finally, two olive leaves, a narrow spiral tendril, and one mustard five-petal flower create an asymmetric crown. This large mustard crochet pumpkin pattern therefore relies on controlled stuffing more than complicated body stitches. A frequent mistake is packing the fiberfill too firmly. Excess stuffing resists the sculpting strands, producing shallow grooves and a nearly spherical pumpkin rather than the strongly segmented form visible in the reference.
Project Info at a Glance
| Skill Level | Time | Finished Size | Hook | Best For |
|---|---|---|---|---|
| Intermediate | Approx. 8–11 hours | Reconstruction target: approx. 25 cm wide × 22 cm overall | 5 mm | Fall centerpieces, shelves, mantels, harvest displays |
The dimensions above are a photo-based reconstruction target, not measurements of an identified original pattern. For comparison, Nicole Riley’s published Large Pumpkin uses bulky yarn and a 5 mm hook and finishes at approximately 6.5 × 9 inches / 16.5 × 23 cm. A current large crochet pumpkin listing documents a life-sized version measuring approximately 20 cm high × 25 cm wide, closely matching the scale targeted here.
Materials and Tools
Yarn
- Mustard / golden yellow — medium #4 or light bulky yarn — approximately 180–220 g
- Dark brown — medium #4 yarn — approximately 30–40 g
- Olive green — medium #4 yarn — approximately 35–45 g
- Mustard yellow — approximately 10 g reserved for the flower
- Dark brown — approximately 3–5 g reserved for the flower center
A published large pumpkin pattern using medium #4 yarn lists approximately 175 yards / 160 m for its large pumpkin body, plus about 3 yards for a stem and 8 yards for leaves. Nicole Riley’s bulky Large Pumpkin uses approximately 183–229 m. Keep additional mustard yarn available because the photographed reconstruction is broad, densely stuffed, and deeply sculpted.
Tools
- 5 mm crochet hook
- Polyester fiberfill — approximately 250–350 g depending on density
- Long upholstery or doll needle
- Tapestry needle
- Stitch markers
- Scissors
- Measuring tape
Abbreviations
- MR — magic ring
- sc — single crochet
- inc — 2 sc in one stitch
- dec — invisible decrease
- hdc — half double crochet
- dc — double crochet
- tr — treble crochet
- sl st — slip stitch
- ch — chain
- BLO — back loop only
- st/sts — stitch/stitches
For an invisible decrease, insert the hook through the front loops of the next two stitches, yarn over and complete one single crochet through both loops.
Pattern — Step by Step
Work the pumpkin body in a continuous spiral unless a round specifically states otherwise. Place a marker in the first stitch and move it after every round.
Mustard Pumpkin Body
Yarn: mustard — original reconstruction based on standard amigurumi increase geometry.
R1: 6 sc in MR. (6)
R2: Inc ×6. (12)
R3: (1 sc, inc) ×6. (18)
R4: (2 sc, inc) ×6. (24)
R5: (3 sc, inc) ×6. (30)
R6: (4 sc, inc) ×6. (36)
R7: (5 sc, inc) ×6. (42)
R8: Sc around. (42)
R9: Sc around. (42)
R10: Sc around. (42)
R11: Sc around. (42)
R12: Sc around. (42)
R13: Sc around. (42)
R14: Sc around. (42)
R15: Sc around. (42)
R16: Sc around. (42)
R17: Sc around. (42)
R18: Sc around. (42)
R19: Sc around. (42)
R20: Sc around. (42)
Begin stuffing after R20. Pack the outer wall evenly but leave the center slightly more compressible than the perimeter.
R21: (5 sc, dec) ×6. (36)
R22: Sc around. (36)
R23: (4 sc, dec) ×6. (30)
R24: Sc around. (30)
R25: (3 sc, dec) ×6. (24)
R26: Sc around. (24)
Add the final stuffing now. Keep approximately 2 cm of space beneath the crown slightly softer so the stem can sit in a visible recess.
R27: (2 sc, dec) ×6. (18)
R28: (1 sc, dec) ×6. (12)
R29: Dec ×6. (6)
Fasten off with a 150 cm tail. Thread through the six remaining front loops and close the opening.
Sculpting the Six Pumpkin Lobes
The smooth body becomes pumpkin-shaped only after the exterior channels are added.
Thread a long mustard strand through a doll needle.
Insert the needle through the bottom center and bring it out through the crown.
Wrap the strand over the outside of the pumpkin and return through the bottom center.
Pull until a distinct groove forms.
Repeat at approximately 60-degree intervals until six evenly spaced channels divide the body.
Make a second pass through each groove if greater depth is needed. The photographed pumpkin has pronounced valleys, but the yarn should not disappear deeply enough to distort individual crochet stitches.
Tie the shaping strand securely beneath the pumpkin and bury the ends inside the stuffing.
Curved Brown Stem
Yarn: dark brown.
The stem should finish approximately 10–12 cm long and curve forward.
R1: 6 sc in MR. (6)
R2: Inc ×6. (12)
R3: (1 sc, inc) ×6. (18)
R4: BLO sc around. (18)
R5: (4 sc, dec) ×3. (15)
R6: Sc around. (15)
R7: (3 sc, dec) ×3. (12)
R8: Sc around. (12)
R9: Sc around. (12)
R10: Sc around. (12)
R11: Sc 8, sl st 4. (12)
R12: Sc 8, sl st 4. (12)
R13: Sc 9, sl st 3. (12)
R14: Sc 9, sl st 3. (12)
R15: Sc around. (12)
R16: Sc around. (12)
R17: (2 sc, dec) ×3. (9)
R18: Sc around. (9)
R19: (1 sc, dec) ×3. (6)
Stuff the lower two-thirds firmly and the curved upper section lightly. The shorter slip stitches on one side create the forward bend.
Fasten off. Close the six-stitch tip and weave in that end. Leave a separate 50 cm tail at the base for attachment.
Large Olive Leaf — Make 2
Yarn: olive green. Published pumpkin-leaf references commonly use worsted #4 yarn and hooks around 5 mm; this is an original photo-based leaf reconstruction.
Ch 15.
Starting in second chain from hook, work:
sl st, sc, hdc, dc, dc, tr, tr, tr, dc, dc, hdc, sc, sl st into the next 13 chains, leaving the final foundation chain for the tip.
Work 5 sc into the final chain.
Continue along the opposite side of the foundation:
sl st, sc, hdc, dc, dc, tr, tr, tr, dc, dc, hdc, sc, sl st.
Join at the base.
Ch 5. Starting in second chain, sl st in four chains to create the stem.
Fasten off with a 35 cm tail.
Target approximately 9–10 cm long.
Raised Leaf Vein
Join olive yarn at the leaf base.
Surface slip stitch along the original foundation chain to the tip.
Fasten off.
Keep the surface stitches relaxed. A tight central vein shortens the foundation and causes the leaf to fold sharply along its axis.
Small Olive Leaf — Make 1
Ch 11.
Starting in second chain, work into the next nine chains:
sl st, sc, hdc, dc, tr, dc, hdc, sc, sl st.
Work 5 sc in the final chain.
Along the opposite side work:
sl st, sc, hdc, dc, tr, dc, hdc, sc, sl st.
Join at the base.
Ch 4 and sl st back through three chains for the stem.
Fasten off with a 30 cm tail.
Curly Olive Vine
Yarn: olive green.
Ch 32.
Starting in second chain from hook, work 3 sc in each of the next 24 chains.
Sl st in each of the remaining seven chains.
Fasten off with a 30 cm tail.
The repeated increases force the first 24 chains into a spiral while the seven slip stitches create a flatter attachment section.
Target a relaxed visible curl approximately 10–13 cm long.
Five-Petal Mustard Flower
Yarn: dark brown center and mustard petals.
Ch 4 and join with sl st to form a ring.
R1: Work 10 sc into the ring. Join with sl st. (10)
Change to mustard.
R2: *Sl st in next st, (ch 3, 3 dc, ch 3, sl st) in next st.* Repeat ×5. (5 petals)
Fasten off with a 30 cm tail.
This construction uses exactly two center stitches per petal:
10 center stitches ÷ 2 = 5 petals.
Block lightly to approximately 6–7 cm across.
Positioning the Pumpkin Crown
Set the finished body on a flat surface.
Locate the crown center where all six grooves converge.
Position the brown stem first.
The stem should lean slightly forward rather than standing vertically.
Place one large olive leaf to the left and one to the right, allowing their bases to disappear beneath the stem.
Position the smaller leaf behind the flower.
The mustard flower sits on the front-right side of the stem in the photographed arrangement.
Let the spiral vine fall toward the front-left lobe.
Attaching the Curved Stem
Sew through all 18 stitches of the stem’s broad base.
Make a second attachment circle approximately 1 cm above the base, catching the pumpkin surface without pulling through the opposite side.
This second anchoring line matters because a 10–12 cm curved stem creates leverage at the crown.
Push the base slightly into the softer crown stuffing before tightening the final stitches. The resulting recess makes the stem appear to emerge from the pumpkin rather than sit on top of it.
Attaching the Leaves
Secure the complete stem section of each leaf.
Add one concealed stitch approximately 2 cm along the center vein.
Leave the remaining edges unattached.
The free outer portions should lift slightly from the pumpkin surface.
Place the two large leaves at different angles so they do not form a symmetrical bow around the stem.
Attaching the Flower
Position the five-petal flower against the front-right side of the stem.
Sew through the brown center at four evenly spaced points.
Add one hidden stitch beneath the base of two petals if the flower rotates.
Leave the remaining petal edges free.
Attaching the Vine
Sew the seven-slip-stitch flat section beneath the left leaf.
Add one concealed stitch where the first spiral begins.
Leave the rest of the curl unattached.
The lower portion should hang over the front-left lobe without being stretched straight.
Assembly
- Crochet the mustard body through R29, stuffing after R20 and leaving the crown slightly softer than the outer walls before closing the final six stitches.
- Pass a long mustard shaping strand from bottom center to crown and create six exterior channels at approximately 60-degree intervals around the body.
- Repeat the sculpting passes where needed until the six lobes have similar widths, then secure and bury the shaping yarn beneath the pumpkin.
- Crochet and lightly stuff the 10–12 cm curved brown stem, keeping the upper curved section softer than its broad 18-stitch base.
- Sew the stem into the crown recess through all base stitches, then add a second anchoring line approximately 1 cm above the first attachment.
- Crochet two large olive leaves and one small leaf, add relaxed surface-slip-stitch veins, and place them asymmetrically around the stem.
- Sew each leaf through its stem and approximately 2 cm of center vein while leaving the pointed outer edges free from the pumpkin surface.
- Crochet the five-petal mustard flower and attach its brown center to the front-right side of the stem with four evenly spaced sewing points.
- Make the 32-chain olive spiral vine, secure its seven-chain flat section beneath the left leaf, and leave the curled portion hanging freely over the front lobe.
- Weave all remaining tails through at least 5 cm of matching crochet, reshape the six grooves by hand, and check that the finished pumpkin stands without rocking.
The completed reconstruction should have six deeply divided mustard lobes, a forward-curving brown stem, three olive leaves, one spiral vine, and one five-petal mustard flower.
7 Technical Tips
- The grooves disappear after sculpting: remove approximately 10–15% of the stuffing before tightening the shaping strands again. A rigidly packed body prevents the six exterior channels from sinking far enough to separate the lobes.
- One pumpkin lobe becomes narrower than the others: mark the body into six approximately 60-degree sections before making the first shaping pass. Moving a groove by even 1–2 cm near the equator noticeably changes the neighboring lobe widths.
- The stem falls sideways: sew a second attachment circle approximately 1 cm above its 18-stitch base. A single line of stitches at the bottom acts like a hinge under a tall curved stem.
- The leaves curl into tubes: keep the surface-slip-stitch center vein relaxed and compare it with the original foundation length. A vein shortened by roughly 5 mm can pull a 9 cm leaf sharply inward.
- The vine loses its spiral: work exactly three single crochets into each of the first 24 foundation chains. One stitch per chain creates a straight cord, while inconsistent increases produce irregular waves instead of a compact curl.
- The flower center buckles: keep the base at exactly 10 single crochets before constructing five petals. Each petal consumes two center stitches, so an 8- or 12-stitch center changes the radial spacing.
- The finished pumpkin rocks on the table: massage stuffing away from the bottom center and flatten a base approximately 8–10 cm across. Concentrated stuffing directly beneath the center creates a rounded contact point instead of a stable platform.
Why the Body Stops at 42 Stitches
The reconstruction follows standard six-section amigurumi expansion:
6 → 12 → 18 → 24 → 30 → 36 → 42 stitches.
Every increase round adds exactly six stitches. The 42-stitch plateau is then maintained through R20 before the body decreases in the same six-stitch progression.
The apparent finished diameter depends heavily on yarn thickness, hook size, stuffing, and sculpting. For the large photographed scale, choose a substantial medium #4 yarn or light bulky yarn rather than a thin worsted cotton.
Published Large-Pumpkin Size Benchmark
Nicole Riley’s Large Pumpkin specifies Knit Picks Brava Bulky, a 5 mm hook, and approximately 200–250 yards / 183–229 m.
Its published size is approximately 6.5 × 9 inches / 16.5 × 23 cm. The pattern uses linked treble crochet rather than the single-crochet amigurumi construction used here, so its stitch instructions are not being reproduced.
The dimensions and material data provide a useful benchmark for a substantial tabletop pumpkin made with a 5 mm hook.
Published 25 cm Pumpkin Benchmark
A current large crochet pumpkin listing describes a life-sized design approximately 8 inches / 20 cm high and 10 inches / 25 cm wide, with a circumference around 70 cm.
That width is especially relevant to the photo reconstruction because the visible pumpkin occupies a broad tabletop footprint and has a relatively tall botanical crown.
The construction in that commercial pattern is cable-textured and differs from the smooth horizontal rounds used in this article.
Published Medium-Yarn Pumpkin Benchmark
A current three-size pumpkin pattern specifies medium #4 yarn and a 4.5 mm hook.
Its large size is approximately 6.5 inches high with a 26-inch circumference. The listed body requirement is approximately 175 yards, with about 3 yards for the stem and 8 yards for leaves.
That provides a practical material reference when selecting medium yarn for a large stuffed pumpkin.
Published Aran Pumpkin Benchmark
Michelle Hall’s Large Pumpkin uses Aran yarn and a 4.5 mm hook.
The published finished measurement is approximately 8 inches wide × 6.5 inches tall, and its listed yarn requirement is approximately 284 yards / 260 m.
The pattern forms its pumpkin sections during crochet rather than sculpting a smooth stuffed form afterward, demonstrating how construction method can substantially alter yarn requirements.
Published Pumpkin Leaf Benchmark
Doily Designs publishes a pumpkin leaf made with worsted #4 yarn and a 5 mm hook.
The finished leaf measures approximately 2.25 inches / 5.7 cm including its stem.
That pattern works along both sides of a foundation chain, the same general leaf-building principle used in this reconstruction. The larger leaves here use a longer foundation to better match the broad foliage visible around the stem.
Published Stem, Leaf and Vine Benchmark
ChristaCoDesign’s pumpkin topper uses #4 medium worsted yarn and a 5 mm hook for a stem, leaf, and curly vine.
The published materials estimate approximately 21–23 m of yarn for the topper components.
The designer also documents the standard technique of creating a spiral vine by working multiple stitches into individual foundation chains. The vine written here uses three single crochets per chain over a fixed 24-chain section for a reproducible curl.
Why the Stem Is Curved
A straight cylinder would change the silhouette significantly.
The reference stem rises from the center and bends toward the viewer.
Rounds containing eight or nine single crochets followed by slip stitches shorten one side without reducing the total stitch count. Repeating that imbalance gradually pulls the tube toward the shorter side.
Light stuffing in the bend allows the curve to remain visible after attachment.
Why the Pumpkin Uses Six Lobes
The visible body reads as approximately six major sections rather than many narrow ribs.
Six lobes also correspond naturally with a six-stitch amigurumi expansion.
Marking six equal positions around the equator creates an approximately 60-degree interval between neighboring grooves.
That spacing produces broad lobes capable of showing the horizontal crochet rows clearly.
Controlling Groove Depth
Do not create maximum depth on the first pass.
Make all six grooves at moderate tension first.
Set the pumpkin on the table and compare the lobe widths.
Then tighten selected grooves with a second pass.
This staged method reduces the chance that the first channel becomes much deeper than the sixth.
Stuffing the Body
Add stuffing in small pieces rather than inserting several large handfuls.
Keep the equator full enough to resist collapsing under the shaping yarn.
The crown and bottom center should remain more compressible.
A slightly softer crown accepts the broad stem base, while a moldable bottom can be flattened into a stable tabletop footprint.
Making a Smaller Pumpkin
Stop increasing at 36 stitches.
Maintain the 36-stitch plateau for approximately eight to ten rounds, then decrease:
36 → 30 → 24 → 18 → 12 → 6.
Use six shaping passes and reduce the stem to approximately 7–8 cm.
The leaves should also be shortened by two or three foundation chains so they remain proportional.
Making a Wider Pumpkin
For a substantially broader body, add one standard increase round after R7:
(6 sc, inc) ×6 = 48 stitches.
Maintain 48 stitches through the central plateau and reverse the shaping with:
(6 sc, dec) ×6 = 42, followed by the existing decrease sequence.
Expect additional yarn and stuffing consumption. Test the larger body before increasing the leaf dimensions.
Changing the Flower Color
Burnt orange creates stronger separation from the mustard pumpkin.
Cream produces a lighter botanical crown.
For the closest photo-inspired result, retain mustard petals and use dark brown only for the center.
The brown center visually links the flower to the stem without introducing another major color.
Changing the Leaf Color
Muted olive gives the strongest autumn contrast against mustard.
Dark forest green produces a sharper color break, while sage creates a softer crown.
If using three leaf shades, place the darkest leaf behind the flower and keep the vine in the middle green value so the spiral remains visible over the pumpkin body.
Making a Longer Vine
Add foundation chains before beginning the increases.
For a vine approximately 15–18 cm long, start with ch 40 and work three single crochets into the first 31 chains, leaving eight chains for the flat attachment section.
Do not stretch the spiral while measuring it. Use its relaxed length.
Correcting an Overstuffed Pumpkin
If the grooves barely form, reopen the six-stitch crown before adding stronger sculpting yarn.
Remove stuffing from the central area first.
Close the crown and repeat the six shaping passes.
Using excessively strong tension on an overstuffed body can distort or break the crochet stitches without producing the required deep channels.
Correcting Unequal Lobes
Place six markers around the equator before sculpting.
Each marker represents one groove position.
If a completed lobe is too narrow, move one neighboring groove outward rather than simply loosening both channels.
Compare the pumpkin from above, where uneven section widths are easier to see.
Correcting a Loose Stem
Do not add glue.
Run a fresh brown sewing strand through the pumpkin crown and the stem’s R4 BLO ridge.
Work completely around the base.
Then make three anchoring stitches from the stem approximately 2 cm above the crown into separate points on the pumpkin surface.
Bury the strand inside the body.
Correcting a Flat Flower
The flower should sit slightly above the leaves.
If it disappears against the pumpkin, add one small circle of matching brown felt or a crocheted 10-stitch disk behind its center before sewing.
Do not stuff the petals. Their edges should remain flexible.
Yarn Planning
Make the pumpkin body before cutting yarn for decorative pieces.
Record the weight of the remaining mustard yarn.
Reserve at least 10 g for the flower and any repairs to the shaping channels.
When substituting yarn, compare meterage per 100 g rather than relying only on the printed weight category because medium yarns can vary considerably in thickness.
Care and Storage
Follow the care label of the selected yarn.
For a stuffed centerpiece, spot cleaning is generally less disruptive to the sculpted channels than repeated full washing.
Support the curved stem when storing the pumpkin.
Do not place heavy seasonal decorations on top of the leaves or flower because long-term compression can flatten their blocked shapes.
Reshape the six lobes by hand after storage.
Sources
Ravelry — Large Pumpkin by Nicole Riley — bulky yarn, 5 mm hook, 183–229 m yardage, and approximately 16.5 × 23 cm published size.
Nicki’s Homemade Crafts — Large Crochet Pumpkin — companion reference for Nicole Riley’s large decorative pumpkin and linked-crochet construction.
Ravelry — Large Pumpkin by Michelle Hall — Aran yarn, 4.5 mm hook, 260 m yardage, and approximately 8 × 6.5 inch published size.
Ravelry — Fall Harvest Pumpkins by Sweet Softies — adjustable ribbed pumpkin reference using medium yarn and multiple hook sizes.
ChristaCoDesign — Crochet Pumpkin Stem, Leaf and Vine Pattern — #4 worsted yarn, 5 mm hook, stem construction, leaf reference, and spiral-vine technique.
Doily Designs — Crochet Pumpkin Vine Leaf Pattern — worsted #4 yarn, 5 mm hook, approximately 2.25-inch leaf, and foundation-chain leaf construction.
Ravelry — Life-sized Chunky Pumpkins by Heather C Gibbs — bulky-yarn pumpkin reference with a 6.5 mm hook and published large dimensions.
Conclusion
Build the six-lobe body before committing to the crown because the final groove depth determines how large the stem and leaves should appear. Stuff the equator firmly, leave the crown more compressible, and establish all six sculpting channels before tightening any single groove a second time. Your concrete next step is to crochet through the 42-stitch plateau and measure the body before beginning the decreases. Save this large mustard crochet pumpkin pattern to Pinterest or share the finished centerpiece on Instagram with #MustardHarvestPumpkin. For this particular crown, would you keep the mustard five-petal flower or switch its petals to burnt orange?









