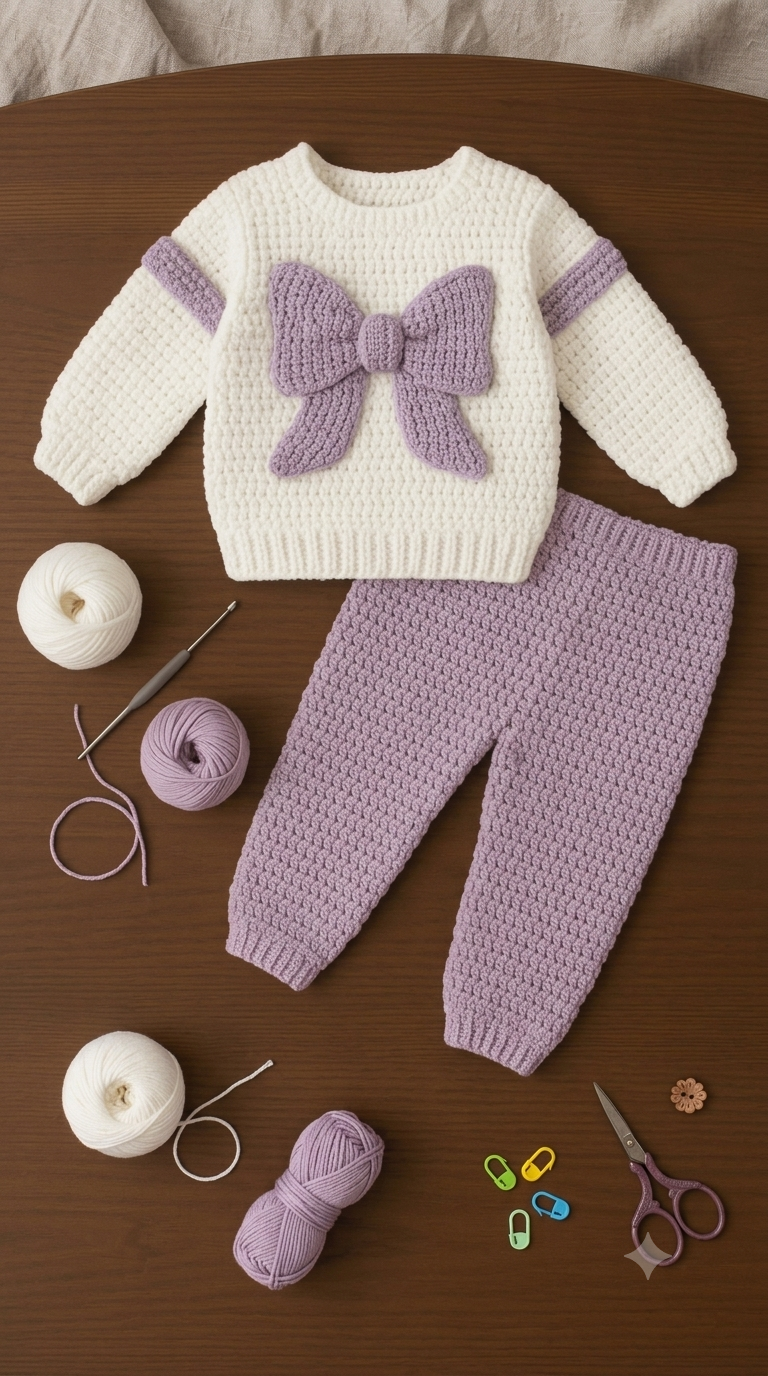
A bow nearly as wide as the baby’s chest changes the construction of this pullover before the first sleeve is attached. This crochet baby sweater and pants set pairs a cream DK pullover with lavender trousers, contrast sleeve bands, and a dimensional bow. Use a 4 mm hook and DK yarn for a 3–6-month reference size. The matching two-piece format also removes the need to coordinate separate handmade garments.
The Design: What Makes This Bow Set Different
Three structural choices define this crochet baby outfit pattern. First, the pullover uses compact ribbing at the neck, lower edge, and cuffs so the cream body does not visually compete with the large lavender bow. Second, fuller sleeves taper sharply toward the wrists. That shaping creates the balloon profile visible in the photograph while retaining a fitted cuff.
The third decision is scale. A small appliqué would disappear against this sweater; the bow needs broad loops, a narrow center wrap, and separate lower tails.
The matching crochet baby pants pattern repeats the lavender rather than introducing a third major color. This gives the two garments a clear visual connection. A common error with a crochet bow sweater is attaching the bow before blocking the front. That can pull the chest fabric inward and distort its width.
Project Info at a Glance
| Skill Level | Time | Finished Size | Hook | Best For |
|---|---|---|---|---|
| Intermediate | Multi-session garment project | 3–6 months reference; 18-inch chest sizing reference | 4.0 mm | Coordinated infant outfit |
The 3–6-month/18-inch reference and 4 mm DK combination are documented in published baby sweater-set patterns. Always check the intended child’s measurements before selecting the final stitch counts.
Materials and Tools
Yarn
For this photo-inspired version, purchase approximately 190–250 g total DK yarn. This is a working project allowance rather than the exact consumption of the photographed garments because the original pattern and yarn specifications are unavailable.
- Cream/ivory DK yarn: approximately 150 g
- Dusty lavender DK yarn: approximately 100 g
- Yarn weight: DK / #3
Choose cream and lavender yarns from the same yarn family when possible. Matching fiber content and construction helps the two colors respond similarly during washing and blocking.
Tools
- 4.0 mm crochet hook
- 3.5 mm crochet hook for firmer ribbing if required by gauge
- Yarn needle
- Locking stitch markers
- Scissors
- Flexible measuring tape
- Rust-resistant pins
- Blocking mat
- Waste yarn for holding stitches
No safety eyes, stuffing, buttons, or amigurumi hardware are required.
Abbreviations
- ch — chain
- sc — single crochet
- hdc — half double crochet
- dc — double crochet
- sl st — slip stitch
- BLO — back loop only
- st/sts — stitch/stitches
- RS — right side
- WS — wrong side
- rep — repeat
Invisible decrease is an amigurumi technique and is not required for this garment; shaping is produced through conventional garment decreases or skipped edge stitches.
Gauge and Sizing
For this photo-inspired version, target approximately 18 hdc stitches per 10 cm after washing and drying the swatch as the finished garment will be treated.
Measure the intended wearer whenever possible. The 3–6-month label is a reference category rather than a substitute for actual chest, arm, waist, rise, and leg measurements.
The construction below is intended as a framework for an approximately 18-inch chest infant size. Adjust row and stitch counts when the required measurements or your gauge differ.
Pattern — Step by Step
Sweater Back
Yarn: cream.
Ch 43.
Row 1: Hdc in second ch from hook and across. (42)
Rows 2–20: Ch 1, turn, hdc across. (42)
At the armhole level, begin shoulder shaping.
Row 21: Sl st across first 3 sts, hdc across to last 3 sts. (36 worked sts)
Rows 22–31: Ch 1, turn, hdc across. (36)
For the upper back, divide the shoulder and neck sections according to the required neck width. Work each shoulder separately so the neckline can be adjusted to the intended wearer.
Fasten off with a 25 cm sewing tail at each shoulder.
Sweater Front
Yarn: cream.
Ch 43.
Row 1: Hdc in second ch from hook and across. (42)
Rows 2–20: Hdc across. (42)
Row 21: Reduce the working width at both armhole edges to match the back.
Rows 22–27: Work even.
Create a centered neck opening during the final rows. Keep both shoulder widths equal and check the opening against the required head circumference before joining the second shoulder.
A pullover can match the chest correctly and still be unusable if the neckline cannot pass comfortably over the head.
Fasten off.
Lower Sweater Ribbing
Yarn: cream.
Ch 7.
Row 1: Sc in second ch from hook and across. (6)
Row 2 onward: Ch 1, turn, sc BLO across. (6)
Continue until the rib strip fits the lower sweater circumference with slight negative ease. Seam the short ends, then sew the rib evenly around the lower edge.
Neck Ribbing
Yarn: cream.
Ch 5.
Row 1: Sc in second ch from hook and across. (4)
Following rows: Ch 1, turn, sc BLO across. (4)
Continue until the strip fits around the completed neckline without puckering. Join the ends and sew the ribbing around the neck with the seam positioned at the center back.
The photographed sweater has a relatively compact round neckline. Check head clearance before permanently closing the band.
Sleeves — Make 2
Yarn: cream with lavender band.
Begin at the cuff so the wrist circumference can be measured directly.
Ch 7.
Row 1: Sc in second ch from hook and across. (6)
Row 2 onward: Sc BLO across until the rib strip fits the wrist comfortably.
Join the rib ends. Work evenly around the upper edge in cream hdc.
Increase gradually over the lower sleeve. Continue until the sleeve reaches the position of the lavender band shown in the reference image.
Change to lavender and work approximately 4–5 cm in the established stitch pattern.
Change back to cream.
Add further increases above the band to create the fuller balloon-style sleeve. Work even toward the upper arm, then reduce the sleeve-cap width gradually so it matches the sweater armhole.
Fasten off with a 30 cm sewing tail.
Contrast Sleeve Bands — Make 2
Yarn: lavender.
The bands can be incorporated directly into each sleeve rather than sewn on separately.
Use lavender for approximately 6–8 rows, depending on row gauge. Measure the first band and make the second band to the same physical depth.
Change back to cream at the same relative position on both sleeves.
Pants Waistband
Yarn: lavender.
Ch 7.
Row 1: Sc in second ch from hook and across. (6)
Row 2 onward: Ch 1, turn, sc BLO across. (6)
Continue until the ribbing fits the required waist with comfortable stretch. Join the short ends.
Rotate the band and work hdc evenly around its long edge. Place a stitch marker at the center back.
Pants Rise
Yarn: lavender.
Work hdc in joined rounds.
Rounds 1–2: Hdc around.
Rounds 3–8: Continue evenly, adding back-rise shaping when required by measurements.
Following rounds: Continue until the waist-to-crotch depth reaches the target rise.
Use the intended wearer’s measurement rather than transferring the rise measurement from a different baby size.
Pants Legs — Make 2
Yarn: lavender.
Divide the total pants stitches into equal halves at the crotch.
Join the yarn for the first leg.
Round 1: Hdc around the first half of the stitches.
Round 2 onward: Hdc around, decreasing symmetrically where required to reproduce the tapered leg visible in the photograph.
Continue until the leg reaches the required ankle length minus the cuff depth.
Repeat for the second leg using exactly the same number of rounds and decreases.
Ankle Cuffs — Make 2
Yarn: lavender.
Ch 7.
Row 1: Sc in second ch from hook and across. (6)
Following rows: Ch 1, turn, sc BLO across. (6)
Continue until the strip fits the ankle. Join its short ends and sew one cuff to each trouser leg.
Align the cuff seam with the inner-leg line.
Large Bow Loops
Yarn: lavender.
Ch 31.
Row 1: Hdc in second ch from hook and across. (30)
Rows 2–14: Ch 1, turn, hdc across. (30)
Fasten off.
Fold the rectangle so the short ends meet at the center back. Sew the edges securely, then pinch the middle into several narrow folds.
The finished loop section should remain broad enough to dominate the sweater front without extending into the armholes.
Bow Center Wrap
Yarn: lavender.
Ch 7.
Row 1: Sc in second ch from hook and across. (6)
Rows 2–12: Ch 1, turn, sc across. (6)
Wrap the strip firmly around the pinched center of the bow. Sew the short edges together at the back.
Do not attach the completed bow to the sweater yet.
Bow Tails — Make 2
Yarn: lavender.
Ch 11.
Row 1: Hdc in second ch from hook and across. (10)
Rows 2–14: Hdc across. (10)
Row 15: Skip first st, hdc across. (9)
Row 16: Hdc across. (9)
Row 17: Skip first st, hdc across. (8)
Rows 18–20: Hdc across. (8)
Fasten off.
Shape the lower end with a slight diagonal during finishing. Make the second tail as a mirror image.
Bow Assembly
Place both tails behind the bow loops so they angle outward slightly. Sew them securely to the back of the center section.
Pin the completed bow to the sweater while the sweater lies completely flat. Align the bow’s horizontal center with the centerline of the sweater.
Attach the bow securely at the center and at several concealed points along the loops. Do not stitch every outer edge to the sweater because this removes the raised dimensional appearance.
Assembly
- Block the sweater front and back to matching dimensions before seaming.
- Join the sweater shoulders while keeping the neckline centered.
- Attach the neck ribbing and check the finished opening against the required head measurement.
- Pin each sleeve midpoint to its shoulder seam, then sew the sleeve caps into the armholes.
- Close the sleeve and side seams from each wrist to the sweater hem.
- Attach the lower sweater ribbing without overstretching individual sections.
- Finish the pants crotch and inner-leg joins while matching both legs precisely.
- Attach both ankle cuffs and align their seams with the inside-leg seams.
- Pin the bow loops, tails, and center section to the blocked sweater front, then hand-sew them securely without catching the sweater back.
- Weave in every yarn tail, remove all markers, and compare the two sleeves and two trouser legs by measurement.
The completed project consists of one cream round-neck pullover with lavender sleeve details and oversized bow, plus one pair of tapered lavender pants.
7 Technical Tips
- Mark every pants round. A misplaced beginning-of-round marker can move the crotch division several stitches sideways and cause the legs to twist.
- Measure the neckline before closing the ribbing. The opening must accommodate the required head circumference because chest size does not determine head clearance.
- Keep bow attachment points localized. Sewing around the complete perimeter can flatten the loops and pull a horizontal crease into the sweater front.
- Compare sleeve lengths every 4–5 cm. Even two additional rows on one sleeve become visible once the lavender contrast bands are placed side by side.
- Pin each sleeve cap at three reference points. Mark the shoulder midpoint and both underarm points first so excess fabric does not accumulate on one side.
- Count every pants-leg round. A one-round difference can position the ankle cuffs at different heights even when both cuffs have identical ribbing.
- Weave yarn tails through at least 4–5 cm of matching fabric. Very short tails near the waistband or bow can migrate toward the surface after stretching and laundering.
Fit Checks Before Finishing
Baby garments require more information than an age label. Check the actual chest circumference, sweater length, arm length, wrist circumference, waist, rise, and inseam whenever those measurements are available.
Published patterns demonstrate considerable variation between sizes and designers. A 3–6-month garment may use an 18-inch chest reference, while larger baby sweaters can measure around 33 cm in body length. Those dimensions should not be transferred automatically from one size to another.
Yarn choice also changes the finished measurements. DK acrylic, merino DK, cotton blends, and dense light-worsted yarns can produce noticeably different fabrics even when worked with the same hook.
Wash the gauge swatch before committing to the full garment. Measure it only after the fabric has dried in the same manner intended for the finished set.
For infant clothing, keep decorative components securely attached and avoid loose cords or unsecured small embellishments. The photographed design can be constructed entirely from yarn without beads or detachable decorative pieces.
Color Placement and Photo Matching
The visual balance depends on maintaining a clear separation between cream and lavender. Cream covers the sweater body, main sleeve sections, neckline, hem, and cuffs. Lavender appears as the upper-sleeve contrast bands before becoming the primary color of the bow and pants.
Position both sleeve bands at exactly the same measured distance from the cuffs or shoulders. Measuring in centimeters is more reliable than comparing row counts alone when tension changes slightly between sleeves.
The bow belongs on the upper-middle section of the sweater front rather than directly beneath the neckline. Its width is intentionally substantial compared with the torso.
Before sewing, pin the completed bow in place and lay the sweater flat. Keep both loop tips comfortably inside the armhole lines and check that both tails fall at matching angles.
Yarn Substitution
DK/#3 yarn is a practical starting category for this crochet baby sweater and pants set. A 4 mm hook provides a useful starting point, but the final hook size should be selected according to the washed gauge rather than the number printed on the yarn label.
Make a generous swatch, wash it, dry it flat, and measure the central 10 cm.
If the swatch contains too many stitches per 10 cm, change to a larger hook. If it contains too few stitches, move to a smaller hook and make another swatch.
Use cream and lavender yarns with similar fiber content and washing instructions whenever possible. Different shrinkage rates can distort the contrast sleeve bands, waistband, cuffs, or bow after laundering.
Conclusion
Block the sweater and trousers separately, compare the sleeve and leg lengths, then attach the lavender bow only after the sweater front reaches its final dimensions. This sequence prevents the decoration from affecting the blocked shape and makes accurate centering easier. Your next step is to work and wash a DK gauge swatch with the 4 mm hook before calculating final garment measurements for the intended child. Save the finished crochet baby sweater and pants set to Pinterest and share the cream-and-lavender version on Instagram with #LavenderBowBabySet. For this specific design, would you keep the oversized bow width shown in the photo or reduce it so the loop tips sit farther from the armholes?









